 There's a ton of great open source hardware solutions out there. Often they're used to teach kids how to code, but their also fun for adults to learn about hardware!
Ultimately that "LED Moment" can be the start of a love affair with open source hardware and software! Arduino is great, as is Arduino talking to the Cloud! If that's too much or too many moving parts, you always start small with other little robot kits for kids.
Recently my 10 year old and I have been playing with the Circuit Playground Express from Adafruit. We like it because it supports not just block-based programming and JavaScript via MakeCode (more on that in a moment) but you can also graduate to Circuit Python. Want to be even more advanced/ You can also use the Arduino IDE to talk to Circuit Playground Express. It's quickly becoming our favorite board. Be sure to get the board, some batteries and a holder, as well as a few alligator clips.
The Circuit Playground Express board is round and has alligator-clip pads around it so you don't have to solder to get started. It has as bunch of sensors for light, temperature, motion, sound, as well as an IR receiver and transmitter and LEDs for visual output. There's a million things you can do with it. This summer Microsoft Research is doing a project a week you can do with the kids in your life with Make Code!
I think the Circuit Playground Express is excellent by itself, but I like that I can stack it on top of the AdaFruit Crickit to make a VERY capable robotics platform. It's an ingenious design where three screws and metal standoffs connect the Crickit to the Circuit Playground and provide a bus for power and communication. The 10 year old wants to make a BattleBot now.
Sitting architecturally on top of all this great hardware is the open source Microsoft Make Code development environment. It's amazing and more people should be talking about it. MakeCode works with LEGO Mindstorms EV3, micro:bit, Circuit Playground Express, Minecraft, Cue robots, Chibichips, and more. The pair of devices is truly awesome.
Frankly I'm blown away at how easy it is and how easily my kids were productive. The hardest part of the whole thing was the last step where they need to copy the compiled code to the Circuit Playground Express. The editor is all online at GitHub https://github.com/Microsoft/pxt and you can run it locally if you like but there's no reason to unless you're developing new packages.
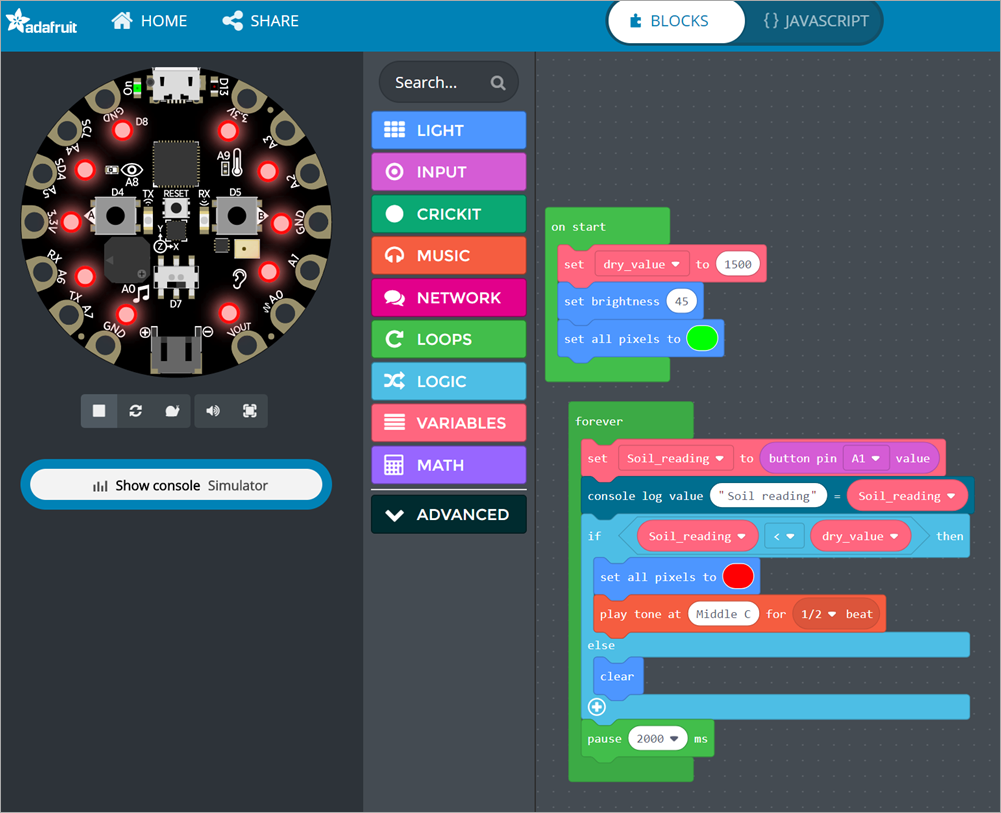
We went to https://makecode.adafruit.com/ for the Circuit Playground Express. We made a new project (and optionally added the Crickit board blocks as an extension) and then got to work. The 10 year old followed a tutorial and made a moisture sensor that uses an alligator clip and a nail to check if our plants need to be watered! (If they do, it beeps and turns red!)
You can see the code here as blocks...

or see the same code as JavaScript!
let Soil_reading = 0
let dry_value = 0
dry_value = 1500
light.setBrightness(45)
light.setAll(0x00ff00)
forever(function () {
    Soil_reading = input.pinA1.value()
    console.logValue("Soil reading", Soil_reading)
    if (Soil_reading < dry_value) {
        light.setAll(0xff0000)
        music.playTone(262, music.beat(BeatFraction.Half))
    } else {
        light.clear()
    }
    pause(__internal.__timePicker(2000))
})
When you've written your code, you just click DOWNLOAD and you'll get a "uf2" file.

Then the hardest part, you plug in the Circuit Playground Express via USB, it shows up as a Drive called "CPLAYBOOT," and you copy that file over. It's easy for techies, but a speed bump for kids.

It's really a genius process where they have removed nearly every obstacle in the hardware. After the file gets copied over (literally after the last byte is written) the device resets and starts running it.
The "Developer's Inner Loop" is as short as possible, so kudos to the team. Code, download, deploy, run/test, repeat.
This loop is fast and clever, but I wanted to speed it up a little so I wrote this little utility to automatically copy your MakeCode file to the Circuit Playground Express. Basically the idea is:
- Associate my app with *.uf2 files
- When launched, look for a local drive labeled CPLAYBOOK and copy the uf2 file over to it.
That's it. It speeds up the experience and saves me a number of clicks. Sure there's batch file/powershell/script ways to do it but this wasn't hard.
static void Main(string[] args)
{
    var sourceFile = args[0];
    var drive = (from d in DriveInfo.GetDrives()
                 where d.VolumeLabel == "CPLAYBOOT"
                 select d.RootDirectory).FirstOrDefault();

    if (drive == null) {
        Console.WriteLine("Press RESET on your Circuit Playground Express and try again!");
        Environment.Exit(1);
    }
    Console.WriteLine($"Found Circuit Playground Express at {drive.FullName}");
    File.Copy(sourceFile, Path.Combine(drive.FullName, Path.GetFileName(sourceFile)));
}
Then I double click on the uf2 file and get this dialog and SCROLL DOWN and click "Look for another app on this PC." (They are making this hard because they want you to use a Store App, which I haven't made yet)

Now I can just click my uf2 files in Windows Explorer and they'll automatically get deployed to my Circuit Playground Express!
Found Circuit Playground Express at D:
You can find source here https://github.com/shanselman/MakeCodeLaunchAndCopy if you're a developer, just get .NET Core 2.1 and run my .cmd file on Windows to build it yourself. Feel free to make it a Windows Store App if you're an overachiever. Pull Requests appreciated ;)
Otherwise, get the a little release here https://github.com/shanselman/MakeCodeLaunchAndCopy/releases and unzip the contents into its own folder on Windows, go double-click a UF2 file and point Windows to the MakeCodeLaunchAndCopy.exe file and you're all set!
Sponsor: Preview the latest JetBrains Rider with its built-in spell checking, initial Blazor support, partial C# 7.3 support, enhanced debugger, C# Interactive, and a redesigned Solution Explorer.
© 2018 Scott Hanselman. All rights reserved.


