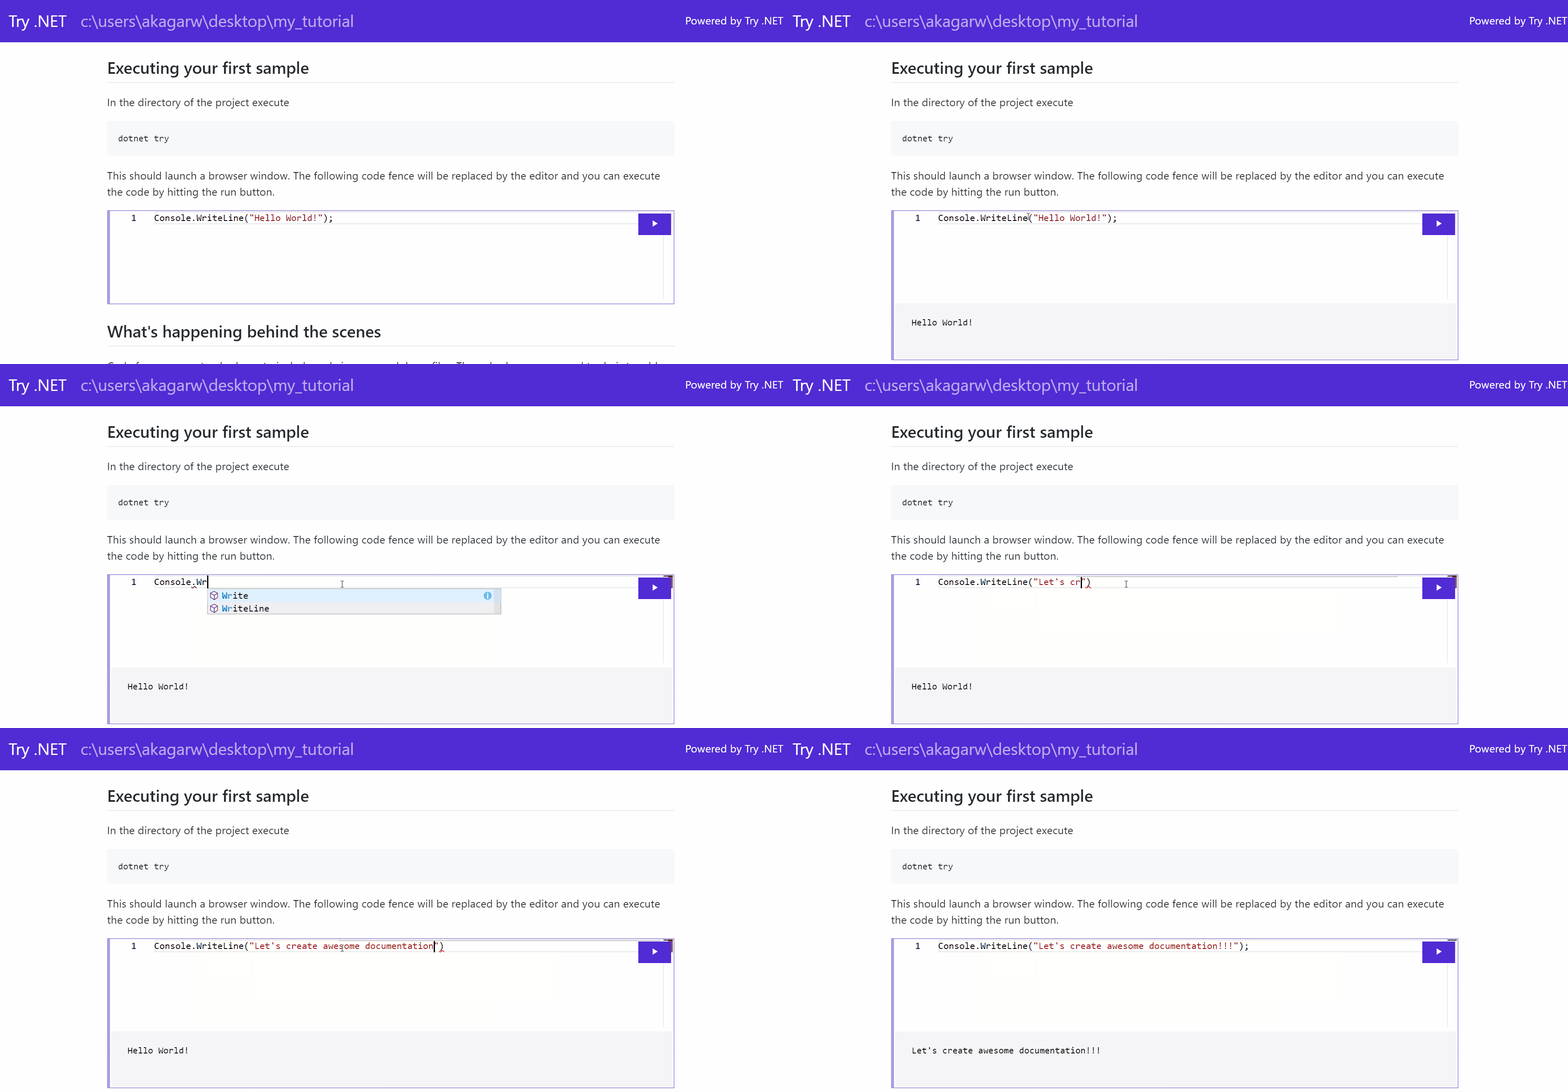
dotnet try a global tool which allows developers to create interactive workshops and documentation. Tutorials created with dotnet try let users start learning without having to install an editor. Features like IntelliSense and live diagnostics give users a sophisticated learning and editing experience. Today, we are releasing a new dotnet new template called trydotnet-tutorial. This template can be installed next to existing dotnet new templates. It creates a project and associated files to help content authors understand the basics of dotnet try. This can serve as the foundation of your own awesome documentation!
Setup
To set this up, let’s begin by installing the template. In a command prompt execute,
dotnet new -i Microsoft.DotNet.Try.ProjectTemplate.Tutorial
If the installation succeeds, it will print the available templates for dotnet new, including trydotnet-tutorial.
Also, you need to install the dotnet try global tool, if you haven’t already
dotnet tool install -g dotnet-try
Using the template
Navigate to an empty directory (or create a new one). Inside that directory, execute the following command:
dotnet new trydotnet-tutorial
For example, if the directory name is “myTutorial”, it will result in the following layout:
Tip: You can also use the --name option to automatically create a directory with the appropriate name.
dotnet new trydotnet-tutorial --name myTutorial
Now, let’s see the template in action. In the “myTutorial” directory, execute the following command:
dotnet try
This will start the dotnet try tool and open a browser window with the interactive readme. You can click the “Run” button in the browser and see the output of the program. If you type in the editor you will also get live diagnostics and IntelliSense. Try modifying the code here and clicking run again to see the effect of your changes.
Understanding the template
The files in a dotnet try tutorial will typically be of one of three categories:
Markdown files
These are the files that will serve as your documentation. These files will be rendered normally by other markdown engines and include special settings to enable them to be rendered interactively by the dotnet try engine.
In Readme.md, notice that the code fences (the three tick notation () used to denote code in markdown format) have some special arguments like --source-file, --region, etc and you actually don't see any code inside the fences. However when we run dotnet try, the code fence is replaced with an interactive editor.
Project File
myTutorial.csproj is a normal C# project file that targets .NET Core. Any NuGet packages you add to this file will be available to the users.
Note: This project references System.CommandLine.DragonFruit. The usage is explained below.
Source Files
These are the files that contain the code that will be executed. For simplicity, the template has only one source file: Program.cs. However, since your project is a .NET Core project, any .cs files added to the directory will be a part of the compilation. You can also reference any of these files from a code fence in your markdown file.
Looking at the contents of Program.cs, you will notice that instead of the familiar Main(string[] args) entry point, this program's entry point uses the new experimental library System.CommandLine.DragonFruit to parse the arguments that were specified in your Markdown file's code fence. The Readme.md sample uses these arguments to call different methods. You're not required to use any particular library in your backing project. The command line arguments are available if you want to respond to them, and DragonFruit is a concise option for doing so.
What's happening behind the scenes
Code fences are a standard way to include code in your markdown files. The only change you need to make is to add a few options immediately following the in the first line of your code fence. If you notice the below code fence (excerpted from Readme.md), there are three options in use.
```cs --source-file ./Program.cs --project ./myTutorial.csproj --region HelloWorld
```
| Option | What it does |
|---|---|
--project ./myTutorial.csproj |
Points to the project that the snippet is part of. |
--region HelloWorld |
Identifies a C# code #region to focus on. |
--source-file ./Program.cs |
Points to the file where the sample code is pulled from. |
The code in Program.cs demonstrates one way to use regions. Here regions are being used to determine which method to execute as well as determining which part of the code to display in the editor.
You’re all set! Now you can tweak and play around with the template and create your own awesome interactive tutorials.
You can learn more or reach out to us on GitHub.
The post Create interactive documentation with the new Try .NET template appeared first on .NET Blog.

