Quantcast
Channel: Category Name
Viewing all 5971 articles
Browse latest View live

Analyze AI enriched content with Azure Search’s knowledge store

$
0
0

Through integration with Cognitive Services APIs, Azure Search has long had the ability to extract text and structure from images and unstructured content. Until recently, this capability was used exclusively in full text search scenarios, exemplified in demos like the JFK files which analyzes diverse content in JPEGs and makes it available for online search. The journey from visual unstructured content, to searchable structured content is enabled by a feature called cognitive search. This capability in Azure Search is now extended with the addition of a knowledge store that saves enrichments for further exploration and analysis beyond search itself.

The knowledge store feature of Azure Search, available in preview, refers to a persistence layer in cognitive search that describes a physical expression of documents created through AI enrichments. Enriched documents are projected into tables or hierarchical JSON, which you can explore using any client app that is able to access Azure Storage. In Azure Search itself, you define the physical expression or shape of the projections in the knowledge store settings within your skillset.

Customers are using a knowledge store (preview) in diverse ways, such as to validate the structure and accuracy of enrichments, generate training data for AI models, and ad-hoc analysis of their data.

For example, the Metropolitan Museum of Art opened access to all images of public domain works in its collection. Enriching the artworks with cognitive search and the knowledge store allowed us to explore the latent relationships within the artworks on different dimensions like time and geography. Questions like how have images of family groups changed over time, or when were domestic animals included in paintings, are now answerable when you are able to identify, extract, and save the information in a knowledge store (preview).

With the knowledge store, anyone with an Azure subscription can apply AI to find patterns, insights, or create dashboards over previously inaccessible content.

What is the knowledge store (preview)?

Cognitive search is the enrichment of documents with AI skills before they are added to your search index. The knowledge store allows you to project the already enriched documents as objects (blobs) in JSON format or tabular data in table storage.

As part of your projection, you can shape the enriched document to meet your needs. This ensures that the projected data aligns with your intended use.

When using tabular projections, a knowledge store (preview) can project your documents to multiple tables while preserving the relationships between the data projected across tables. The knowledge store has several other features like allowing you to save multiple unrelated projections of your data. You can find more information about a knowledge store (preview) in the overview documentation.

Flow chart illistrating the knowledge store projecting documents to multiple tables, while preserving the relationships between the data projected across tables.

Data visualization and analytics

Search enables you to find relevant documents, but when you’re looking to explore your data for corpus wide aggregations or want to visualize changes over time you need your data represented in a form other than a search index.

Leveraging Power BI’s integration with Azure tables, gets your dashboard started with only a few clicks. To identify insights from the enriched documents over dimensions like time or space, simply project your enriched documents into tables, validate that Power BI recognizes the relationships and you should now have your data in a format that is ready to consume within the visuals.

When you create a visual, any filters work, even when your data spans related tables. As an example, the art dashboard was created on the open access data from the MET in the knowledge store and the Art Explorer site uses the search index generated from the same set of enrichments.

Images of MET artworks, World cloud tags, and Locations where artifacts originated that make up a MET catalog enriched by Cognitive Search

The art explorer site allows you to find art works and related works while the Power BI report gives you a visual representation of the corpus and allows you to slice your data along different dimensions. You now can answer questions like “How does body armor evolve over time?”

In this example, a knowledge store (preview) enabled us to analyze the data ad-hoc. In another example, we may for instance enrich invoices or business forms, project the structured data to a knowledge store (preview), and then create a business-critical report.

Improving AI models

A knowledge store (preview) can also help improve the cognitive search experience itself as a data source for training AI models deployed as a custom skill within the enrichment pipeline. Customers deploying an AI model as a custom skill can project a slice of the enriched data shaped to be the source of their machine learning (ML) pipelines. A knowledge store (preview) now serves as a validator of the custom skill as well as a source of new data that can be manually labeled to retrain the model. While the enrichment pipeline operates on each document individually, corpus level skills like clustering require a set of documents to act on. A knowledge store (preview) can operate on the entire corpus to further enrich documents with skills like clustering and save the results back in a knowledge store (preview) or update the documents in the index.

The knowledge store operating on the entire corpus to further enrich documents with skills like clustering and save the results back in the knowledge store or update the documents in the index.

Getting started

To start using a knowledge store (preview) you will need to:

  1. Add a knowledge store (preview) configuration to your skillset.
  2. Optionally, add a shaper skill to the skillset to define the shape of the projected enrichment.
  3. Add a projection for tables, objects, or both to a knowledge store (preview). You may project the output of the shaper skill, or elements from the enriched document directly.

A knowledge store (preview) enables the use of your enriched data in new or improved models, visualizing and exploring the data in tools like Power BI and app based experiences merging the raw and enriched data. We will continue to add more capabilities and updates over the coming months.

For a detailed walkthrough, see the knowledge store (preview) getting started guide.


Two ways to share Azure Advisor recommendations

$
0
0

If your IT organization is like most, you probably work with many different people across many different teams. When it comes to common IT tasks like optimizing your cloud workloads, you might need to interact with several resource owners or even complete a formal review process.

That’s why with Azure Advisor, we’ve made it easy to share recommendations with other people across your teams so you can follow best practices that help you get the most out of Azure. Advisor is a free Azure service that helps you optimize your Azure resources for high availability, security, performance, and cost by providing personalized recommendations based on your usage and configurations.

Here are two ways you can share your Advisor best practice recommendations with your teams.

1. Export a PDF or CSV of your Advisor recommendations

Probably the simplest way to share your Advisor recommendations is by exporting an Advisor recommendation report as a PDF or CSV through the Advisor UI in the Azure portal.

Screenshot of exporting PDF or CSV throgh the Advisor UI in the Azure portal

This report shows a summary of your Advisor recommendations by category, subscription, and potential business impact. Then you can easily share it with other teams so the resource owners can take action and optimize their resources for high availability, security, performance, and cost.

Screenshot displaying a summary of the Advisor recommendations by category, subscription, and potential business impact

If you want to provide a specific view of a subset of your recommendations, you can use the UI filters or drill down into specific categories and recommendations. The recommendation report will only contain what you see on the screen when you generate it, which can help you focus on the most critical optimizations.

2. Use the Advisor API to integrate with your ticketing system or dashboards

The other way to share your Advisor recommendations with other people in your organization is via the Advisor REST API. Using this API, you can connect Advisor with your organization’s ticketing system and assign remediation work, set up an internal working dashboard your teams can review and action, or leverage Advisor’s recommendation data any way you choose.

Diagram showing one way to use Azure Advisor REST API with ticketing application

The visual above shows just one way you can use the Advisor API with your ticketing application to share Advisor recommendations with your teams. Some setup is required, but once this scenario is complete, you can start remediating your recommendations more programmatically which will save you time as you optimize your resources.

This more advanced approach tends to work best for larger organizations, organizations managing a large number of Azure subscriptions and resources that are generating a large number of recommendations, and organizations that have a fairly sophisticated IT practice in place, since it scales well with the size of your deployments.

Visit the Advisor API documentation to learn more.

Get started with Advisor

Visit Advisor in the Azure portal to get started reviewing, sharing, and remediating your recommendations. For more in-depth guidance, visit the documentation. Let us know if you have a suggestion for Advisor by submitting an idea to the Azure Advisor feedback forum.

New Azure Active Directory capabilities help you eliminate passwords at work

Write Better Code Faster with Roslyn Analyzers

$
0
0

Roslyn, the .NET compiler platform, helps you catch bugs even before you run your code. One example is Roslyn’s spellcheck analyzer that is built into Visual Studio. Let’s say you are creating a static method and misspelled the word static as statc. You will be able to see this spelling error before you run your code because Roslyn can produce warnings in your code as you type even before you’ve finished the line. In other words, you don’t have to build your code to find out that you made a mistake.

Roslyn Analyzer Spell Check

Roslyn analyzers can also surface an automatic code fix through the Visual Studio light bulb icon that allows you to fix your code immediately.

But what if you could catch even more bugs?

Let me introduce you to Roslyn analyzer packages. These collections of analyzers provide a more verbose analysis, but don’t ship with the default Visual Studio tools. To learn more about our favorite Roslyn analyzers visit our Roslyn analyzers GitHub repository. This repository includes the FxCop rules that are still applicable to modern software development, but now target our modern code analysis platform based on Roslyn. Let’s go ahead and install this package to be more productive and write better code faster!

To Install FxCop analyzers as a NuGet package:

  1. Assuming you’re using Visual Studio 2017 Version 15.8 or newer, choose the most recent version of Microsoft.CodeAnalysis.FxCopAnalyzers.
  2. Install the package in Visual Studio, using the Package Manager UI.

Roslyn FxCop Nuget Package

Once you have the package installed you can simply customize the analyzer diagnostics from the Solution Explorer. An analyzer node will appear under the References or Dependencies node in the Solution Explorer. If you expand the analyzers, and then expand one of the analyzer assemblies, you can see all the diagnostics in the assembly.

Roslyn Analyzer Property References

You can view the properties of a diagnostic, including its description and default severity, in the properties window. To view the properties, right-click on the rule and select Properties, or select the rule and then press Alt+Enter.

Roslyn Analyzers Diagnostic Properties

The icons next to each diagnostic in Solution Explorer correspond to the icons you see in the rule set when you open it in the editor:

  • the “i” in a circle indicates a severity of Info
  • the “!” in a triangle indicates a severity of Warning
  • the “x” in a circle indicates a severity of Error
  • the “i” in a circle on a light-colored background indicates a severity of Hidden
  • the “↓” in a circle indicates a suppressed diagnostic

Roslyn Analyzer Severity Options

You can then set the rule set severity from the Solution Explorer. In the Solution Explorer, expand Dependencies > Analyzers. Expand the assembly that contains the rule you want to set the severity for. Right-click on the rule and select Set Rule Set Severity and in the fly-out menu, select one of the severity options.

Roslyn Analyzer Rule Set Severity

If you set the rule severity to a warning you will then receive a warning in your code for that specific rule set.

Roslyn Analyzer Preview Change

Now that you understand how analyzers work you can be more productive and write better code faster!

FAQ:

Q: This warning appears in Visual Studio: “Run Code Analysis has been deprecated in favor of FxCop analyzers, which run during build. Refer to https://aka.ms/fxcopanalyzers to migrate to FxCop analyzers”. What does this mean?
A: FxCop is the Code Analysis engine that predates Roslyn by almost a decade. Just like we moved our compiler forward (e.g. introduced Roslyn), we are also moving our code analysis technology forward to the Roslyn platform. Since it is powered by the .NET Compiler Platform it can produce warnings in your code as you type. In other words, you don’t have to build your code to find out that you made a mistake.

Q: What’s the difference between FxCop analyzers and legacy FxCop?
A: FxCop analyzers analyze source code in real time and during compilation, whereas legacy FxCop is a static code analysis and analyzes binary files after build has completed. For more information, see Roslyn analyzers vs. static code analysis and FxCop analyzers FAQ.

Q: Can I write custom analyzers?
A: Absolutely! Documentation on how to write an analyzer is found here.

Q: Should I use Roslyn analyzers or .editorconfig for code style?
A: Roslyn analyzers and .editorconfig files work hand-in-hand. When you define code styles in an .editorconfig file or on the text editor options page, you’re actually configuring the Roslyn analyzers that are built into Visual Studio.

Q: Do analyzers work in continuous integration (CI) builds?
A: Yes, analyzers installed as NuGet packages can be enforced in CI builds.

Q: Where can I request more analyzers or report bugs?
A: You can request more analyzer and report bugs on the Roslyn repository on GitHub.


The post Write Better Code Faster with Roslyn Analyzers appeared first on .NET Blog.

Create and manage Azure Pipelines from the command line

$
0
0

We recently introduced a unified YAML experience in Azure Pipelines where you can configure pipelines to do CI, CD or CI and CD together. Over the past few months we have been building capability to manage YAML backed pipelines from the command line to cater to developers who prefer working from the command line interface or require commands to automate set up and management. We are excited to announce the availability of az pipelines command in the Azure DevOps extension for developers who want to create and manage YAML backed Azure Pipelines from the CLI. The az pipelines command group allows you to create, delete, list, run, show and update a pipeline, enabling you to manage pipelines effectively from the command line.

Create an Azure Pipeline from the command line

Interacting from the command line can get challenging by having to remember various parameters and keying it in properly. To make things simple, we have crafted the az pipelines create command by letting developers go from a Git repo to a pipeline through an easy to use interactive flow, eliminating any need to remember a bunch of parameters.
1. To start, you need the Azure CLI with the Azure DevOps extension installed. Have a look at the Azure DevOps CLI – Get Started documentation for details.
2. Clone your Git repository and navigate to the repo directory.
3. Run az pipelines create:
az pipelines create --name "Contoso.CI"
4. Follow the steps to set up the pipeline.

Check out the documentation for more details.

You can also automate the entire pipeline creation process by providing a reference to a YAML file inside your repository. Picking up from the example above, imagine you had the completed YAML available in the repository; you can create the pipeline by simply running the command:
az pipelines create --name "Contoso.CI" --yml-path /azure-pipelines.yml

YAML run of pipeline

Manage Azure Pipeline runs

Once the pipeline is created, a pipeline run is triggered. You can use the az pipelines runs command group to manage pipelines runs. Use az pipelines runs list command to view all pipelines runs and az pipelines runs show command to view details pertaining to a particular run.

The az pipelines runs command group also contains the artifact and tag command sub groups which are used to manage artifacts pertaining to a run or tag a run, respectively.

Refer the az pipelines runs command documentation for details pertaining to usage and syntax.

For DevOps professionals who prefer to work from the command line, the az pipelines commands let you manage Azure Pipelines right from the terminal, without having to navigate to the portal. If you have any changes you’d like or suggestions for features then we’d love your feedback in our Azure DevOps extension GitHub Repo.

The post Create and manage Azure Pipelines from the command line appeared first on Azure DevOps Blog.

Introducing Azure Lighthouse

$
0
0

Enabling partners to deliver differentiated managed services

Partners are at the heart of incredible innovation stories on Azure, lighting up the path to success for our customers. Today, we are launching the general availability of Azure Lighthouse, capabilities for cross customer management at scale for partners to differentiate and benefit from greater efficiency and automation. Our partners who used this new capability early on are fans!

Together with Gavriella Schuster, Corporate Vice President, One Commercial Partner, I’m extending our thanks to the Azure Expert MSP communities for their role in this journey with us on Azure Lighthouse. More than ever before, our customers count on our partners’ expertise in migrating mission-critical workloads to Azure, running scalable and dynamic applications and architecting modern apps with Azure Kubernetes Service (AKS). Azure Lighthouse is part of our ongoing investment to empower the ecosystem with efficient tools, so partners can grow profitably as their customer base reaches new peaks. Over the past year, we’ve sailed the seas of product development together to do so.

Enabling higher automation across the lifecycle of managing customers (from patching to log analysis, policy, configuration, and compliance), Azure Lighthouse brings scale and precision together for service providers at no additional cost and that’s consistently for all licensing constructs customers might choose, including enterprise agreement (EA), cloud solution provider (CSP), and pay-as-you-go.

"DXC is excited to partner with Microsoft on the release of Microsoft Azure Lighthouse, which enhances DXC’s deep and broad portfolio of offerings on Microsoft Azure. With Azure Lighthouse, we get a single environment to manage across customers and their resources with higher automation and enhanced governance.”

- Dan Hushon, Senior Vice President and Chief Technology Officer, DXC Technology

Imagine monitoring virtual machine (VM) resource health across hundreds of customers in a single view inside Azure portal. Imagine creating, updating and resizing Azure resources of multiple customers with an API call, without having to cycle through multiple access tokens and identities. Imagine not having to switch context across customers to view all alerts from a single environment. It’s now possible with Azure Lighthouse!

Azure Lighthouse is powered by the Azure delegated resource management capability of Azure Resource Manager foundation. Through a logical projection of customer resources onto a service provider’s tenant context, it unlocks multiple customer, cross-tenant views and operations. Customers and partners decide on the precise scope of the projection, as well as the role-based access desired. Check out Azure Chief Technology Officer Mark Russinovich’s blog for a deep under-the-hood view.

“Azure Lighthouse fits perfectly into our strategy as it allows us to securely manage Azure resources at scale and deliver automation via programmatic options such as ARM templates and APIs.” 

- Stanislav Zhelyazkov, Cloud Infrastructure Engineer, Sentia

Azure Lighthouse capabilities come alive both natively and also through API integration into partner cloud management portals or partner applications such as monitoring and IT service management. This partner-to-partner collaboration is unique to Microsoft’s partner ecosystem.

“Azure Lighthouse will change the way we manage our customers’ Azure resources. With this set of capabilities, we will be able to manage all subscriptions with centralized monitoring, alerting, compliance, and security from a single portal.”

- Wesley Haakman, Lead Azure Architect, Intercept

Additionally, service providers can seamlessly onboard new customers via public or private managed services offers on Azure marketplace or using Azure Resource Manager templates. With a repository of extensibility and automation templates on GitHub, partners have options with Azure Lighthouse. Thanks to a built-in activation of Partner Admin Link, managed services partners using Azure Lighthouse can seamlessly participate in partner rewards and incentives.

At this next frontier of cloud growth, partners will continue to be key to customer success. Our focus at Azure to enable customer and partner joint success will continue, as passionately as ever. We look forward to hearing about the experiences in using Azure Lighthouse—please be in touch.

Azure Lighthouse

Learn more at azure.com/lighthouse.

Additional resources

Azure Lighthouse Documentation

GitHub repository

Introducing the new Azure Migrate: A hub for your migration needs

$
0
0

Moving on-premises apps and data to the cloud is a key step in our customers’ migration journey, and we’re committed to helping simplify that process. Earlier this year, we invited customers to participate in the preview of multiple new migration capabilities. Today, I am excited to announce the latest evolution of Azure Migrate, which provides a streamlined, comprehensive portfolio of Microsoft and partner tools to meet migration needs, all in one place.

With the general availability of Azure Migrate, including the new integrated partner experience, Server Assessment, Server Migration, Database Assessment, and Database Migration capabilities, we strive to make the cloud journey even easier for customers. Azure Migrate acts as a central hub for all migration needs and tools from infrastructure to applications to data. We are truly democratizing the migration process with guidance and choice.

New Azure Migrate integrated experience

The new experience provides you access to Microsoft and ISV tools and helps identify the right tool for your migration scenario. To help with large-scale datacenter migrations and cloud transformation projects, we’ve also added end-to-end progress tracking.

Microsoft Azure portal displaying the Azure Migrate overview

New features include:

  • Guided experience for the most common migration scenarios such as server and database migration, data movement to Azure with Data Box, and migration of applications to Azure App Service
  • Feature-based grouping and choice of Microsoft and partner tools for the typical phases of the migration process—discovery, assessment, and migration
  • An integrated experience that ensures continuity and gives you a consistent view of your datacenter assets

Carbonite, Cloudamize, Corent, Device42, Turbonomic, and UnifyCloud are already integrated with Azure Migrate. 

Powerful Server Assessment and Server Migration capabilities

With our new Azure Migrate: Server Assessment service offering, in addition to discovery and assessment of VMware servers, you will now be able to:

  • Perform large-scale VMware datacenter discovery and assessment for migration. Customers can now discover and assess 35,000 virtual machines (VMs). This is a tremendous scale improvement from the previous limit of 1,500 VMs.
  • Perform large-scale Hyper-V datacenter discovery and assessment for migration. Customers can now profile Hyper-V hosts with up to 10,000 VMs. You can also bring all your inventory from VMware and Hyper-V in the same Azure Migrate project.
  • Get performance-based rightsizing, application dependency analysis, migration cost planning, and readiness analysis for both VMware and Hyper-V. You don’t need any agents to perform discovery and assessment with Server Assessment.

Microsoft Azure portal displaying the Server Assessment overview

Azure Migrate: Server Assessment is free to all Azure customers and will soon add support for physical server discovery and assessment.

Building on our current ability to perform migration of VMware, Hyper-V, Amazon Web Services (AWS), and Google Cloud Platform (GCP) virtual machines and physical servers to Azure, the new Azure Migrate: Server Migration enables:

  • Agentless migration of VMware VMs to Azure in preview. When you opt to use the new agentless migration method for VMware VMs, you can use the same appliance for discovery, assessment, and migration. Onboard once and execute the entire process seamlessly. You also get OS-agnostic support to help you migrate any client or server OS, including Windows or Linux, that is supported on the Azure platform. This complements the generally available agent-based migration capability.
  • Agentless migration of Hyper-V VMs to Azure and agent-based migration of physical servers and VMs running on Amazon Web Services or Google Cloud Platform to Azure.
  • Simplified experience, similar to creating a virtual machine in Azure. The assessment recommendations automatically get applied to the VMs as you start migrating them, especially the rightsizing recommendations that help you optimize servers and save money. This feature works with assessments performed by Azure Migrate: Server Assessment or any integrated partners, such as Cloudamize and Turbonomic.
  • No-impact migration testing that helps you plan your migration with confidence. You also get zero data loss when you move your applications to Azure.

Microsoft Azure portal displaying the Server Migration overview

Azure Migrate: Server Migration is free to all Azure customers. You only pay for the compute and storage that you consume in your Azure subscription.

Geographic availability

The Azure Migrate experience, including Server Assessment, Server Migration, and our integrated set of Microsoft and partner tools, are available starting today in United States, Europe, Asia, and the United Kingdom. You can start by creating an Azure Migrate project in a geography of your choice. We will ensure that metadata associated with your Microsoft and partner scenarios is retained in an Azure datacenter in the geography that you select. Later this month, customers will be able to create their Azure Migrate projects in Australia, Canada, and Japan. You can use a project in any geography to perform migrations to any Azure region of your choice.

You can see the new Azure Migrate, Server Assessment, and Server Migration in action in the videos below.

We are innovating faster than ever before so that you can experience the modern capabilities in Azure. Get started with Azure Migrate.

How Azure Lighthouse enables management at scale for service providers

$
0
0

Extending Azure Resource Manager with delegated resource management

Today, Erin Chapple, Corporate Vice President, Microsoft Azure, announced the general availability of Azure Lighthouse, a single control plane for service providers to view and manage Azure across all their customers. Inspired by Azure partners who continue to incorporate infrastructure-as-code and automation into their managed service practices, Azure Lighthouse introduces a new delegated resource concept that simplifies cross-tenant governance and operations.

Granular access, better automation, and simplified customer onboarding

Powering Azure Lighthouse is an Azure Resource Manager capability called delegated resource management. Delegated resource management lets customers delegate permissions to service providers over scopes, including subscriptions, resource groups, and individual resources, which enable service providers to perform management operations on their behalf. After customers delegate resources to a service provider, the provider can provide access to users or accounts in provider’s tenant within the constraints specified by the customer, using the standard role-based access control (RBAC) mechanisms. The standard RBAC mechanisms work as if customer resources were resources in provider’s own subscriptions. Finally, delegated resource management works consistently regardless of the licensing construct service providers and their customers might choose—enterprise agreement (EA), cloud solution provider (CSP), and pay-as-you-go.

“Azure delegated resource management enables Nordcloud customers to easily provide secure access. It simplifies onboarding new managed services customers, ensuring our high security and compliance standards are met.”

Ilja Summala, Group CTO, Nordcloud

Cross-tenant management at scale, with enhanced visibility and governance

Delegated management uniquely supports management-at-scale and automation patterns of service providers, whether those providers are managed services partners acting on behalf of customers or central IT teams of enterprises with multiple Azure tenants. Partners can now manage tens of thousands of resources from thousands of distinct customers from their own Azure portal or CLI context. Because customer resources are visible to service providers as Azure resources in their own tenant, service providers can easily automate status monitoring, and applying create, update, change, delete (CRUD) changes across the resources of many customers from a single location.

Everything relevant to Azure resource management, from the Azure portal to services such as Azure Policy, Resource Graph, Log Analytics feature of Azure Monitor, or Update Management, all honor delegated resource management. What’s more, both customers and service providers can see who took actions on the resources from the activity log, increasing accountability for both parties, with protection of the privacy of individual service provider identities. That’s because the newly built resource provider, Microsoft Managed Services, enables Azure services to determine if a call was made from a resource’s home tenant or from a service provider’s tenant.

Delegated Resource Mangement

Our partners have several options for how they use these new capabilities. Since the Azure Lighthouse portal experiences have corresponding APIs, PowerShell, Azure CLI, REST APIs, or client SDKs, it’s easy to integrate into other cloud management portals, ITSM tools, or monitoring tools.

How our partners use Azure Lighthouse

Examples from two of our expert partners, Rackspace and Sentia, highlight the power of Azure Lighthouse and delegated resource management:

Rackspace is enhancing security and response capabilities using Azure Lighthouse in three steps:

  1. Utilizing Azure Resource Graph and cross-tenant queries to quickly detect which customers have impacted images or hosts deployed
  2. Applying an in-guest audit policy across all customers’ managed estates to verify host settings relating to impact/vulnerability
  3. Using update management to report on impacted systems and schedule targeted hot fixes

Sentia pivoted CI/CD pipeline to use declarative Azure Resource Manager templates for provisioning management artifacts across all customers who are under Azure CSP licensing construct. Sentia’s managed services offer is now 90 percent based on Resource Manager templates, which simplifies deployments dramatically, automating monitoring, governance, and management tasks at scale, across customers. 

Continued Azure Resource Manager investments for our partners

Azure Lighthouse and delegated resource management are just the latest of the platform investments we continue to make for our partners. Together with Azure managed applications and custom providers, they enable comprehensive management-at-scale capability for partners and customers. To hear more, watch my demo at Microsoft Build 2019. Some of the other management innovations we’ve made include the following:

  • Partners can build cross-tenant experiences into their solutions with minimal development, since Azure Resource Manager APIs and Azure Resource Graph queries are now enhanced with tenant context.
  • Service providers and ISVs can extend and serve-up their IP natively within Azure using custom providers. Imagine end-customers raising service requests to service providers from within Azure, thanks to the ability of custom provider to integrate ITSM tools’ capabilities natively to Azure.
  • Customers can purchase applications developed by partners from the Azure Marketplace that come with management out of the box provided by service providers. Underlying application resources are protected from the customer while they use the new managed application UI to interact with an application safely. Service providers are given full access to the application to maintain, update, and provide application support for the customer from managed application center.

“We are delighted to see the adoption of the new Azure Lighthouse capabilities into Veeam’s Backup-as-a-Service offerings, representing a natural extension of our cloud-based business offerings. This partnership is a great opportunity for our managed services providers to easily extend Backup-as-a-Service offerings by Veeam using Azure Lighthouse, in order to manage their Azure customers at scale.”

Tim FitzGerald, Vice President, North America Cloud, Ingram Micro Inc.

When Azure as a platform does more for our partners, our partners can focus more on providing differentiated services and higher value to our joint customers. That is how partners make more possible on Azure. We look forward to hearing your feedback on Azure Lighthouse and delegated resource management.


Ensuring customer success: Introducing the Azure Migration Program

$
0
0

Last July, I shared our approach to helping customers migrate to Azure. Since then, we’ve seen tremendous customer response working with organizations such as Allscripts, Chevron, J.B. Hunt, and Carlsberg Beers, and we’ve gained valuable insights about customer needs along their journey. Today, we are bringing together a best practice-based, holistic experience for migrating existing applications and systems to Azure.  

Azure Migration Program   

Azure Migration Program includes prescriptive advice, resources, and tools customers need for a successful path to the cloud from start to finish. Using proven cloud adoption methodologies, tools, resources, and best practices, customers can ensure their move to Azure is successful. Through the program, customers will work hand in hand with Microsoft experts and specialized migration partners to receive:

“The AMP program is going to help us get our customers through the initial stages of migration more rapidly – especially through the part where it takes us typically a more time, helping their people adjust to operating at cloud-speed, and with a set of automated processes that are quite different than a traditional on-premises operating model.”    

– Alex Brown, CEO, 10th Magnitude

To learn more about the program, watch this video to see how you can benefit. You can also register for the webinar on July 24, 2019 to learn more. If you’re ready to get started now, you can submit your request to participate beginning July 15, 2019.

Why run Windows Server and SQL Server anywhere else?

SQL Server 2008 end of support was July 9, 2019 and Windows Server 2008 end of support is January 14, 2020. Most customers are choosing Azure as the destination for Windows Server and SQL Server workloads for several reasons:

  • Unparalleled innovation. Azure delivers innovative, fully managed capabilities across apps, data, and infrastructure. Azure App Service supports popular app frameworks with advanced DevOps capabilities, delivering a highly productive app migration experience for customers. Azure SQL Database managed instance provides evergreen SQL, which never needs to be patched or upgraded along with comprehensive SQL Server Engine compatibility so customers can migrate SQL Server workloads without changing code. Finally, Azure IaaS can meet all the infrastructure needs for your migrated workloads with global coverage across 54 regions. 
  • Unmatched security. Azure enables a security posture that’s easier to implement and far more comprehensive than other environments, thereby enabling your migrated workloads to be secure and well managed. With Azure Security Center, customers get the built-in protections across hybrid environments. Azure Blueprints makes it easier for customers to define and apply security policies across their workloads speedily and at scale. Azure Sentinel enables advanced security threat hunting and mitigation from across the enterprise.
  • Unbeatable offers. AWS is 5X more expensive than Azure for Windows Server and SQL Server. Customers are realizing significant savings by taking advantage of unique offers like Azure Hybrid Benefit and free Extended Security Updates only in Azure. 

Azure Migrate – Your single destination for all migration needs 

Azure Migrate toolset delivers a unified, integrated experience across Azure and partner migration tools, so customers can identify the right tool for their migration scenario. Azure tools such as Server Assessment, Server Migration, Database Migration Service, and App Service Migration Assistant are now part of Azure Migrate. Azure partner tools such as Carbonite, Cloudamize, Corent, Device42, Turbonomic, and UnifyCloud are now integrated with Azure Migrate with additional integrations on the way. We have also enabled agentless migration and added support for Hyper-V assessments. Learn more and watch the new Azure Migrate video

Get started today

I couldn’t be more excited about the collective opportunity that lies ahead of us and look forward to helping customers confidently plan and migrate to Azure. 

Visit the Azure migration center to get started today.

Announcing preview of Azure Data Share

$
0
0

In a world where data volume, variety, and type are exponentially growing, organizations need to collaborate with data of any size and shape. In many cases data is at its most powerful when it can be shared and combined with data that resides outside organizational boundaries with business partners and third parties. For customers, sharing this data in a simple and governed way is challenging. Common data sharing approaches using file transfer protocol (FTP) or web APIs tend to be bespoke development and require infrastructure to manage. These tools do not provide the security or governance required to meet enterprise standards, and they often are not suitable for sharing large datasets. To enable enterprise collaboration, we are excited to unveil Azure Data Share Preview, a new data service for sharing data across organizations.

Simple and safe data sharing

Data professionals in the enterprise can now use Azure Data Share to easily and safely share big data with external organizations in Azure Blob Storage and Azure Data Lake Storage. New services will continue to come online. As a fully managed Azure service, Azure Data Share does not require infrastructure to set up and it scales to meet big data sharing demands. The intuitive interface makes sharing easy and productive, directly from the Azure portal. With just a few clicks data professionals choose which data to share and who to share it with. They can schedule the service to automatically share new or changed data pertaining to specific datasets, as well as stop future updates from flowing through at any time. With Azure Data Share, data professionals have greater control over each data sharing relationship and can govern use by associating term of use with each data share created. To receive the data, recipients must agree to the terms of use specified.

Alongside governance, security is fundamental in Azure Data Share and leverages core Azure security measures to help protect the data.

Azure Data Share, view of sent shares in the Azure portal

Enabling data collaboration

Azure Data Share maximizes access to simple and safe data sharing for organizations in many industries. For example, retailers can leverage Azure Data Share to easily share sales inventory and demographic data for demand forecasting and price optimization with their suppliers.

In the finance industry, Microsoft collaborated with Finastra, a multi-billion dollar company and provider of the broadest portfolio of financial services software in the world today that spans retail banking, transaction banking, lending, and treasury and capital markets. Finastra is fully integrating Azure Data Share with their open platform, FusionFabric.cloud, to enable seamless distribution of premium datasets to a wider ecosystem of application developers across the FinTech value chain. These datasets have been curated by Finastra over several years, and by leveraging the data distribution capabilities of Azure Data Share, ingestion by app developers and other partners requires simple wrangling, significantly reducing the go to market timeframe and unlocking net new revenue potential for Finastra.

“Our decision to integrate Azure Data Share with Finastra’s FusionFabric.cloud platform is now a great way to further accelerate innovation via an expanded open ecosystem. Our partnership with Microsoft truly provides us with limitless opportunities to drive transformation in Financial Services.”

- Eli Rosner, Chief Product and Technology Officer, Finastra

Next steps

Industries of all types need a simple and safe way to share data. Azure Data Share opens up new opportunities for innovation and insights to drive greater business impact.

Enhancing Microsoft’s commercial marketplace for partners

$
0
0

As we head into the global partner conference Microsoft Inspire on July 14-18, 2019, a big focus is on rethinking how we make it easier for customers to discover, try, and buy cloud-based software and services from our partners. Today, we're excited to announce new tools, commerce options, and a rewards program through the Microsoft commercial marketplace that help partners leverage this important distribution channel.

Today, we're excited to announce new tools, commerce options, and a rewards program through the Microsoft commercial marketplace that makes it easier than ever for our partners to grow their business through this important distribution channel.

Commercial marketplace as a new distribution channel

Many people think of a commercial marketplace as a simple catalog of offer listings which are often difficult to navigate.  For customers, they are often linked off to a different experience for trial and purchase. Publishers and partner selling solutions are challenged by how to differentiate their solutions to stand out in the volume of offers.

We are working with our partner community to ensure the commercial marketplace experiences deliver a new distribution channel to drive their business growth. For example, Microsoft AppSource targets business decision makers while Azure Marketplace targets IT and developers. This includes having the commerce capabilities and solution supply to capture the rising customer demand in online enterprise software purchases.

Microsoft’s commercial marketplace has at its core, one product catalog, which includes both Microsoft cloud software and services as well as software and services from our partners built on top of and to connect with one or more cloud services offered by Microsoft (Microsoft 365, Dynamics 365, Microsoft Power Platform, and Azure) publishing as transactable offers. This is not just for independent software vendors (ISVs) creating repeatable intellectual property (IP). The commercial marketplace experiences also support offers from managed service providers (MSPs) and consulting services from systems integrators (SIs) such as one-day assessments, migration offers, and more.

Diagram illustrating one product catalog from Microsoft's commercial marketplace with cater to publishers and buyers

Customers can discover, try, and buy solutions from the marketplace in one of three ways:

  1. Direct from the publishers
  2. Through our field sales teams who retire quota for selling eligible partner solutions, or
  3. Through our global distribution channel, where we now also pay the channel a 10 percent incentive to sell marketplace publisher solutions with a transactable SaaS offer, and who participate in the IP co-sell program. 

Customers are looking for quicker buying experiences where they can purchase Microsoft products AND solutions from our partners – together in one place, with one transaction, on a unified invoice, which the commercial marketplace provides.

Using the commercial marketplace as a strategic distribution channel will require partners to think about their business model in new and different ways, which can provide significant new revenue streams. For instance, any publisher can continue to list or trial their solution in Microsoft AppSource or Azure Marketplace, but the impact will likely be similar to what they face today, where the customer discovery experience is crowded due to volume of offers and the publisher struggles to differentiate their solution. However, when a publisher chooses to transact in Microsoft’s commercial marketplace, they get access to a whole new set of benefits and ways to sell:

  • Gain access to a global reseller channel with over 70,000 cloud solution providers (CSP) in over 140 countries who receive an incentive directly from Microsoft when they resell publisher solutions.
  • Provides simplified deal-making with custom contract amendments.
  • Centralized partnership experience via Partner Center for the commercial marketplace onboarding, lead sharing, deal registration, benefits, incentives, sales analytics, and investments.
  • New go-to-market (GTM) benefits via marketplace rewards that unlocks GTM benefits for publishers as they reach various transaction thresholds.

A single onboarding and management experience

Whether a customer buys direct through Microsoft field sellers or through CSP, each of these channels is accessible and managed by partners through a single ingestion point known as Partner Center. Within Partner Center, publishers can publish marketplace offers and manage their engagements, while resellers can bundle Microsoft software and services with publisher’s software and services. This simplifies customer, publisher, and reseller engagement with one transaction and one invoice.

New commerce options

To accompany this new publisher experience, we’ve released new commerce capabilities that partners of all sizes are already starting to benefit from such as ESRI with site-based SaaS, Barracuda, and Trend Micro who use custom business models for their SaaS-based applications. Approved Contact, Crossware, and MongoDB are also using the per-seat SaaS capabilities and managed services from long-time Microsoft partners like Ingram Micro.

These new commerce enhancements allow publishers to customize their offers to meet customer needs and scale through the global reach of Microsoft’s customer and channel communities.

Marketplace rewards

We’re also sharing marketplace rewards, which is a new benefits program which will enhance the success of publishers with transactable offers in the commercial marketplace. Through the program publishers can unlock sales, marketing, and technical benefits to help accelerate their success. As a publisher’s business grows they’ll continue to unlock more benefits designed to provide support at every stage of their growth. This comes with a new badging program for Microsoft AppSource and Azure Marketplace that will quickly direct customers to partner solutions they can trust, which will work with cloud services from Microsoft. We will be publishing additional details on the program next week during Microsoft Inspire.

With these capabilities, publishers will be able to create new revenue streams, reach new customers in new markets, and grow their business faster than ever before.

Next steps

Learn more about how to onboard and publish your offers at Partner Center, how to list them on Microsoft AppSource and Azure Marketplace, and how to take advantage of the new go-to-market services and onboarding resources.

Visit the Microsoft Inspire site, which will be updated with materials, photos, and keynote replays for more highlights from the event.

Clang/LLVM Support for MSBuild Projects

$
0
0

Visual Studio 2019 version 16.2 Preview 3 includes built-in Clang/LLVM support for MSBuild projects. In our last release, we announced support for Clang/LLVM for CMake. In the latest Preview of Visual Studio, we have extended that support to also include MSBuild projects. While in most cases we recommend using the MSVC compiler, we are committed to making Visual Studio one of the most comprehensive IDEs on Windows. You may want to use Clang instead if you are developing cross platform code, especially if it already depends on Clang or GCC extensions. You can now use Clang/LLVM to target both Windows and Linux using MSBuild just like you can with CMake projects. We’ve also updated our included version of Clang to 8.0.0. Please download the latest Preview to try it out and let us know how it works.

Installing the Clang Tools for Visual Studio

You can install the Clang tools for Windows by selecting “C++ Clang Tools for Windows” as part of the “Desktop development with C++” workload. It is not installed by default, but if you have installed it before, Clang will automatically be updated to 8.0.0 when you install the latest Preview.

Install the “C++ Clang tools for Windows” component with the “Desktop development with C++” workload.

If you want to use your own Clang compiler with Windows instead of the bundled one, you can do that too. Navigate to “Individual Components” and select “C++ Clang-cl for v142 build tools.” You will only be able to use recent versions of Clang (8.0.0 or later) with the Microsoft STL though. We strongly recommend using the bundled compiler as it will be kept up to date as the STL is updated.

Or just install the tooling with “C++ Clang-cl for v142 build tools” under “Individual Components.”

To use Clang with Linux projects, just install the “Linux development” workload. You won’t need to select any more components. The remote machine or WSL will need to have Clang installed. Just install Clang from your distribution’s package manager or from LLVM’s download page.

Use Clang with Windows MSBuild Projects

You can use Clang with most MSBuild projects that target Windows. To get started, create a new C++ project or open an existing one. Then, you can change the platform toolset to “LLVM (clang-cl)”:Select the “LLVM (clang-cl)” Platform Toolset under Configuration Properties > General.

If this toolset doesn’t appear, it likely isn’t installed – see above for installation instructions.

Visual Studio uses the clang-cl frontend with MSBuild on Windows so the properties for Clang will be the same as MSVC based projects. Some compiler options are not supported by clang-cl (e.g. Just My Code) and will be not be shown in the Property Pages when you are using Clang.

Use Clang with Linux MSBuild Projects

Using Clang with Linux projects is also as simple as selecting the appropriate platform toolset. For Linux projects, there are two toolsets to choose from. One for using Clang with a WSL instance on the local machine and another for using Clang on a remote machine:

For Linux projects, Visual Studio uses the Clang GCC-compatible frontend. The project properties and nearly all compiler flags are identical.

Custom Clang Installations and Compiler Arguments

You can also use a custom installation of Clang. On Windows, by default, the built-in version of Clang from the installer will always be used. On Linux, the first installation of Clang found on the PATH will be used. However, you can override this behavior on either platform by setting defining a property in your project file:

<LLVMInstallDir>PATH_TO_LLVM</LLVMInstallDir>

To do this, you will need to unload your project and edit it. You can add this to any project configurations that you would like to use your custom installation of Clang. Keep in mind, the Microsoft STL is only compatible with very recent versions of Clang: 8.0.0 as of this post.

If you need to use a Clang compile or link flag that isn’t supported by the project property pages, you can do that in the project properties under Configuration Properties > C/C++ or Linker > Command Line. Consider opening a feedback ticket if you find yourself using a particular option this way frequently. Based on demand, we may add it to the property pages.

Send us Feedback

Your feedback is a critical part of ensuring that we can deliver the best experience.  We would love to know how Visual Studio 2019 version 16.2 Preview 3 is working for you. If you find any issues or have a suggestion, the best way to reach out to us is to Report a Problem.

The post Clang/LLVM Support for MSBuild Projects appeared first on C++ Team Blog.

Checklist for writing great Visual Studio extensions

$
0
0

Great Visual Studio extensions share a few key features that sets them apart from the rest. They look and feel well crafted, are performant and reliable, do what they advertise to perfection, and blend in naturally among Visual Studio’s own features.

To make it easier to write great extensions, we’ve worked with the extensibility community to come up with a simple checklist to follow. There’s even a GitHub issue template you can use so you remember to go through the checklist.

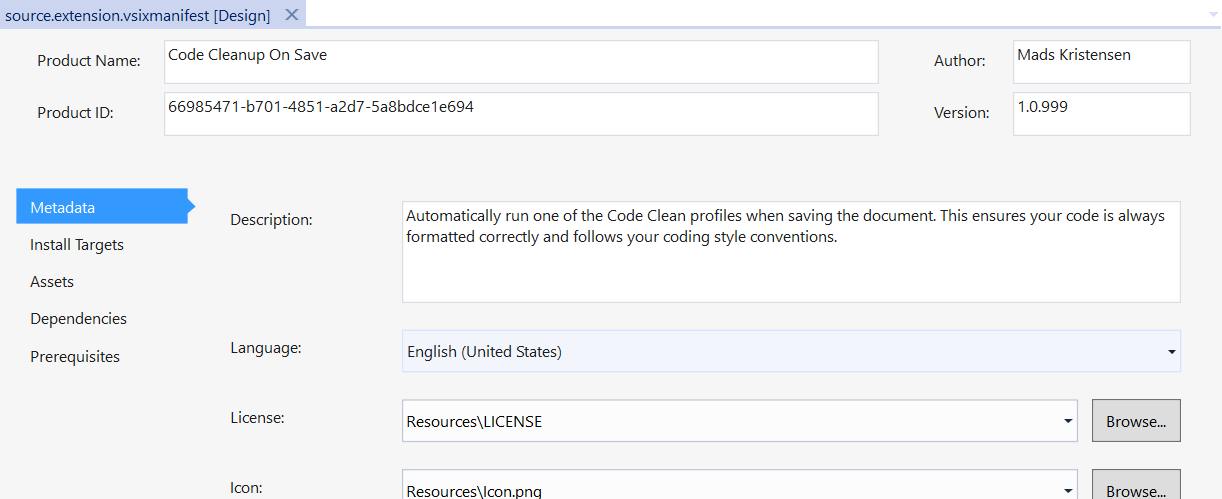
A .vsixmanifest file showing best practices

Rules

The following list is in no specific order. Remember to complete all items for best results.

Rule 1: Adhere to threading rules

Add the Microsoft.VisualStudio.SDK.Analyzers NuGet package to your VSIX project. This will help you discover and fix common violations of best practices regarding threading.

Rule 2: Add high-quality icon

All extensions should have an icon associated with it. Make sure the icon is a high-quality .png file with the size 128×128 pixels in 96 DPI or more. After adding the icon to your VSIX project, register it in the .vsixmanifest file as both the Icon and Preview image. The Visual Studio Marketplace makes use of the larger icon and it will get resized dynamically when shown inside Visual Studio.

Rule 3: Name and description

Studies show that users are more likely to install extensions with short and descriptive names and accurate descriptions. Make sure the name reflects the essence of what the extension does. The description in the .vsixmanifest file should set expectations as to what the extension does. So, a brief mention of what problems it solves and what main features it has are key.

Rule 4: Write good Marketplace description

This is one of the most important things you should do to make your extension successful. A good description consists of:

  • Screenshots/animated GIFs of the UI added by the extension
  • Detailed description of the individual features
  • Links to more details if applicable

Rule 5: Add license

The license is visible on the Marketplace, in the VSIX installer and in the Extensions Manager dialog. Always specify a license to set the expectations for the users. Consider using choosealicense.com to help find the right license for you. The reason for this rule is to remove any ambiguity, which is important for many Visual Studio users.

Rule 6: Add privacy notice

If the extension collects data such as telemetry or in any other way communicates with a remote endpoint, add a note about it in the description.

Rule 7: Use KnownMonikers when possible

Visual Studio ships with thousands of icons which are available in the KnownMonikers collection. When adding icons to command buttons, see if you can use the existing KnownMonikers icons since they are part of a design language familiar to the Visual Studio users. Here’s a full list of KnownMonikers and grab the KnownMonikers Explorer extension to find the right one for your scenarios.

Rule 8: Make it feel native to VS

Follow the same design patterns and principles that Visual Studio itself uses. This makes the extension feel natural to the users. It also reduces distractions caused by poorly designed UI. Make sure that all buttons, menus, toolbars and tool windows are only visible by default when the user is in the right context to use them. There are some rules of thumb to follow:

  • Don’t ever add a new top-level menu (next to File, Edit, etc.)
  • No buttons, menus and toolbars should be visible in contexts they don’t apply to
  • If auto load is necessary (it probably isn’t), do it as late as possible.
  • Use VisibilityConstraints to toggle visibility of commands instead of relying on auto load

Rule 9: Use proper version ranges

It can be tempting to support versions of Visual Studio all the way back to Visual Studio 2010 to ensure that everyone can use your new extension. The problem with that is that by doing so, it is no longer possible to use any APIs introduced later than that minimum version the extension supports. Often, those new APIs are important and help improve performance and reliability of both your extension as well as Visual Studio itself.

Here are our recommendations for deciding what versions of Visual Studio to support:

  • Support only the previous and current version of Visual Studio – don’t support older versions if possible
  • Don’t specify an open-ended version range. E.g. [16.0,). Learn more about version ranges.

Your thoughts

What do you think of this checklist? Do you agree with the rules? Please let us know your thoughts in the comments below or on the GitHub repo for the checklist. I hope this makes it a little easier to give your extensions that little extra something that sets it apart from the rest.

The post Checklist for writing great Visual Studio extensions appeared first on The Visual Studio Blog.

We’ve Released New Bird’s Eye Imagery!

$
0
0

Bing Maps was one of the first mapping services on the web to offer oblique 45-degree angle aerial imagery, also known as Bird’s Eye. Bing Maps is still as committed as ever to offering fresh high-resolution satellite and aerial imagery. Over the last 12 months we’ve been busy releasing refreshed and expanded Bird’s Eye imagery and we want to make sure our customers and users are aware of the progress we’ve been making. In this effort, we’re excited to say we’ve released approximately 102,000 square kilometers of new Bird’s Eye imagery spanning 100+ cities in the United States over the last several months with more to come.

Bird’s Eye is a great complement to ortho (top down) imagery because it has much more depth and provides all four angled views of your destination or area of interest. This Bird’s Eye imagery is sub-10 CM GSD (ground sample distance), which allows us to support more detailed levels of map zoom. Bird’s Eye is available in the Bing Maps Web Control and Bing Maps REST Imagery API, allowing you multiple ways to offer this rich set of aerial imagery to your customers and users. Bird’s Eye imagery is also featured at Bing.com/maps.

Here are some great examples of the recent Bird’s Eye imagery that has been released to Bing Maps:

Francis Ford Coppola Winery, Geyserville, CA

Francis Ford Coppola Winery, Geyserville, CA, on Bing Maps - https://binged.it/2JsHFcP


University of Arizona Stadium, Tucson, AZUniversity of Arizona Stadium, Tucson, AZ, on Bing Maps - https://binged.it/2NIP0sW
 

Buddy Holly Center, Lubbock, TXBuddy Holly Center, Lubbock, TX, on Bing Maps - https://binged.it/2NIP3oC
 

National Memorial for Peace and Justice, Montgomery, ALNational Memorial for Peace and Justice, Montgomery, AL, on Bing Maps - https://binged.it/2Jtc8aY
 

University of Notre Dame, South Bend, INUniversity of Notre Dame, South Bend, IN on Bing Maps - https://binged.it/2Jrdm6d

Cities and areas of interest that have recently been updated with new Bird’s Eye imagery:


  Augusta, GA
  

  Fresno, CA
  

  Phoenix, AZ
  

  Austin, TX
  

  Greenville, SC
  

  Plant City, FL
  

  Bakersfield, CA
  

  Gresham, OR
  

  Port Charlotte, FL
  

  Boca Raton, FL
  

  Helotes, TX
  

  Reno, NV
  

  Boise, ID
  

  Hemet, CA
  

  Rialto, CA
  

  Bradenton, FL
  

  Henderson, NV
  

  Riverside, CA
  

  Brighton, MI
  

  Hillsboro, OR
  

  Salem, OR
  

  Broken Arrow, OK
  

  Idaho Falls, ID
  

  Salinas, CA
  

  Brooksville, FL
  

  Indianapolis, IN
  

  San Antonio, TX
  

  Cape Coral, FL
  

  Jackson, MS
  

  San Diego, CA
  

  Carson City, NV
  

  Jacksonville Beach, FL
  

  San Jose, CA
  

  Cedar Rapids, IA
  

  Jacksonville, FL
  

  San Mateo, CA
  

  Charleston, WV
  

  Jupiter, FL
  

  Santa Clarita, CA
  

  Chattanooga, TN
  

  Kalamazoo, MI
  

  Santa Cruz, CA
  

  Chesterfield, MO
  

  Kennewick, WA
  

  Santa Fe, NM
  

  Clarksville, TN
  

  Kissimmee, FL
  

  Santa Maria, CA
  

  Clermont, FL
  

  Lafayette, LA
  

  Santa Rosa, CA
  

  Columbia, SC
  

  Land O' Lakes, FL
  

  Sarasota, FL
  

  Columbus, GA
  

  Lansing, MI
  

  Sausalito, CA
  

  Corona, CA
  

  Lawrence, KS
  

  Shreveport, LA
  

  Corpus Christi, TX
  

  Leesburg, FL
  

  Simi Valley, CA
  

  Dade City, FL
  

  Los Angeles, CA
  

  Sioux Falls, SD
  

  Dallas, TX
  

  Lubbock, TX
  

  Sonoma, CA
  

  Davis, CA
  

  Lynchburg, VA
  

  South Bend, IN
  

  Denver, CO
  

  Medford, OR
  

  Springfield, IL
  

  Des Moines, IA
  

  Mobile, AL
  

  St George, UT
  

  El Paso, TX
  

  Modesto, CA
  

  St Petersburg, FL
  

  Eustis, FL
  

  Moncks Corner, SC
  

  Stockton, CA
  

  Fairfield, CA
  

  Montgomery, AL
  

  Tampa, FL
  

  Fargo, ND
  

  Mt. Pleasant, SC
  

  Tucker, GA
  

  Fayetteville, NC
  

  Murrieta, CA
  

  Tucson, AZ
  

  Fishers, IN
  

  Myakka City, FL
  

  Tulsa, OK


  Venice, FL


  Zephyrhills, FL
  

Be on the lookout for even more new Birds Eye imagery being released over the coming months.

- Bing Maps Team


Microsoft Teams reaches 13 million daily active users, introduces 4 new ways for teams to work better together


Exploring the Micorosoft Healthcare Bot partner program

$
0
0

This post was co-authored by Hadas Bitran, Group Manager, Microsoft Healthcare Israel.

Every day, healthcare organizations are beginning their digital transformation journey with the Microsoft Healthcare Bot Service built on Azure. The Healthcare Bot service empowers healthcare organizations to build and deploy an Artificial Intelligence (AI) powered, compliant, conversational healthcare experience at scale. The service combines built-in medical intelligence with natural language capabilities, extensibility tools, and compliance constructs, allowing healthcare organizations such as providers, payers, pharma, HMOs, and telehealth to give people access to trusted and relevant healthcare services and information.

Healthcare organizations can leverage the Healthcare Bot Service on their digital transformation journey today, as we announced in our blog Microsoft Healthcare Bot brings conversational AI to healthcare. That’s why we are so happy to share more information on the Healthcare Bot Service partner program. Our Healthcare Bot certified partners empower healthcare organizations to successfully deploy virtual assistants on the Microsoft Healthcare Bot service. Working with an official partner, healthcare organizations can achieve the full potential of the Microsoft Healthcare Bot by leveraging the expertise and experience of partners who understand the business needs and challenges in healthcare.

This new program is open to existing Microsoft partners that support organizations in the healthcare domain, and delivers the training and resources required to support customers with end to end solutions using Microsoft’s Healthcare Bot Service. The program is designed to support partner success and enable partners to provide tailored solutions using the Healthcare Bot service as a foundation.

With the power of the cloud and a platform that is uniquely built for healthcare conversational intelligence, partners can quickly demonstrate value and iterate on solutions for customers. Official partners have access to partner-only resources and benefits that will enable them to provide customers with differentiated and value-added offerings such as:

  • Partner listing in the Healthcare Bot partner directory.
  • Preferential messaging tiers.
  • Free demonstration and proof of concept Healthcare Bot Instances.
  • Direct support channel from the product team.
  • Partner resources including sales materials, product updates and release notes.

The Microsoft Healthcare Bot service helps partners bring conversational AI to innovative healthcare organizations. Partners can support healthcare organizations to deploy customized conversational experiences at scale, reducing costs and improving outcomes for their patients with virtual assistants built to complement their healthcare services.

The Healthcare Bot provides partners with a comprehensive platform to automate healthcare engagements and provides patients with instant access to the services they need. The service facilitates multi-channel healthcare conversations such as chat bots or handoff to live nurses over Microsoft Teams. Partners can build differentiated offerings and create unique conversational healthcare experiences that support the type of digital interaction required by the patient.

Next steps

Partners interested in certification should submit a request to HealthBotSupport@microsoft.com. Healthcare organizations seeking certified Healthcare Bot partners can find more information in the official partner directory.

Azure Pipelines integration with Jira Software

$
0
0

Some teams prefer to have a choice of tools for configuring development pipelines, and that is most effective when the tools are integrated and users can retain context as they move between systems for details.

Jira Software is a development tool used by agile teams to plan, track, and manage software releases. Using Azure Pipelines, teams can configure CI/CD pipelines for applications of any language, deploying to any platform or any cloud.

Microsoft and Atlassian have partnered together to build an integration between Azure Pipelines and Jira Software.

This integration connects the two products, providing full tracking of how and when the value envisioned with an issue is delivered to end users. This enables teams to setup a tight development cycle from issue creation through release. Key development milestones like builds and deployments associated to a Jira issue can then be tracked from within Jira Software.

Associated Jira issues can also be viewed in releases in Azure Pipelines for a complete deployment history per environment.

Some teams like to use Jira Software for issue tracking, GitHub as a source repository and Azure Pipelines for CI/CD. Developers add Jira issue keys to the GitHub commits and Azure Pipelines automatically keeps track of the commits consumed and associated issues in each deployment.

By adding build and release information from Azure Pipelines to associated Jira issues, we complete a three-way linking of information. Teams can start from any of the three services (Jira Software, Azure DevOps and GitHub) and get complete visibility into planning, development and deployment. Product managers can understand whether the feature can be used by end customers, developers can track whether their commits have been deployed to production, and release managers can create release notes in a jiffy.

Get started by installing Azure Pipelines integration with Jira and connect Azure DevOps organizations with your Jira Software instance. You can connect multiple organizations with one instance and get data for all your teams and related projects. Learn more about setting up the integration in our documentation.

The post Azure Pipelines integration with Jira Software appeared first on Azure DevOps Blog.

Debug the DOM in Visual Studio Code using Elements for Microsoft Edge

$
0
0

Over the past few months, we’ve been working closely with web developers to understand how to simplify your workflows by building on our new Chromium-powered DevTools foundation for the next version of Microsoft Edge. One consistent theme we heard in these conversations is that you want to spend more time working with code in your favorite editor. Given you can already debug Edge from VS Code, the next logical step is to integrate the most-used browser tool, Elements, into VS Code, as well.

You can try this out today in our new preview VS Code extension, Elements for Microsoft Edge. This extension is an initial preview meant to better understand the issues you have manipulating and debugging HTML and CSS across browser tools and your editor. To get started, download a Microsoft Edge Insider preview build then install the Elements for Microsoft Edge extension.

Why Elements?

We’ve heard from developers that it’s frustrating to mix different workflows when trying to accomplish the same job across the DevTools and IDE. Specifically, we identified three areas that have significant opportunity for improvement:

  • Quickly bringing changes back to source code when modifying CSS in the DevTools
  • Minimizing the chance you lose changes when making multiple modifications to HTML/CSS in the DevTools
  • Quickly making a change to source code and seeing that change reflected in the browser

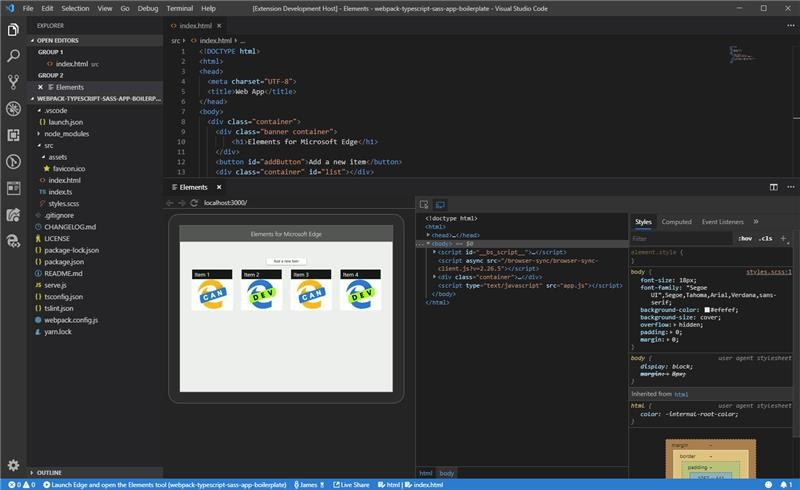
Screen capture showing the Elements for Microsoft Edge extension open in VS Code, with a live preview of a website open

The Elements for VS Code extension is our first step toward simplifying these workflows by enabling you to inspect and debug the DOM directly from within VS Code and see the impact of changes to the page in real time. This experience starts with the Elements tab because it is the most-used tool in the family of Microsoft Edge DevTools, and with VS Code because it’s by far the most-used text editor by web developers today.

Getting started with Elements for Microsoft Edge

To try the Elements for Microsoft Edge extension, first install a Dev or Canary channel preview build of Microsoft Edge then install the Elements for Microsoft Edge VS Code extension from the VS Code Marketplace.

Once both are installed, open VS Code to the project you want to work on and you’ll see a new view added to the side bar: Elements for Microsoft Edge icon

Clicking this will take you to the targets list that shows any debuggable instances of Microsoft Edge. If you don’t currently have a debuggable target open, you can click the plus (+) button to launch a new instance and attach to it. Alternatively, you can use a task in your launch.json file, just as you might with other kinds of debugger extensions.

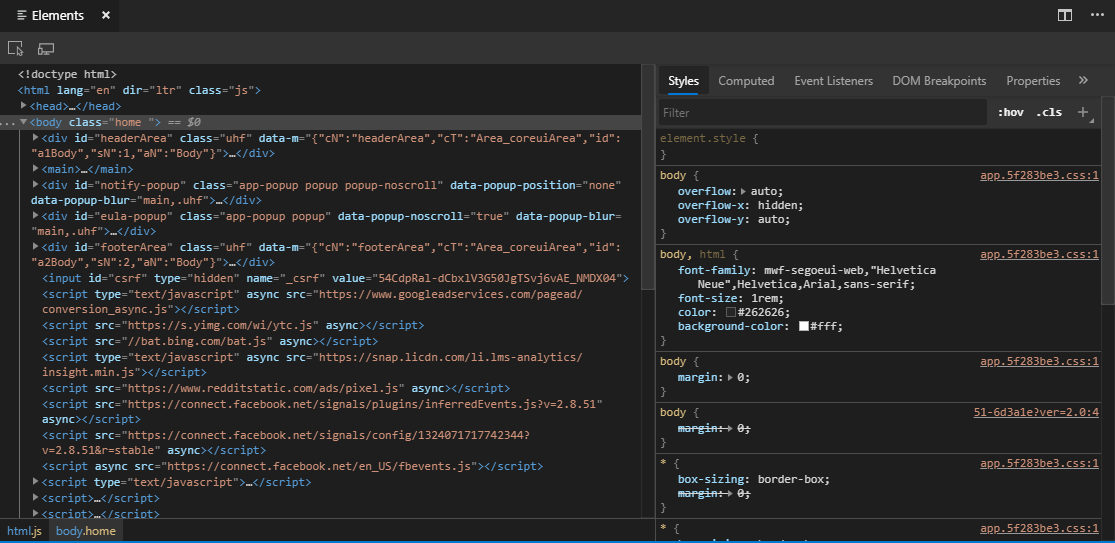
Attaching to an instance of the browser will open the new Elements tool panel showing you the HTML document structure and CSS styling information for your site or app.

Screenshot showing the Elements panel in Elements for Microsoft Edge

If you regularly use the Microsoft Edge DevTools or other Chromium-powered browser tools, this window should look familiar. You can navigate the structure of the DOM, see styling information for the selected element, change CSS values and element attributes, and anything else you are used to from the in-browser Elements tool.

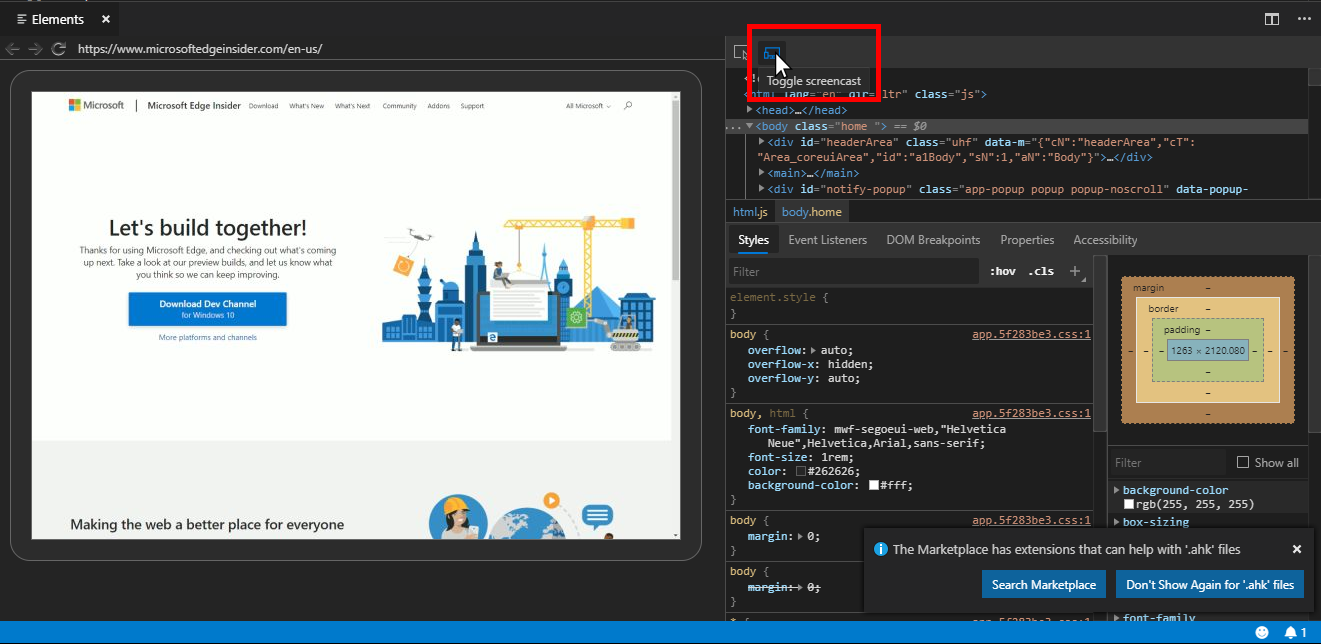
To see a live view of your website inside the Elements extension, just press the “Toggle screencast” button.

Screen shot highlighting the "toggle screencast" button in Elements for Microsoft Edge

This view will update live as you make changes to the CSS and HTML, so you don’t have to leave VS Code to see how changes affect the layout of your site.

What to expect

One of our principles is to iterate rapidly in partnership with real customers. As we investigate potential DevTools solutions, we intend to ship functional prototypes in the open so we can get your early feedback.

The Elements for Microsoft Edge extension is our first such prototype, meaning it won’t be perfect and we expect to learn a lot along the way. We intend to move forward largely based on your feedback to ensure any solutions we ship and maintain are good fits for the Microsoft Edge DevTools and VS Code communities.

We do not intend to migrate the Microsoft Edge DevTools out of the browser and fully into the IDE. In general, we believe that there are many opportunities to integrate browser tools across other aspects of your workflow but we remain committed to providing best-in-class and separate browser tools, as well. Where integration makes sense we want to build it thoughtfully, moving from simple prototypes to a more cohesive solution that feels right with the hosting environment.

You can visit our GitHub repo for examples of using the tools and to submit any issues you encounter along the way. Feel free to reach out to us on Twitter, as well: @edgedevtools.

We’re excited to hear what you think—happy coding!

– Paul Gildea, Program Manager, Microsoft Edge DevTools

The post Debug the DOM in Visual Studio Code using Elements for Microsoft Edge appeared first on Microsoft Edge Blog.

Top Stories from the Microsoft DevOps Community – 2019.07.12

$
0
0

It is July, and the summer is in full swing. I got a nice break from travel, and now I’m headed to Microsoft Ready/Inspire next week. Say hi if you are at either conference!
In the meantime, enjoy these highlights from the Azure DevOps community.

End-to-end CI/CD automation using Azure DevOps unified Yaml-defined Pipelines
This post from Melony Qin is an excellent walkthrough of deploying your application using the new YAML CI/CD pipelines in Azure DevOps. The solution builds and deploys an App Service infrastructure, and then builds, tests and deploys a Node.js application into multiple environments using a multi-stage YAML pipeline.

Analyze your repository with Azure Pipelines
This article from SonarCloud.io walks you through analyzing your BitBucket repositories in Azure Pipelines. Once you set up the SonarCloud extension in Azure DevOps, you can use the
Sonar Analysis tasks in your Continuous Integration pipelines to identify vulnerabilities, bugs, code smells, and more on your repository branches. And, of course, the same process would work with other types of Git repositories as well!

A CI/CD Pipeline with Azure DevOps and AWS Managed Kubernetes
Did you know you can deploy from Azure DevOps to any cloud? This post from David Henry features a CI/CD pipeline in Azure Pipelines deploying an application to the AWS managed Kubernetes service, EKS. It follows an important principle of “Build once, deploy anywhere”, deploying the same Docker image to multiple environments.

Using Azure CLI with PowerShell: error handling explained
Rob Bos discovered that when you use the Azure CLI via the PowerShell task in Azure Pipelines, the PowerShell script continues on error, and the pipeline still executes as if no error occurred. Luckily, there is a way to get the Azure CLI command output, and check it in PowerShell to identify errors. Read this blog post to learn how!

Azure DevOps with React
This is a great post by Gosia Borzecka on creating a CI/CD pipeline for a Node.js application using React and Gatsby. Gosia uses Azure Pipelines to auto-generate a YAML CI pipeline for her GitHub repository, and then extends it to complete the Build and Release, deploying the application via FTP.

How to Add Azure Pipelines Badge to Your Repository’s Readme in GitHub
For everyone who appreciates sharing their Build analytics and having that green Build status on display, this post by PoAn (Baron) Chen walks through the process of adding an Azure Pipelines status badge to your GitHub repo. Following these quick steps, you can add the status badge!

Azure DevOps Hidden Gems #4 – Understand Build Agents by Installing One Locally on Your Development Machine
Hosted agents are a really nice perk of Azure DevOps, allowing you to run your pipelines on Windows, Linux and Mac machines without worrying about VM setup, but for security and consistency reasons they don’t allow any access to the agent VMs. Even if you are using self-hosted agents, you probably should stay away from setting up back doors, since an accidental change to the agent configuration could cause inconsistent behavior in your agent pool. Sometimes, however, you really want to have easy access to your Build Agent for debugging. This post will walk you through setting up a Build Agent on your local machine. Thank you, Graham Smith, for continuing the Hidden Gems series!

If you’ve written an article about Azure DevOps or find some great content about DevOps on Azure, please share it with the #AzureDevOps hashtag on Twitter!

The post Top Stories from the Microsoft DevOps Community – 2019.07.12 appeared first on Azure DevOps Blog.

Real World Cloud Migrations: Azure Front Door for global HTTP and path based load-balancing

$
0
0

As I've mentioned lately, I'm quietly moving my Website from a physical machine to a number of Cloud Services hosted in Azure. This is an attempt to not just modernize the system - no reason to change things just to change them - but to take advantage of a number of benefits that a straight web host sometimes doesn't have. I want to have multiple microsites (the main page, the podcast, the blog, etc) with regular backups, CI/CD pipeline (check in code, go straight to staging), production swaps, a global CDN for content, etc.

I'm breaking a single machine into a series of small sites BUT I want to still maintain ALL my existing URLs (for good or bad) and the most important one is hanselman.com/blog/ that I now want to point to hanselmanblog.azurewebsites.net.

That means that the Azure Front Door will be receiving all the traffic - it's the Front Door! - and then forward it on to the Azure Web App. That means:

  • hanselman.com/blog/foo -> hanselmanblog.azurewebsites.net/foo
  • hanselman.com/blog/bar -> hanselmanblog.azurewebsites.net/foo
  • hanselman.com/blog/foo/bar/baz -> hanselmanblog.azurewebsites.net/foo/bar/baz

There's a few things to consider when dealing with reverse proxies like this and I've written about that in detail in this article on Dealing with Application Base URLs and Razor link generation while hosting ASP.NET web apps behind Reverse Proxies.

You can and should read in detail about Azure Front Door here.

It's worth considering a few things. Front Door MAY be overkill for what I'm doing because I have a small, modest site. Right now I've got several backends, but they aren't yet globally distributed. If I had a system with lots of regions and lots of App Services all over the world AND a lot of static content, Front Door would be a perfect fit. Right now I have just a few App Services (Backends in this context) and I'm using Front Door primarily to manage the hanselman.com top level domain and manage traffic with URL routing.

On the plus side, that might mean Azure Front Door was exactly what I needed, it was super easy to set up Front Door as there's a visual Front Door Designer. It was less than 20 minutes to get it all routed, and SSL certs too just a few hours more. You can see below that I associated staging.hanselman.com with two Backend Pools. This UI in the Azure Portal is (IMHO) far easier than the Azure Application Gateway. Additionally, Front Door is Global while App Gateway is Regional. If you were a massive global site, you might put Azure Front Door in ahem, front, and Azure App Gateway behind it, regionally.

image

Again, a little overkill as my Pools are pools are pools of one, but it gives me room to grow. I could easily balance traffic globally in the future.

CONFUSION: In the past with my little startup I've used Azure Traffic Manager to route traffic to several App Services hosted all over the global. When I heard of Front Door I was confused, but it seems like Traffic Manager is mostly global DNS load balancing for any network traffic, while Front Door is Layer 7 load balancing for HTTP traffic, and uses a variety of reasons to route traffic. Azure Front Door also can act as a CDN and cache all your content as well. There's lots of detail on Front Door's routing architecture details and traffic routing methods. Azure Front Door is definitely the most sophisticated and comprehensive system for fronting all my traffic. I'm still learning what's the right size app for it and I'm not sure a blog is the ideal example app.

Here's how I set up /blog to hit one Backend Pool. I have it accepting both HTTP and HTTPS. Originally I had a few extra Front Door rules, one for HTTP, one for HTTPs, and I set the HTTP one to redirect to HTTPS. However, Front door charges 3 cents an hour for the each of the first 5 routing rules (then about a penny an hour for each after 5) but I don't (personally) think I should pay for what I consider "best practice" rules. That means, forcing HTTPS (an internet standard, these days) as well as URL canonicalization with a trailing slash after paths. That means /blog should 301 to /blog/ etc. These are simple prescriptive things that everyone should be doing. If I was putting a legacy app behind a Front Door, then this power and flexibility in path control would be a boon that I'd be happy to pay for. But in these cases I may be able to have that redirection work done lower down in the app itself and save money every month. I'll update this post if the pricing changes.

/blog hits the Blog App Service

After I set up Azure Front Door I noticed my staging blog was getting hit every few seconds, all day forever. I realized there are some health checks but since there's 80+ Azure Front Door locations and they are all checking the health of my app, it was adding up to a lot of traffic. For a large app, you need these health checks to make sure traffic fails over and you really know if you app is healthy. For my blog, less so.

There's a few ways to tell Front Door to chill. First, I don't need Azure Front Door doing a GET requests on /. I can instead ask it to check something lighter weight. With ASP.NET 2.2 it's as easy as adding HealthChecks. It's much easier, less traffic, and you can make the health check as comprehensive as you want.

app.UseHealthChecks("/healthcheck");

Next I turned the Interval WAY app so it wouldn't bug me every few seconds.

Interval set to 255 seconds

These two small changes made a huge difference in my traffic as I didn't have so much extra "pinging."

After setting up Azure Front Door, I also turned on Custom Domain HTTPs and pointing staging to it. It was very easy to set up and was included in the cost.

Custom Domain HTTPS

I haven't decided if I want to set up Front Door's caching or not, but it might mean an easier, more central way than using a CDN manually and changing the URLs for my sites static content and images. In fact, the POP (Point of Presense) locations for Front Door are the same as those for Azure CDN.

NOTE: I will have to at some point manage the Apex/Naked domain issue where hanselman.com and www.hanselman.com both resolve to my website. It seems this can be handled by either CNAME flattening or DNS chasing and I need to check with my DNS provider to see if this is supported. I suspect I can do it with an ALIAS record. Barring that, Azure also offers a Azure DNS hosting service.

There is another option I haven't explored yet called Azure Application Gateway that I may test out and see if it's cheaper for what I need. I primarily need SSL cert management and URL routing.

I'm continuing to explore as I build out this migration plan. Let me know your thoughts in the comments.


Sponsor: Develop Xamarin applications without difficulty with the latest JetBrains Rider: Xcode integration, JetBrains Xamarin SDK, and manage the required SDKs for Android development, all right from the IDE. Get it today


© 2019 Scott Hanselman. All rights reserved.
     
Viewing all 5971 articles
Browse latest View live


<script src="https://jsc.adskeeper.com/r/s/rssing.com.1596347.js" async> </script>