Quantcast
Channel: Category Name
Viewing all 5971 articles
Browse latest View live

Migrating Delegate.BeginInvoke Calls for .NET Core

$
0
0

I recently worked with a couple customers migrating applications to .NET Core that had to make code changes to workaround BeginInvoke and EndInvoke methods on delegates not being supported on .NET Core. In this post, we’ll look at why these APIs aren’t implemented for .NET Core, why their usage isn’t caught by the .NET API Portability Analyzer, and how to fix code using them to work with .NET Core.

About the APIs

As explained in .NET documentation, the BeginInvoke method on delegate types allows them to be invoked asynchronously. BeginInvoke immediately (without waiting for the delegate to complete) returns an IAsyncResult object that can be used later (by calling EndInvoke) to wait for the call to finish and receive its return value.

For example, this code calls the DoWork method in the background:

delegate int WorkDelegate(int arg);
...
WorkDelegate del = DoWork;

// Calling del.BeginInvoke starts executing the delegate on a
// separate ThreadPool thread
Console.WriteLine("Starting with BeginInvoke");
var result = del.BeginInvoke(11, WorkCallback, null);

// This writes output to the console while DoWork is running in the background
Console.WriteLine("Waiting on work...");

// del.EndInvoke waits for the delegate to finish executing and 
// gets its return value
var ret = del.EndInvoke(result);

The Asynchronous Programming Model (APM) (using IAsyncResult and BeginInvoke) is no longer the preferred method of making asynchronous calls. The Task-based Asynchronous Pattern (TAP) is the recommended async model as of .NET Framework 4.5. Because of this, and because the implementation of async delegates depends on remoting features not present in .NET Core, BeginInvoke and EndInvoke delegate calls are not supported in .NET Core. This is discussed in GitHub issue dotnet/corefx #5940.

Of course, existing .NET Framework code can continue to use IAsyncResult async patterns, but running that code on .NET Core will result in an exception similar to this at runtime:

Unhandled Exception: System.PlatformNotSupportedException: Operation is not supported on this platform.
   at BeginInvokeExploration.Program.WorkDelegate.BeginInvoke(Int32 arg, AsyncCallback callback, Object object)

Why doesn’t ApiPort catch this?

There are other APIs that are supported on .NET Framework that aren’t supported on .NET Core, of course. What made this one especially confusing for the customers I worked with was that the .NET API Portability Analyzer didn’t mention the incompatibility in its report. Following our migration guidance, the customers had run the API Port tool to spot any APIs used by their projects that weren’t available on .NET Core. BeginInvoke and EndInvoke weren’t reported.

The reason for this is that BeginInvoke and EndInvoke methods on user-defined delegate types aren’t actually defined in .NET Framework libraries. Instead, these methods are emitted by the compiler (see the ‘Important’ note in Asynchronous Programming Using Delegates) as part of building code that declares a delegate type.

In the code above, the WorkDelegate delegate type is declared in the C# code. The IL of the compiled library includes BeginInvoke and EndInvoke methods, added by the compiler:

.class auto ansi sealed nested private WorkDelegate
        extends [mscorlib]System.MulticastDelegate
{
.method public hidebysig specialname rtspecialname 
        instance void  .ctor(object 'object',
                                native int 'method') runtime managed
{
} // end of method WorkDelegate::.ctor

.method public hidebysig newslot virtual 
        instance int32  Invoke(int32 arg) runtime managed
{
} // end of method WorkDelegate::Invoke

.method public hidebysig newslot virtual 
        instance class [mscorlib]System.IAsyncResult 
        BeginInvoke(int32 arg,
                    class [mscorlib]System.AsyncCallback callback,
                    object 'object') runtime managed
{
} // end of method WorkDelegate::BeginInvoke

.method public hidebysig newslot virtual 
        instance int32  EndInvoke(class [mscorlib]System.IAsyncResult result) runtime managed
{
} // end of method WorkDelegate::EndInvoke

} // end of class WorkDelegate


The methods have no implementation because the CLR provides them at runtime.

The .NET Portability Analyzer only analyzes calls made to methods declared in .NET Framework assemblies, so it misses these methods, even though they may feel like .NET dependencies. Because the Portability Analyzer decides which APIs to analyze by looking at the name and public key token of the assembly declaring the API, the only way to analyze BeginInvoke and EndInvoke methods on user-defined delegates would be to analyze all API calls, which would require a large change to the portability analyzer and would have undesirable performance drawbacks.

How to remove BeginInvoke/EndInvoke usage

The good news here is that calls to BeginInvoke and EndInvoke are usually easy to update so that they work with .NET Core. When fixing this type of error, there are a couple approaches.

First, if the API being invoked with the BeginInvoke call has a Task-based asynchronous alternative, call that instead. All delegates expose BeginInvoke and EndInvoke APIs, so there’s no guarantee that the work is actually done asynchronously (BeginInvoke may just invoke a synchronous workflow on a different thread). If the API being called has an async alternative, using that API will probably be the easiest and most performant fix.

If there are no Task-based alternatives available, but offloading the call to a thread pool thread is still useful, this can be done by using Task.Run to schedule a task for running the method. If an AsyncCallback parameter was supplied when calling BeginInvoke, that can be replaced with a call to Task.ContinueWith.

Task-based Asynchronous Pattern (TAP) documentation has guidance on how to wrap IAsyncResult-style patterns as Tasks using TaskFactory. Unfortunately, that solution doesn’t work for .NET Core because the APM APIs (BeginInvoke, EndInvoke) are still used inside the wrapper. The TAP documentation guidance is useful for using older APM-style code in .NET Framework TAP scenarios, but for .NET Core migration, APM APIs like BeginInvoke and EndInvoke need to be replaced with synchronous calls (like Invoke) which can be run on a separate thread using Task.Run.

As an example, the code from earlier in this post can be replaced with the following:

delegate int WorkDelegate(int arg);
...
WorkDelegate del = DoWork;

// Schedule the work using a Task and 
// del.Invoke instead of del.BeginInvoke.
Console.WriteLine("Starting with Task.Run");
var workTask = Task.Run(() => del.Invoke(11));

// Optionally, we can specify a continuation delegate 
// to execute when DoWork has finished.
var followUpTask = workTask.ContinueWith(TaskCallback);

// This writes output to the console while DoWork is running in the background.
Console.WriteLine("Waiting on work...");

// We await the task instead of calling EndInvoke.
// Either workTask or followUpTask can be awaited depending on which
// needs to be finished before proceeding. Both should eventually
// be awaited so that exceptions that may have been thrown can be handled.
var ret = await workTask;
await followUpTask;

This code snippet provides the same functionality and works on .NET Core.

Resources

The post Migrating Delegate.BeginInvoke Calls for .NET Core appeared first on .NET Blog.


People Recognition Enhancements – Video Indexer

$
0
0

Want to train Video Indexer to recognize people relevant specifically to your account? We have great news for you!

Face detection and recognition are both very widely used insights that Video Indexer provides. The face recognition feature includes the ability to recognize around 1M celebrity faces out of the box and to train account level custom Person models to recognize non-celebrity people who are relevant to a customer’s specific organization. We received multiple requests from customers to further enhance the capabilities of custom Person models. Today, we are happy to announce a wealth of enhancements that makes custom Person model training and management faster and easier.

These enhancements include a centralized custom Person model management page that allows you to create multiple models in your account. Each of these models can hold up to 1M different people. From this page, you can create new models and add new people to existing models. Here, you can also review, rename, and delete your models if needed. On top of that, you can now train your account to identify people based on images of people’s faces even before you upload any video to your account (public preview). For instance, organizations that already have an archive of people images can now leverage those archives to pre-train their models.

Multiple and larger models

Video Indexer now supports up to 50 Persons models per account, and each of those models supports up to 1 million different people. If your Video Indexer account caters to different use-cases, you can benefit from being able to create multiple Person models in your account. For example, if the content in your account is meant to be sorted into different channels, you might want to have a separate Person model for each channel.

You have the option to select the custom Person model that you want to use to index a video. This will determine which model Video Indexer you will use to identify people in the video and to update any new people tagged directly from the video.

Content model customization view

Centralized Custom Person model management

A new “People” tab has been added in the content model customization area of Video Indexer’s portal. This is a great place to centrally review and manage all the account’s custom Person models. Here, you can also add new Person models to your account and add new people to your existing models. For videos that have not been indexed using a custom Person model, any tagged faces in the video will automatically appear in your ‘Default’ Person model.

Render and index dialog with people model options listed.

Train Person models from images

If you already have an archive of relevant face images, you can use these face images to train Person models in your account even before you’ve uploaded your first video! Simply drag and drop a set of images to the person entry in the content model customization page. Training from image is currently in public preview.

Each person entry in the model can be managed separately. By clicking the “manage” action for a person you will see all the images that this persons model is trained from, either from videos or from images that you have manually uploaded. Within the “manage” action, you can also upload and delete face images for a person. The more face images that you add for a person generally means the better chances there are to get accurate recognition of that person.

Person dialog details with the option to manage images.

Duplicate names support

From time to time, users need to tag two different people with the same name. Video Indexer now allows users to add multiple people with the same name and is still capable of identifying each person separately. However, we still recommend having unique names for people for ease of use.


Have questions or feedback? We would love to hear from you! Use our UserVoice to help us prioritize features, or email us with any questions.

Azure Search – New Storage Optimized service tiers available in preview

$
0
0

Search graphicAzure Search is an AI-powered cloud search service for modern mobile and web app development. Azure Search is the only cloud search service with built-in artificial intelligence (AI) capabilities that enrich all types of information to easily identify and explore relevant content at scale. It uses the same integrated Microsoft natural language stack as Bing and Office, plus prebuilt AI APIs across vision, language, and speech. With Azure Search, you spend more time innovating on your websites and applications, and less time maintaining a complex search solution.

Today we are announcing the preview of two new service tiers for Storage Optimized workloads in Azure Search. These L-Series tiers offer significantly more storage at a reduced cost per terabyte when compared to the Standard tiers, ideal for solutions with a large amount of index data and lower query volume throughout the day, such as internal applications searching over large file repositories, archival scenarios when you have business data going back many years, or e-discovery applications.     

Searching over all your content

From finding a product on a retail site to looking up an account within a business application, search services power a wide range of solutions with differing needs. While some scenarios like product catalogs need to search over a relatively small amount of information (100MB to 1GB) quickly, for others it’s a priority to search over large amounts of information in order to properly research, perform business processes, and make decisions. With information growing at the rate of 2.5 quintillion bytes of new data per day, this is becoming a much more common–and costly– scenario, especially for businesses.

What’s new with the L-series tier

The new L-Series service tiers support the same programmatic API, command-line interfaces, and portal experience as the Basic and Standard tiers of Azure Search. Internally, Azure Search provisions compute and storage resources for you based on how you’ve scaled your service. Compared to the S-Series, each L-Series search unit has significantly more storage I/O bandwidth and memory, allowing each unit’s corresponding compute resources to address more data. The L-Series is designed to support much large indexes overall (up to 24 TB total on a fully scaled out L2) for applications.


Standard S1

Standard S2

Standard S3

Storage Optimized L1

Storage Optimized L2

Storage

25 GB/partition
(max 300 GB documents per service)

100 GB/partition
(max 1.2 TB documents per service)

200 GB/partition
(max 2.4 TB documents per service)

1 TB/partition

(max 12 TB documents per service)

2 TB/partition

(max 24 TB documents per service)

Max indexes per service

50

200

200 or 1000/partition in high density2 mode

10

10

Scale out limits

Up to 36 units per service
(max 12 partitions; max 12 replicas)

Up to 36 units per service
(max 12 partitions; max 12 replicas)

Up to 36 units per service
(max 12 partitions; max 12 replicas)
up to 12 replicas in high density2 mode

Up to 36 units per service
(max 12 partitions; max 12 replicas)

Up to 36 units per service
(max 12 partitions; max 12 replicas)

Please refer to the Azure Search pricing page for the latest pricing details.

Customer success and common scenarios

We have been working closely with Capax Global LLC, A Hitachi Group Company to create a service tier that works for one of their customers. Capax Global combines well-established patterns and practices with emerging technologies while leveraging a wide range of industry and commercial software development experience. In our discussions with them, we found that a storage optimized tier would be a good fit for their application since it offers the same search functionality at a significantly lower price than the standard tier. 

“The new Azure Search Storage Optimized SKU provides a cost-effective solution for customers with a tremendous amount of content. With it, we’re now able to enrich the custom solutions we build for our customers with a cloud hosted document-based search that meets the search demands of millions of documents while continuing to lead with Azure. This new SKU has further strengthened the array of services we have to utilize to help our customers solve their business problems through technology.”

– Mitch Prince, VP Cloud Productivity + Enablement at Capax Global LLC, A Hitachi Group Company

The Storage Optimized service tiers are also a great fit for applications that incorporate the new cognitive search capabilities in Azure Search, where you can leverage AI-powered components to analyze and annotate large volumes of content, such as PDFs, office documents, and rows of structured data. These data stores can result in many terabytes of indexable data, which becomes very costly to store in a query latency-optimized service tier like the S3. Cognitive search combined with the L-Series tiers of Azure Search provide a full-text query solution capable of storing terabytes of data and returning results in seconds.

Regional availability

For the initial public preview, the Storage Optimized service tiers will be available in the following regions:

  • West US 2
  • South Central US
  • North Central US
  • West Europe
  • UK South
  • Australia East

We’ll be adding additional regions over the coming weeks. If your preferred region is not supported, please reach out to us directly at azuresearch_contact@microsoft.com to let us know.

Getting started

For more information on these new Azure Search tiers and pricing, please visit our documentation, pricing page, or go to the Azure portal to create your own Search service.

Visual Studio Extensibility Day at Build 2019

$
0
0

Please join us for a day full of Visual Studio extensibility deep dives, geek-outs, and networking on Friday, May 10th, 2019 at the Microsoft campus in Redmond. Our agenda is intended for existing and new Visual Studio IDE (not VSCode) extension authors and partners and will be highly technical in nature.

The Extensibility Day will take place in Microsoft building 18 which is the home of the Visual Studio engineering team. This means that we will have Visual Studio engineers directly on hand throughout the day for your questions and troubleshooting.

You’ll learn about what’s new in Visual Studio 2019 for extensibility, get an update from the Marketplace and see what’s on the roadmap. On top of that, there will be technical deep dives that explore the inner workings of it all. Sprinkle on some networking, Q&A, swag, and surprises and you’ll end up with a great day of learning and fun. The event ends in the afternoon with an opportunity to unwind with your fellow extenders at the Microsoft Commons in the heart of the Redmond Campus.

Should I go?

If you have written a Visual Studio IDE extension or have been a Visual Studio partner, then we would encourage you to attend. There is a lot of content, networking opportunities and you have a venue to interact with the VS engineers and help shape future work too!

The event will not contain any introductory sessions and will assume that you are familiar with the Visual Studio extensibility model.

Register

Registration is now open and operates under a first-come first-serve basis. We have limited availability so make sure to register as soon as possible.

The post Visual Studio Extensibility Day at Build 2019 appeared first on The Visual Studio Blog.

Announcing TypeScript 3.4

$
0
0

Today we’re happy to announce the availability of TypeScript 3.4!

If you haven’t yet used TypeScript, it’s a language that builds on JavaScript that adds optional static types. The TypeScript project provides a compiler that checks your programs based on these types to prevent certain classes of errors, and then strips them out of your program so you can get clean readable JavaScript code that will run in any ECMAScript runtime (like your favorite browser, or Node.js). TypeScript also leverages this type information to provide a language server, which can be used for powerful cross-platform editor tooling like code completions, find-all-references, quick fixes, and refactorings.

TypeScript also provides that same tooling for JavaScript users, and can even type-check JavaScript code typed with JSDoc using the checkJs flag. If you’ve used editors like Visual Studio or Visual Studio Code on a .js file, TypeScript is powering that experience, so you might already be using TypeScript in some capacity!

To get started with TypeScript, you can get it through NuGet, or through npm with the following command:

npm install -g typescript

You can also get editor support by

Support for other editors will likely be rolling in in the near future.

Let’s dive in and see what’s new in TypeScript 3.4!

Faster subsequent builds with the --incremental flag

Because TypeScript files are compiled, there is an intermediate step between writing and running your code. One of our goals is to minimize build time given any change to your program. One way to do that is by running TypeScript in --watch mode. When a file changes under --watch mode, TypeScript is able to use your project’s previously-constructed dependency graph to determine which files could potentially have been affected and need to be re-checked and potentially re-emitted. This can avoid a full type-check and re-emit which can be costly.

But it’s unrealistic to expect all users to keep a tsc --watch process running overnight just to have faster builds tomorrow morning. What about cold builds? Over the past few months, we’ve been working to see if there’s a way to save the appropriate information from --watch mode to a file and use it from build to build.

TypeScript 3.4 introduces a new flag called --incremental which tells TypeScript to save information about the project graph from the last compilation. The next time TypeScript is invoked with --incremental, it will use that information to detect the least costly way to type-check and emit changes to your project.

// tsconfig.json
{
    "compilerOptions": { 
        "incremental": true,
        "outDir": "./lib"
    },
    "include": ["./src"]
}

By default with these settings, when we run tsc, TypeScript will look for a file called .tsbuildinfo in the output directory (./lib). If ./lib/.tsbuildinfo doesn’t exist, it’ll be generated. But if it does, tsc will try to use that file to incrementally type-check and update our output files.

These .tsbuildinfo files can be safely deleted and don’t have any impact on our code at runtime – they’re purely used to make compilations faster. We can also name them anything that we want, and place them anywhere we want using the --tsBuildInfoFile flag.

// front-end.tsconfig.json
{
    "compilerOptions": {
        "incremental": true,
        "tsBuildInfoFile": "./buildcache/front-end",
        "outDir": "./lib"
    },
    "include": ["./src"]
}

As long as nobody else tries writing to the same cache file, we should be able to enjoy faster incremental cold builds.

How fast, you ask? Well, here’s the difference in adding --incremental to the Visual Studio Code project’s tsconfig.json

Step Compile Time
Compile without --incremental 47.54s
First compile with --incremental 52.77s
Subsequent compile with --incremental with API surface change 30.45s
Subsequent compile with --incremental without API surface change 11.49s

For a project the size of Visual Studio Code, TypeScript’s new --incremental flag was able to reduce subsequent build times down to approximately a fifth of the original.

Composite projects

Part of the intent with composite projects (tsconfig.jsons with composite set to true) is that references between different projects can be built incrementally. As such, composite projects will always produce .tsbuildinfo files.

outFile

When outFile is used, the build information file’s name will be based on the output file’s name. As an example, if our output JavaScript file is ./output/foo.js, then under the --incremental flag, TypeScript will generate the file ./output/foo.tsbuildinfo. As above, this can be controlled with the --tsBuildInfoFile flag.

The --incremental file format and versioning

While the file generated by --incremental is JSON, the file isn’t mean to be consumed by any other tool. We can’t provide any guarantees of stability for its contents, and in fact, our current policy is that any one version of TypeScript will not understand .tsbuildinfo files generated from another version.

What else?

That’s pretty much it for --incremental! If you’re interested, check out the pull request (along with its sibling PR) for more details.

In the future, we’ll be investigating APIs for other tools to leverage these generated build information files, as well as enabling the flag for use directly on the command line (as opposed to just in tsconfig.json files).

Higher order type inference from generic functions

TypeScript 3.4 has several improvements around inference that were inspired by some very thoughtful feedback from community member Oliver J. Ash on our issue tracker. One of the biggest improvements relates to functions inferring types from other generic functions.

To get more specific, let’s build up some motivation and consider the following compose function:

function compose<A, B, C>(f: (arg: A) => B, g: (arg: B) => C): (arg: A) => C {
    return x => g(f(x));
}

compose takes two other functions:

  • f which takes some argument (of type A) and returns a value of type B
  • g which takes an argument of type B (the type f returned), and returns a value of type C

compose then returns a function which feeds its argument through f and then g.

When calling this function, TypeScript will try to figure out the types of A, B, and C through a process called type argument inference. This inference process usually works pretty well:

interface Person {
    name: string;
    age: number;
}

function getDisplayName(p: Person) {
    return p.name.toLowerCase();
}

function getLength(s: string) {
    return s.length;
}

// has type '(p: Person) => number'
const getDisplayNameLength = compose(
    getDisplayName,
    getLength,
);

// works and returns the type 'number'
getDisplayNameLength({ name: "Person McPersonface", age: 42 });

The inference process is fairly straightforward here because getDisplayName and getLength use types that can easily be referenced. However, in TypeScript 3.3 and earlier, generic functions like compose didn’t work so well when passed other generic functions.

interface Box<T> {
    value: T;
}

function makeArray<T>(x: T): T[] {
    return [x];
}

function makeBox<U>(value: U): Box<U> {
    return { value };
}

// has type '(arg: {}) => Box<{}[]>'
const makeBoxedArray = compose(
    makeArray,
    makeBox,
)

makeBoxedArray("hello!").value[0].toUpperCase();
//                                ~~~~~~~~~~~
// error: Property 'toUpperCase' does not exist on type '{}'.

Oof! What’s this {} type?

Well, traditionally TypeScript would see that makeArray and makeBox are generic functions, but it couldn’t just infer T and U in the types of A, B, and C. If it did, it would end up with irreconcilable inference candidates T[] and U for B, plus it might have the type variables T and U in the resulting function type, which wouldn’t actually be declared by that resulting type. To avoid this, instead of inferring directly from T and U, TypeScript would infer from the constraints of T and U, which are implicitly the empty object type (that {} type from above).

As you might notice, this behavior isn’t desirable because type information is lost and Ideally, we would infer a better type than {}.

TypeScript 3.4 now does that. During type argument inference for a call to a generic function that returns a function type, TypeScript will, as appropriate, propagate type parameters from generic function arguments onto the resulting function type.

In other words, instead of producing the type

type EraseMe =
(arg: {}) => Box<{}[]>

TypeScript 3.4 just “does the right thing” and makes the type

type EraseMe =
<T>(arg: T) => Box<T[]>

Notice that T has been propagated from makeArray into the resulting type’s type parameter list. This means that genericity from compose‘s arguments has been preserved and our makeBoxedArray sample will just work!

interface Box<T> {
    value: T;
}

function makeArray<T>(x: T): T[] {
    return [x];
}

function makeBox<U>(value: U): Box<U> {
    return { value };
}

// has type '<T>(arg: T) => Box<T[]>'
const makeBoxedArray = compose(
    makeArray,
    makeBox,
)

// works with no problem!
makeBoxedArray("hello!").value[0].toUpperCase();

For more details, you can read more at the original change.

Improvements for ReadonlyArray and readonly tuples

TypeScript 3.4 makes it a little bit easier to use read-only array-like types.

A new syntax for ReadonlyArray

The ReadonlyArray type describes Arrays that can only be read from. Any variable with a reference to a ReadonlyArray can’t add, remove, or replace any elements of the array.

function foo(arr: ReadonlyArray<string>) {
    arr.slice();        // okay
    arr.push("hello!"); // error!
}

While it’s good practice to use ReadonlyArray over Array when no mutation is intended, it’s often been a pain given that arrays have a nicer syntax. Specifically, number[] is a shorthand version of Array<number>, just as Date[] is a shorthand for Array<Date>.

TypeScript 3.4 introduces a new syntax for ReadonlyArray using a new readonly modifier for array types.

function foo(arr: readonly string[]) {
    arr.slice();        // okay
    arr.push("hello!"); // error!
}

readonly tuples

TypeScript 3.4 also introduces new support for readonly tuples. We can prefix any tuple type with the readonly keyword to make it a readonly tuple, much like we now can with array shorthand syntax. As you might expect, unlike ordinary tuples whose slots could be written to, readonly tuples only permit reading from those positions.

function foo(pair: readonly [string, string]) {
    console.log(pair[0]);   // okay
    pair[1] = "hello!";     // error
}

The same way that ordinary tuples are types that extend from Array – a tuple with elements of type T1, T2, … Tn extends from Array< T1 | T2 | … Tn>readonly tuples are types that extend from ReadonlyArray. So a readonly tuple with elements T1, T2, … Tn extends from ReadonlyArray< T1 | T2 | … Tn>.

readonly mapped type modifiers and readonly arrays

In earlier versions of TypeScript, we generalized mapped types to operate differently on array-like types. This meant that a mapped type like Boxify could work on arrays and tuples alike.

interface Box<T> { value: T }

type Boxify<T> = {
    [K in keyof T]: Box<T[K]>
}

// { a: Box<string>, b: Box<number> }
type A = Boxify<{ a: string, b: number }>;

// Array<Box<number>>
type B = Boxify<number[]>;

// [Box<string>, Box<number>]
type C = Boxify<[string, boolean]>;

Unfortunately, mapped types like the Readonly utility type were effectively no-ops on array and tuple types.

// lib.d.ts
type Readonly<T> = {
    readonly [K in keyof T]: T[K]
}

// How code acted *before* TypeScript 3.4

// { readonly a: string, readonly b: number }
type A = Readonly<{ a: string, b: number }>;

// number[]
type B = Readonly<number[]>;

// [string, boolean]
type C = Readonly<[string, boolean]>;

In TypeScript 3.4, the readonly modifier in a mapped type will automatically convert array-like types to their corresponding readonly counterparts.

// How code acts now *with* TypeScript 3.4

// { readonly a: string, readonly b: number }
type A = Readonly<{ a: string, b: number }>;

// readonly number[]
type B = Readonly<number[]>;

// readonly [string, boolean]
type C = Readonly<[string, boolean]>;

Similarly, you could write a utility type like Writable mapped type that strips away readonly-ness, and that would convert readonly array containers back to their mutable equivalents.

type Writable<T> = {
    -readonly [K in keyof T]: T[K]
}

// { a: string, b: number }
type A = Writable<{
    readonly a: string;
    readonly b: number
}>;

// number[]
type B = Writable<readonly number[]>;

// [string, boolean]
type C = Writable<readonly [string, boolean]>;

Caveats

Despite its appearance, the readonly type modifier can only be used for syntax on array types and tuple types. It is not a general-purpose type operator.

let err1: readonly Set<number>; // error!
let err2: readonly Array<boolean>; // error!

let okay: readonly boolean[]; // works fine

You can see more details in the pull request.

const assertions

When declaring a mutable variable or property, TypeScript often widens values to make sure that we can assign things later on without writing an explicit type.

let x = "hello";

// hurray! we can assign to 'x' later on!
x = "world";

Technically, every literal value has a literal type. Above, the type "hello" got widened to the type string before inferring a type for x.

One alternative view might be to say that x has the original literal type "hello" and that we can’t assign "world" later on like so:

let x: "hello" = "hello";

// error!
x = "world";

In this case, that seems extreme, but it can be useful in other situations. For example, TypeScript users often create objects that are meant to be used in discriminated unions.

type Shape =
    | { kind: "circle", radius: number }
    | { kind: "square", sideLength: number }

function getShapes(): readonly Shape[] {
    let result = [
        { kind: "circle", radius: 100, },
        { kind: "square", sideLength: 50, },
    ];
    
    // Some terrible error message because TypeScript inferred
    // 'kind' to have the type 'string' instead of
    // either '"circle"' or '"square"'.
    return result;
}

Mutability is one of the best heuristics of intent which TypeScript can use to determine when to widen (rather than analyzing our entire program).

Unfortunately, as we saw in the last example, in JavaScript properties are mutable by default. This means that the language will often widen types undesirably, requiring explicit types in certain places.

function getShapes(): readonly Shape[] {
    // This explicit annotation gives a hint
    // to avoid widening in the first place.
    let result: readonly Shape[] = [
        { kind: "circle", radius: 100, },
        { kind: "square", sideLength: 50, },
    ];
    
    return result;
}

Up to a certain point this is okay, but as our data structures get more and more complex, this becomes cumbersome.

To solve this, TypeScript 3.4 introduces a new construct for literal values called const assertions. Its syntax is a type assertion with const in place of the type name (e.g. 123 as const). When we construct new literal expressions with const assertions, we can signal to the language that

  • no literal types in that expression should be widened (e.g. no going from "hello" to string)
  • object literals get readonly properties
  • array literals become readonly tuples
// Type '10'
let x = 10 as const;

// Type 'readonly [10, 20]'
let y = [10, 20] as const;

// Type '{ readonly text: "hello" }'
let z = { text: "hello" } as const;

Outside of .tsx files, the angle bracket assertion syntax can also be used.

// Type '10'
let x = <const>10;

// Type 'readonly [10, 20]'
let y = <const>[10, 20];

// Type '{ readonly text: "hello" }'
let z = <const>{ text: "hello" };

This feature means that types that would otherwise be used just to hint immutability to the compiler can often be omitted.

// Works with no types referenced or declared.
// We only needed a single const assertion.
function getShapes() {
    let result = [
        { kind: "circle", radius: 100, },
        { kind: "square", sideLength: 50, },
    ] as const;
    
    return result;
}

for (const shape of getShapes()) {
    // Narrows perfectly!
    if (shape.kind === "circle") {
        console.log("Circle radius", shape.radius);
    }
    else {
        console.log("Square side length", shape.sideLength);
    }
}

Notice the above needed no type annotations. The const assertion allowed TypeScript to take the most specific type of the expression.

This can even be used to enable enum-like patterns in plain JavaScript code if you choose not to use TypeScript’s enum construct.

export const Colors = {
    red: "RED",
    blue: "BLUE",
    green: "GREEN",
} as const;

// or use an 'export default'

export default {
    red: "RED",
    blue: "BLUE",
    green: "GREEN",
} as const;

Caveats

One thing to note is that const assertions can only be applied immediately on simple literal expressions.

// Error! A 'const' assertion can only be applied to a
// to a string, number, boolean, array, or object literal.
let a = (Math.random() < 0.5 ? 0 : 1) as const;

// Works!
let b = Math.random() < 0.5 ?
    0 as const :
    1 as const;

Another thing to keep in mind is that const contexts don’t immediately convert an expression to be fully immutable.

let arr = [1, 2, 3, 4];

let foo = {
    name: "foo",
    contents: arr,
} as const;

foo.name = "bar";   // error!
foo.contents = [];  // error!

foo.contents.push(5); // ...works!

For more details, you can check out the respective pull request.

Type-checking for globalThis

It can be surprisingly difficult to access or declare values in the global scope, perhaps because we’re writing our code in modules (whose local declarations don’t leak by default), or because we might have a local variable that shadows the name of a global value. In different environments, there are different ways to access what’s effectively the global scope – global in Node, window, self, or frames in the browser, or this in certain locations outside of strict mode. None of this is obvious, and often leaves users feeling unsure of whether they’re writing correct code.

TypeScript 3.4 introduces support for type-checking ECMAScript’s new globalThis – a global variable that, well, refers to the global scope. Unlike the above solutions, globalThis provides a standard way for accessing the global scope which can be used across different environments.

// in a global file:

var abc = 100;

// Refers to 'abc' from above.
globalThis.abc = 200;

Note that global variables declared with let and const don’t show up on globalThis.

let answer = 42;

// error! Property 'answer' does not exist on 'typeof globalThis'.
globalThis.answer = 333333;

It’s also important to note that TypeScript doesn’t transform references to globalThis when compiling to older versions of ECMAScript. As such, unless you’re targeting evergreen browsers (which already support globalThis), you may want to use an appropriate polyfill instead.

For more details on the implementation, see the feature’s pull request.

Convert parameters to destructured object

Sometimes, parameter lists start getting unwieldy.

function updateOptions(
    hue?: number,
    saturation?: number,
    brightness?: number,
    positionX?: number,
    positionY?: number,
    positionZ?: number,) {
    
    // ....
}

In the above example, it’s way too easy for a caller to mix up the order of arguments given. A common JavaScript pattern is to instead use an “options object”, so that each option is explicitly named and order doesn’t ever matter. This emulates a feature that other languages have called “named parameters”.

interface Options {
    hue?: number,
    saturation?: number,
    brightness?: number,
    positionX?: number,
    positionY?: number,
    positionZ?: number,
}

function updateOptions(options: Options = {}) {
    
    // ....
}

In TypeScript 3.4, our intern Gabriela Britto has implemented a new refactoring to convert existing functions to use this “named parameters” pattern.

A refactoring being applied to a function to make it take a destructured object.

In the presence of multiple parameters, TypeScript will provide a refactoring to convert the parameter list into a single destructured object. Accordingly, each site where a function is called will also be updated. Features like optionality and defaults are also tracked, and this feature also works on constructors as well.

Currently the refactoring doesn’t generate a name for the type, but we’re interested in hearing feedback as to whether that’s desirable, or whether providing it separately through an upcoming refactoring would be better.

For more details on this refactoring, check out the pull request.

Breaking changes

While it’s never ideal, TypeScript 3.4 does introduce some breaking changes – some simply due to improvements in inference. You can see slightly more detailed explanations on our Breaking Changes page.

Propagated generic type arguments

In certain cases, TypeScript 3.4’s improved inference might produce functions that are generic, rather than ones that take and return their constraints (usually {}).

declare function compose<T, U, V>(f: (arg: T) => U, g: (arg: U) => V): (arg: T) => V;

function list<T>(x: T) { return [x]; }
function box<T>(value: T) { return { value }; }

let f = compose(list, box);
let x = f(100)

// In TypeScript 3.4, 'x.value' has the type
//
//   number[]
//
// but it previously had the type
//
//   {}[]
//
// So it's now an error to push in a string.
x.value.push("hello");

An explicit type annotation on x can get rid of the error.

Contextual return types flow in as contextual argument types

TypeScript now uses types that flow into function calls (like then in the below example) to contextually type function arguments (like the arrow function in the below example).

function isEven(prom: Promise<number>): Promise<{ success: boolean }> {
    return prom.then<{success: boolean}>((x) => {
        return x % 2 === 0 ?
            { success: true } :
            Promise.resolve({ success: false });
    });
}

This is generally an improvement, but in the above example it causes true and false to acquire literal types which is undesirable.

The appropriate workaround is to add type arguments to the appropriate call – the then method call in this example.

function isEven(prom: Promise<number>): Promise<{ success: boolean }> {
    //               vvvvvvvvvvvvvvvvvv
    return prom.then<{success: boolean}>((x) => {
        return x % 2 === 0 ?
            { success: true } :
            Promise.resolve({ success: false });
    });
}

Consistent inference priorities outside of strictFunctionTypes

In TypeScript 3.3 with --strictFunctionTypes off, generic types declared with interface were assumed to always be covariant with respect to their type parameter. For function types, this behavior was generally not observable. However, for generic interface types that used their type parameters with keyof positions – a contravariant use – these types behaved incorrectly.

In TypeScript 3.4, variance of types declared with interface is now correctly measured in all cases. This causes an observable breaking change for interfaces that used a type parameter only in keyof (including places like Record<K, T> which is an alias for a type involving keyof K). The example above is one such possible break.

interface HasX { x: any }
interface HasY { y: any }

declare const source: HasX | HasY;
declare const properties: KeyContainer<HasX>;

interface KeyContainer<T> {
    key: keyof T;
}

function readKey<T>(source: T, prop: KeyContainer<T>) {
    console.log(source[prop.key])
}

// This call should have been rejected, because we might
// incorrectly be reading 'x' from 'HasY'. It now appropriately errors.
readKey(source, properties);

This error is likely indicative of an issue with the original code.

Top-level this is now typed

The type of top-level this is now typed as typeof globalThis instead of any. As a consequence, you may receive errors for accessing unknown values on this under noImplicitAny.

// previously okay in noImplicitAny, now an error
this.whargarbl = 10;

Note that code compiled under noImplicitThis will not experience any changes here.

What’s next?

The TypeScript team has recently started to publish our iteration plans – write-ups of features considered, committed work items, and targeted release dates for a given release. To get an idea of what’s next, you can check out the 3.5 iteration plan document, as well as the rolling feature roadmap page. Based on our planning, some key highlights of 3.5 might include .d.ts file emit from JavaScript projects, and several editor productivity features.

We hope that TypeScript continues to make coding a joy. If you’re happy with this release, let us know on Twitter, and if you’ve got any suggestions on what we can improve, feel free to file an issue on GitHub.

Happy hacking!

– Daniel Rosenwasser and the TypeScript team

The post Announcing TypeScript 3.4 appeared first on TypeScript.

.NET Core Workers as Windows Services

$
0
0

In .NET Core 3.0 we are introducing a new type of application template called Worker Service. This template is intended to give you a starting point for writing long running services in .NET Core. In this walkthrough we will create a worker and run it as a Windows Service.

Create a worker

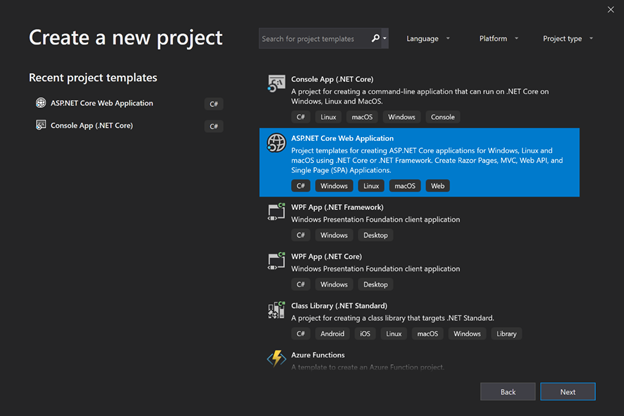
Preview Note: In our preview releases the worker template is in the same menu as the Web templates. This will change in a future release. We intend to place the Worker Server template directly inside the create new project wizard.

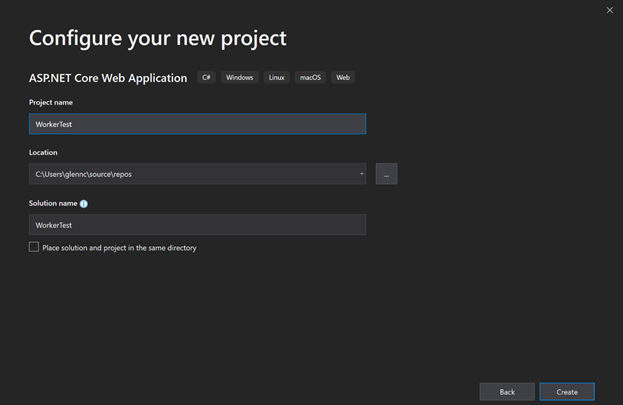
Create a Worker in Visual Studio

image

image

image

Create a Worker on the command line

Run dotnet new worker

image

Run as a Windows Service

In order to run as a Windows Service we need our worker to listen for start and stop signals from ServiceBase the .NET type that exposes the Windows Service systems to .NET applications. To do this we want to:

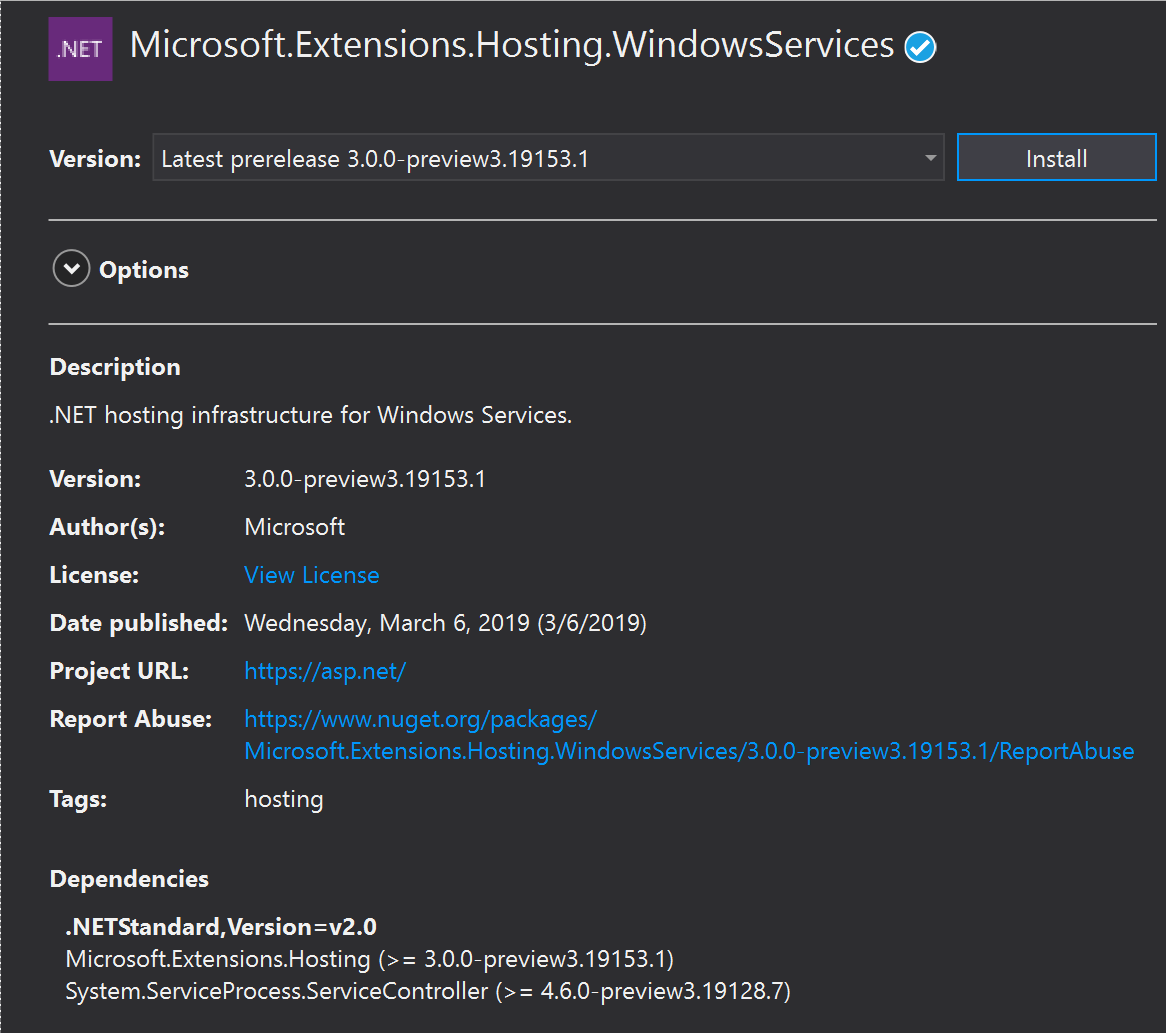
Add the Microsoft.Extensions.Hosting.WindowsServices NuGet package

image

Add the UseServiceBaseLifetime call to the HostBuilder in our Program.cs

public class Program
{
    public static void Main(string[] args)
    {
        CreateHostBuilder(args).Build().Run();
    }

    public static IHostBuilder CreateHostBuilder(string[] args) =>
        Host.CreateDefaultBuilder(args)
            .UseServiceBaseLifetime()
            .ConfigureServices(services =>
            {
                services.AddHostedService<Worker>();
            });
}

This method does a couple of things. First, it checks whether or not the application is actually running as a Windows Service, if it isn’t then it noops which makes this method safe to be called when running locally or when running as a Windows Service. You don’t need to add guard clauses to it and can just run the app normally when not installed as a Windows Service.

Secondly, it configures your host to use a ServiceBaseLifetime. ServiceBaseLifetime works with ServiceBase to help control the lifetime of your app when run as a Windows Service. This overrides the default ConsoleLifetime that handles signals like CTL+C.

Install the Worker

Once we have our worker using the ServiceBaseLifetime we then need to install it:

First, lets publish the application. We will install the Windows Service in-place, meaning the exe will be locked whenever the service is running. The publish step is a nice way to make sure all the files I need to run the service are in one place and ready to be installed.

dotnet publish -o c:codeworkerpub

Then we can use the sc utility in an admin command prompt

sc create workertest binPath=c:codeworkerpubWorkerTest.exe

For example:

image

Security note: This command has the service run as local system, which isn’t something you will generally want to do. Instead you should create a service account and run the windows service as that account. We will not talk about that here, but there is some documentation on the ASP.NET docs talking about it here: https://docs.microsoft.com/en-us/aspnet/core/host-and-deploy/windows-service?view=aspnetcore-2.2

Logging

The logging system has an Event Log provider that can send log message directly to the Windows Event Log. To log to the event log you can add the Microsoft.Extensions.Logging.EventLog package and then modify your Program.cs:

public static IHostBuilder CreateHostBuilder(string[] args) =>
    Host.CreateDefaultBuilder(args)
        .ConfigureLogging(loggerFactory => loggerFactory.AddEventLog())
        .ConfigureServices(services =>
        {
            services.AddHostedService<Worker>();
        });

Future Work

In upcoming previews we plan to improve the experience of using Workers with Windows Services by:

  1. Rename UseWindowsServiceBaseLifetime to UseWindowsService
  2. Add automatic and improved integration with the Event Log when running as a Windows Service.

Conclusion

We hope you try out this new template and want you to let us know how it goes, you can file any bugs or suggestions here: https://github.com/aspnet/AspNetCore/issues/new/choose

The post .NET Core Workers as Windows Services appeared first on ASP.NET Blog.

Top Stories from the Microsoft DevOps Community – 2019.03.29

$
0
0

One of the embarrassing things that can happen to you when you travel a lot is that you start to forget what day of the week it is. When you fly out on a Sunday, spend some time in one place, then hop on another flight and work in a totally different place, you run the risk of not fully internalizing what day of the week it is.

I mention this because regular readers will have noticed that there were no Top Stories last week. It seems that in my travel-addled mind, I woke up on Saturday thinking that it was Friday. So when I was getting ready to write about the week’s top stories, their time had already past. On the plus side, that makes this week’s list of stories all the better. Enjoy!

YAML Build in Azure DevOps
Ricci Gian Maria takes another look at the YAML build functionality in Azure Pipelines; as a long-time user of Azure DevOps, he wasn’t ready to adopt YAML when it was in preview. But after taking another look, he’s ready to recommend it. 🎉

Scripts for Azure Pipelines Agent Deployment
The hosted build agents that we provide do a great job for most use cases, but sometimes you need to run your own private build agent. And if you do, Rasťo Novotný has great step-by-step instructions and helpful scripts for provisioning your build agent.

CI/CD through Azure DevOps
Getting started with continuous integration and continuous delivery of your web application can seem daunting the first time you do it. Never fear, Chinmay Dey has an introduction that takes you soup-to-nuts through the setup, from creating an Azure DevOps organization to deploying your web app to Azure.

Configuring Docker with Env Files Written from Azure DevOps Variables
Sometimes we have the data we need but not in the format that we need it in. Patrick McVeety-Mill came up with a clever method to take Azure Pipelines build variables and transform them into an environment variable file suitable for using with docker.

Did you know? Changing default and comparison branch in Git from Azure DevOps
I’ve been working on Azure DevOps for 15 years(!) and I still learn new things every day. Today, Matteo Emili taught me that you can change your default branch for comparing Git branches independently of the default branch for pull requests. 🤯

As always, if you’ve written an article about Azure DevOps or find some great content about DevOps on Azure then let me know! I’m @ethomson on Twitter.

The post Top Stories from the Microsoft DevOps Community – 2019.03.29 appeared first on Azure DevOps Blog.

Displaying your realtime Blood Glucose from NightScout on an AdaFruit PyPortal

$
0
0

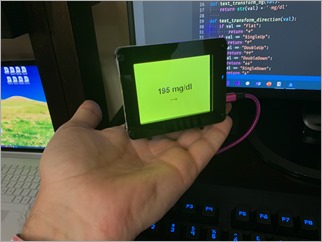
file-2AdaFruit makes an adorable tiny little Circuit Python IoT device called the PyPortal that's just about perfect for the kids - and me. It a little dakBoard, if you will - a tiny totally programmable display with Wi-Fi and  lots of possibilities and sensors. Even better, you can just plug it in over USB and edit the code.py file directly on the drive that will appear. When you save code.py the device soft reboots and runs your code.

I've been using Visual Studio Code to program Circuit Python and it's become my most favorite IoT experience so far because it's just so easy. The "Developer's Inner Loop" of code, deploy, debug is so fast.

As you may know, I use a Dexcom CGM (Continuous Glucose Meter) to manage my Type 1 Diabetes. I feed the data every 5 minutes into an instance of the Nightscout Open Source software hosted in Azure. That gives me a REST API to my own body.

I use that REST API to make "glanceable displays" where I - or my family - can see my blood sugar quickly and easily.

I put my blood sugar in places like:

And today, on a tiny PyPortal device. The code is simple, noting that I don't speak Python, so Pull Requests are always appreciated.

import time

import board
from adafruit_pyportal import PyPortal

# Set up where we'll be fetching data from
DATA_SOURCE = "https://NIGHTSCOUTWEBSITE/api/v1/entries.json?count=1"
BG_VALUE = [0, 'sgv']
BG_DIRECTION = [0, 'direction']

RED = 0xFF0000;
ORANGE = 0xFFA500;
YELLOW = 0xFFFF00;
GREEN = 0x00FF00;

def get_bg_color(val):
if val > 200:
return RED
elif val > 150:
return YELLOW
elif val < 60:
return RED
elif val < 80:
return ORANGE
return GREEN

def text_transform_bg(val):
return str(val) + ' mg/dl'

def text_transform_direction(val):
if val == "Flat":
return "→"
if val == "SingleUp":
return "↑"
if val == "DoubleUp":
return "↑↑"
if val == "DoubleDown":
return "↓↓"
if val == "SingleDown":
return "↓"
if val == "FortyFiveDown":
return "→↓"
if val == "FortyFiveUp":
return "→↑"
return val

# the current working directory (where this file is)
cwd = ("/"+__file__).rsplit('/', 1)[0]
pyportal = PyPortal(url=DATA_SOURCE,
json_path=(BG_VALUE, BG_DIRECTION),
status_neopixel=board.NEOPIXEL,
default_bg=0xFFFFFF,
text_font=cwd+"/fonts/Arial-Bold-24-Complete.bdf",
text_position=((90, 120), # VALUE location
(140, 160)), # DIRECTION location
text_color=(0x000000, # sugar text color
0x000000), # direction text color
text_wrap=(35, # characters to wrap for sugar
0), # no wrap for direction
text_maxlen=(180, 30), # max text size for sugar & direction
text_transform=(text_transform_bg,text_transform_direction),
)

# speed up projects with lots of text by preloading the font!
pyportal.preload_font(b'mg/dl012345789');
pyportal.preload_font((0x2191, 0x2192, 0x2193))
#pyportal.preload_font()

while True:
try:
value = pyportal.fetch()
pyportal.set_background(get_bg_color(value[0]))
print("Response is", value)
except RuntimeError as e:
print("Some error occured, retrying! -", e)
time.sleep(180)

I've put the code up at https://github.com/shanselman/NightscoutPyPortal. I want to get (make a custom?) a larger BDF (Bitmap Font) that is about twice the size AND includes 45 degree arrows ↗ and ↘ as the font I have is just 24 point and only includes arrows at 90 degrees. Still, great fun and took just an hour!

NOTE: I used the Chortkeh BDF Font viewer to look at the Bitmap Fonts on Windows. I still need to find a larger 48+ PT Arial.

What information would YOU display on a PyPortal?


Sponsor: Manage GitHub Pull Requests right from the IDE with the latest JetBrains Rider. An integrated performance profiler on Windows comes to the rescue as well.


© 2018 Scott Hanselman. All rights reserved.
     

Azure.Source – Volume 76

$
0
0

Hybrid strategy | Preview | Generally available | News & updates | Technical content | Azure shows | Events | Customers, partners, and industries

Build a Successful Hybrid Strategy

Do you have workloads in the cloud & on-premises? Then you know how important it is to have a comprehensive hybrid design and implementation plan. To help you approach hybrid cloud even more effectively, Microsoft announced two new hybrid cloud services: Azure Stack HCI Solutions and Azure Data Box Edge. Whether you need a single or multi-cloud, or are looking to bring intelligent edge computing to your business, you need a consistent and secure environment, no matter where your data resides.

Enabling customers’ hybrid strategy with new Microsoft innovation

The ability for customers to embrace both public cloud and local datacenter, plus edge capability, is enabling customers to improve their IT agility and maximize efficiency. The benefit of a hybrid approach is also what continues to bring customers to Azure, the one cloud that has been uniquely built for hybrid. We haven’t slowed our investment in enabling a hybrid strategy, particularly as this evolves into the new application pattern of using intelligent cloud and intelligent edge. We are continuing to expand Azure Stack offerings to meet a broader set of customer needs, so they can run virtualized applications in their own datacenter. Join the on-demand hybrid cloud virtual event.

Announcing Azure Stack HCI: A new member of the Azure Stack family

Announcing Azure Stack HCI solutions are now available for customers who want to run virtualized applications on modern hyperconverged infrastructure (HCI) to lower costs and improve performance. Azure Stack HCI solutions feature the same software-defined compute, storage, and networking software as Azure Stack, and can integrate with Azure for hybrid capabilities such as cloud-based backup, site recovery, monitoring, and more. Azure Stack HCI solutions are designed to run virtualized applications on-premises in a familiar way, with simplified access to Azure for hybrid cloud scenarios. A great hybrid cloud strategy is one that meets you where you are, delivering cloud benefits to all workloads wherever they reside.

Thumbnail from Build your hybrid strategy with Azure Stack and Azure Stack HCI

Accelerated AI with Azure Machine Learning service on Azure Data Box Edge

Announcing the preview of Azure Machine Learning hardware accelerated models powered by Project Brainwave on Data Box Edge. This preview enhances Azure Machine Learning service by enabling you to train a TensorFlow model for image classification scenarios, containerize the model in a Docker container, and then deploy the container to a Data Box Edge device with Azure IoT Hub. Applying machine learning models to the data on Data Box Edge provides lower latency and savings on bandwidth costs, while enabling real-time insights and speed to action for critical business decisions.

Azure Data Box family meets customers at the edge

Announcing the general availability of Azure Data Box Edge and the Azure Data Box Gateway. Data Box Edge is an on-premises anchor point for Azure and can be racked alongside your existing enterprise hardware or live in non-traditional environments from factory floors to retail aisles. Data Box Edge comes with a built-in storage gateway. If you don’t need the Data Box Edge hardware or edge compute, then the Data Box Gateway is also available as a standalone virtual appliance that can be deployed anywhere within your infrastructure. You can get these products today in the Azure portal.

Now in preview

New updates to Azure AI expand AI capabilities for developers

Continuing our quest to make Azure the best place to build AI, we have introduced a preview of the new Anomaly Detector Service which uses AI to identify problems so companies can minimize loss and customer impact. We have also announced the general availability of Custom Vision to more accurately identify objects in images. From using speech recognition, translation, and text-to-speech to image and object detection, Azure Cognitive Services makes it easy for developers to add intelligent capabilities to their applications in any scenario.

Screenshot of the Custom Vision platform, where you can train the model to detect unique objects in an image, such as your brand’s logo.

People Recognition Enhancements - Video Indexer

Announcing Video Indexer enhancements that makes custom Person model training and management faster and easier. Enhancements include a centralized custom Person Model Management page for creating multiple models in your account; giving you the ability to train your account to identify people based on images of people’s faces even before you upload any video. Video Indexer now also supports up to 50 Persons Models per account, where each of the models supports up to 1 million different people. The new Video Indexer features are now in public preview.

Azure Search – New Storage Optimized service tiers available in preview

Announcing the preview of two new service tiers for Storage Optimized workloads in Azure Search. Azure Search is an AI-powered cloud search service for modern mobile and web app development. Azure Search is the only cloud search service with built-in artificial intelligence (AI) capabilities that enrich all types of information to easily identify and explore relevant content at scale. With Azure Search, you spend more time innovating on your websites and applications, and less time maintaining a complex search solution.

Announcing the public preview of Data Discovery & Classification for Azure SQL Data Warehouse

Announcing the public preview of Data Discovery & Classification for Azure SQL Data Warehouse, an additional capability for managing security for sensitive data. Data Discovery & Classification alleviates the pain-point of protecting sensitive data from becoming unmanageable to discover, classify, and protect as your data assets grow. Azure SQL Data Warehouse is a fast, flexible, and secure cloud data warehouse tuned for running complex queries fast and across petabytes of data.

Also available in preview

Now generally available

Larger, more powerful Managed Disks for Azure Virtual Machines

Announcing the general availability of larger and more powerful Azure Managed Disk sizes of up to 32 TiB on Premium SSD, Standard SSD, and Standard HDD disk offerings. In addition, we support disk sizes up to 64 TiB on Ultra Disks in preview. We are also increasing the performance scale targets for Premium SSD to 20,000 IOPS and 900 MB/sec. With the general availability (GA) of larger disk sizes, Azure now offers a broad range of disk sizes for your production workload needs, with unmatched scale and performance. Our next step is to enable the preview of Azure Backup for larger disk sizes providing you full coverage for enterprise backup scenarios by the end of May 2019. Similarly, Azure Site Recovery support for on-premises to Azure, and Azure to Azure Disaster Recovery will be extended to all disk sizes soon.

Azure Premium Block Blob Storage is now generally available

Announce general availability of Azure Premium Blob Storage. Premium Blob Storage is a new performance tier in Azure Blob Storage for block blobs and append blobs; complimenting the existing Hot, Cool, and Archive access tiers. Premium Blob Storage is ideal for workloads that require very fast response times and/or high transactions rates, such as IoT, Telemetry, AI, and scenarios with humans in the loop such as interactive video editing, web content, online transactions, and more. Premium Blob Storage is available with Locally-Redundant Storage (LRS) and comes with High-Throughput Block Blobs (HTBB), which provides very high and instantaneous write throughput when ingesting block blobs larger than 256KB. Premium Blob Storage is initially available in US East, US East 2, US Central, US West, US West 2, North Europe, West Europe, Japan East, Australia East, Korea Central, and Southeast Asia regions with more regions to come.

Chart showing Latency comparison of Premium and Standard Blob Storage (Average: 10x less, 99th percentile: 40x less)

Azure Blob Storage lifecycle management generally available

Announcing the general availability of Blob Storage Lifecycle Management to automate blob tiering and retention with custom defined rules. Azure Blob Storage Lifecycle Management offers a rich, rule-based policy which you can use to transition your data to the best access tier and to expire data at the end of its lifecycle. This feature is available in all Azure public regions.

Azure Storage support for Azure Active Directory based access control generally available

Announcing the general availability of Azure Active Directory (AD) based access control for Azure Storage Blobs and Queues. Enterprises can now grant specific data access permissions to users and service identities from their Azure AD tenant using Azure’s Role-based access control (RBAC).  Administrators can then track individual user and service access to data using Storage Analytics logs. Storage accounts can be configured to be more secure by removing the need for most users to have access to powerful storage account access keys.

Blob storage interface on Data Box is now generally available

Announcing the general availability of a blob storage interface on Data Box. The blob storage interface allows you to copy data into the Data Box via REST and makes the Data Box appear like an Azure storage account. Applications that write to Azure blob storage can be configured to work with the Azure Data Box. With this capability, partners like Veeam, Rubrik, and DefendX are now able to use the Data Box to assist customers moving data to Azure.

Also generally available

News and updates

Clean up files by built-in delete activity in Azure Data Factory

Azure Data Factory (ADF) is a fully-managed data integration service in Azure that allows you to iteratively build, orchestrate, and monitor your Extract Transform Load (ETL) workflows. You must periodically clean up files from the on-premises or the cloud storage server when the files become out of date. The ADF built-in delete activity, which can be part of your ETL workflow, deletes undesired files without writing code. You can use ADF to delete folder or files from Azure Blob Storage, Azure Data Lake Storage Gen1, Azure Data Lake Storage Gen2, File System, FTP Server, sFTP Server, and Amazon S3.

What’s new in Azure IoT Central – March 2019

This post recaps the new features now available in Azure IoT Central; including embedded Microsoft Flow, updates to the Azure IoT Central connector, Azure Monitor action groups, multiple dashboards, localization support, and highlights the recently expanded Jobs functionality. With these new features, you can more conveniently build workflows as actions and reuse groups of actions, organize your visualizations across multiple dashboards, and work with IoT Central with your favorite language.

Screenshot showing Microsoft Flow is now embedded in IoT Central

Incrementally copy new files by LastModifiedDate with Azure Data Factory

Azure Data Factory (ADF) is the fully-managed data integration service for analytics workloads in Azure. Using ADF, users can load the lake from 80 plus data sources on-premises and in the cloud, use a rich set of transform activities to prep, cleanse, and process the data using Azure analytics engines, while also landing the curated data into a data warehouse for getting innovative analytics and insights. Now, ADF provides a new capability for you to incrementally copy new or changed files only by LastModifiedDate from a file-based store. The feature is available when loading data from Azure Blob Storage, Azure Data Lake Storage Gen1, Azure Data Lake Storage Gen2, Amazon S3, File System, SFTP, and HDFS.

High-Throughput with Azure Blob Storage

Announcing that High-Throughput Block Blob (HTBB) is globally enabled in Azure Blob Storage. HTBB provides significantly improved and instantaneous write-throughput when ingesting larger block blobs, up to the storage account limits for a single blob. We have also removed the guesswork in naming your objects, enabling you to focus on building the most scalable applications. High-Throughput Block Blob is now available in all Azure regions and is automatically active on your existing storage accounts at no extra cost.

Additional news and updates

Technical content

Building serverless microservices in Azure - sample architecture

Distributed applications take full advantage of living in the cloud to run globally, avoid bottlenecks, and always be available for users worldwide. Most cloud native applications use a microservices architecture to maximize the wide range of managed services for managing infrastructure, scaling, and improving critical processes like deployment or monitoring. This post focuses on how building serverless microservices is a great fit for event-driven scenarios, and how you can use the Azure Serverless platform.

Microservices benefits slide including independent modules, isolated points of failure, autonomous scalability, tech flexibility, and faster value delivery.

Analysis of network connection data with Azure Monitor for virtual machines

Azure Monitor for virtual machines (VMs) collects network connection data that you can use to analyze the dependencies and network traffic of your VMs. Analyze the number of live and failed connections, bytes sent and received, and the connection dependencies of your VMs down to the process level. Get started with log queries in Azure Monitor for VMs.

Resource governance in Azure SQL Database

When you choose a specific Azure SQL Database service tier, you are selecting a pre-defined set of allocated resources across several dimensions such as CPU, storage type, storage limit, memory, and more. Ideally, you select a service tier that meets the workload demands of your application. With each service tier selection, you are also inherently selecting a set of resource usage boundaries & limits. Learn how to use governance to help set a balanced set of allocated resources.

How to run Ghost blogging software on Azure in a Linux Docker Container

In this post, Jessica details the steps needed for running a Ghost blog in a Docker container on Azure.

Get an official service issue root cause analysis with Azure Service Health

Azure Service Health helps you stay informed and take action when Azure service issues like incidents and planned maintenance affect you by providing a personalized health dashboard, customizable alerts, and expert guidance. Learn to use Azure Service Health’s health history to review past health issues and get official root cause analyses (RCAs) to share with your internal and external stakeholders.

AKS Networking Policies

This blog post looks at securing traffic between pods in Azure Kubernetes Service. It outlines the basics of a demo that demonstrates the process using the Cloud Shell.

How to access Azure Linux virtual machines with Azure Active Directory

In this blog post, Neil Paterson walks through the basic configuration steps for accessing Azure Linux virtual machines using Azure AD credentials.

MSDEV podcast: The MXChip with Suz Hinton

The popular podcast MSDev is joined by Suz Hinton to discuss the MXChip Microcontroller board. Folks learned what it was, why you would use it, and some other technical learnings around hardware and Azure IoT in general.

Serverless — from the beginning, using Azure Functions (Azure portal), Part I

Part 1 in this series covers the essentials of Serverless computing in the cloud. It defines the term and explains how to get started with Azure Functions in the Azure Portal. This is the first part of five. In this part Chris also looks at Function apps, triggers and bindings, and the practical approaches needed to use Serverless within your apps.

Deploying Deep Learning models using Kubeflow on Azure

In this blog post, we will be looking into two machine learning toolkits Azure Machine Learning service (AML) and Kubeflow to compare the two approaches for a computer vision scenario where one would like to deploy a trained deep learning model for image classification. We hope this will help data scientists make a more informed decision for their next deployment problem.

Azure Stack IaaS – part six

A fundamental quality of a cloud is that it provides an elastic pool for your resource to use when needed. Since you only pay for what you use, you don’t need to over provision. Instead, you can optimize capacity based on demand. See some of the ways you can do this for your IaaS VMs running in Azure and Azure Stack. Azure and Azure Stack makes it easy for you to resize, scale out, add and remove your VM from the portal.

Additional technical content

Azure shows

Episode 272 - The New Azure Monitor | The Azure Podcast

Shankar Sivadasan, a Senior Azure Product Marketing Manager, gives us all the details on how the trusty Azure Monitor service has evolved into the main monitoring solution in Azure.


Read the transcript

Deploy to Azure using GitHub Actions | Azure Friday

Gopi joins Donavan to discuss how to deploy to Azure using GitHub Actions, which helps you to configure CI/CD from the GitHub UI.

Using GitHub Actions to Deploy to Azure | The DevOps Lab

Damian sits down with Product Manager Gopinath Chigakkagari to talk about deploying to Azure using GitHub Actions. In this episode, Gopi walks through a deployment process inside GitHub Actions to deploy a containerized application to Azure on a new push to a repository. Along the way, he'll also show some of the features and advantages of GitHub Actions itself.

Azure IoT Certification Service | Internet of Things Show

Azure IoT Certification Service can streamline your IoT device certification processes and reduce validation processes for device manufacturers.

Five Ways You Can Build Mobile Apps with JavaScript | Five Things

Why are there so many options for developing mobile apps? What should you choose? How can you slipstream your way into mobile and take advantage of the cloud? Todd Anglin has all the answers and wears some snazzy clothing, in this episode of Five Things.

Investigating Production Issues with Azure Monitor and Snapshot Debugger | On .NET

In this episode, Isaac Levin joins us to share how the developer exception resolution experience can be better with Azure Monitor and Snapshot Debugger. The discussion talks about what Azure Monitor is and an introduction to Snapshot Debugger, and quickly goes into demos showcasing what developers can do with Snapshot Debugger.

Using Ethereum Logic Apps to push ledger data into to a MySQL or PostgreSQL database | Block Talk

In this episode we show how to use the Ethereum Logic App connector to integrate a ledger with common backend systems like popular open-source databases, MySQL and PostgreSQL.

How to add Azure Alerts as push notifications on your phone | Azure Portal Series

The Azure mobile app allows you to receive Azure Alerts as push notifications on your mobile device. In this video of the Azure Portal “How To” Series, learn how you can setup Azure Alerts such as metric alerts, log analytics, Application Insights, and Activity Log from Azure Monitor on the Azure portal.

Thumbnail from How to add Azure Alerts as push notifications on your phone

How to use Azure Automation with PowerShell | Azure Tips and Tricks

In this edition of Azure Tips and Tricks, learn how to use Azure Automation with a Windows Machine with PowerShell. Azure Automation makes it easy to do common tasks like, scaling Azure SQL Database up and down and starting and stopping a virtual machine.

Thumbnail from How to use Azure Automation with PowerShell

Matt Mitrik on GitHub with Azure Boards | Azure DevOps Podcast

Jeffrey Palermo and Matt Mitrik discuss GitHub with Azure Boards. They talk about the level of integration that’s going to be in Azure Boards (how they’re thinking about things right now and where they want to go), their efforts towards new project workflow and integration for Azure Boards, and the timeline Matt’s team is looking at for these changes. Matt also gives his pitch for GitHub as the future premiere offering and why you should consider migrating.

Episode 4 - Azure Enthusiast: Kevin Boland | AzureABILITY

AzureABILITY host Louis Berman talks Azure with Bentley Systems' Kevin Boland—an Enterprise Cloud Architect who manages one of the largest and most complex set of Azure deployments on the planet.


Read the transcript

Additional Azure shows & videos

Events

Hannover Messe 2019: Azure IoT Platform updates power new, highly-secured Industrial IoT Scenarios

Hannover Messe 2019 is taking place this week (01-05 April) in Hannover, Germany and Azure is there. Manufacturing continues to be one of the leading industries adopting IoT for a growing set of scenarios to improve safety, efficiency, and reliability for people and devices. We’ve made several significant additions to our IoT platform to address these needs; including the launch of Azure Digital Twins and Azure Sphere, and the general availability of Azure IoT Central and Azure IoT Edge. Introducing a set of new product capabilities and programs that make it easier for our customers to build enterprise-grade industrial IoT solutions with open standards, while ensuring security and innovation protection across cloud boundaries.

Customers, partners, and industries

Azure Sphere ecosystem accelerates innovation

How can device builders bring a high level of security to the billions of network-connected devices expected to be deployed in the next decade? It starts with building security into your IoT solution from the silicon up. In this post, you learn about the holistic device security of Azure Sphere and how the expansion of the Azure Sphere ecosystem is helping to accelerate the process of taking secure solutions to market.

Why IoT is not a technology solution—it's a business play

To help you plan your IoT journey, we’re rolling out a four-part blog series. In the upcoming posts, we’ll cover how to create an IoT business case, overcome capability gaps, and simplify execution; all advice to help you maximize your gains with IoT. In this first post, explore the mindset it takes to build IoT into your business model.

Umanis lifts the hood on their AI implementation methodology

Umanis, a systems integrator and preferred AI training partner based in France, has been innovating in Big Data and Analytics in numerous verticals for more than 25 years and has developed an effective methodology for guiding customers into the Intelligent Cloud. Umanis has found it to be a robust way of rolling out end-to-end data and AI projects while minimizing friction and risk. By using this approach to present a Data & AI project to both customers and internal teams, everyone can get a good feeling of what activities, technologies, and challenges are involved.

Illustration of the iterative methodology Umanis follows: Assimilate, Learn, and Act

Azure Marketplace new offers – Volume 34

The Azure Marketplace is the premier destination for all your software needs – certified and optimized to run on Azure. Find, try, purchase, and provision applications & services from hundreds of leading software providers. You can also connect with Gold and Silver Microsoft Cloud Competency partners to help your adoption of Azure. In the second half of February we published 50 new offers.


Azure Windows Virtual Desktop in public preview and a big win for Cosmos DB | A Cloud Guru - Azure This Week

This time on Azure This Week, Lars covers Windows Virtual Desktop in public preview, Azure Cosmos DB gets another big win, and Microsoft and NVIDIA extend video analytics to the intelligent edge.

Thumbnail from Azure Windows Virtual Desktop in public preview and a big win for Cosmos DB

Step up your machine learning process with Azure Machine Learning service

$
0
0

Step up your machine learning process with Azure Machine Learning service

Everyone’s talking about machine learning (ML). Business decision makers are finding ways to deploy machine learning in their organizations. Data scientists are keeping up with all the advancements, tools, and frameworks available. Media outlets are reporting on awe-inspiring breakthroughs in the artificial intelligence revolution.

We believe the way forward lies in democratizing artificial intelligence and machine learning by proxy. This means making machine learning services available to singular data scientists and developers, small to medium sized businesses, and global organizations–all with the ability to scale their models up and out.

This means offering automated and prebuilt algorithms, as well as the ability to create highly customized models. It also means ensuring they are compatible with open source frameworks.

The challenges of machine learning

As you likely already know, machine learning is a data science technique that allows computers to use existing data to forecast future behaviors, outcomes, and trends. But the promises of machine learning come with challenges. Here are just a few:

  • There is a lot of manual math, data analysis, programming, training, and experimentation.
  • There are multiple ways to solve every problem.
  • Challenges arise in monitoring and evaluating the precision, accuracy, and efficacy of a given model.
  • Data scientists struggle to find the right development tools, debugging tools, and educational resources.

Azure Machine Learning service

The Azure Machine Learning service provides a cloud-based service you can use to develop, train, test, deploy, manage, and track machine learning models. With Automated Machine Learning and other advancements available, training and deploying machine learning models is easier and more approachable than ever.

Below are three of the key pillars of Azure Machine Learning service that give us an edge. I’ll be going into greater detail about each of these pillars in subsequent blogs, so stay tuned!

These three pillars apply largely to automated machine learning, also provided under Azure Machine Learning service. Automated machine learning helps users of all skill levels accelerate their pipelines, leverage open source frameworks, and scale easily. Automated machine learning, a form of deep machine learning, makes machine learning more accessible across an organization.

1. End-to-end ML lifecycle management

There’s a lot that goes into the machine learning lifecycle. Data preparation, experimentation, model training, model management, deployment, and monitoring traditionally require time and manual effort. Azure Machine Learning service seamlessly integrates with Azure services to provide end-to-end capabilities for the entire machine learning lifecycle, making it simpler and faster than ever. With Azure Machine Learning Service, you can:

  • Create multiple or common workspaces to collaborate easily across teams.
  • Centralize management of all model artifacts.
  • Schedule runs in parallel.
  • Manage scripts and data separately.
  • Ensure ease of support and maintenance with CI/CD while driving quality over time and preventing model drift.
  • Easily track your experiments and version your models.
  • Manage and monitor your models directly in the Azure portal.

2. Power productivity and ease-of-use with an open platform

Data scientists and developers are empowered to easily build and train highly accurate machine learning and even deep-learning models through the frameworks and tools that they’re familiar with. You can now bring machine learning models to market faster with flexible open tools. With Azure Machine Learning, you can:

  • Use your favorite open source frameworks.
  • Use a familiar and rich set of tools, such as Jupyter Notebooks, with the Python extension for Visual Studio Code.
  • Reduce friction and refocus on building models.
  • Easily leverage the multi-cloud interoperability with built-in ONNX support.

3. Scale up and out to the cloud or edge easily

Previously, machine learning requires powerful compute capabilities in order to train models quickly. With hardware acceleration (GPUs, containers, etc.), scaling up or out is much easier. With Azure Machine Learning, you can:

  • Use any data and deploy models anywhere.
  • Scale out training from your local laptop or workstation to the cloud with compute on-demand.
  • Get GPU and deep learning framework support.
  • Distribute training for faster results by running models over a cluster of GPU-equipped computers in tandem.
  • Feel confident in enterprise-grade security, audit, and compliance.
  • Have reliable model deployment across cloud and edge.
  • Get cost effective inferencing with batch prediction and scoring.
  • Consume real-time scoring for targeted outcomes.

As you can see, Azure Machine Learning service provides an effective solution to a number of top concerns for individuals and organizations seeking to deploy machine learning models and are making an effort to advance machine learning for everyone’s benefit. Look out for more upcoming blogs in this series, where we will cover each of these three pillars in more detail.

Learn more

Learn more about the Azure Machine Learning service.

Get started with a free trial of Azure Machine Learning service.

Enabling precision medicine with integrated genomic and clinical data

$
0
0

Precision medicine tailors a patient's medical treatment by factoring in their genetic makeup and clinical data. The key to applying this methodology is integrating clinical data with an individual’s genomic data for the most complete longitudinal healthcare record to power the most precise and effective treatment.

Problem: data in silos, detached from the point of care

Currently, clinical information resides in silos (elecftronic healthcare records, radiological information systems, laboratory information systems, and picture archiving and communication systems), with little to no integration or interoperability between them. Furthermore, there is not just one genome for a patient, but multiple “omes” including the genome, proteome, transcriptome, epigenome, and microbiome and beyond. The lack of availability of a complete, integrated longitudinal patient record incorporating multiomics to power precision medicine has several detrimental effects. First and foremost, it results in less effective medicine, and suboptimal patient outcomes. It can also delay diagnoses where data required to support a clinical decision is not readily available. Working with an incomplete medical record can increase the risk of errors. Last but not least, this can exacerbate the lack of coordination across multidisciplinary care teams, resulting in suboptimal patient care and increased healthcare costs. For precision medicine, this presents a significant challenge around how to integrate clinical data systems and clinical genomic data. The cumulative result is the reduced feasibility of providing precision medicine at the point of care.

The solution: seamless connection of clinical data with genomic data

Kanteron Systems Platform is a patient-centric, workflow-aware, precision medicine solution. The solution integrates many key types of healthcare data for a complete patient longitudinal record to power precision medicine including medical imaging, digital pathology, clinical genomics, and pharmacogenomic data.

The figure below shows key data layers of the Kanteron Platform:

Layered representation of clinical data available through the Kanteron System including pharmacogenomics, clinical genomics, digital pathology, biosensors, medical imaging.

Benefits

The solution provides several key benefits to help fulfill the potential of precision medicine. First, it provides a clinical content management system across the full range of data types comprising the patient record. With the cost of full genomic sequencing now dipping below the $1,000 USD mark, a tsunami of genomic data is expected. Each genome record can take up to 150 GB or more of storage. The Kanteron Platform provides support for managing this massive growth in genomic data and paves the way for genomic sequencing at scale. Through the integration of data and support for multiomics, this solution can also be used to enable pharmacogenomics, in turn helping to increase medication efficacy and reduce adverse events. Artificial intelligence and machine learning are most powerful when applied to the full patient record, across the range of data types comprising this record. Through integration of key data types, the Kanteron Platform enables healthcare organizations to realize the full potential of artificial intelligence to improve patient outcomes and reduce healthcare costs.

Azure services that make a difference

Azure offers Kanteron’s customers a level of flexibility, scalability, security, and compliance that is not possible with on-premises installations. Azure is also available across 54 regions and 140 countries worldwide, and just expanded into South Africa, enabling healthcare organizations to deploy where required and satisfy any applicable data sovereignty requirements. Azure supports a vast range of compliance requirements as seen in the Compliance offerings. We now have 91 certifications and attestations. Key Azure services used to support the Kanteron Platform include both Azure Storage, and Virtual Machines.

Recommended Next steps

Explore how the Kanteron Systems Platform can power your precision medicine practice to the next level through integration of genomic and clinical data, and support for advanced artificial intelligence.

Schema validation with Event Hubs

$
0
0

Event Hubs is fully managed, real-time ingestion Azure service. It integrates seamlessly with other Azure services. It also allows Apache Kafka clients and applications to talk to Event Hubs without any code changes.

Apache Avro is a binary serialization format. It relies on schemas (defined in JSON format) that define what fields are present and their type. Since it's a binary format, you can produce and consume Avro messages to and from the Event Hubs.

Event Hubs' focus is on the data pipeline. It doesn't validate the schema of the Avro events.

If it's expected that the producer and consumers will not be in sync with the event schemas, there needs to be "source of truth" for the schema tracking, both for producers and consumers.

Confluent has a product for this. It's called Schema Registry. Schema Registry is part of the Confluent’s open source offering.

Schema Registry can store schemas, list schemas, list all the versions of a given schema, retrieve a certain version of a schema, get the latest version of a schema, and it can do schema validation. It has a UI and you can manage schemas via its REST APIs as well.

image

What are my options on Azure for the Schema Registry?

  1. You can install and manage your own Apache Kafka cluster (IaaS)
  2. You can install Confluent Enterprise from the Azure Marketplace.
  3. You can use the HDInsight to launch a Kafka Cluster with the Schema Registry.
    I've put together an ARM template for this. Please see the GitHub repo for the HDInsight Kafka cluster with Confluent’s Schema Registry.
  4. Currently, Event Hubs store only the data, events. All metadata for the schemas doesn’t get stored. For the schema metadata storage, along with the Schema Registry, you can install a small Kafka cluster on Azure.
    Please see the following GitHub post on how to configure the Schema Registry to work with the Event Hubs.
  5. On a future release, Event Hubs, along with the events, will be able to store the metadata of the schemas. At that time, just having a Schema Registry on a VM will suffice. There will be no need to have a small Kafka cluster.

Other than the Schema Registry, are the any alternative ways of doing the schema validation for the events?

Yes, we can utilize Event Capture feature of the Event Hubs for the schema validation.

While we are capturing the message on a Azure Blob storage or a Azure Data Lake store, we can trigger an Azure Function via a Capture Event. This Function then can custom validate the received message's schema by leveraging the Avro Tools/libraries.

Please see the following for capturing events through Azure Event Hubs into Azure Blob Storage or Azure Data Lake Storage and/or see how to use Event Grid and Azure Functions for migrating Event Hubs data into a data warehouse.

We can also write Spark job(s) that consumes the events from the Event Hubs and validates the Avro messages by the custom schema validation Spark code with the help of org.apache.avro.* and kafka.serializer.* Java packages per say. Please look at this tutorial on how to stream data into Azure Databricks using Event Hubs.

Conclusion

Microsoft Azure is a comprehensive cloud computing service that allows you both the control of IaaS and the higher-level services of PaaS.

After the assessment of the project, if the schema validation is required, one can use Event Hubs PaaS service with a single Schema Registry VM instance, or can leverage the Event Hubs Capture Event feature for the schema validations.

The future of manufacturing is open

$
0
0

With the expansion of IoT across all industries data is becoming the currency of innovation. Organizations have both an opportunity and a business imperative to adopt technologies quickly, build digital competencies, and offer new value-added services that will serve their broader ecosystem.

Manufacturing is an industry where IoT is having a transformational impact, yet which also requires many companies to come together for IoT to be effective. We see several challenges that slow down innovation in manufacturing, such as proprietary data structures from legacy industrial assets and closed industrial solutions. These closed structures foster data silos and limit productivity, hindering production and profitability. It takes more than new software to drive transformation—it takes a new approach to open standards, an ecosystem mindset, the ability to break out of the “walled garden” for data as well as new technology.

This is why Microsoft has invested heavily in making Azure work seamlessly with OPC UA. In fact, we are the leading contributor of open source software to the OPC Foundation. To further this open platform approach, we have collaborated with world-leading manufacturers to accelerate innovation in industrial IoT to shorten time to value. But we feel we need to do more, not just directly between Microsoft and our partners but across the industry and between the partners themselves. It’s not about what any one company can deliver within their operations – it’s about what they can share with others across the sector to help everyone achieve at new levels. It’s clearly a much bigger task than any one organization can take on, and today, I’m pleased to share more about the investments we are making to advance innovation in the manufacturing space by enabling open platforms.

Announcing the Open Manufacturing Platform

Today at Hannover Messe 2019, we are launching the Open Manufacturing Platform (OMP) together with the BMW Group, our partner on this initiative. Built on the Microsoft Azure Industrial IoT cloud platform, the OMP will provide a reference architecture and open data model framework for community members who will both contribute to and learn from others around industrial IoT projects. We’ve set up an initial approach and are actively working to bring new community members on board. BMW has an initial use case focused on their IoT platform, built on Microsoft Azure, in the second generation of autonomous transport systems in one of their sites, greatly simplifying their logistics processes and creating greater efficiency. More information about this and the partnership can be found here.

The OMP provides a single open platform architecture that liberates data from legacy industrial assets, standardizes data models for more efficient data correlation, and most importantly, enables manufacturers to share their data with ecosystem partners in a controlled and secure way, allowing others to benefit from their insights. With pre-built industrial use cases and reference designs, community members will work together to address common industrial challenges while maintaining ownership over their own data. Our news release, shared jointly with the BMW Group this morning, can be found here.

A rising tide that lifts all boats

The recognition of the need for an open approach is taking hold across the industry, as evidenced by SAP’s announcement today of the Open Industry 4.0 Alliance. This alliance – focused on factories, plants and warehouses – between SAP and a number of European manufacturing leaders will help create an open ecosystem for the operation of highly automated factories.

OMP and the Open Industry 4.0 Alliance are complementary visions. Both recognize the need for an open platform for the cloud and intelligent edge on the ground in the factory. Both highlight an open data model and standards-based data exchange mechanisms that allow for cross-company collaboration.

We’ve been working closely with SAP on efforts like the Open Data Initiative and across the industry on a wide range of initiatives including the Industrial Internet Consortium, the Plattform Industrie 4.0 and the OPC Foundation. We look forward to continuing this fruitful partnership and working to align OMP and the Open Industry 4.0 Alliance. Collaboration is the lifeblood of future manufacturing and the more we work together, the more we can accomplish.

Read more here.

Monitoring on Azure HDInsight Part 2: Cluster health and availability

$
0
0

This is the second blog post in a four-part series on Monitoring on Azure HDInsight. "Monitoring on Azure HDInsight Part 1: An Overview" discusses the three main monitoring categories: cluster health and availability, resource utilization and performance, and job status and logs. This blog covers the first of those topics, cluster health and availability, in more depth.


As a high-availability service, Azure HDInsight ensures that you can spend time focused on your workloads, not worrying about the availability of your cluster. To accomplish this, HDInsight clusters are equipped with two head nodes, two gateway nodes, and three ZooKeeper nodes, making sure there is no single point of failure for your cluster. Nevertheless, Azure HDInsight offers multiple ways to comprehensively monitor the status of your clusters’ nodes and the components that run on them. HDInsight clusters include both Apache Ambari, which provides health information at a glance and predefined alerts, as well as Azure Monitor logs integration, which allows the querying of metrics and logs as well as configurable alerts.

Apache Ambari                   

Apache Ambari, included on all HDInsight clusters, simplifies cluster management and monitoring cluster via an easy-to-use web UI and REST API. Today, Ambari is the best way to monitor the health and availability of a single HDInsight cluster in depth.

Dashboard

The Ambari dashboard contains widgets that show a handful of metrics to give you a quick overview of your HDInsight cluster’s health. These widgets show metrics such as the number of live DataNodes (worker nodes), JournalNodes (ZooKeeper nodes), NameNode (head nodes) uptime, as well as metrics specific to certain cluster types such as YARN ResourceManager uptime for Spark and Hadoop clusters.

ambari_dashboard

The Ambari Dashboard, included on all Azure HDInsight clusters.

Hosts – View individual node status

The hosts tab allows you to drill down further and view status information for individual nodes in the cluster. This offers a view showing whether there are any active alerts for the current node as well as the status/availability of each individual component running on the node.

ambari_hosts

The Ambari Hosts view shows detailed status information for individual nodes in your cluster.

Ambari alerts

Ambari also provides several configurable alerts out of the box that can provide notification of specific events. The number of currently active alerts is shown in the upper-left corner of Ambari in a red badge containing the number of alerts.

ambari_alerts

Ambari offers many predefined alerts related to availability, including:

Alert Name

Description

DataNode Health Summary

This service-level alert is triggered if there are unhealthy DataNodes.

NameNode High Availability Health

This service-level alert is triggered if either the Active NameNode or Standby NameNode are not running.

Percent JournalNodes Available

This alert is triggered if the number of down JournalNodes in the cluster is greater than the configured critical threshold. It aggregates the results of JournalNode process checks.

Percent DataNodes Available

This alert is triggered if the number of down DataNodes in the cluster is greater than the configured critical threshold. It aggregates the results of DataNode process checks.

A full list of Ambari alerts that help monitor the availability of a cluster can be found in our documentation, “Availability and reliability of Apache Hadoop cluster in HDInsight.”

The detailed view for each alert shows a description of the alert, the specific criteria or thresholds that will trigger a warning or critical alert, and the check interval for the criteria. The thresholds and check interval can be configured for individual alerts.

ambari_alerts_detail

The Ambari detailed alert view shows the description of the alert and the check interval and threshold for the alert to fire.

Email Notifications

Ambari also offers support for configuring email notifications. Ambari email notifications can be a good way to monitor alerts when managing many HDInsight clusters.

ambari_email

Configuring Ambari email notifications can be a useful way to be notified of alerts for your clusters.

Azure Monitor logs integration

Azure Monitor logs enables data generated by multiple resources such as HDInsight clusters, to be collected and aggregated in one place to achieve a unified monitoring experience.

As a prerequisite, you will need a Log Analytics Workspace to store the collected data. If you have not already created one, you can follow the instructions for creating a Log Analytics Workspace.

You can then easily configure an HDInsight cluster to send many workload-specific metrics to Log Analytics, such as YARN ResourceManager information for Spark/Hadoop clusters, broker topics, and controller metrics for Kafka clusters. You can even configure multiple HDInsight clusters to send metrics to the same Log Analytics Workspace so you can monitor all of your clusters in a single place. See how to enable Azure Monitor logs integration on your HDInsight cluster by visiting our documentation on using Azure Monitor logs to monitor HDInsight clusters.

Query metrics tables in the logs blade

Once Log Analytics Integration is enabled, which may take a few minutes, you can start querying the logs/metrics tables.

la_logs

The Logs blade in a Log Analytics workspace lets you query collected metrics and logs across many clusters.

The computer availability tab in the logs blade of your Log Analytics Workspace lists a number of sample queries related to availability, such as:

Query Name

Description

Computers availability today

Chart the number of computers sending logs, each hour.

List heartbeats

List all computer heartbeats from the last hour.

Last heartbeat of each computer

Show the last heartbeat sent by each computer.

Unavailable computers

List all known computers that didn't send a heartbeat in the last 5 hours.

Availability rate

Calculate the availability rate of each connected computer.

Azure Monitor alerts

You can also set up Azure Monitor alerts that will trigger when the value of a metric or the results of a query meet certain conditions.

You can condition on a query returning a record with a value that is greater than or less than some thresholds, or even on the number of results returned by a query. For example, you could create an alert to send an email when one or more nodes haven’t sent a heartbeat in one hour (i.e. is presumed to be unavailable). You can create multiple conditions that need to be met in order for an alert to fire.

There are several types of actions you can choose to trigger when your alert fires, such as an email, SMS, push, voice, an Azure Function, a LogicApp, a Webhook, an ITSM, or an Automation Runbook. You can set multiple actions for a single alert. Find more information about these different types of actions by visiting our documentation, “Create and manage action groups in the Azure portal.”

Finally, you can specify a severity for the alert in addition to the name. The ability to specify severity is a powerful tool that can be used when creating multiple alerts. For example, you could create one alert to raise a Warning (Sev 1) alert if a single head node becomes unavailable and another alert that raises a Critical (Sev 0) alert in the unlikely event that both head nodes go down. Alerts can be grouped by severity when viewed later.

la_alerts

Azure Monitor alerts are an extremely customizable way to receive alerts for specific events.

Next steps

While HDInsight’s redundant architecture, designed for high availability, means that a single failure will never impact the functionality of your cluster, HDInsight makes sure that you are always informed about potential availability issues so they can be mitigated early on. Between Apache Ambari with Azure Monitor logs integration, and Apache Ambari with Azure Log Analytics integration, Azure HDInight will offer comprehensive solutions for both monitoring a cluster in depth or monitoring many clusters at a glance. You can learn more and see concrete examples in our documentation, “How To Monitor Cluster Availability With Ambari and Azure Monitor Logs.”

Try HDInsight now

We hope you will take full advantage of monitoring on HDInsight and we are excited to see what you will build with Azure HDInsight. Read this developer guide and follow the quick start guide to learn more about implementing these pipelines and architectures on Azure HDInsight. Stay up-to-date on the latest Azure HDInsight news and features by following us on Twitter #AzureHDInsight and @AzureHDInsight. For questions and feedback, reach out to AskHDInsight@microsoft.com.

About HDInsight

Azure HDInsight is an easy, cost-effective, enterprise-grade service for open source analytics that enables customers to easily run popular open source frameworks including Apache Hadoop, Spark, Kafka, and others. The service is available in 36 public regions and Azure Government and National Clouds. Azure HDInsight powers mission-critical applications in a wide variety of sectors and enables a wide range of use cases including ETL, streaming, and interactive querying.

Alerts in Azure are now all the more consistent!

$
0
0

The typical workflow we hear from customers - both ITOps and DevOps teams - is that alerts go to the appropriate team (on-call individual) based on some metadata such as subscription ID, resource groups, and more. The common alert schema makes this workflow more streamlined by providing a clear separation between the essential meta-data that is needed to route the alert, and the additional context that the responsible team (or individual) needs to debug and fix the issue.Azure Monitor alerts provides rich alerting capabilities on a variety of telemetry such as metrics, logs, and activity logs. Over the past year, we have unified the alerting experience by providing a common consumption experience including UX and API for alerts. However, the payload format for alerts remained different which puts the burden of building and maintaining multiple integrations, one for each alert type based on telemetry, on the user. Today, we are releasing a new common alert schema that provides a single extensible format for all alert types.

What’s the common alert schema?

With the common alert schema, all alert payloads generated by Azure Monitor will have a consistent structure. Any alert instance describes the resource that was affected and the cause of the alert, and these are described in the common schema in the following sections:

  • Essentials: A set of standardized fields which are common across all alert types. It describes what resource the alert is on, along with additional common alert metadata such as severity or description.
  • Alert context: A set of fields which describe the cause of the alert details that vary based on the alert type. For example, a metric alert would have fields like the metric name and metric value in the alert context, whereas an activity log alert would have information about the event that generated the alert.

How does it help me?

The typical workflow we hear from customers - both ITOps and DevOps teams - is that alerts go to the appropriate team (on-call individual) based on some metadata such as subscription ID, resource groups, and more. The common alert schema makes this workflow more streamlined by providing a clear separation between the essential meta-data that is needed to route the alert, and the additional context that the responsible team (or individual) needs to debug and fix the issue.

Find more information about the exact fields, versioning, and other schema related details.

How is this going to impact me?

If you consume alerts from Azure in any manner whether it be email, webhooks, external tools, or others you might want to continue reading.

  • Email: A consistent and detailed email template allowing you to not only diagnose issues at a glance, but also jump to the process of working on the incident through deeplinks to the alert details on the portal and the affected resource.
  • SMS: A consistent SMS template
  • Webhook, Logic Apps, Azure Functions: A consistent JSON structure, allowing you to easily build integrations across different alert types.

The new schema will also enable a more rich consumption experience across both the Azure portal and the Azure mobile app in the immediate future. You can learn more about the changes coming as part of this feature by visiting our documentation.

Why should I switch over from my existing integrations?

If you already have integrations with the existing schemas, the reason to switch over are many:

  • Consistent alert structure means that you could potentially have fewer integrations, making the process of managing and maintaining these connectors a much simpler task.
  • Payload enrichments like rich diagnostic information, ability to customize, and more would surface up only in the new schema.

How do I get this new schema?

To avoid breaking your existing integrations, the common alert schema is something you can opt-in to and opt-out of as well.

Screenshot display for adding an action group

To opt-in or out from the Azure portal:

  1. Open any existing or a new action in an action group.
  2. Select Yes for the toggle to enable the common alert schema as shown.

If you wish to opt-in at scale, you can also use the action groups API to automate this process. Learn more about how to write integrations for the common alert schema and the alert context schemas for the different alert types.

As always, we would love to hear your feedback. Please continue to share your thoughts at azurealertsfeedback@microsoft.com


Visual Studio 2019: Code faster. Work smarter. Create the future.

$
0
0

Visual Studio 2019 is generally available today and available for download. With Visual Studio 2019, you and your teams will become more productive in building current and future projects as you benefit from the innovation in the IDE that makes every keystroke count.

As we’ve shared earlier, Visual Studio 2019 improves on Visual Studio 2017 in a few areas. It helps you get into your code more quickly by making it simpler to clone a Git repo or to open an existing project or folder. It also introduces improvements to the template selection screen to make it easier to start a new project. While you’re coding, you’ll notice that Visual Studio 2019 improves code navigation and adds many refactorings, as well as a document health indicator and one-click code clean-up to apply multiple refactoring rules. There are also improvements to the debugging experience, including data breakpoints for .NET Core apps that help you break only on value changes you’re looking for. It also includes get AI-assisted code completion with Visual Studio IntelliCode.

These capabilities work with both your existing project and new projects – from cross-platform C++ applications, to .NET mobile apps for Android and iOS written using Xamarin, to cloud-native applications using Azure services. The goal with Visual Studio 2019 is to support these projects from development, through testing, debugging, and even deployment, all while minimizing the need for you to switch between different applications, portals, and websites.

Check out the launch event

Be sure to tune in to the Visual Studio 2019 Launch Event today at launch.visualstudio.com, or watch it on-demand later, where we’ll go into a lot more depth on these features and many others. During the launch event, we’ll discuss and demo Visual Studio 2019. We’ll also share content on Visual Studio 2019 for Mac and Visual Studio Live Share, both of which are also releasing today. There are also almost 70 local launch events around the world you can join today and over 200 between now and end of June. Thank you for your enthusiasm about our best release yet.

To help kick-start your experience with Visual Studio 2019, we’ve partnered with Pluralsight and LinkedIn Learning to bring you new training content. Pluralsight has a new, free, Visual Studio 2019 course (available until April 22, 2019). A path and skill assessment are also available, so you can dive right in. On LinkedIn Learning you’ll find a new course (free until May 2nd) covering the highlights in Visual Studio 2019. Of course, you can always head over to VisualStudio.com and our docs to find out what’s new, or dig into the release notes for all the details.

Thank you for your ongoing feedback

We could not have made this happen without you. Ever since we released Preview 1 of Visual Studio 2019 in December, we’ve received an incredible amount of feedback from you, both on what you like and what you want to see improved. As always, you can continue to use the Report a Problem tool in Visual Studio or head over to the Visual Studio Developer Community to track your issue or suggest a feature. We’ve made many tweaks and improvements along the way to address your feedback, rest assured that we will continue doing so in minor releases going forward.

We want to sincerely thank you for taking the time to provide the feedback that we use to shape Visual Studio 2019 into the best developer environment for you. We can’t wait to see what you’ll create with Visual Studio 2019.

The post Visual Studio 2019: Code faster. Work smarter. Create the future. appeared first on The Visual Studio Blog.

Live Share now included with Visual Studio 2019

$
0
0

We’re excited to announce the general availability of Visual Studio Live Share, and that it is now included with Visual Studio 2019! In the year since Live Share began its public preview, we’ve been working to enhance the many ways you collaborate with your team. This release is the culmination of that work, and all the things we’ve learned from you along the way.

If you haven’t heard of Live Share, it’s a tool that enables real-time collaborative development with your teammates from the comfort of your own tools. You’re able to share your code, and collaboratively edit and debug, without needing to clone repos or set up environments. It’s easy to get started with Live Share.

Thanks for all your feedback!

We’ve been thrilled with all the great feedback and discussions we’ve had. Your input has helped guide Live Share’s development and enabled us to focus in on the areas of collaboration most important to you. Based on your feedback, we added features like read-only mode, support for additional languages like C++ and Python, and enabled guests to start debugging sessions.

/var/folders/78/t4msz04s0lg7jvy0w9lv_nwc0000gn/T/com.microsoft.Word/WebArchiveCopyPasteTempFiles/sidebyside1.png

Additionally, we’ve learned so much about how your teams collaborate, and how Live Share is applicable in a wide variety of use cases. Live Share can be used while pair programming, conducting code reviews, giving lectures and presenting to students and colleagues, or even mob programming during hackathons. Live Share complements the many diverse ways you work – whether it be together while co-located in the same office, remotely from home, or in different countries on opposite sides of the world.

3rd Party Extensions

Live Share is all about sharing the full context of your project. It’s not just the code in Visual Studio, but also the extensions you use. Along with this release, we’re excited to have partnered with a few 3rd party extensions to enhance the Live Share experience in Visual Studio.

OzCode enhances your C# debugging experience by offering a suite of visualizations, like datatips to see how items are passed through a LINQ query, and heads-up display to see how a set of boolean expressions evaluates. During a Live Share session, guests can now leverage time-travel debugging as well.

CodeStream enables you to create discussions about your codebase to help build knowledge with your teammates. One of the biggest feature requests we’ve received has been to include integrated chat, and with CodeStream, you get a companion chat experience within a Live Share session.

Collaborate Today

We’re continuing to build and improve Live Share! We have so much more collaboration goodness to share. We’ve received such great feedback and would love to continue to hear more from you. Feel free to let us know what you’d like to see next with Live Share by filing issues and feature requests or by responding to our feedback survey.

With Live Share installed by default in Visual Studio 2019, it’s easy to get started collaborating with your team. For more information about using Live Share, please check out our docs!

The post Live Share now included with Visual Studio 2019 appeared first on The Visual Studio Blog.

Visual Studio 2019 for Mac is now available

$
0
0

Today, we are excited to announce the general availability of Visual Studio 2019 for Mac – the next major version of our .NET IDE on the Mac. This release is now available as an update in the Stable channel for existing Visual Studio for Mac users, and new users can download and install it today as well. You also can learn more about the new capabilities in this version by reading our release notes.

Visual Studio 2019 for Mac focuses on improving the core of the IDE, setting a foundation for us to bring new capabilities to you more rapidly with future updates. In this blog post, we want to highlight some of the new capabilities included with this release which have been shaped greatly by your feedback. Thank you! In addition to general improvements to the IDE, we have also introduced several improvements for developers building mobile apps using Xamarin, games using Unity, and web applications and services using .NET Core. So, let’s get started!

A new C# editor

The code editor in Visual studio for Mac has been completely replaced with a new editor built on a shared core with Visual Studio on Windows, and with native macOS UI. Not only does this provide an enhanced experience with smooth editing and navigation, but the new editor also has all the powerful IntelliSense/code-completion and quick fix suggestions you expect from a Visual Studio editor. Furthermore, we have added support for bi-directional text, multi-caret, word wrapping and much more that you can read about in greater detail here.

We are busy adding a last few finishing touches to the editor and hence the preview editor is only available for use when you opt-in. To enable the new editor, navigate to the Visual Studio > Preferences… menu, Text Editor > General section and check the Open C# files in the New Editor checkbox. Stay tuned as we work towards enabling it for C# and XAML, with other languages coming shortly thereafter.

Visual Studio for Mac 2019 - editor

Start window

With Visual Studio 2019 for Mac, we’ve introduced a brand-new way of interacting with your projects and getting you where you need to go in the IDE. The Start Window allows you to quickly create new projects or conveniently search and navigate to a project you might have previously opened in the IDE.

start screen Visual Studio for Mac

Running multiple instances

Visual Studio 2019 for Mac allows you to easily launch multiple instances of the IDE from the macOS dock, enabling you to work on multiple solutions simultaneously, one per instance.

Multiple VS4Mac instances

Xamarin tools

Developers run though the “build, deploy, debug” cycle countless times in any given day. As we continue working to shorten the inner development loop, we’ve made big gains in trimming down the time you spend building and deploying for Android, so you can focus on creating amazing mobile apps. Say goodbye to all those build-time coffee breaks!

With the help of your feedback, we found that optimizing incremental builds and deployments is one great way to achieve a high-impact improvement. Testing with the SmartHotel360 app showed an almost 30% decrease in incremental build times, while deployment times are over twice as fast:

Step Visual Studio 2017 Visual Studio 2019 Delta
First build 01:04.20 00:50.13 -21.95%
Incremental Build (XAML Change) 00:10.62 00:07.47 -29.66%
Deploy (XAML Change) 00:09.03 00:04.44 -50.83%


A full report of build performance profiling, as well as methodology, can be viewed on the Xamarin.Android wiki.

Tools for Unity

We have ported the Unity debugger from Visual Studio on Windows to the Mac. Beyond making it possible for us to apply fixes across both products at the same time, this new debugger provides better compatibility with older versions of Unity and a better experience when debugging unsafe C# code.

ASP.NET Core and .NET Core tools

We have made many improvements to our .NET Core and web tools including better support for JavaScript colorization within Razor (.cshtml) files, auto-updating of Azure functions, the ability to easily set up multiple startup projects for debugging and, finally, updated Docker tools.

Performance, reliability and accessibility improvements

We have made a significant number of performance and reliability improvements in this release across the board. In particular, the C# code editor, Git support, Xamarin, and.NET Core debugging should all be significantly faster and more reliable with this release. This release also includes more than 200 accessibility related fixes that move us closer to our goal to be completely accessible on the Mac.

What’s next for Visual Studio 2019 for Mac

As we had previously called out in our roadmap, our near-term priority is to enable the new editor for C#, followed by other file extensions. Beyond that, we are bringing over the Xamarin Forms XAML language service from Visual Studio on Windows to the Mac, adding support for multi-targeting, solution level package management and file-nesting support for ASP.NET Core. Stay tuned for future Visual Studio 2019 for Mac updates!

We strive to be 100% driven by your feedback and we love to hear from you, so please do share your feedback and suggestions. Thank you for helping us shape Visual Studio for Mac. We look forward to you downloading and using this new release.


The post Visual Studio 2019 for Mac is now available appeared first on The Visual Studio Blog.

Windows 10 SDK Preview Build 18362 available now!

$
0
0

Today, we released a new Windows 10 Preview Build of the SDK to be used in conjunction with Windows 10 Insider Preview (Build 18362 or greater). The Preview SDK Build 18362 contains bug fixes and under development changes to the API surface area.

The Preview SDK can be downloaded from developer section on Windows Insider.

For feedback and updates to the known issues, please see the developer forum. For new developer feature requests, head over to our Windows Platform UserVoice.

Things to note:

  • This build works in conjunction with previously released SDKs and Visual Studio 2017. You can install this SDK and still also continue to submit your apps that target Windows 10 build 1809 or earlier to the Microsoft Store.
  • The Windows SDK will now formally only be supported by Visual Studio 2017 and greater. You can download the Visual Studio 2017 here.
  • This build of the Windows SDK will install on Windows 10 Insider Preview builds and supported Windows operating systems.
  • In order to assist with script access to the SDK, the ISO will also be able to be accessed through the following URL: https://go.microsoft.com/fwlink/?prd=11966&pver=1.0&plcid=0x409&clcid=0x409&ar=Flight&sar=Sdsurl&o1=18362 once the static URL is published.

Tools Updates

Message Compiler (mc.exe)

  • The “-mof” switch (to generate XP-compatible ETW helpers) is considered to be deprecated and will be removed in a future version of mc.exe. Removing this switch will cause the generated ETW helpers to expect Vista or later.
  • The “-A” switch (to generate .BIN files using ANSI encoding instead of Unicode) is considered to be deprecated and will be removed in a future version of mc.exe. Removing this switch will cause the generated .BIN files to use Unicode string encoding.
  • The behavior of the “-A” switch has changed. Prior to Windows 1607 Anniversary Update SDK, when using the -A switch, BIN files were encoded using the build system’s ANSI code page. In the Windows 1607 Anniversary Update SDK, mc.exe’s behavior was inadvertently changed to encode BIN files using the build system’s OEM code page. In the 19H1 SDK, mc.exe’s previous behavior has been restored and it now encodes BIN files using the build system’s ANSI code page. Note that the -A switch is deprecated, as ANSI-encoded BIN files do not provide a consistent user experience in multi-lingual systems.

Breaking Changes

IAppxPackageReader2 has been removed from appxpackaging.h

The interface IAppxPackageReader2 was removed from appxpackaging.h. Eliminate the use of use of IAppxPackageReader2 or use IAppxPackageReader instead.

Change to effect graph of the AcrylicBrush

In this Preview SDK, we’ll be adding a blend mode to the effect graph of the AcrylicBrush called Luminosity. This blend mode will ensure that shadows do not appear behind acrylic surfaces without a cutout. We will also be exposing a LuminosityBlendOpacity API available for tweaking that allows for more AcrylicBrush customization.

By default, for those that have not specified any LuminosityBlendOpacity on their AcrylicBrushes, we have implemented some logic to ensure that the Acrylic will look as similar as it can to current 1809 acrylics. Please note that we will be updating our default brushes to account for this recipe change.

TraceLoggingProvider.h  / TraceLoggingWrite

Events generated by TraceLoggingProvider.h (e.g. via TraceLoggingWrite macros) will now always have Id and Version set to 0.

Previously, TraceLoggingProvider.h would assign IDs to events at link time. These IDs were unique within a DLL or EXE, but changed from build to build and from module to module.

API Updates, Additions and Removals

Additions:


namespace Windows.AI.MachineLearning {
  public sealed class LearningModelSession : IClosable {
    public LearningModelSession(LearningModel model, LearningModelDevice deviceToRunOn, LearningModelSessionOptions learningModelSessionOptions);
  }
  public sealed class LearningModelSessionOptions
  public sealed class TensorBoolean : IClosable, ILearningModelFeatureValue, IMemoryBuffer, ITensor {
    void Close();
    public static TensorBoolean CreateFromBuffer(long[] shape, IBuffer buffer);
    public static TensorBoolean CreateFromShapeArrayAndDataArray(long[] shape, bool[] data);
    IMemoryBufferReference CreateReference();
  }
  public sealed class TensorDouble : IClosable, ILearningModelFeatureValue, IMemoryBuffer, ITensor {
    void Close();
    public static TensorDouble CreateFromBuffer(long[] shape, IBuffer buffer);
    public static TensorDouble CreateFromShapeArrayAndDataArray(long[] shape, double[] data);
    IMemoryBufferReference CreateReference();
  }
  public sealed class TensorFloat : IClosable, ILearningModelFeatureValue, IMemoryBuffer, ITensor {
    void Close();
    public static TensorFloat CreateFromBuffer(long[] shape, IBuffer buffer);
    public static TensorFloat CreateFromShapeArrayAndDataArray(long[] shape, float[] data);
    IMemoryBufferReference CreateReference();
  }
  public sealed class TensorFloat16Bit : IClosable, ILearningModelFeatureValue, IMemoryBuffer, ITensor {
    void Close();
    public static TensorFloat16Bit CreateFromBuffer(long[] shape, IBuffer buffer);
    public static TensorFloat16Bit CreateFromShapeArrayAndDataArray(long[] shape, float[] data);
    IMemoryBufferReference CreateReference();
  }
  public sealed class TensorInt16Bit : IClosable, ILearningModelFeatureValue, IMemoryBuffer, ITensor {
    void Close();
    public static TensorInt16Bit CreateFromBuffer(long[] shape, IBuffer buffer);
    public static TensorInt16Bit CreateFromShapeArrayAndDataArray(long[] shape, short[] data);
    IMemoryBufferReference CreateReference();
  }
  public sealed class TensorInt32Bit : IClosable, ILearningModelFeatureValue, IMemoryBuffer, ITensor {
    void Close();
    public static TensorInt32Bit CreateFromBuffer(long[] shape, IBuffer buffer);
    public static TensorInt32Bit CreateFromShapeArrayAndDataArray(long[] shape, int[] data);
    IMemoryBufferReference CreateReference();
  }
  public sealed class TensorInt64Bit : IClosable, ILearningModelFeatureValue, IMemoryBuffer, ITensor {
    void Close();
    public static TensorInt64Bit CreateFromBuffer(long[] shape, IBuffer buffer);
    public static TensorInt64Bit CreateFromShapeArrayAndDataArray(long[] shape, long[] data);
    IMemoryBufferReference CreateReference();
  }
  public sealed class TensorInt8Bit : IClosable, ILearningModelFeatureValue, IMemoryBuffer, ITensor {
    void Close();
    public static TensorInt8Bit CreateFromBuffer(long[] shape, IBuffer buffer);
    public static TensorInt8Bit CreateFromShapeArrayAndDataArray(long[] shape, byte[] data);
    IMemoryBufferReference CreateReference();
  }
  public sealed class TensorString : IClosable, ILearningModelFeatureValue, IMemoryBuffer, ITensor {
    void Close();
    public static TensorString CreateFromShapeArrayAndDataArray(long[] shape, string[] data);
    IMemoryBufferReference CreateReference();
  }
  public sealed class TensorUInt16Bit : IClosable, ILearningModelFeatureValue, IMemoryBuffer, ITensor {
    void Close();
    public static TensorUInt16Bit CreateFromBuffer(long[] shape, IBuffer buffer);
    public static TensorUInt16Bit CreateFromShapeArrayAndDataArray(long[] shape, ushort[] data);
    IMemoryBufferReference CreateReference();
  }
  public sealed class TensorUInt32Bit : IClosable, ILearningModelFeatureValue, IMemoryBuffer, ITensor {
    void Close();
    public static TensorUInt32Bit CreateFromBuffer(long[] shape, IBuffer buffer);
    public static TensorUInt32Bit CreateFromShapeArrayAndDataArray(long[] shape, uint[] data);
    IMemoryBufferReference CreateReference();
  }
  public sealed class TensorUInt64Bit : IClosable, ILearningModelFeatureValue, IMemoryBuffer, ITensor {
    void Close();
    public static TensorUInt64Bit CreateFromBuffer(long[] shape, IBuffer buffer);
    public static TensorUInt64Bit CreateFromShapeArrayAndDataArray(long[] shape, ulong[] data);
    IMemoryBufferReference CreateReference();
  }
  public sealed class TensorUInt8Bit : IClosable, ILearningModelFeatureValue, IMemoryBuffer, ITensor {
    void Close();
    public static TensorUInt8Bit CreateFromBuffer(long[] shape, IBuffer buffer);
    public static TensorUInt8Bit CreateFromShapeArrayAndDataArray(long[] shape, byte[] data);
    IMemoryBufferReference CreateReference();
  }
}
namespace Windows.ApplicationModel {
  public sealed class Package {
    StorageFolder EffectiveLocation { get; }
    StorageFolder MutableLocation { get; }
  }
}
namespace Windows.ApplicationModel.AppService {
  public sealed class AppServiceConnection : IClosable {
    public static IAsyncOperation<StatelessAppServiceResponse> SendStatelessMessageAsync(AppServiceConnection connection, RemoteSystemConnectionRequest connectionRequest, ValueSet message);
  }
  public sealed class AppServiceTriggerDetails {
    string CallerRemoteConnectionToken { get; }
  }
  public sealed class StatelessAppServiceResponse
  public enum StatelessAppServiceResponseStatus
}
namespace Windows.ApplicationModel.Background {
  public sealed class ConversationalAgentTrigger : IBackgroundTrigger
}
namespace Windows.ApplicationModel.Calls {
  public sealed class PhoneLine {
    string TransportDeviceId { get; }
    void EnableTextReply(bool value);
  }
  public enum PhoneLineTransport {
    Bluetooth = 2,
  }
  public sealed class PhoneLineTransportDevice
}
namespace Windows.ApplicationModel.Calls.Background {
  public enum PhoneIncomingCallDismissedReason
  public sealed class PhoneIncomingCallDismissedTriggerDetails
  public enum PhoneTriggerType {
    IncomingCallDismissed = 6,
  }
}
namespace Windows.ApplicationModel.Calls.Provider {
  public static class PhoneCallOriginManager {
    public static bool IsSupported { get; }
  }
}
namespace Windows.ApplicationModel.ConversationalAgent {
  public sealed class ConversationalAgentSession : IClosable
  public sealed class ConversationalAgentSessionInterruptedEventArgs
  public enum ConversationalAgentSessionUpdateResponse
  public sealed class ConversationalAgentSignal
  public sealed class ConversationalAgentSignalDetectedEventArgs
  public enum ConversationalAgentState
  public sealed class ConversationalAgentSystemStateChangedEventArgs
  public enum ConversationalAgentSystemStateChangeType
}
namespace Windows.ApplicationModel.Preview.Holographic {
  public sealed class HolographicKeyboardPlacementOverridePreview
}
namespace Windows.ApplicationModel.Resources {
  public sealed class ResourceLoader {
    public static ResourceLoader GetForUIContext(UIContext context);
  }
}
namespace Windows.ApplicationModel.Resources.Core {
  public sealed class ResourceCandidate {
    ResourceCandidateKind Kind { get; }
  }
  public enum ResourceCandidateKind
  public sealed class ResourceContext {
    public static ResourceContext GetForUIContext(UIContext context);
  }
}
namespace Windows.ApplicationModel.UserActivities {
  public sealed class UserActivityChannel {
    public static UserActivityChannel GetForUser(User user);
  }
}
namespace Windows.Devices.Bluetooth.GenericAttributeProfile {
  public enum GattServiceProviderAdvertisementStatus {
    StartedWithoutAllAdvertisementData = 4,
  }
  public sealed class GattServiceProviderAdvertisingParameters {
    IBuffer ServiceData { get; set; }
  }
}
namespace Windows.Devices.Enumeration {
  public enum DevicePairingKinds : uint {
    ProvidePasswordCredential = (uint)16,
  }
  public sealed class DevicePairingRequestedEventArgs {
    void AcceptWithPasswordCredential(PasswordCredential passwordCredential);
  }
}
namespace Windows.Devices.Input {
  public sealed class PenDevice
}
namespace Windows.Devices.PointOfService {
  public sealed class JournalPrinterCapabilities : ICommonPosPrintStationCapabilities {
    bool IsReversePaperFeedByLineSupported { get; }
    bool IsReversePaperFeedByMapModeUnitSupported { get; }
    bool IsReverseVideoSupported { get; }
    bool IsStrikethroughSupported { get; }
    bool IsSubscriptSupported { get; }
    bool IsSuperscriptSupported { get; }
  }
  public sealed class JournalPrintJob : IPosPrinterJob {
    void FeedPaperByLine(int lineCount);
    void FeedPaperByMapModeUnit(int distance);
    void Print(string data, PosPrinterPrintOptions printOptions);
  }
  public sealed class PosPrinter : IClosable {
    IVectorView<uint> SupportedBarcodeSymbologies { get; }
    PosPrinterFontProperty GetFontProperty(string typeface);
  }
  public sealed class PosPrinterFontProperty
  public sealed class PosPrinterPrintOptions
  public sealed class ReceiptPrinterCapabilities : ICommonPosPrintStationCapabilities, ICommonReceiptSlipCapabilities {
    bool IsReversePaperFeedByLineSupported { get; }
    bool IsReversePaperFeedByMapModeUnitSupported { get; }
    bool IsReverseVideoSupported { get; }
    bool IsStrikethroughSupported { get; }
    bool IsSubscriptSupported { get; }
    bool IsSuperscriptSupported { get; }
  }
  public sealed class ReceiptPrintJob : IPosPrinterJob, IReceiptOrSlipJob {
    void FeedPaperByLine(int lineCount);
    void FeedPaperByMapModeUnit(int distance);
    void Print(string data, PosPrinterPrintOptions printOptions);
    void StampPaper();
  }
  public struct SizeUInt32
  public sealed class SlipPrinterCapabilities : ICommonPosPrintStationCapabilities, ICommonReceiptSlipCapabilities {
    bool IsReversePaperFeedByLineSupported { get; }
    bool IsReversePaperFeedByMapModeUnitSupported { get; }
    bool IsReverseVideoSupported { get; }
    bool IsStrikethroughSupported { get; }
    bool IsSubscriptSupported { get; }
    bool IsSuperscriptSupported { get; }
  }
  public sealed class SlipPrintJob : IPosPrinterJob, IReceiptOrSlipJob {
    void FeedPaperByLine(int lineCount);
    void FeedPaperByMapModeUnit(int distance);
    void Print(string data, PosPrinterPrintOptions printOptions);
  }
}
namespace Windows.Globalization {
  public sealed class CurrencyAmount
}
namespace Windows.Graphics.DirectX {
  public enum DirectXPrimitiveTopology
}
namespace Windows.Graphics.Holographic {
  public sealed class HolographicCamera {
    HolographicViewConfiguration ViewConfiguration { get; }
  }
  public sealed class HolographicDisplay {
    HolographicViewConfiguration TryGetViewConfiguration(HolographicViewConfigurationKind kind);
  }
  public sealed class HolographicViewConfiguration
  public enum HolographicViewConfigurationKind
}
namespace Windows.Management.Deployment {
  public enum AddPackageByAppInstallerOptions : uint {
    LimitToExistingPackages = (uint)512,
  }
  public enum DeploymentOptions : uint {
    RetainFilesOnFailure = (uint)2097152,
  }
}
namespace Windows.Media.Devices {
  public sealed class InfraredTorchControl
  public enum InfraredTorchMode
  public sealed class VideoDeviceController : IMediaDeviceController {
    InfraredTorchControl InfraredTorchControl { get; }
  }
}
namespace Windows.Media.Miracast {
  public sealed class MiracastReceiver
  public sealed class MiracastReceiverApplySettingsResult
  public enum MiracastReceiverApplySettingsStatus
  public enum MiracastReceiverAuthorizationMethod
  public sealed class MiracastReceiverConnection : IClosable
  public sealed class MiracastReceiverConnectionCreatedEventArgs
  public sealed class MiracastReceiverCursorImageChannel
  public sealed class MiracastReceiverCursorImageChannelSettings
  public sealed class MiracastReceiverDisconnectedEventArgs
  public enum MiracastReceiverDisconnectReason
  public sealed class MiracastReceiverGameControllerDevice
  public enum MiracastReceiverGameControllerDeviceUsageMode
  public sealed class MiracastReceiverInputDevices
  public sealed class MiracastReceiverKeyboardDevice
  public enum MiracastReceiverListeningStatus
  public sealed class MiracastReceiverMediaSourceCreatedEventArgs
  public sealed class MiracastReceiverSession : IClosable
  public sealed class MiracastReceiverSessionStartResult
  public enum MiracastReceiverSessionStartStatus
  public sealed class MiracastReceiverSettings
  public sealed class MiracastReceiverStatus
  public sealed class MiracastReceiverStreamControl
  public sealed class MiracastReceiverVideoStreamSettings
  public enum MiracastReceiverWiFiStatus
  public sealed class MiracastTransmitter
  public enum MiracastTransmitterAuthorizationStatus
}
namespace Windows.Networking.Connectivity {
  public enum NetworkAuthenticationType {
    Wpa3 = 10,
    Wpa3Sae = 11,
  }
}
namespace Windows.Networking.NetworkOperators {
  public sealed class ESim {
    ESimDiscoverResult Discover();
    ESimDiscoverResult Discover(string serverAddress, string matchingId);
    IAsyncOperation<ESimDiscoverResult> DiscoverAsync();
    IAsyncOperation<ESimDiscoverResult> DiscoverAsync(string serverAddress, string matchingId);
  }
  public sealed class ESimDiscoverEvent
  public sealed class ESimDiscoverResult
  public enum ESimDiscoverResultKind
}
namespace Windows.Perception.People {
  public sealed class EyesPose
  public enum HandJointKind
  public sealed class HandMeshObserver
  public struct HandMeshVertex
  public sealed class HandMeshVertexState
  public sealed class HandPose
  public struct JointPose
  public enum JointPoseAccuracy
}
namespace Windows.Perception.Spatial {
  public struct SpatialRay
}
namespace Windows.Perception.Spatial.Preview {
  public sealed class SpatialGraphInteropFrameOfReferencePreview
  public static class SpatialGraphInteropPreview {
    public static SpatialGraphInteropFrameOfReferencePreview TryCreateFrameOfReference(SpatialCoordinateSystem coordinateSystem);
    public static SpatialGraphInteropFrameOfReferencePreview TryCreateFrameOfReference(SpatialCoordinateSystem coordinateSystem, Vector3 relativePosition);
    public static SpatialGraphInteropFrameOfReferencePreview TryCreateFrameOfReference(SpatialCoordinateSystem coordinateSystem, Vector3 relativePosition, Quaternion relativeOrientation);
  }
}
namespace Windows.Security.Authorization.AppCapabilityAccess {
  public sealed class AppCapability
  public sealed class AppCapabilityAccessChangedEventArgs
  public enum AppCapabilityAccessStatus
}
namespace Windows.Security.DataProtection {
  public enum UserDataAvailability
  public sealed class UserDataAvailabilityStateChangedEventArgs
  public sealed class UserDataBufferUnprotectResult
  public enum UserDataBufferUnprotectStatus
  public sealed class UserDataProtectionManager
  public sealed class UserDataStorageItemProtectionInfo
  public enum UserDataStorageItemProtectionStatus
}
namespace Windows.Storage.AccessCache {
  public static class StorageApplicationPermissions {
    public static StorageItemAccessList GetFutureAccessListForUser(User user);
    public static StorageItemMostRecentlyUsedList GetMostRecentlyUsedListForUser(User user);
  }
}
namespace Windows.Storage.Pickers {
  public sealed class FileOpenPicker {
    User User { get; }
    public static FileOpenPicker CreateForUser(User user);
  }
  public sealed class FileSavePicker {
    User User { get; }
    public static FileSavePicker CreateForUser(User user);
  }
  public sealed class FolderPicker {
    User User { get; }
    public static FolderPicker CreateForUser(User user);
  }
}
namespace Windows.System {
  public sealed class DispatcherQueue {
    bool HasThreadAccess { get; }
  }
  public enum ProcessorArchitecture {
    Arm64 = 12,
    X86OnArm64 = 14,
  }
}
namespace Windows.System.Profile {
  public static class AppApplicability
  public sealed class UnsupportedAppRequirement
  public enum UnsupportedAppRequirementReasons : uint
}
namespace Windows.System.RemoteSystems {
  public sealed class RemoteSystem {
    User User { get; }
    public static RemoteSystemWatcher CreateWatcherForUser(User user);
    public static RemoteSystemWatcher CreateWatcherForUser(User user, IIterable<IRemoteSystemFilter> filters);
  }
  public sealed class RemoteSystemApp {
    string ConnectionToken { get; }
    User User { get; }
  }
  public sealed class RemoteSystemConnectionRequest {
    string ConnectionToken { get; }
    public static RemoteSystemConnectionRequest CreateFromConnectionToken(string connectionToken);
    public static RemoteSystemConnectionRequest CreateFromConnectionTokenForUser(User user, string connectionToken);
  }
  public sealed class RemoteSystemWatcher {
    User User { get; }
  }
}
namespace Windows.UI {
  public sealed class UIContentRoot
  public sealed class UIContext
}
namespace Windows.UI.Composition {
  public enum CompositionBitmapInterpolationMode {
    MagLinearMinLinearMipLinear = 2,
    MagLinearMinLinearMipNearest = 3,
    MagLinearMinNearestMipLinear = 4,
    MagLinearMinNearestMipNearest = 5,
    MagNearestMinLinearMipLinear = 6,
    MagNearestMinLinearMipNearest = 7,
    MagNearestMinNearestMipLinear = 8,
    MagNearestMinNearestMipNearest = 9,
  }
  public sealed class CompositionGraphicsDevice : CompositionObject {
    CompositionMipmapSurface CreateMipmapSurface(SizeInt32 sizePixels, DirectXPixelFormat pixelFormat, DirectXAlphaMode alphaMode);
    void Trim();
  }
  public sealed class CompositionMipmapSurface : CompositionObject, ICompositionSurface
  public sealed class CompositionProjectedShadow : CompositionObject
  public sealed class CompositionProjectedShadowCaster : CompositionObject
  public sealed class CompositionProjectedShadowCasterCollection : CompositionObject, IIterable<CompositionProjectedShadowCaster>
  public sealed class CompositionProjectedShadowReceiver : CompositionObject
  public sealed class CompositionProjectedShadowReceiverUnorderedCollection : CompositionObject, IIterable<CompositionProjectedShadowReceiver>
  public sealed class CompositionRadialGradientBrush : CompositionGradientBrush
  public sealed class CompositionSurfaceBrush : CompositionBrush {
    bool SnapToPixels { get; set; }
  }
  public class CompositionTransform : CompositionObject
  public sealed class CompositionVisualSurface : CompositionObject, ICompositionSurface
  public sealed class Compositor : IClosable {
    CompositionProjectedShadow CreateProjectedShadow();
    CompositionProjectedShadowCaster CreateProjectedShadowCaster();
    CompositionProjectedShadowReceiver CreateProjectedShadowReceiver();
    CompositionRadialGradientBrush CreateRadialGradientBrush();
    CompositionVisualSurface CreateVisualSurface();
  }
  public interface IVisualElement
}
namespace Windows.UI.Composition.Interactions {
  public enum InteractionBindingAxisModes : uint
  public sealed class InteractionTracker : CompositionObject {
    public static InteractionBindingAxisModes GetBindingMode(InteractionTracker boundTracker1, InteractionTracker boundTracker2);
    public static void SetBindingMode(InteractionTracker boundTracker1, InteractionTracker boundTracker2, InteractionBindingAxisModes axisMode);
  }
  public sealed class InteractionTrackerCustomAnimationStateEnteredArgs {
    bool IsFromBinding { get; }
  }
  public sealed class InteractionTrackerIdleStateEnteredArgs {
    bool IsFromBinding { get; }
  }
  public sealed class InteractionTrackerInertiaStateEnteredArgs {
    bool IsFromBinding { get; }
  }
  public sealed class InteractionTrackerInteractingStateEnteredArgs {
    bool IsFromBinding { get; }
  }
  public class VisualInteractionSource : CompositionObject, ICompositionInteractionSource {
    public static VisualInteractionSource CreateFromIVisualElement(IVisualElement source);
  }
}
namespace Windows.UI.Composition.Scenes {
  public enum SceneAlphaMode
  public enum SceneAttributeSemantic
  public sealed class SceneBoundingBox : SceneObject
  public class SceneComponent : SceneObject
  public sealed class SceneComponentCollection : SceneObject, IIterable<SceneComponent>, IVector<SceneComponent>
  public enum SceneComponentType
  public class SceneMaterial : SceneObject
  public class SceneMaterialInput : SceneObject
  public sealed class SceneMesh : SceneObject
  public sealed class SceneMeshMaterialAttributeMap : SceneObject, IIterable<IKeyValuePair<string, SceneAttributeSemantic>>, IMap<string, SceneAttributeSemantic>
  public sealed class SceneMeshRendererComponent : SceneRendererComponent
  public sealed class SceneMetallicRoughnessMaterial : ScenePbrMaterial
  public sealed class SceneModelTransform : CompositionTransform
  public sealed class SceneNode : SceneObject
  public sealed class SceneNodeCollection : SceneObject, IIterable<SceneNode>, IVector<SceneNode>
  public class SceneObject : CompositionObject
  public class ScenePbrMaterial : SceneMaterial
  public class SceneRendererComponent : SceneComponent
  public sealed class SceneSurfaceMaterialInput : SceneMaterialInput
  public sealed class SceneVisual : ContainerVisual
  public enum SceneWrappingMode
}
namespace Windows.UI.Core {
  public sealed class CoreWindow : ICorePointerRedirector, ICoreWindow {
    UIContext UIContext { get; }
  }
}
namespace Windows.UI.Core.Preview {
  public sealed class CoreAppWindowPreview
}
namespace Windows.UI.Input {
  public class AttachableInputObject : IClosable
  public enum GazeInputAccessStatus
  public sealed class InputActivationListener : AttachableInputObject
  public sealed class InputActivationListenerActivationChangedEventArgs
  public enum InputActivationState
}
namespace Windows.UI.Input.Preview {
  public static class InputActivationListenerPreview
}
namespace Windows.UI.Input.Spatial {
  public sealed class SpatialInteractionManager {
    public static bool IsSourceKindSupported(SpatialInteractionSourceKind kind);
  }
  public sealed class SpatialInteractionSource {
    HandMeshObserver TryCreateHandMeshObserver();
    IAsyncOperation<HandMeshObserver> TryCreateHandMeshObserverAsync();
  }
  public sealed class SpatialInteractionSourceState {
    HandPose TryGetHandPose();
  }
  public sealed class SpatialPointerPose {
    EyesPose Eyes { get; }
    bool IsHeadCapturedBySystem { get; }
  }
}
namespace Windows.UI.Notifications {
  public sealed class ToastActivatedEventArgs {
    ValueSet UserInput { get; }
  }
  public sealed class ToastNotification {
    bool ExpiresOnReboot { get; set; }
  }
}
namespace Windows.UI.ViewManagement {
  public sealed class ApplicationView {
    string PersistedStateId { get; set; }
    UIContext UIContext { get; }
    WindowingEnvironment WindowingEnvironment { get; }
    public static void ClearAllPersistedState();
    public static void ClearPersistedState(string key);
    IVectorView<DisplayRegion> GetDisplayRegions();
  }
  public sealed class InputPane {
    public static InputPane GetForUIContext(UIContext context);
  }
  public sealed class UISettings {
    bool AutoHideScrollBars { get; }
    event TypedEventHandler<UISettings, UISettingsAutoHideScrollBarsChangedEventArgs> AutoHideScrollBarsChanged;
  }
  public sealed class UISettingsAutoHideScrollBarsChangedEventArgs
}
namespace Windows.UI.ViewManagement.Core {
  public sealed class CoreInputView {
    public static CoreInputView GetForUIContext(UIContext context);
  }
}
namespace Windows.UI.WindowManagement {
  public sealed class AppWindow
  public sealed class AppWindowChangedEventArgs
  public sealed class AppWindowClosedEventArgs
  public enum AppWindowClosedReason
  public sealed class AppWindowCloseRequestedEventArgs
  public sealed class AppWindowFrame
  public enum AppWindowFrameStyle
  public sealed class AppWindowPlacement
  public class AppWindowPresentationConfiguration
  public enum AppWindowPresentationKind
 public sealed class AppWindowPresenter
  public sealed class AppWindowTitleBar
  public sealed class AppWindowTitleBarOcclusion
  public enum AppWindowTitleBarVisibility
  public sealed class CompactOverlayPresentationConfiguration : AppWindowPresentationConfiguration
  public sealed class DefaultPresentationConfiguration : AppWindowPresentationConfiguration
  public sealed class DisplayRegion
  public sealed class FullScreenPresentationConfiguration : AppWindowPresentationConfiguration
  public sealed class WindowingEnvironment
  public sealed class WindowingEnvironmentAddedEventArgs
  public sealed class WindowingEnvironmentChangedEventArgs
  public enum WindowingEnvironmentKind
  public sealed class WindowingEnvironmentRemovedEventArgs
}
namespace Windows.UI.WindowManagement.Preview {
  public sealed class WindowManagementPreview
}
namespace Windows.UI.Xaml {
  public class UIElement : DependencyObject, IAnimationObject, IVisualElement {
    Vector3 ActualOffset { get; }
    Vector2 ActualSize { get; }
    Shadow Shadow { get; set; }
    public static DependencyProperty ShadowProperty { get; }
    UIContext UIContext { get; }
    XamlRoot XamlRoot { get; set; }
  }
  public class UIElementWeakCollection : IIterable<UIElement>, IVector<UIElement>
  public sealed class Window {
    UIContext UIContext { get; }
  }
  public sealed class XamlRoot
  public sealed class XamlRootChangedEventArgs
}
namespace Windows.UI.Xaml.Controls {
  public sealed class DatePickerFlyoutPresenter : Control {
    bool IsDefaultShadowEnabled { get; set; }
    public static DependencyProperty IsDefaultShadowEnabledProperty { get; }
  }
  public class FlyoutPresenter : ContentControl {
    bool IsDefaultShadowEnabled { get; set; }
    public static DependencyProperty IsDefaultShadowEnabledProperty { get; }
  }
  public class InkToolbar : Control {
    InkPresenter TargetInkPresenter { get; set; }
    public static DependencyProperty TargetInkPresenterProperty { get; }
  }
  public class MenuFlyoutPresenter : ItemsControl {
    bool IsDefaultShadowEnabled { get; set; }
    public static DependencyProperty IsDefaultShadowEnabledProperty { get; }
  }
  public sealed class TimePickerFlyoutPresenter : Control {
    bool IsDefaultShadowEnabled { get; set; }
    public static DependencyProperty IsDefaultShadowEnabledProperty { get; }
  }
  public class TwoPaneView : Control
  public enum TwoPaneViewMode
  public enum TwoPaneViewPriority
  public enum TwoPaneViewTallModeConfiguration
  public enum TwoPaneViewWideModeConfiguration
}
namespace Windows.UI.Xaml.Controls.Maps {
  public sealed class MapControl : Control {
    bool CanTiltDown { get; }
    public static DependencyProperty CanTiltDownProperty { get; }
    bool CanTiltUp { get; }
    public static DependencyProperty CanTiltUpProperty { get; }
    bool CanZoomIn { get; }
    public static DependencyProperty CanZoomInProperty { get; }
    bool CanZoomOut { get; }
    public static DependencyProperty CanZoomOutProperty { get; }
  }
  public enum MapLoadingStatus {
    DownloadedMapsManagerUnavailable = 3,
  }
}
namespace Windows.UI.Xaml.Controls.Primitives {
  public sealed class AppBarTemplateSettings : DependencyObject {
    double NegativeCompactVerticalDelta { get; }
    double NegativeHiddenVerticalDelta { get; }
    double NegativeMinimalVerticalDelta { get; }
  }
  public sealed class CommandBarTemplateSettings : DependencyObject {
    double OverflowContentCompactYTranslation { get; }
    double OverflowContentHiddenYTranslation { get; }
    double OverflowContentMinimalYTranslation { get; }
  }
  public class FlyoutBase : DependencyObject {
    bool IsConstrainedToRootBounds { get; }
    bool ShouldConstrainToRootBounds { get; set; }
    public static DependencyProperty ShouldConstrainToRootBoundsProperty { get; }
    XamlRoot XamlRoot { get; set; }
  }
  public sealed class Popup : FrameworkElement {
    bool IsConstrainedToRootBounds { get; }
    bool ShouldConstrainToRootBounds { get; set; }
    public static DependencyProperty ShouldConstrainToRootBoundsProperty { get; }
  }
}
namespace Windows.UI.Xaml.Core.Direct {
  public enum XamlPropertyIndex {
    AppBarTemplateSettings_NegativeCompactVerticalDelta = 2367,
    AppBarTemplateSettings_NegativeHiddenVerticalDelta = 2368,
    AppBarTemplateSettings_NegativeMinimalVerticalDelta = 2369,
    CommandBarTemplateSettings_OverflowContentCompactYTranslation = 2384,
    CommandBarTemplateSettings_OverflowContentHiddenYTranslation = 2385,
    CommandBarTemplateSettings_OverflowContentMinimalYTranslation = 2386,
    FlyoutBase_ShouldConstrainToRootBounds = 2378,
    FlyoutPresenter_IsDefaultShadowEnabled = 2380,
    MenuFlyoutPresenter_IsDefaultShadowEnabled = 2381,
    Popup_ShouldConstrainToRootBounds = 2379,
    ThemeShadow_Receivers = 2279,
    UIElement_ActualOffset = 2382,
    UIElement_ActualSize = 2383,
    UIElement_Shadow = 2130,
  }
  public enum XamlTypeIndex {
    ThemeShadow = 964,
  }
}
namespace Windows.UI.Xaml.Documents {
  public class TextElement : DependencyObject {
    XamlRoot XamlRoot { get; set; }
  }
}
namespace Windows.UI.Xaml.Hosting {
  public sealed class ElementCompositionPreview {
    public static UIElement GetAppWindowContent(AppWindow appWindow);
    public static void SetAppWindowContent(AppWindow appWindow, UIElement xamlContent);
  }
}
namespace Windows.UI.Xaml.Input {
  public sealed class FocusManager {
    public static object GetFocusedElement(XamlRoot xamlRoot);
  }
  public class StandardUICommand : XamlUICommand {
    StandardUICommandKind Kind { get; set; }
  }
}
namespace Windows.UI.Xaml.Media {
  public class AcrylicBrush : XamlCompositionBrushBase {
    IReference<double> TintLuminosityOpacity { get; set; }
    public static DependencyProperty TintLuminosityOpacityProperty { get; }
  }
  public class Shadow : DependencyObject
  public class ThemeShadow : Shadow
  public sealed class VisualTreeHelper {
    public static IVectorView<Popup> GetOpenPopupsForXamlRoot(XamlRoot xamlRoot);
  }
}
namespace Windows.UI.Xaml.Media.Animation {
  public class GravityConnectedAnimationConfiguration : ConnectedAnimationConfiguration {
    bool IsShadowEnabled { get; set; }
  }
}
namespace Windows.Web.Http {
  public sealed class HttpClient : IClosable, IStringable {
    IAsyncOperationWithProgress<HttpRequestResult, HttpProgress> TryDeleteAsync(Uri uri);
    IAsyncOperationWithProgress<HttpRequestResult, HttpProgress> TryGetAsync(Uri uri);
    IAsyncOperationWithProgress<HttpRequestResult, HttpProgress> TryGetAsync(Uri uri, HttpCompletionOption completionOption);
    IAsyncOperationWithProgress<HttpGetBufferResult, HttpProgress> TryGetBufferAsync(Uri uri);
    IAsyncOperationWithProgress<HttpGetInputStreamResult, HttpProgress> TryGetInputStreamAsync(Uri uri);
    IAsyncOperationWithProgress<HttpGetStringResult, HttpProgress> TryGetStringAsync(Uri uri);
    IAsyncOperationWithProgress<HttpRequestResult, HttpProgress> TryPostAsync(Uri uri, IHttpContent content);
    IAsyncOperationWithProgress<HttpRequestResult, HttpProgress> TryPutAsync(Uri uri, IHttpContent content);
    IAsyncOperationWithProgress<HttpRequestResult, HttpProgress> TrySendRequestAsync(HttpRequestMessage request);
    IAsyncOperationWithProgress<HttpRequestResult, HttpProgress> TrySendRequestAsync(HttpRequestMessage request, HttpCompletionOption completionOption);
  }
  public sealed class HttpGetBufferResult : IClosable, IStringable
  public sealed class HttpGetInputStreamResult : IClosable, IStringable
  public sealed class HttpGetStringResult : IClosable, IStringable
  public sealed class HttpRequestResult : IClosable, IStringable
}
namespace Windows.Web.Http.Filters {
  public sealed class HttpBaseProtocolFilter : IClosable, IHttpFilter {
    User User { get; }
    public static HttpBaseProtocolFilter CreateForUser(User user);
  }
}

The post Windows 10 SDK Preview Build 18362 available now! appeared first on Windows Developer Blog.

GPS Week Number Rollover – Microsoft has you covered!

$
0
0

In the late 1990s, the time and date features of computer systems became a topic of high interest for every business, as programmers realized that a simple abbreviation of four digit years to only the last two digits had a fatal flaw – the rollover to the year 2000. But early preparation and remediation ensured that the predicted Y2K disaster never occurred. In much the same way, Microsoft has completed preparations for the upcoming GPS Week Number Rollover to ensure that users of Microsoft time sources do not experience any impact.

In the financial services industry, coordinating and reporting time is critical. The same Global Positioning System (GPS) we rely upon daily to get from point A to point B, also provides precise and accurate Coordinated Universal Time (UTC) to financial markets. It transmits the correct date and time by supplying the receiver with the current week and the current number of seconds in the week. The week number is encoded into the data stream by a 10-bit field.  A binary 10-bit word can represent a maximum of 1,024 weeks (roughly19.7 years or an epoch). At the end of each epoch, the receiver resets the week number to zero and starts counting again. This is when a new epoch begins. GPS week zero started on January 6, 1980, and the second epoch will reset on April 6, 2019. Theoretically this could cause GPS receivers to malfunction. Since financial institutions worldwide use GPS to obtain precise time for setting internal clocks used to create financial transaction timestamps, malfunctions due to this GPS week rollover could affect the precise timing of trades for billions of financial transactions that happen each day. An inaccurate time stamp could result in non-compliance with regulations like the Financial Industry Regulatory Authority (FINRA) and the Markets in Financial Instruments Directive (MiFID II). 

Microsoft is aware of this upcoming transition and has reviewed devices and procedures to ensure readiness. Azure products and services that rely on GPS timing devices have received declaration of compliance with IS-GPS-200 from the device manufacturers, mitigating risk to users of Microsoft time sources.

Viewing all 5971 articles
Browse latest View live


<script src="https://jsc.adskeeper.com/r/s/rssing.com.1596347.js" async> </script>