Quantcast
Channel: Category Name
Viewing all 5971 articles
Browse latest View live

MVP Spotlight – Ask Dr. Neil: An in depth Q&A about mixed reality, Bing Maps, touchscreen tech, and more

$
0
0

Dr. Neil RoodynDr. Neil Roodyn, also known as Dr. Neil, has many titles – founder, consultant, trainer, Microsoft Regional Director, MVP and more. He has a wealth of knowledge and expertise when it comes to all things related to tech. As founder and director of tech company, nsquared, Dr. Neil has developed solutions that use shared screen technology to enrich interactions and Bing Maps has played a role in many of those projects.

Below is Q&A with Dr. Neil about mixed reality, Bing Maps, being a Microsoft Regional Director, MVP and everything in between.


I saw that you are a Microsoft Regional Director. What do you do in your role as Microsoft Regional Director?

I am Regional Director, and it is important to state that as a Regional Director I am not employed by Microsoft. The Regional Director program enables Microsoft leaders to gain insights and hear real world voices. This feedback provides the Microsoft leadership team with the information it needs to continue empowering developers and IT people with the most impactful and innovative tools, services and solutions. The Regional Director program consists of (approximately) 160 of the world’s top technology visionaries, chosen for both cross-platform expertise, community leadership, and business capabilities. I am grateful to be part of that program that helps Microsoft better understand what is happening in the world of technology. Personally, I spend time supporting start-ups, reviewing new technologies, and innovating new ways to apply technology to benefit humanity.

How did you become a Microsoft MVP, and what made you decide to become one?

I initially was awarded as an MVP because of the work I was doing to help developers learn .NET, build Smartphone software, and develop for the Tablet PC. That was in the early 2000’s. Since then I have helped engage developers with Virtual Earth (now Bing Maps), Microsoft Translator (now Speech Services), Surface Table, Kinect for Windows, HoloLens, UWP, Surface Hub, and many other technologies.

I never decided to become an MVP, I do things that I think will help make the world of software better, if Microsoft decides that is worthy of me being awarded as an MVP, I am grateful to receive the award.

From reading about all the cool projects you have worked on over the years, it sounds like you are always ahead of the curve. For example, working on smartphone tech back in 1999, tablet devices in 2002, and digital tables in 2008. What are you working on now?

As always, I have many projects I am working on. The interesting ones happen at the intersection of the Internet of Things (IoT), machine learning, and cloud services. One of the projects we recently announced is the Intelligent Meeting Room, http://intelligentmeetingroom.com This combines many of the technologies I have worked on in the last couple of decades to create a space where everything is recorded, transcribed and captured. It is becoming clear that the complete digitization of human transactions is underway. This will lead to far more transparency in the world. Eventually I think we will see this transparency lead to a reduction in need for security. The concept of privacy, as we currently see it, is reasonably modern, and, if we get the technology right, we can reframe the concept of privacy to complete openness.

We spoke to you back in 2014 about nsquared and how you are using Bing Maps in a mapping solution (i.e., nsquared maps) that you built for Windows to run on the Perceptive Pixel touchscreens. Have you released a new version of nsquared maps? Are you using maps in any other solutions?

The latest versions of nsquared maps have been developed for the nsquared DIGITABLE product. You can find out more here https://nsquaredsolutions.com/business/maps/. With massive multi-touch and multi-user support, nsquared maps enables multiple people to work on the same map, or different maps, on the same screen at the same time. It is several iterations of improvement on the product we demonstrated in 2014.

We have used digital maps in several other bespoke solutions for customers, both in client-side applications and web sites.

Also, it looks like you are doing Mixed Reality (MR) projects with nsquared now. Can you provide some details about what you are working on with mixed reality?

In 2018 I helped to teach developers how to integrate Azure services into their Mixed Reality applications. This lead to twelve workshops with customers around the world helping them to build cloud enabled MR applications. Each workshop was 4 or 5 days with a customer building a proof of concept for an application they desired. The end result of this was 14 of the level 300 hands on labs in the Mixed Reality academy.

I think Mixed Reality has incredible applications in education, I am surprised we are not seeing more adoption of the immersive (cheaper) headsets in high schools and universities. It is an area where more development is needed in order to unleash the potential in this space.

We just recently launched a Microsoft Garage Project, the Maps SDK for Unity developers that enables mixed reality map experiences. What do you think the future holds for mixed reality and maps?

I love the Maps SDK for Unity. If you have played with it you realize how powerful immersive Mixed Reality can be when combined with mapping technologies. Once you learn the simple controls, it is easy to navigate through a city or over a terrain in a way that provides a much richer experience than you get from a ‘flat screen’ map experience. It is of course a very single user experience right now. There is an opportunity to create a multi-user Mixed Reality mapping experience. This would be a good project for a developer looking for something interesting to do with the Bing Maps SDK. Even better, combine the multi-user maps with an educational experience in Mixed Reality.

Are you using Bing Maps in any of your current projects? If so, what are you using Bing Maps for?

I continue to support the nsquared maps project. I have also been involved in a couple of proof of concept projects recently using Bing Maps combined with some online machine learning algorithms. Hopefully I will be able to highlight these projects soon.

Why did you choose Bing Maps for that solution?

A couple of reasons for choosing the Bing Maps service. The API set makes it simpler to use, and my experience helps here. The other reason was the licensing model. Depending on the customer needs, you should make sure you can get the deal you want for the product to make sense. With Bing Maps, the commercial team has been helpful to navigate the contract and make sure the customer is getting the license that makes the most sense.

What benefits are you seeing?

It has been fast to prototype ideas and get visual concepts in front of customers and investors. This helps to get buy in for the project. For larger organizations that already have a commercial agreement with Microsoft, the licensing is usually very straight forward.

For more information about nsquared, go to http://nsquaredsolutions.com/. For more about the Bing Maps for Enterprise solutions, go to https://www.microsoft.com/maps.

- Bing Maps Team


Visual Studio 2019 version 16.2 Preview 2

$
0
0

We are announcing the release of the second preview of Visual Studio 2019 version 16.2. The latest version is available for you to download from VisualStudio.com, or, if you already have the Preview installed, just click the notification bell from inside Visual Studio to update. This latest preview adds the ability debug JavaScript code using the new Microsoft Edge Insider, an improved installation experience, and updates to the application installer command-line packaging. We’ve highlighted some of the notable features below. You can see a list of all the changes in the release notes. 

Microsoft Edge Insider support 

The latest preview release of Visual Studio enables debugging JavaScript in the new Microsoft Edge Insider browser for ASP.NET and ASP.NET Core projects. To do this, simply install the browser, set a breakpoint in the application’s JavaScript and start a debug session. Visual Studio will launch a new browser window with debugging enabled allowing you to step through your JavaScript code within Visual Studio.
But it doesn’t stop there since Visual Studio also supports debugging custom browser configurations using the “Browse with” option to launch the browser with custom CLI parameters (e.g. inprivate).

Visual Studio Installer support 

The Visual Studio Installer will now better handle size space detection based on what you already have installed on your machine. The improved installer experience means that if the required amount of space is larger than what is available, the installation does not attempt. 

.NET Productivity Improvements 

The latest preview release continues to focus on developer productivity and we bring even more refactoring capabilities to enable you to write better code faster. We’ve heard the request to bring back the Sort Usings command and that it should be separate from the Remove Usings command. We appreciate everyone who shared their feedback with usYou can find the Sort Usings command under Edit > IntelliSense.

We’ve also added the ability to convert a switch statements to switch expressionsSince switch expressions  are a new C# 8.0 featureyou need to ensure that you’re utilizing the latest language version, i.e. C# 8.0. Under project file, verify the language version is set to preview. Place your cursor in the switch keyword, type (Ctrl+.) to open the Quick Actions and Refactorings menu, and then select Convert switch statement to expression. 

Finally, we’ve added the ability to generate a parameter as code fix. Place the cursor in the variable name and type (Ctrl+.) to open the Quick Actions and Refactorings menu. Select the option to Generate a variable to create a new parameter. 

App Installer Command Line Packaging Improvements 

In Visual Studio 2019 version 16.2 Preview 2, we improved the sideloaded command line packaging experience for Windows Desktop projects and, in particular, those that are configured to receive automatic updates using an .appinstaller file.   

In previous versions of Visual Studio, you were required to use one of three different methods to properly set the HoursBetweenUpdateChecks update setting in the .appinstaller file. You could use the Packaging Wizard to package the application, add the AppInstallerUpdateFrequency and AppInstallerCheckForUpdateFrequency build properties to the project file, or pass these parameters as command line arguments. 

In Preview 2, we have eliminated the need to use the Package Wizard or define these build properties.  Instead, you are able to simply define and pass HoursBetweenUpdateChecks as a parameter during the command line build, simplifying and making it easy to adjust that setting. 

Take it for a spin today 

Give the latest Preview release a try by downloading it online, or updating via the notification bell inside Visual Studio. You can also launch and use the Visual Studio Installer to install the update. 

Our PM team is always reviewing feedback and we look forward to hearing what you have to say about our latest release. If you come across any issues, make sure to let us know by using the Report a Problem tool in Visual Studio. If you have any feature ideas or want to ask questions, you should head over to Visual Studio Developer Community. We use your feedback to decide what to work on as we pursue our goal to make Visual Studio 2019 the best developer tool, so thank you again on behalf of our entire team. 

The post Visual Studio 2019 version 16.2 Preview 2 appeared first on The Visual Studio Blog.

Announcing ML.NET 1.1 and Model Builder updates (Machine Learning for .NET)

$
0
0

alt text

ML.NET is an open-source and cross-platform machine learning framework (Windows, Linux, macOS) for .NET developers.

ML.NET offers Model Builder Model Builder (a simple UI tool for Visual Studio) and CLI to make it super easy to build custom ML Models using AutoML.

Using ML.NET, developers can leverage their existing tools and skillsets to develop and infuse custom AI into their applications by creating custom machine learning models for common scenarios like Sentiment Analysis, Recommendation, Image Classification and more!.

Today we’re announcing ML.NET 1.1 which includes updates for ML.NET (v1.0 was released on May 2019) and Model Builder for Visual Studio.

Following are the key highlights:

ML.NET updates

  • Added support for in-memory ‘image type’ in IDataview: In previous versions of ML.NET whenever you used images in a model (such as when scoring a TensorFlow or ONNX model using images) you needed to load the images from files placed on a drive by specifying file paths. In ML.NET 1.1 you can now load in-memory images and process them directly.

  • New Anomaly Detection algorithm (in preview): Added a new Anomaly Detection algorithm named SrCnnAnomalyDetection to the Time Series NuGet package. This algorithm based on a Super-Resolution Deep Convolutional Network. One of the advantages of this algorithm is that it does not require any prior training. This contribution comes from the Azure Anomaly Detector team.

    For further learning see this sample code for anomaly detection

  • New Time Series Forecasting components (in preview): This new feature added to the Time Series NuGet package allows you to implement a time series forecasting model based on Singular Spectrum Analysis(SSA). It is named in ML.NET as AdaptiveSingularSpectrumSequenceModeler. This type of time series forecasting prediction is very useful when your data has some kind of periodic component where events have a causal relationship and they happen (or miss to happen) in some point of time. For example, sales forecasts impacted by different seassons (Holiday-season, sales timeframe, weekends, etc.) or any other type of data where the time component is important.

    For further learning see this sample code for forecasting

  • Additional enhancements and remarks:

    • Upgrade internal TensorFlow version from 1.12.0 to 1.13.1
    • Microsoft.ML.TensorFlow has been upgraded from 0.12 (preview) to 1.0 (release).
  • Bug fixing: For further learning on bug fixes released on v1.1 go to the ML.NET v1.1 Release Notes

Model Builder updates

This release of Model Builder adds support for a new scenario and address many customer reported issues.

alt text

  • New Issue Classification Template:
    This scenario enables a user to add support for classifying tabular data into many classes. This template uses multi-class classification which can be used for classifying data into 3+ categories. E.g You can use this template for predicting GitHub issues, customer support ticket routing, classifying emails into different categories and many more scenarios.

  • Improve Evaluate step:
    Evaluate step now shows more correct information about the top models explored. This was the most commonly requested fix reported by customers.

  • Improve code generation step:
    Improve instructions for easily consuming generated code by referring to the project names.

  • Address customer feedback:
    This release also address many customer reported issues around installation errors, usability feedback and stability improvements and more.

Planning to go to production?

alt text

If you are using ML.NET in your app and looking to go into production, you can talk to an engineer on the ML.NET team to:

Fill out this form and leave your contact information at the end if you’d like someone from the ML.NET team to contact you.

Get started with ML.NET and Model Builder for Visual Studio

alt text

Get started with ML.NET here.

Get started with Model Builder here.

Next, going further explore some other resources:

Thanks and happy coding with ML.NET!

The ML.NET Team.

This blog was authored by Cesar de la Torre, Pranav Rastogi plus additional contributions of the ML.NET team

The post Announcing ML.NET 1.1 and Model Builder updates (Machine Learning for .NET) appeared first on .NET Blog.

Visual Studio Code Remote Development over SSH to a Raspberry Pi is butter

$
0
0

There's been a lot of folks, myself included, who have tried to install VS Code on the Raspberry Pi. In fact, there's a lovely process for this now. However, we have to ask ourselves is a Raspberry Pi really powerful enough to be running a full development environment and the app being debugged? Perhaps, but maybe this is a job for remote debugging. That means installing Visual Studio Code locally on my Windows or Mac machine, then having Visual Studio code install its headless server component (for ARM7) on the Pi.

In January I blogged about Remote Debugging with VS Code on a Raspberry Pi using .NET Core on ARM. It was, and is, a little hacked together with SSH and wishes. Let's set up a proper VS Code Remote environment so I can be productive on a Pi while still enjoying my main laptop's abilities.

  • First, can you ssh into your Raspberry Pi without a password prompt?
    • If not, be sure to set that up with OpenSSH, which is now installed on Windows 10 by default.
    • You know you've got it down when you can "ssh pi@mypi" and it just drops you into a remote prompt.
  • Next, get Visual Studio Code Insiders plus

From within VS Code Insiders, hit Ctrl/CMD+P and type "Remote-SSH" for some of the choices.

Remote-SSH options in VS Code

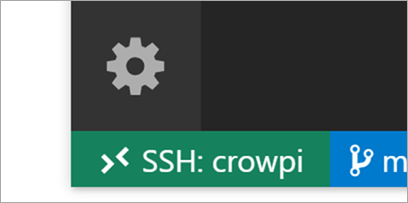
I can connect to Host and VS Code will SSH into the PI and install the VS Code server components in ~./vscode-server-insiders and then connect to them. It will take a minute as its downloading a 25 meg GZip and unzipping it into this temp folder. You'll know you're connected when you see this green badge as seen below that says "SSH: hostname."

Green badge in VS Code - SSH: crowpi

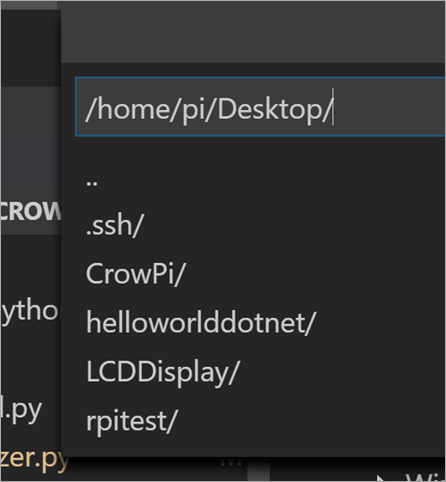
Then when you go "File | Open Folder" from the main menu, you'll get the remote system's files! You are working and editing locally on remote files.

My Raspberry Pi's desktop, remotely

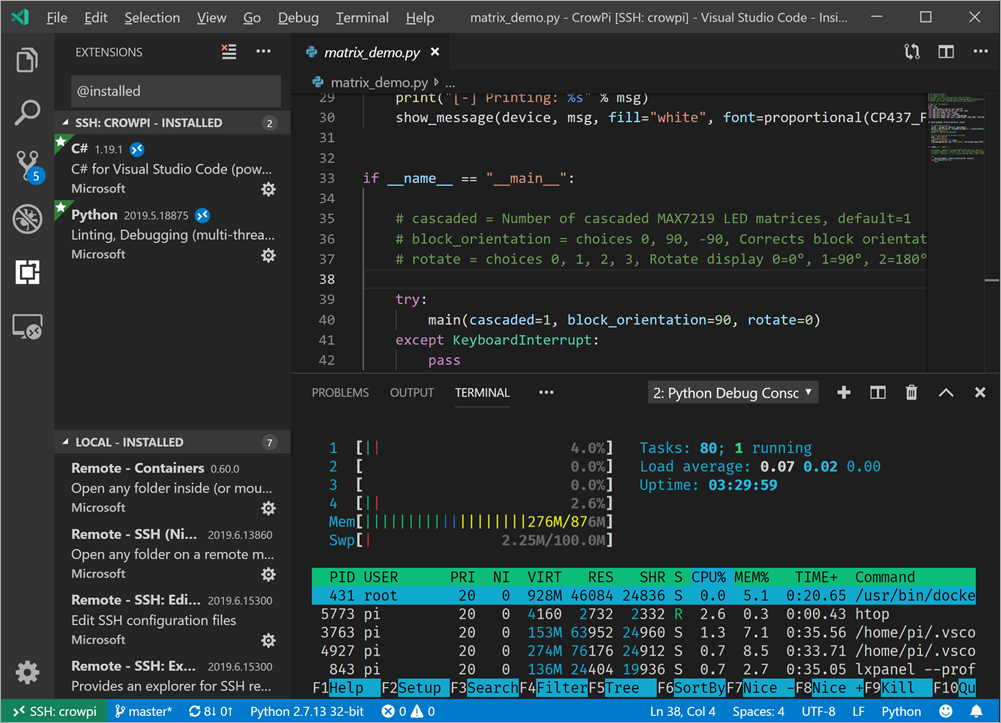
Note here that some of the extensions are NOT installed locally! The Python language services (using Jedi) are running remotely on the Raspberry Pi, so when I get intellisense, I'm getting it remoted from the actual machine I'm developing on, not a guess from my local box.

Some extentions are local and others are remote

When I open a Terminal with Ctrl+~, see that I'm automatically getting a remote terminal and I've even running htop in it!

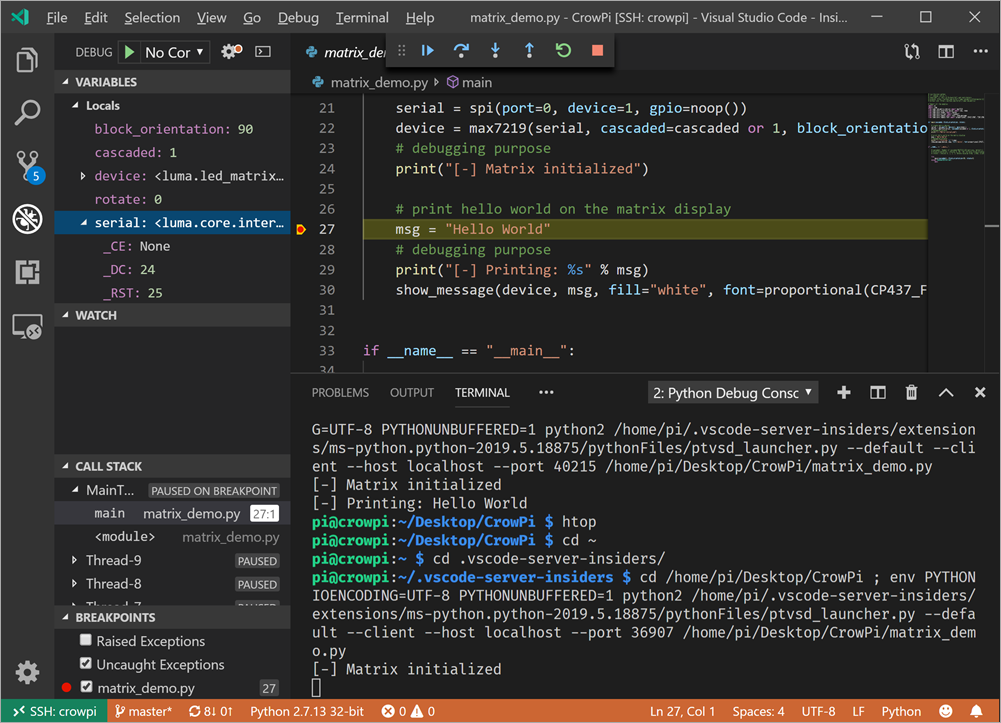
Check this out, I'm doing a remote interactive debugging session against CrowPi samples running on the Raspberry Pi (in Python 2) remotely from VS Code on my Windows 10 machine! I did need to make one change to the remote settings as it was defaulting to Python3 and I wanted to use Python2 for these samples.

Remote Debugging a Raspberry Pi

This has been a very smooth process and I remain super impressed with the VS Remote Development experience. I'll be looking at containers, and remote WSL debugging soon as well. Next step is to try C#, remotely, which will mean making sure the C# OmniSharp Extension


Sponsor: Suffering from a lack of clarity around software bugs? Give your customers the experience they deserve and expect with error monitoring from Raygun.com. Installs in minutes, try it today!


© 2018 Scott Hanselman. All rights reserved.
     

Azure IoT Tools help you connect to Azure IoT Hub in 1 minute in Visual Studio Code

$
0
0

When doing development for Azure IoT solutions, developers may want to test and debug their cloud solution with a real device. However, not every developer has a real device in their hand.  With the Azure IoT Tools for Visual Studio Code, you can easily use Visual Studio Code as a device simulator to quickly interact with Azure IoT Hub. Let’s see how easy it is to send a D2C (device-to-cloud) message in Visual Studio Code! Say Hello to IoT Hub in Visual Studio Code in 1 minute!

Prerequisites

  1. If you don’t have an Azure subscription, create a free account before you begin.
  2. Install Visual Studio Code
  3. Install the Azure IoT Tools extension for Visual Studio Code

Create an IoT Hub

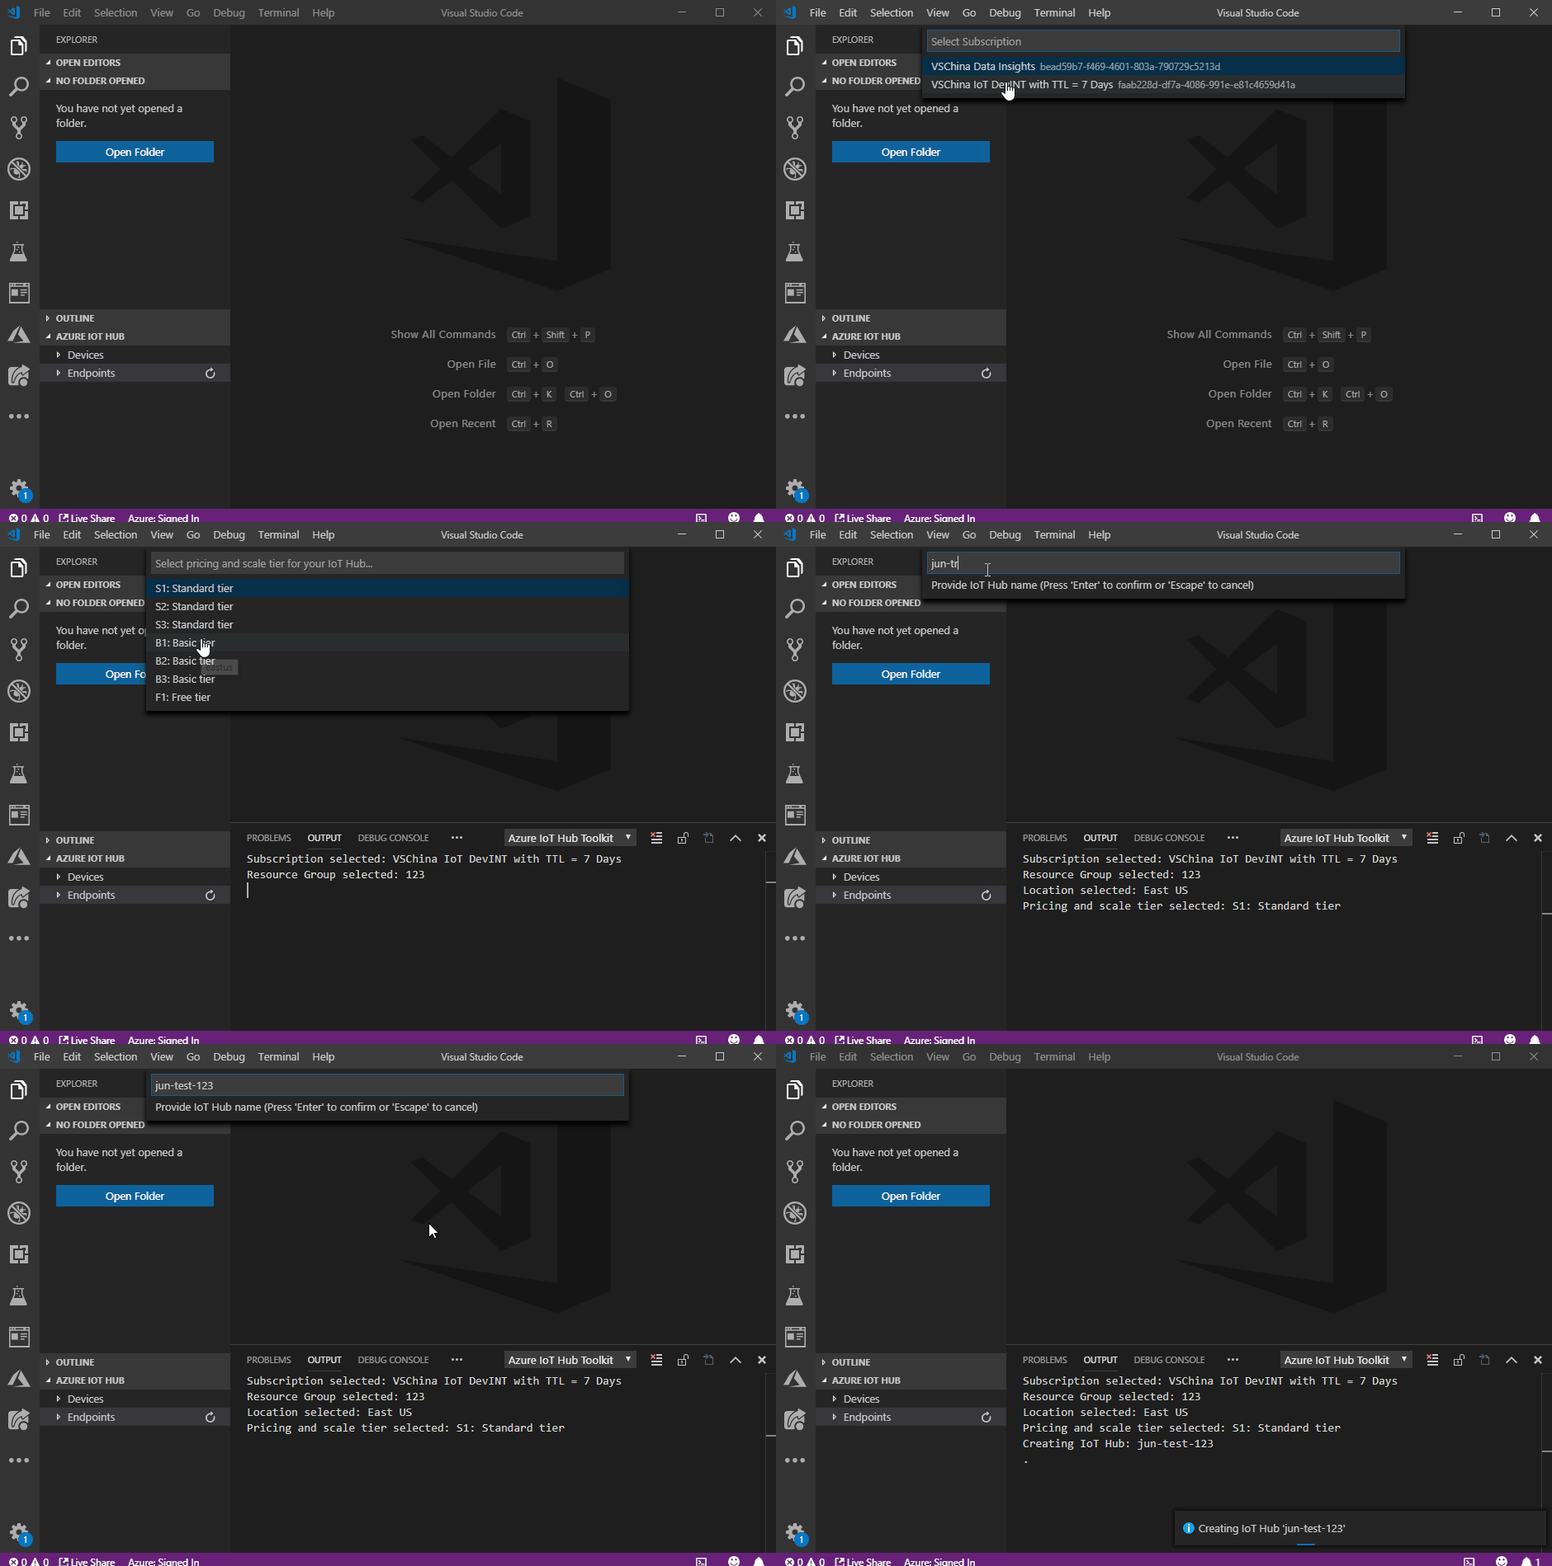
The first step is to create an IoT Hub in your subscription from Visual Studio Code.

  1. Click … > Create IoT Hub at AZURE IOT HUB tab, or type Azure IoT Hub: Create IoT Hub in Command Palette. (If you want to use an existing IoT Hub, click … > Select IoT Hub at AZURE IOT HUB tab)
  2. Choose your subscription, resource group, and the closest deploy location to you.
  3. For Pricing and scale tier, select the F1 – Free tier if it’s still available on your subscription.
  4. Enter the name of your IoT Hub.
  5. Wait a few minutes until the IoT Hub is created. you can see that your devices status become No device in ….

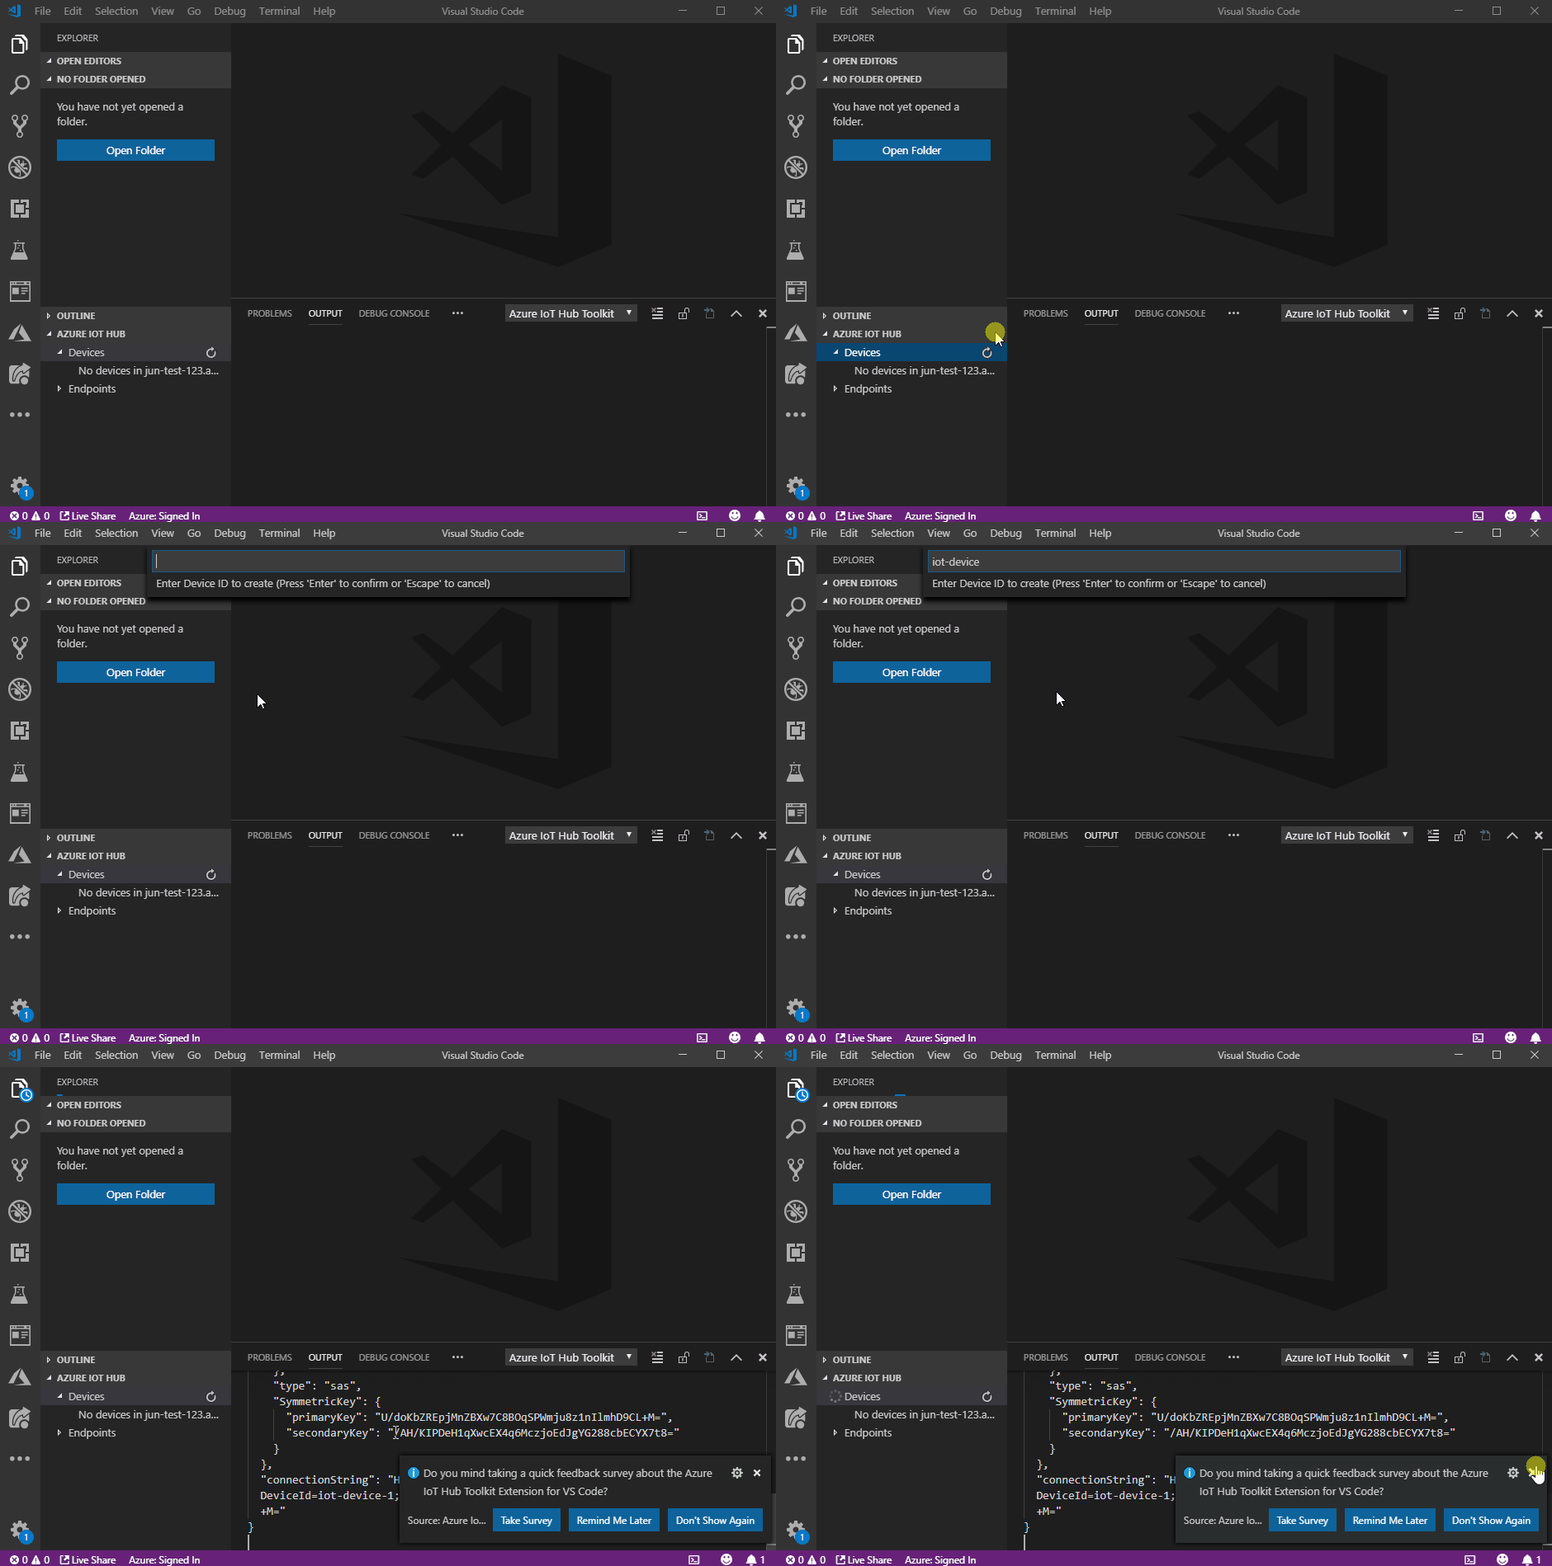
Register a device

A device must be registered with your IoT Hub before it can connect.

  1. Click … > Create Device at AZURE IOT HUB tab, or type Azure IoT Hub: Create Device in Command Palette.
  2. Enter device ID and press Enter.
  3. Wait a few seconds until the new device is created.

Say Hello to IoT Hub (Send D2C message)

Right-click your device and select Send D2C message to IoT Hub, then enter the message, results will be shown in OUTPUT > Azure IoT Hub Toolkit view. Your ‘Hello World’ is sent to Azure IoT Hub!

Monitor IoT Hub D2C message in Visual Studio Code

While you could send message to your IoT Hub, it is also possible to monitor those messages in Visual Studio Code.

  • Right-click your device and select Start Monitoring Built-in Event Endpoint.

  • The monitored messages will be shown in OUTPUT > Azure IoT Hub Toolkit view.
  • To stop monitoring, right-click the OUTPUT view and select Stop Monitoring Built-in Event Endpoint.

Is that cool? You could send and receive messages for Azure IoT Hub very easily in Visual Studio Code. Is that all? Not yet! Actually, you could use Azure IoT Tools extension to do lots of things when you develop with Azure IoT Hub! Checkout our Wiki Page to see the full list of features and tutorials. You could also use Azure IoT Tools to easily call Azure IoT Hub REST APIs or generate Azure IoT application with different languages such as C#, Java, Node.js, PHP, Python. For more IoT tooling announcements and tutorials, please check out our IoT Developer Blog. Azure IoT Tools make your Azure IoT development easier.

Useful Resources:

The post Azure IoT Tools help you connect to Azure IoT Hub in 1 minute in Visual Studio Code appeared first on The Visual Studio Blog.

Streamlining Azure DevOps extension development

$
0
0

Azure DevOps has an incredibly deep set of functionality to allow you to build extensions for your team. You can add and modify elements in the UI as well as build back-end tasks. While the majority of features your team needs on a day-to-day basis are built in, extensions allow you to modify Azure DevOps to meet your needs. In this blog post, we’re going to highlight some tips and tricks to accelerate development of your own extension.

What’s the problem we’re trying to solve?

Most modern IDEs have built-in debugging tools that you can use to inspect code, insert breakpoints, manipulate values, etc. The problem is that when you’re writing extensions to Azure DevOps, they need to run in the context of Azure DevOps. The official Azure DevOps extension documentation includes a guide on how to debug, but the approach it describes is to redeploy the extension to the marketplace each time you make a change and then use the browser’s built-in debugging tools. That process requires you to switch context to the browser’s dev tools every time you need to debug. Ideally, you would want to work directly inside your IDE or editor and debug immediately without having to publish to the marketplace.

The following steps describe how to convert an existing extension to use an alternate approach to development that loads the code directly from your dev machine rather than from a deployed bundle from the marketplace. This takes advantage of the capability in Azure DevOps to load content from localhost, which will enable us to hot reload and debug in Visual Studio Code.

Step 1: Reconfigure your vss-extension.json

  1. Create a new configs folder, and place the following files in there, replacing [extension-id] with your extension’s ID: configs/dev.json

{
    "id": "[extension-id]-dev", 
    "public": false, 
    "baseUri": "https://localhost:3000" 
}

configs/release.json

{
    "id": "[extension-id]", 
    "public": true 
}

Step 2: Update your webpack.config.json

  1. Enable source map and point your dev server to https://localhost:3000.

    module.exports = {
    devtool: "inline-source-map",
    devServer: {
    https: true,
    port: 3000
    }
    // ...
    };

  2. Configure the dev server to serve files from the correct path.

module.exports = {
    output: {
    publicPath: "/dist/"
        // ...
    }
    // ...
};

Step 3: Enable Firefox debugging in your Visual Studio Code launch.json file

  1. Install Firefox.

We use Firefox because the Visual Studio Code – Debugger for Chrome extension doesn’t yet support iframes. If you would prefer to debug your extension in Chrome, please add your support to this feature request.

  1. Install the Debugger for Firefox extension for Visual Studio Code.
  2. Add the following configuration to your launch.json file:

{
    "version": "0.2.0",
    "configurations": [
        {
            "name": "Launch Firefox",
            "type": "firefox",
            "request": "launch",
            "url": "https://localhost:3000/",
            "reAttach": true,
            "pathMappings": [
                {
                    "url": "webpack:///",
                    "path": "${workspaceFolder}/"
                }
            ]
        }
    ]
}

Step 4: Configure and run your debug server

  1. Install the webpack-dev-server package in your app.

npm install --global webpack-dev-server

  1. Launch your dev server.

webpack-dev-server --mode development

Step 5: Deploy your debug extension

  1. If you haven’t already installed it, you’ll need to install the tfx-cli in order to publish your extension.

npm install --global tfx-cli

  1. Run the following command to deploy a dev version of your extension.

tfx extension publish --manifest-globs vss-extension.json --overrides-file configs/dev.json --token [token]

This will have a different ID from your release version (see the dev.json above), so you will need to install this new extension in your respective Azure DevOps project to see it running.

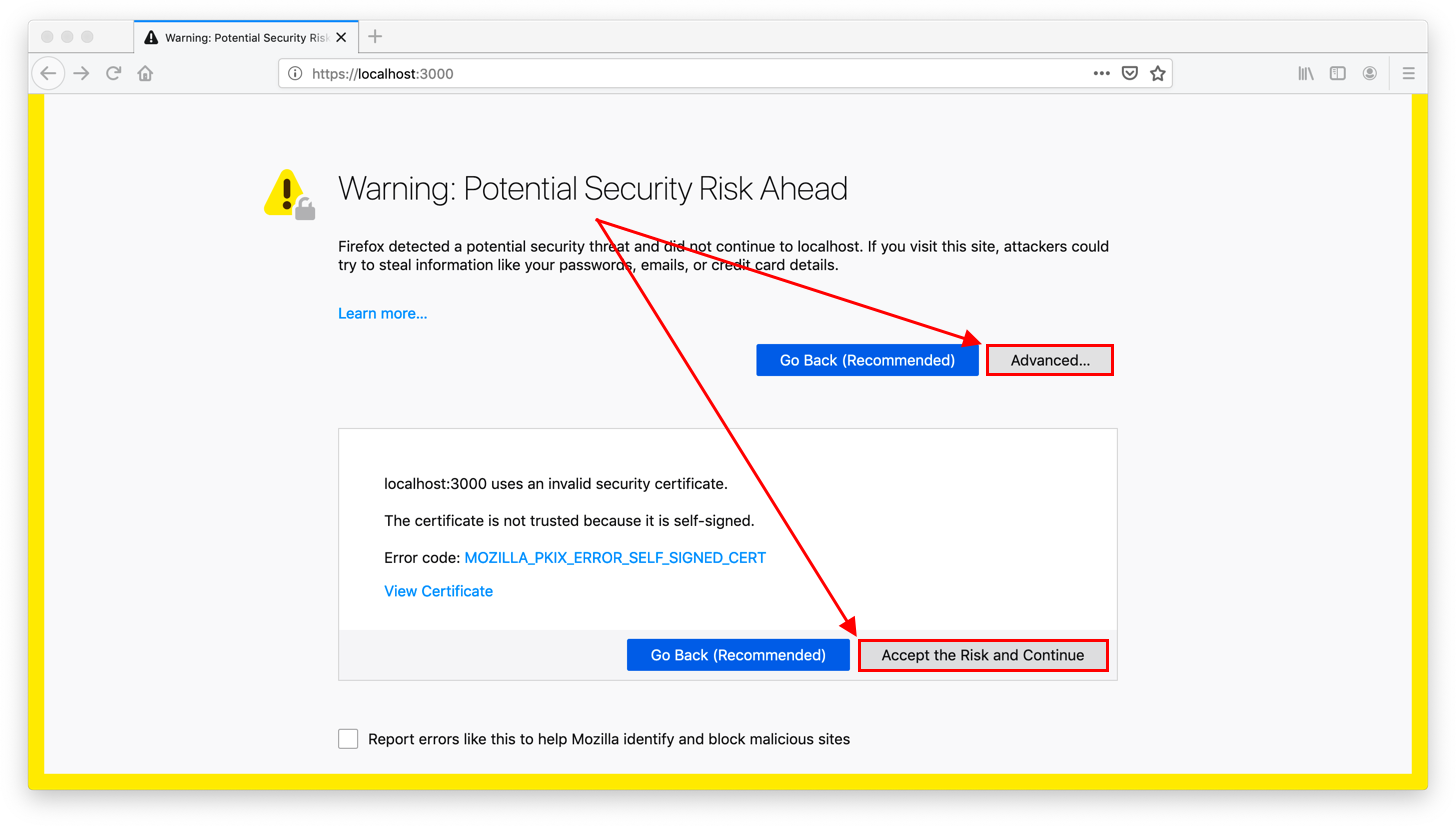
Step 6: Launch Firefox and debug

  1. Accept the HTTPS certificate warning. certificate warning
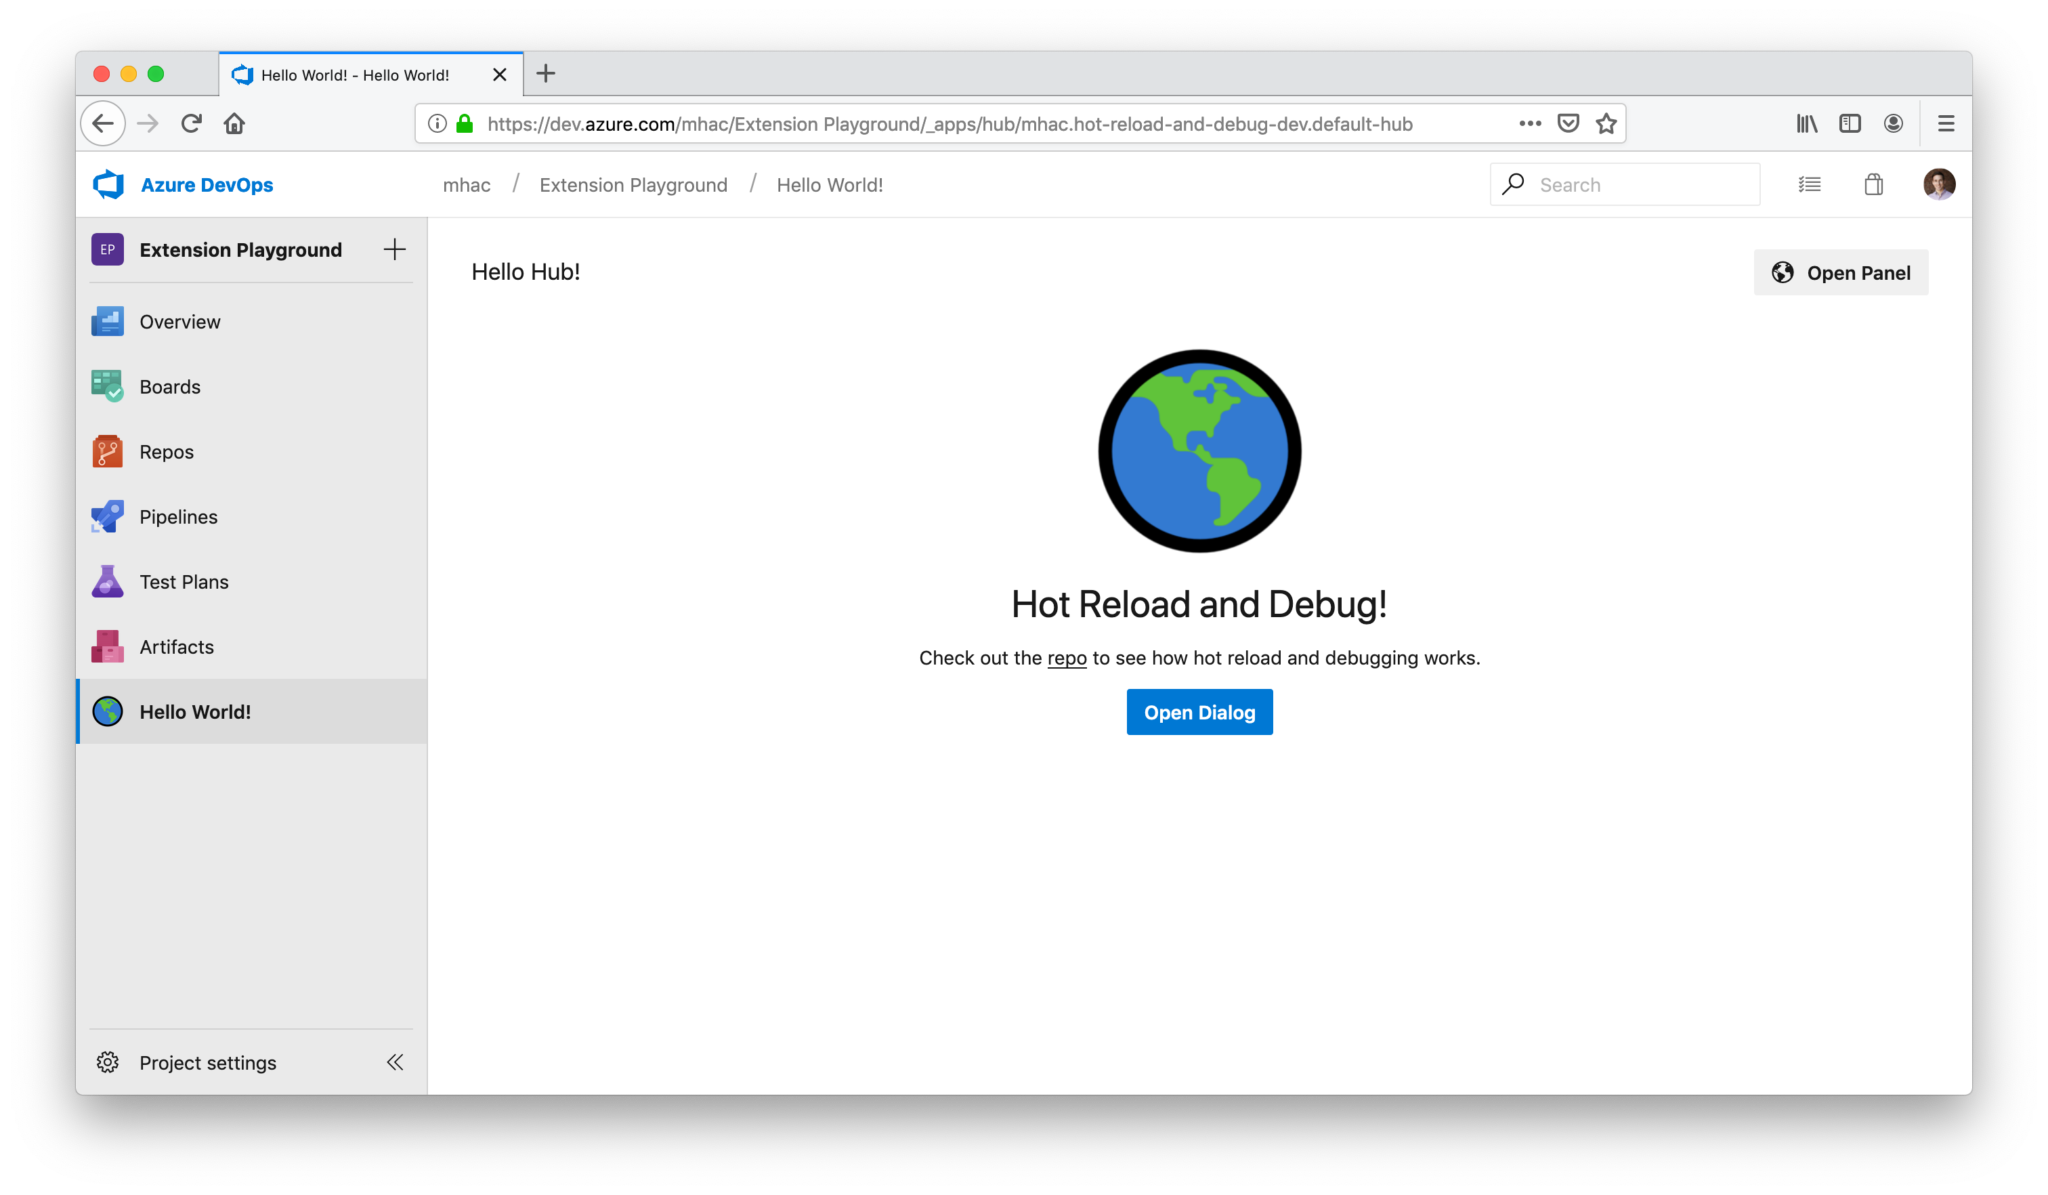
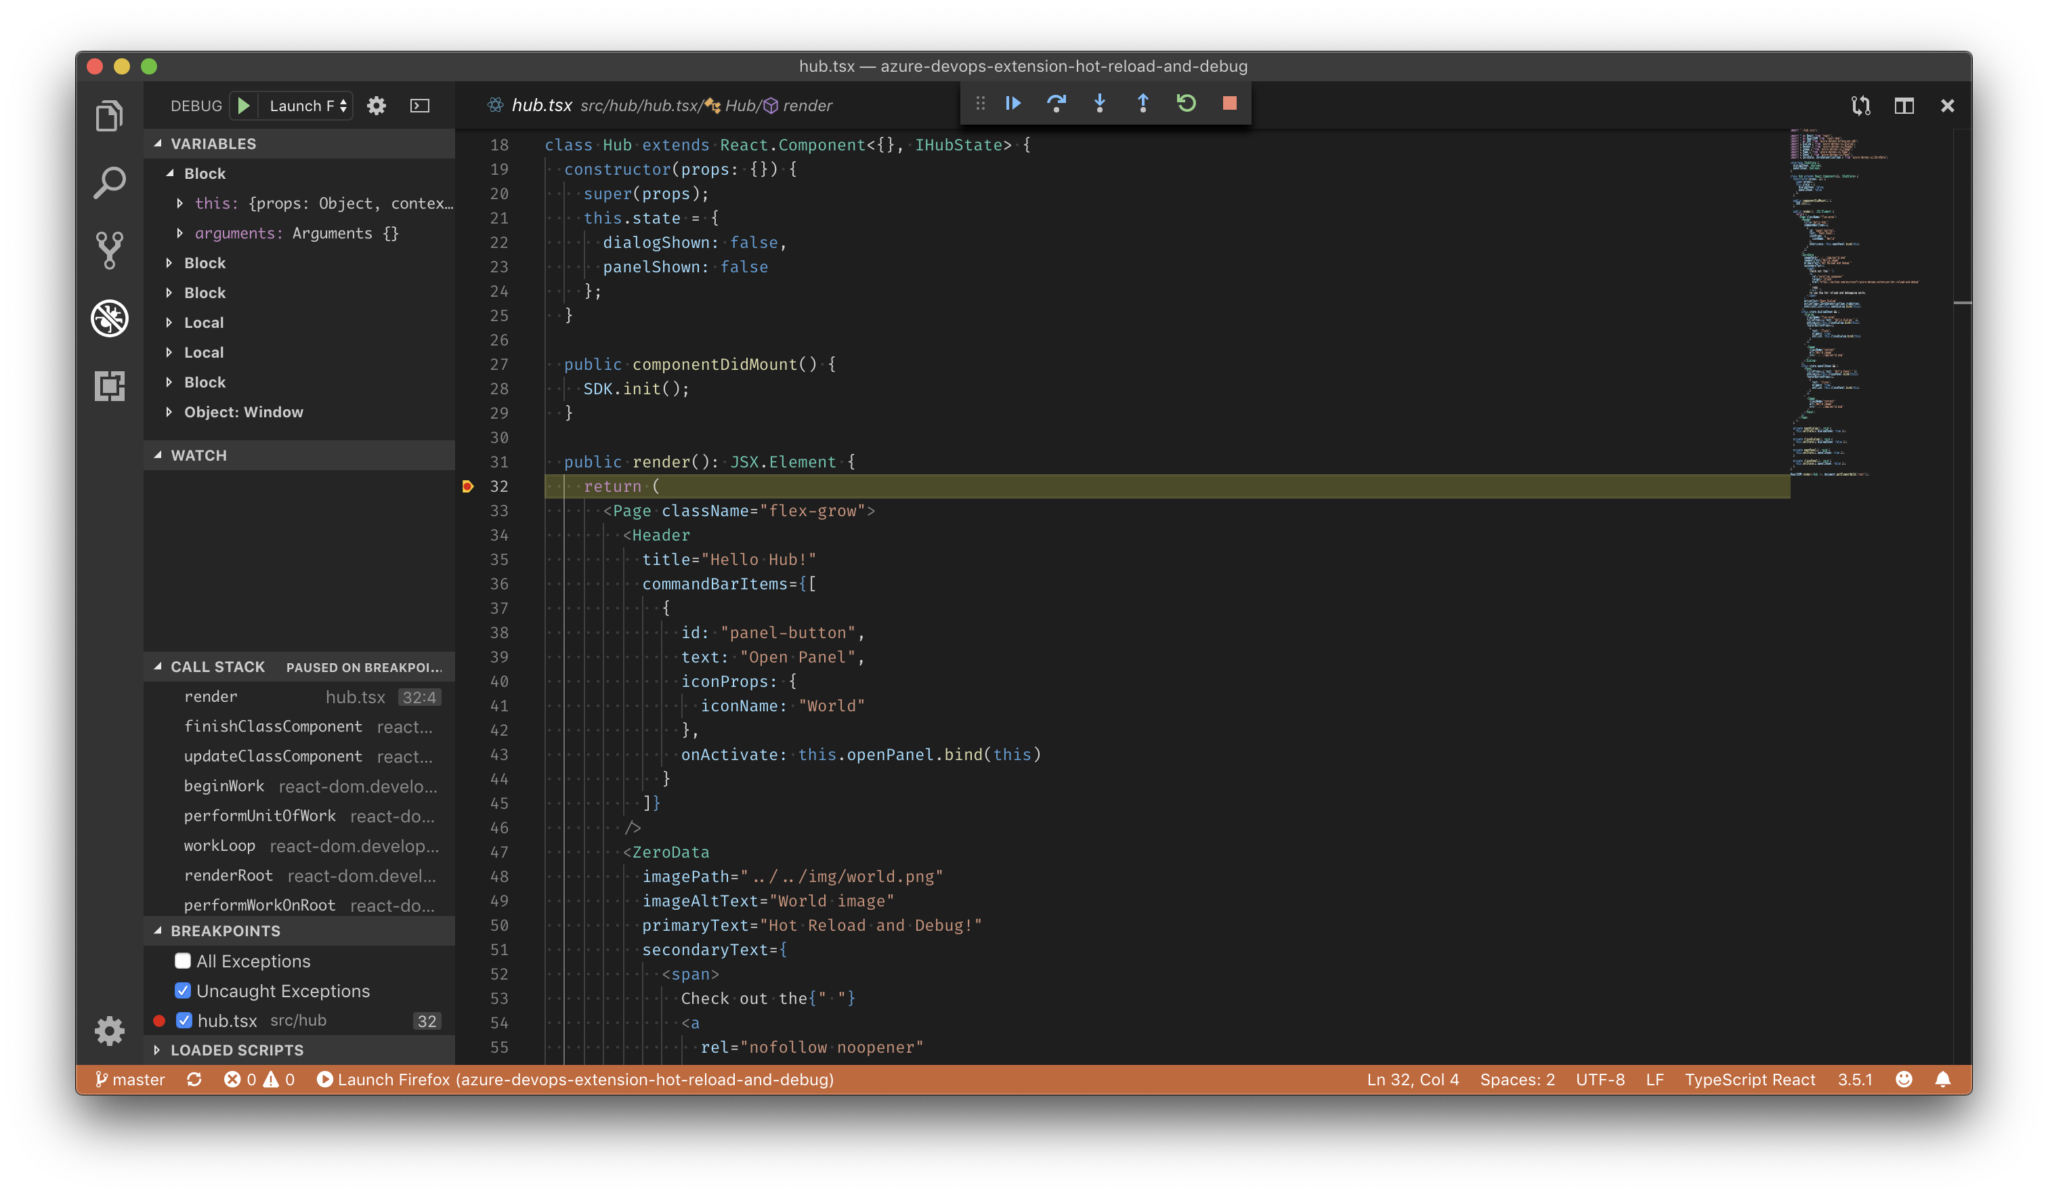
  2. Put a breakpoint in Visual Studio Code and then browse to your extension.
  3. You should see your breakpoint hit in Visual Studio Code. breakpoint debugging

Conclusion

For more detailed, step-by-step instructions, see this repo and if you want to start a new extension project, check out the Yeoman generator our team built to get everything set up faster.

The post Streamlining Azure DevOps extension development appeared first on Azure DevOps Blog.

Join Microsoft at ISC2019 in Frankfurt

$
0
0

The world of computing goes deep and wide in regards to working on issues related to our environment, economy, energy, and public health systems. These needs require modern, advanced solutions that can be hard to scale, take a long time to deliver, and were traditionally limited to a few organizations. Microsoft Azure delivers high-performance computing (HPC) capability and tools to power solutions that address these challenges integrated into a global-scale cloud platform.

Join us in Frankfurt, Germany from June 17–19, 2019 at the world's second-largest supercomputing show, ISC High Performance 2019. Learn how Azure customers combine the flexibility and elasticity of the cloud and how to integrate both our specialized compute virtual machines (VMs), as well as bare-metal offerings from Cray.

Microsoft booth presentations and topics include:

  • How to achieve high-performance computing on Azure
  • Cray Supercomputing on Azure
  • Cray ClusterStor on Azure with H-Series VMs
  • AI and HPC with NVIDIA
  • Autonomous driving
  • Live demos
  • Case studies from partners and customers
  • More about our recently launched HB and HC virtual machines

To learn more, please come by the Microsoft booth, K-530, and say "hello" on June 17 and June 19.

Microsoft, AMD, and Cray breakfast at ISC

Please join us for a co-hosted breakfast with Microsoft, AMD, and Cray on June 19, 2019 where we will discuss how to successful support your large scale HPC jobs in the cloud. In this session we will discuss our recently launched offers with Cray in Azure, as well as the Azure HB-series VMs optimized for applications driven by memory bandwidth, all powered by AMD EPYC processors. The breakfast is at the Frankfurt Marriott in Gold I-III (1st Floor) from 7:45 AM – 9:00 AM. Please feel free to register for this event.

Supercomputing in the cloud

Building on our strong relationship with Cray, we’re excited to showcase our three new dedicated offerings at ISC. We look forward to showcasing our accelerated innovation and delivery of next generation HPC and AI technologies to Azure customers.

We’re looking forward to seeing you at ISC.

Microsoft's ISC schedule

Tuesday, June 18, 2019

10:30 AM –

10:50 AM

Speaker

Burak Yenier, CEO, TheUberCloud Inc.

Title

UberCloud and Microsoft are helping customers move their engineering workload to Azure

11:30 AM –

11:50 AM

Speaker

Mohammad Zamaninasab, AI TSP GBB, Microsoft

Title

Artificial intelligence with Azure Machine Learning, Cognitive Services, DataBricks

12:30 PM –

12:50 PM

Speaker

Dr. Ulrich Knechtel, CSP Manager – EMEA, NVIDIA

Title

Accelerate your HPC workloads with NVIDIA GPUs on Azure

1:30 PM –

1:50 PM

Speaker

Uli Plechschmidt, Storage Marketing, Cray

Title

Why moving large scale, extremely I/O intensive HPC applications to Microsoft Azure is now possible

2:30 PM –

2:50 PM

Speaker

Joseph George, Executive Director, Cray Inc.

Title

5 reasons why you can maximize your manufacturing environment with Cray in Azure

3:30 PM –

3:50 PM

Speaker

Martin Hilgeman, Senior Manager, AMD HPC Centre of Excellence

Title

Turbocharging HPC in the cloud with AMD EPYC

4:30 PM –

4:50 PM

Speaker

Evan Burness, Principal Program Manager, Azure HPC, Microsoft

Title

HPC infrastructure in Azure

5:30 PM –

5:50 PM

Speaker

Niko Dukic, Senior Program Manager for Azure Storage, Microsoft

Title

Azure Storage ready for HPC

Wednesday, June 19, 2019

10:30 AM –

10:50 AM

Speaker

Gabriel Broner, Vice President and General Manager of HPC, Rscale Inc.

Title

Rescale HPC platform on Microsoft Azure

11:30 AM –

11:50 AM

Speaker

Martijn de Vries, CTO, Bright Computing

Title

Enabling hybrid clusters that span on-premises and Microsoft Azure

12:30 PM –

12:50 PM

Speaker

Rob Futrik, Program Manager, Microsoft

Title

HPC Clustermanagement in Azure via Microsoft programs: CycleCloud / Azure Batch / HP Pack

1:30 PM –

1:50 PM

Speaker

Christopher Woll, CTO, GNS Systems

Title

Digital Engineering Center – The HPC Workplace of tomorrow already today

2:30 PM –

2:50 PM

Speaker

Addison Snell, CEO, Intersect360 Research

Title

HPC and AI market update

3:30 PM –

3:50 PM

Speaker

Rick Watkins, Director of Appliance and Cloud Solutions, Altair

Title

Altair HyperWorks Unlimited Virtual Appliance (HWUL-VA) –  Easy to use HPC-Powered CAE solvers running on Azure

4:30 PM –

4:50 PM

Speaker

Gabriel Sallah, PSE GBB, Microsoft

Title

Deploying autonomous driving on Azure

5:30 PM –

5:50 PM

Speaker

Brock Taylor, Engineering Director and HPC Solutions Architect

Title

HPC as a service on-premises and off-premises considerations for the cloud

Announcing .NET Core 3.0 Preview 6

$
0
0

Today, we are announcing .NET Core 3.0 Preview 6. It includes updates for compiling assemblies for improved startup, optimizing applications for size with linker and EventPipe improvements. We’ve also released new Docker images for Alpine on ARM64.

Download .NET Core 3.0 Preview 6 right now on Windows, macOS and Linux.

Release notes have been published at dotnet/core. An API diff between Preview 5 and 6 is also available.

ASP.NET Core and EF Core are also releasing updates today.

If you missed it, check out the improvements we released in .NET Core 3.0 Preview 5, from last month.

WPF and Windows Forms update

The WPF team has now completed publishing most of the WPF codebase to GitHub. In fact, they just published source for fifteen assemblies. For anyone familiar with WPF, the assembly names should be very familiar.

In some cases, tests are still on the backlog to get published at or before 3.0 GA. That said, the presence of all of this code should enable the WPF community to fully participate in making changes across WPF. It is obvious from reading some of the GitHub issues that the community has its own backlog that it has been waiting to realize. Dark theme, maybe?

Alpine Docker images

Docker images are now available for both .NET Core and ASP.NET Core on ARM64. They were previously only available for x64.

The following images can be used in a Dockerfile, or with docker pull, as demonstrated below:

  • docker pull mcr.microsoft.com/dotnet/core/runtime:3.0-alpine-arm64v8
  • docker pull mcr.microsoft.com/dotnet/core/aspnet:3.0-alpine-arm64v8

Event Pipe improvements

Event Pipe now supports multiple sessions. This means that you can consume events with EventListener in-proc and simultaneously have out-of-process event pipe clients.

New Perf Counters added:

  • % Time in GC
  • Gen 0 Heap Size
  • Gen 1 Heap Size
  • Gen 2 Heap Size
  • LOH Heap Size
  • Allocation Rate
  • Number of assemblies loaded
  • Number of ThreadPool Threads
  • Monitor Lock Contention Rate
  • ThreadPool Work Items Queue
  • ThreadPool Completed Work Items Rate

Profiler attach is now implemented using the same Event Pipe infrastructure.

See Playing with counters from David Fowler to get an idea of what you can do with event pipe to perform your own performance investigations or just monitor application status.

See dotnet-counters to install the dotnet-counters tool.

Optimize your .NET Core apps with ReadyToRun images

You can improve the startup time of your .NET Core application by compiling your application assemblies as ReadyToRun (R2R) format. R2R is a form of ahead-of-time (AOT) compilation.

R2R binaries improve startup performance by reducing the amount of work the JIT needs to do as your application is loading. The binaries contain similar native code as what the JIT would produce, giving the JIT a bit of a vacation when performance matters most (at startup). R2R binaries are larger because they contain both intermediate language (IL) code, which is still needed for some scenarios, and the native version of the same code, to improve startup.

R2R is supported with .NET Core 3.0. It cannot be used with earlier versions of .NET Core.

Sample performance numbers

The following are performance numbers collected using a sample WPF application. The application was published as self-contained and did not use the assembly linker (covered later this post).

IL-only Application:

  • Startup time: 1.9 seconds
  • Memory usage: 69.1 MB
  • Application size: 150 MB

With ReadyToRun images:

  • Startup time: 1.3 seconds.
  • Memory usage: 55.7 MB
  • Application size: 156 MB

ReadyToRun images, explained

You can R2R compile both libraries and application binaries. At present, libraries can only be R2R compiled as part of an application, not for delivery as a NuGet package. We’d like more feedback on whether that scenario is important.

AOT compiling assemblies has been available as a concept with .NET for a long time, going back to the .NET Framework and NGEN. NGEN has a key drawback, which is that compilation must be done on client machines, using the NGEN tool. It isn’t possible to generate NGEN images as part of your application build.

Enter .NET Core. It comes with crossgen, which produces native images in a newer format called ReadyToRun. The name describes its primary value proposition, which is that these native images can be built as part of your build and are “ready to run” without any additional work on client machines. That’s a major improvement, and also an important win for climate change.

In terms of compatibility, ReadyToRun images are similar to IL assemblies, with some key differences.

  • IL assemblies contain just IL code. They can run on any runtime that supports the given target framework for that assembly. For example a netstandard2.0 assembly can run on .NET Framework 4.6+ and .NET Core 2.0+, on any supported operating system (Windows, macOS, Linux) and architecture (Intel, ARM, 32-bit, 64-bit).
  • R2R assemblies contain IL and native code. They are compiled for a specific minimum .NET Core runtime version and runtime environment (RID). For example, a netstandard2.0 assembly might be R2R compiled for .NET Core 3.0 and Linux x64. It will only be usable in that or a compatible configuration (like .NET Core 3.1 or .NET Core 5.0, on Linux x64), because it contains native code that is only usable in that runtime environment.

Instructions

The ReadyToRun compilation is a publish-only, opt-in feature. We’ve released a preview version of it with .NET Core 3.0 Preview 5.

To enable the ReadyToRun compilation, you have to:

  • Set the PublishReadyToRun property to true.
  • Publish using an explicit RuntimeIdentifier.

Note: When the application assemblies get compiled, the native code produced is platform and architecture specific (which is why you have to specify a valid RuntimeIdentifier when publishing).

Here’s an example:

<Project Sdk="Microsoft.NET.Sdk">
  <PropertyGroup>
    <OutputType>Exe</OutputType>
    <TargetFramework>netcoreapp3.0</TargetFramework>
    <PublishReadyToRun>true</PublishReadyToRun>
  </PropertyGroup>
</Project>

And publish using the following command:

dotnet publish -r win-x64 -c Release

Note: The RuntimeIdentifier can also be set in the project file.

Note: ReadyToRun is currently only supported for self-contained apps. It will be enabled for framework-dependent apps in a later preview.

Native symbol generation can be enabled by setting the PublishReadyToRunEmitSymbols property to true in your project. You do not need to generate native symbols for debugging purposes. These symbols are only useful for profiling purposes.

The SDK currently supports a way to exclude certain assemblies from being compiled into ReadyToRun images. This could be useful for cases when certain assemblies do not really need to be optimized for performance. This can help reduce the size of the application. It could also be a useful workaround for cases where the ReadyToRun compiler fails to compile a certain assembly. Exclusion is done using the PublishReadyToRunExclude item group. Example:

<ItemGroup>
  <PublishReadyToRunExclude Include="FilenameOfAssemblyToExclude.dll" />
</ItemGroup>

Cross platform/architecture compilations

The ReadyToRun compiler doesn’t currently support cross-targeting. You need to compile on a given target. For example, if you want R2R images for Windows x64, you need to run the publish command on that environment.

Exceptions to this:

  • Windows x64 can be used to compiles Windows ARM32, ARM64, and x86 images.
  • Windows x86 can be used to compile Windows ARM32 images.
  • Linux x64 can be used to compile Linux ARM32 and ARM64 images.

Assembly linking

The .NET core 3.0 SDK comes with a tool that can reduce the size of apps by analyzing IL and trimming unused assemblies.

With .NET Core, it has always been possible to publish self-contained apps that include everything needed to run your code, without requiring .NET to be installed on the deployment target. In some cases, the app only requires a small subset of the framework to function and could potentially be made much smaller by including only the used libraries.

We use the IL linker to scan the IL of your application to detect which code is actually required, and then trim unused framework libraries. This can significantly reduce the size of some apps. Typically, small tool-like console apps benefit the most as they tend to use fairly small subsets of the framework and are usually more amenable to trimming.

To use this tool, set PublishTrimmed=true in your project and publish a self-contained app:

dotnet publish -r <rid> -c Release

The publish output will include a subset of the framework libraries, depending on what the application code calls. For a helloworld app, the linker reduces the size from ~68MB to ~28MB.

Applications or frameworks (including ASP.NET Core and WPF) that use reflection or related dynamic features will often break when trimmed, because the linker doesn’t know about this dynamic behavior and usually can’t determine which framework types will be required for reflection at run time. To trim such apps, you need to tell the linker about any types needed by reflection in your code, and in any packages or frameworks that you depend on. Be sure to test your apps after trimming.

For more information about the IL Linker, see the documentation, or visit the mono/linker repo.

Note: In previous versions of .NET Core, ILLink.Tasks was shipped as an external NuGet package and provided much of the same functionality. It is no longer supported – please update to the latest 3.0 SDK and try the new experience!

Using the Linker and ReadToRun Together

The linker and ReadyToRun compiler can be used for the same application. In general, the linker makes your application smaller, and then the ready-to-run compiler will make it a bit larger again, but with a significant performance win. It is worth testing in various configurations to understand the impact of each option.

Note: dotnet/sdk #3257 prevents the linker and ReadyToRun from being used together for WPF and Windows Forms applications. We are working on fixing that as part of the .NET Core 3.0 release.

Native Hosting sample

The team recently posted a Native Hosting sample. It demonstrates a best practice approach for hosting .NET Core in a native application.

As part of .NET Core 3.0, we now expose general functionality to .NET Core native hosts that was previously only available to .NET Core managed applications through the officially provided .NET Core hosts. The functionality is primarily related to assembly loading. This functionality should make it easier to produce native hosts that can take advantage of the full feature set of .NET Core.

Closing

Please try out the new features. Please file issues for the bugs or any challenging experiences you find. We want the feedback! You can file feature requests, too, but they likely will need to wait to get implemented until the next release at this point.

We are now getting very close to being feature complete for .NET Core 3.0, and are now transitioning the focus of the team to the quality of the release. We’ve got a few months of bug fixing and performance work ahead. We’ll appreciate your feedback as we work through that process, too.

On that note, we will soon be switching the master branches on .NET Core repos to the next major release, likely at or shortly after the Preview 7 release (July).

Thanks for trying out .NET Core 3.0 previews. We appreciate your help. At this point, we’re focused on getting a final release in your hands.

The post Announcing .NET Core 3.0 Preview 6 appeared first on .NET Blog.


ASP.NET Core and Blazor updates in .NET Core 3.0 Preview 6

$
0
0

.NET Core 3.0 Preview 6 is now available and it includes a bunch of new updates to ASP.NET Core and Blazor.

Here’s the list of what’s new in this preview:

  • New Razor features: @attribute, @code, @key, @namespace, markup in @functions
  • Blazor directive attributes
  • Authentication & authorization support for Blazor apps
  • Static assets in Razor class libraries
  • Json.NET no longer referenced in project templates
  • Certificate and Kerberos Authentication
  • SignalR Auto-reconnect
  • Managed gRPC Client
  • gRPC Client Factory
  • gRPC Interceptors

Please see the release notes for additional details and known issues.

Get started

To get started with ASP.NET Core in .NET Core 3.0 Preview 6 install the .NET Core 3.0 Preview 6 SDK

If you’re on Windows using Visual Studio, you also need to install the latest preview of Visual Studio 2019.

For the latest client-side Blazor templates also install the latest Blazor extension from the Visual Studio Marketplace.

Upgrade an existing project

To upgrade an existing an ASP.NET Core app to .NET Core 3.0 Preview 6, follow the migrations steps in the ASP.NET Core docs.

Please also see the full list of breaking changes in ASP.NET Core 3.0.

To upgrade an existing ASP.NET Core 3.0 Preview 5 project to Preview 6:

  • Update Microsoft.AspNetCore.* package references to 3.0.0-preview6.19307.2
  • In Blazor apps:
    • Rename @functions to @code
    • Update Blazor specific attributes and event handlers to use the new directive attribute syntax (see below)
    • Remove any call to app.UseBlazor<TStartup>() and instead add a call to app.UseClientSideBlazor<TStartup>() before the call to app.UseRouting(). Also add a call to endpoints.MapFallbackToClientSideBlazor<TStartup>("index.html") in the call to app.UseEndpoints().

Before

app.UseRouting();

app.UseEndpoints(endpoints =>
{
    endpoints.MapDefaultControllerRoute();
});

app.UseBlazor<Client.Startup>();

After

app.UseClientSideBlazorFiles<Client.Startup>();

app.UseRouting();

app.UseEndpoints(endpoints =>
{
    endpoints.MapDefaultControllerRoute();
    endpoints.MapFallbackToClientSideBlazor<Client.Startup>("index.html");
});

New Razor features

We’ve added support for the following new Razor language features in this release.

@attribute

The new @attribute directive adds the specified attribute to the generated class.

@attribute [Authorize]

@code

The new @code directive is used in .razor files (not supported in .cshtml files) to specify a code block to add to the generated class as additional members. It’s equivalent to @functions, but now with a better name.

@code {
    int currentCount = 0;

    void IncrementCount()
    {
        currentCount++;
    }
}

@key

The new @key directive attribute is used in .razor files to specify a value (any object or unique identifier) that the Blazor diffing algorithm can use to preserve elements or components in a list.

<div>
    @foreach (var flight in Flights)
    {
        <DetailsCard @key="flight" Flight="@flight" />
    }
</div>

To understand why this feature is needed, consider rendering a list of cards with flight details without this feature:

<div>
    @foreach (var flight in Flights)
    {
        <DetailsCard Flight="@flight" />
    }
</div>

If you add a new flight into the middle of the Flights list the existing DetailsCard instances should remain unaffected and one new DetailsCard should be inserted into the rendered output.

To visualize this, if Flights previously contained [F0, F1, F2], then this is the before state:

  • DetailsCard0, with Flight=F0
  • DetailsCard1, with Flight=F1
  • DetailsCard2, with Flight=F2

… and this is the desired after state, given we insert a new item FNew at index 1:

  • DetailsCard0, with Flight=F0
  • DetailsCardNew, with Flight=FNew
  • DetailsCard1, with Flight=F1
  • DetailsCard2, with Flight=F2

However, the actual after state this:

  • DetailsCard0, with Flight=F0
  • DetailsCard1, with Flight=FNew
  • DetailsCard2, with Flight=F1
  • DetailsCardNew, with Flight=F2

The system has no way to know that DetailsCard2 or DetailsCard3 should preserve their associations with their older Flight instances, so it just re-associates them with whatever Flight matches their position in the list. As a result, DetailsCard1 and DetailsCard2 rebuild themselves completely using new data, which is wasteful and sometimes even leads to user-visible problems (e.g., input focus is unexpectedly lost).

By adding keys using @key the diffing algorithm can associate the old and new elements or components.

@namespace

Specifies the namespace for the generated class or the namespace prefix when used in an _Imports.razor file. The @namespace directive works today in pages and views (.cshtml) apps, but is now it is also supported with components (.razor).

@namespace MyNamespace

Markup in @functions and local functions

In views and pages (.cshtml files) you can now add markup inside of methods in the @functions block and in local functions.

@{ GreetPerson(person); }

@functions {
    void GreetPerson(Person person)
    {
        <p>Hello, <em>@person.Name!</em></p>
    }
}

Blazor directive attributes

Blazor uses a variety of attributes for influencing how components get compiled (e.g. ref, bind, event handlers, etc.). These attributes have been added organically to Blazor over time and use different syntaxes. In this Blazor release we’ve standardized on a common syntax for directive attributes. This makes the Razor syntax used by Blazor more consistent and predictable. It also paves the way for future extensibility.

Directive attributes all follow the following syntax where the values in parenthesis are optional:

@directive(-suffix(:name))(="value")

Some valid examples:

<!-- directive -->
<div @directive>...</div>
<div @directive="value"></div>

<!-- directive with key/value arg-->
<div @directive:key>...</div>
<div @directive:key="value"></div>

<!-- directive with suffix -->
<div @directive-suffix></div>
<div @directive-suffix="value"></div>

<!-- directive with suffix and key/value arg-->
<div @directive-suffix:key></div>
<div @directive-suffix:key="value"></div>

All of the Blazor built-in directive attributes have been updated to use this new syntax as described below.

Event handlers

Specifying event handlers in Blazor now uses the new directive attribute syntax instead of the normal HTML syntax. The syntax is similar to the HTML syntax, but now with a leading @ character. This makes C# event handlers distinct from JS event handlers.

<button @onclick="@Clicked">Click me!</button>

When specifying a delegate for C# event handler the @ prefix is currently still required on the attribute value, but we expect to remove this requirement in a future update.

In the future we also expect to use the directive attribute syntax to support additional features for event handlers. For example, stopping event propagation will likely look something like this (not implemented yet, but it gives you an idea of scenarios now enabled by directive attributes):

<button @onclick="Clicked" @onclick:stopPropagation>Click me!</button>

Bind

<input @bind="myValue">...</input>
<input @bind="myValue" @bind:format="mm/dd">...</input>
<MyButton @bind-Value="myValue">...</MyButton>

Key

<div @key="id">...</div>

Ref

<button @ref="myButton">...</button>

Authentication & authorization support for Blazor apps

Blazor now has built-in support for handling authentication and authorization. The server-side Blazor template now supports options for enabling all of the standard authentication configurations using ASP.NET Core Identity, Azure AD, and Azure AD B2C. We haven’t updated the Blazor WebAssembly templates to support these options yet, but we plan to do so after .NET Core 3.0 has shipped.

To create a new Blazor app with authentication enabled:

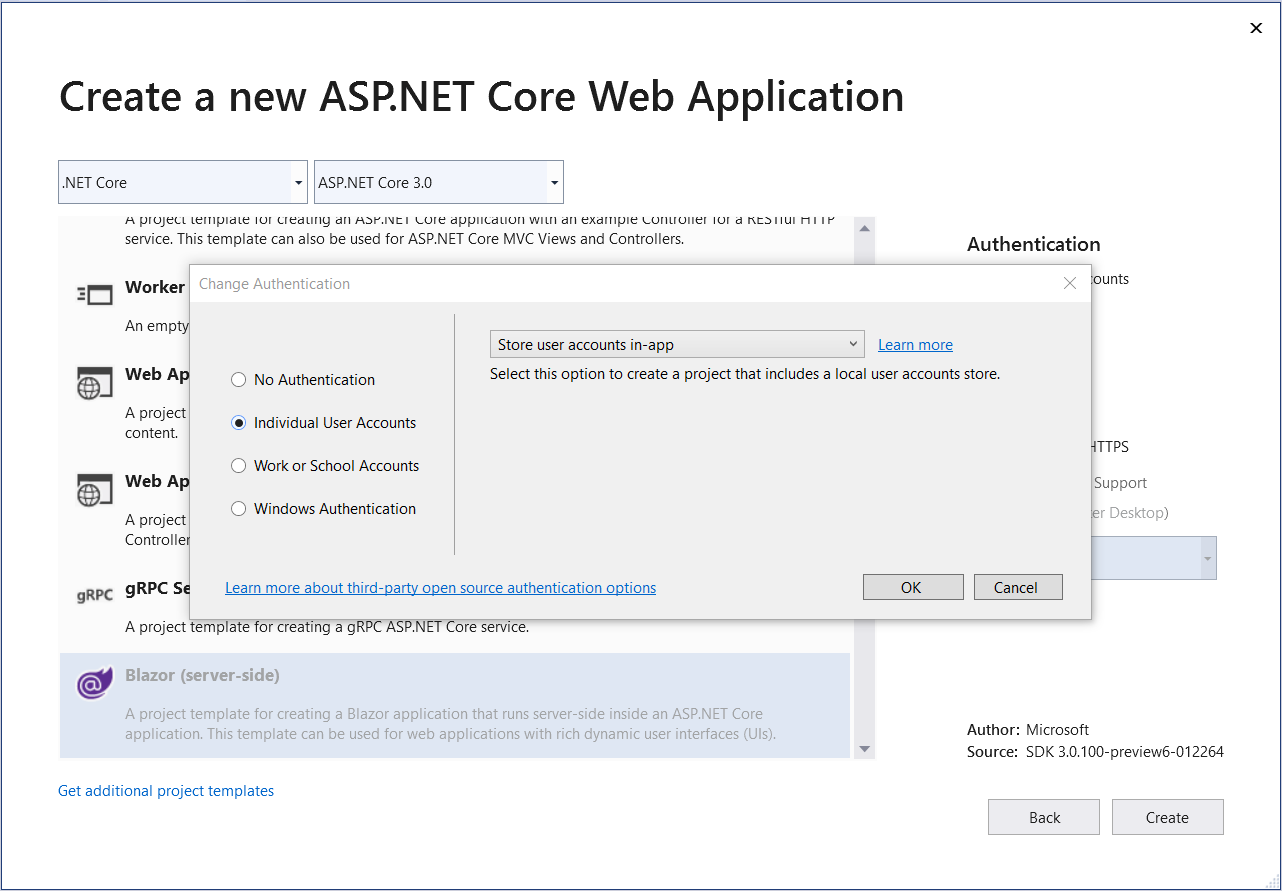
  1. Create a new Blazor (server-side) project and select the link to change the authentication configuration. For example, select “Individual User Accounts” and “Store user accounts in-app” to use Blazor with ASP.NET Core Identity:

Blazor authentication

  1. Run the app. The app includes links in the top row for registering as a new user and logging in.

Blazor authentication running

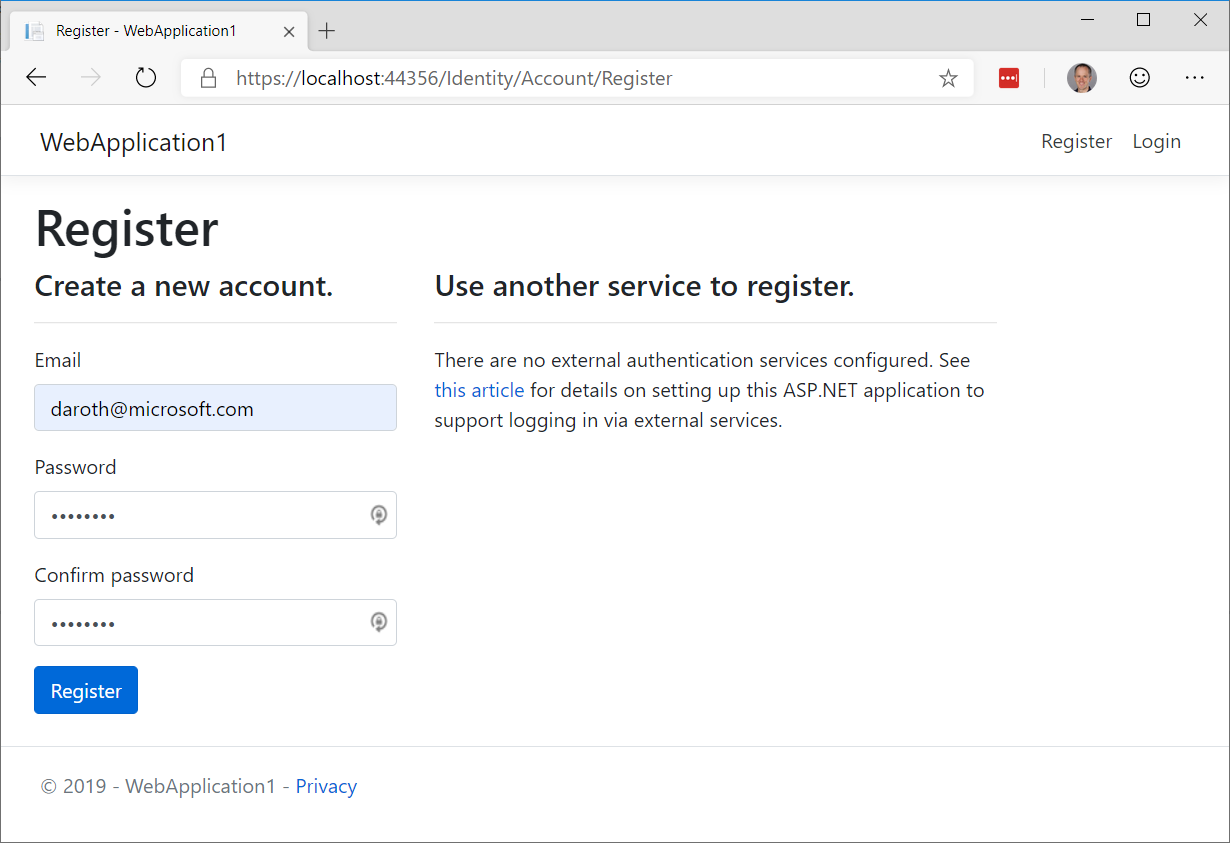
  1. Select the Register link to register a new user.

Blazor authentication register

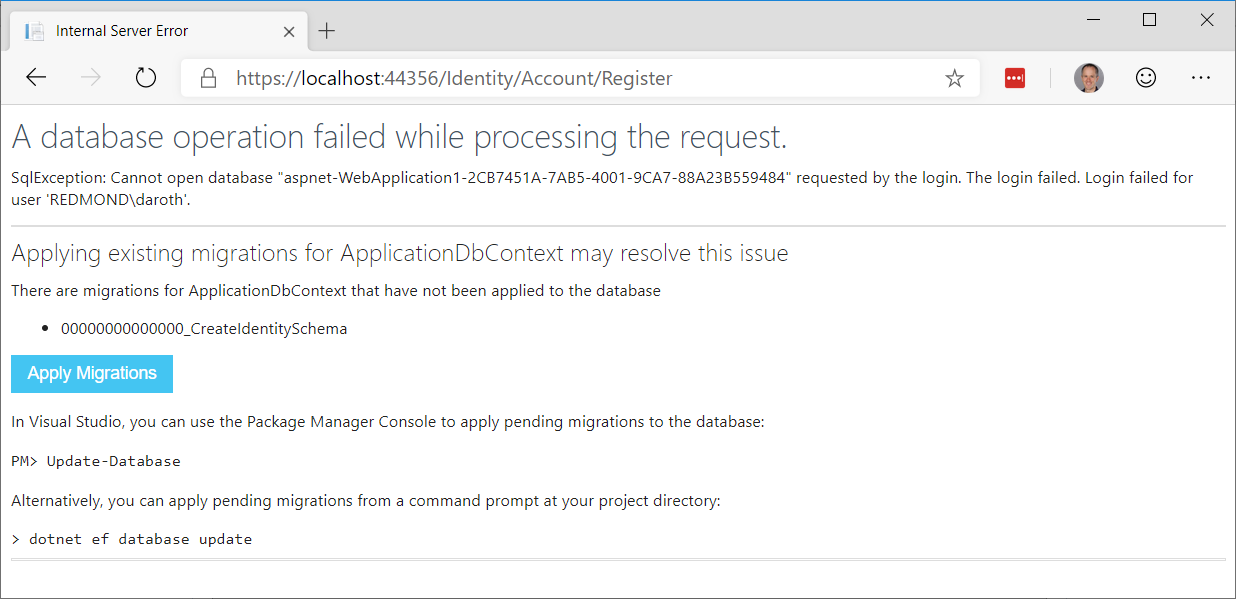
  1. Select “Apply Migrations” to apply the ASP.NET Core Identity migrations to the database.

Blazor authentication apply migrations

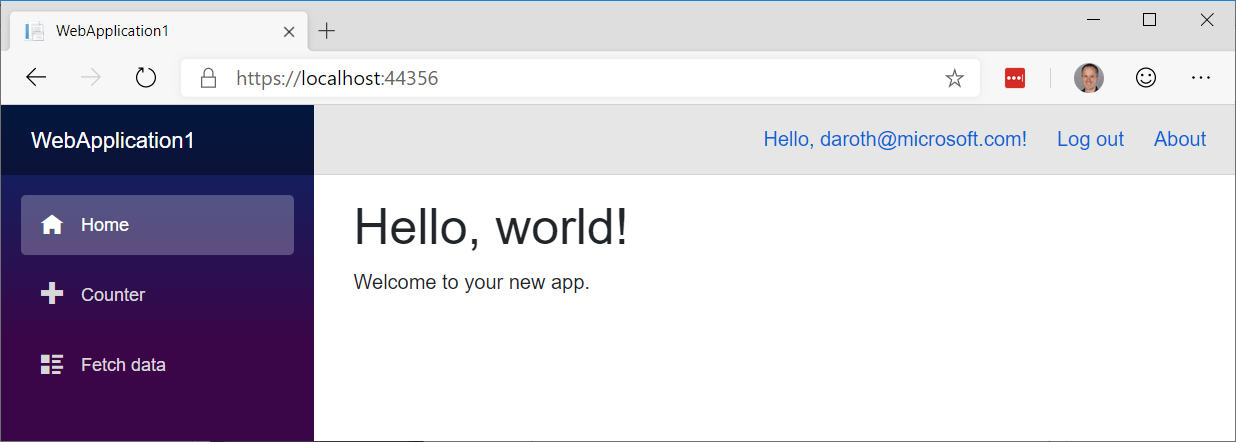
  1. You should now be logged in.

Blazor authentication logged in

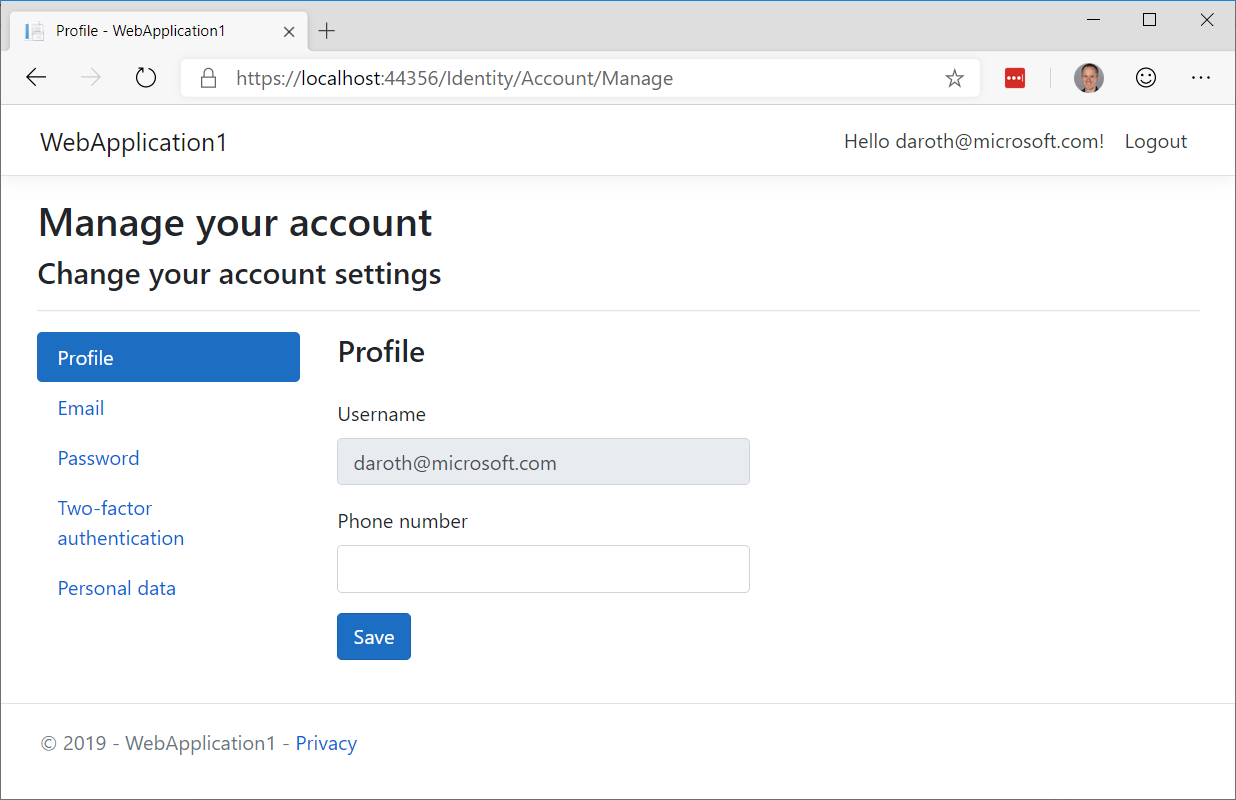
  1. Select your user name to edit your user profile.

Blazor authentication edit profile

In the Blazor app, authentication and authorization are configured in the Startup class using the standard ASP.NET Core middleware.

app.UseRouting();

app.UseAuthentication();
app.UseAuthorization();

app.UseEndpoints(endpoints =>
{
    endpoints.MapControllers();
    endpoints.MapBlazorHub();
    endpoints.MapFallbackToPage("/_Host");
});

When using ASP.NET Core Identity all of the identity related UI concerns are handled by the framework provided default identity UI.

services.AddDefaultIdentity<IdentityUser>()
    .AddEntityFrameworkStores<ApplicationDbContext>();

The authentication related links in top row of the app are rendered using the new built-in AuthorizeView component, which displays different content depending on the authentication state.

LoginDisplay.razor

<AuthorizeView>
    <Authorized>
        <a href="Identity/Account/Manage">Hello, @context.User.Identity.Name!</a>
        <a href="Identity/Account/LogOut">Log out</a>
    </Authorized>
    <NotAuthorized>
        <a href="Identity/Account/Register">Register</a>
        <a href="Identity/Account/Login">Log in</a>
    </NotAuthorized>
</AuthorizeView>

The AuthorizeView component will only display its child content when the user is authorized. Alternatively, the AuthorizeView takes parameters for specifying different templates when the user is Authorized, NotAuthorized, or Authorizing. The current authentication state is passed to these templates through the implicit context parameter. You can also specify specific roles or an authorization policy on the AuthorizeView that the user must satisfy to see the authorized view.

To authorize access to specific pages in a Blazor app, use the normal [Authorize] attribute. You can apply the [Authorize] attribute to a component using the new @attribute directive.

@using Microsoft.AspNetCore.Authorization
@attribute [Authorize]
@page "/fetchdata"

To specify what content to display on a page that requires authorization when the user isn’t authorized or is still in the processing of authorizing, use the NotAuthorizedContent and AuthorizingContent parameters on the Router component. These Router parameters are only support in client-side Blazor for this release, but they will be enabled for server-side Blazor in a future update.

The new AuthenticationStateProvider service make the authentication state available to Blazor apps in a uniform way whether they run on the server or client-side in the browser. In server-side Blazor apps the AuthenticationStateProvider surfaces the user from the HttpContext that established the connection to the server. Client-side Blazor apps can configure a custom AuthenticationStateProvider as appropriate for that application. For example, it might retrieve the current user information by querying an endpoint on the server.

The authentication state is made available to the app as a cascading value (Task<AuthenticationState>) using the CascadingAuthenticationState component. This cascading value is then used by the AuthorizeView and Router components to authorize access to specific parts of the UI.

App.razor

<CascadingAuthenticationState>
    <Router AppAssembly="typeof(Startup).Assembly">
        <NotFoundContent>
            <p>Sorry, there's nothing at this address.</p>
        </NotFoundContent>
    </Router>
</CascadingAuthenticationState>

Static assets in Razor class libraries

Razor class libraries can now include static assets like JavaScript, CSS, and images. These static assets can then be included in ASP.NET Core apps by referencing the Razor class library project or via a package reference.

To include static assets in a Razor class library add a wwwroot folder to the Razor class library and include any required files in that folder.

When a Razor class library with static assets is referenced either as a project reference or as a package, the static assets from the library are made available to the app under the path prefix _content/{LIBRARY NAME}/. The static assets stay in their original folders and any changes to the content of static assets in the Razor class libraries are reflected in the app without rebuilding.

When the app is published, the companion assets from all referenced Razor class libraries are copied into the wwwroot folder of the published app under the same prefix.

To try out using static assets from a Razor class library:

  1. Create a default ASP.NET Core Web App.

    dotnet new webapp -o WebApp1

  2. Create a Razor class library and reference it from the web app.

    dotnet new razorclasslib -o RazorLib1
    dotnet add WebApp1 reference RazorLib1

  3. Add a wwwroot folder to the Razor class library and include a JavaScript file that logs a simple message to the console.

    cd RazorLib1
    mkdir wwwroot

hello.js

console.log("Hello from RazorLib1!");
  1. Reference the script file from Index.cshtml in the web app.
<script src="_content/RazorLib1/hello.js"></script>
  1. Run the app and look for the output in the browser console.

    Hello from RazorLib1!

Projects now use System.Text.Json by default

New ASP.NET Core projects will now use System.Text.Json for JSON handling by default. In this release we removed Json.NET (Newtonsoft.Json) from the project templates. To enable support for using Json.NET, add the Microsoft.AspNetCore.Mvc.NewtonsoftJson package to your project and add a call to AddNewtonsoftJson() following code in your Startup.ConfigureServices method. For example:

services.AddMvc()
    .AddNewtonsoftJson();

Certificate and Kerberos authentication

Preview 6 brings Certificate and Kerberos authentication to ASP.NET Core.

Certificate authentication requires you to configure your server to accept certificates, and then add the authentication middleware in Startup.Configure and the certificate authentication service in Startup.ConfigureServices.

public void ConfigureServices(IServiceCollection services)
{
    services.AddAuthentication(
        CertificateAuthenticationDefaults.AuthenticationScheme)
            .AddCertificate();
    // All the other service configuration.
}

public void Configure(IApplicationBuilder app, IHostingEnvironment env)
{
    app.UseAuthentication();
    // All the other app configuration.
}

Options for certificate authentication include the ability to accept self-signed certificates, check for certificate revocation, and check that the proffered certificate has the right usage flags in it. A default user principal is constructed from the certificate properties, with an event that enables you to supplement or replace the principal. All the options, and instructions on how to configure common hosts for certificate authentication can be found in the documentation.

We’ve also extended “Windows Authentication” onto Linux and macOS. Previously this authentication type was limited to IIS and HttpSys, but now Kestrel has the ability to use Negotiate, Kerberos, and NTLM on Windows, Linux, and macOS for Windows domain joined hosts by using the Microsoft.AspNetCore.Authentication.Negotiate nuget package. As with the other authentication services you configure authentication app wide, then configure the service:

public void ConfigureServices(IServiceCollection services)
{ 
    services.AddAuthentication(NegotiateDefaults.AuthenticationScheme)
        .AddNegotiate();
}

public void Configure(IApplicationBuilder app, IHostingEnvironment env)
{
    app.UseAuthentication();
    // All the other app configuration.
}

Your host must be configured correctly. Windows hosts must have SPNs added to the user account hosting the application. Linux and macOS machines must be joined to the domain, then SPNs must be created for the web process, as well as keytab files generated and configured on the host machine. Full instructions are given in the documentation.

SignalR Auto-reconnect

This preview release, available now via npm install @aspnet/signalr@next and in the .NET Core SignalR Client, includes a new automatic reconnection feature. With this release we’ve added the withAutomaticReconnect() method to the HubConnectionBuilder. By default, the client will try to reconnect immediately and after 2, 10, and 30 seconds. Enlisting in automatic reconnect is opt-in, but simple via this new method.

const connection = new signalR.HubConnectionBuilder()
    .withUrl("/chatHub")
    .withAutomaticReconnect()
    .build();

By passing an array of millisecond-based durations to the method, you can be very granular about how your reconnection attempts occur over time.

.withAutomaticReconnect([0, 3000, 5000, 10000, 15000, 30000])
//.withAutomaticReconnect([0, 2000, 10000, 30000]) yields the default behavior

Or you can pass in an implementation of a custom reconnect policy that gives you full control.

If the reconnection fails after the 30-second point (or whatever you’ve set as your maximum), the client presumes the connection is offline and stops trying to reconnect. During these reconnection attempts you’ll want to update your application UI to provide cues to the user that the reconnection is being attempted.

Reconnection Event Handlers

To make this easier, we’ve expanded the SignalR client API to include onreconnecting and onreconnected event handlers. The first of these handlers, onreconnecting, gives developers a good opportunity to disable UI or to let users know the app is offline.

connection.onreconnecting((error) => {
    const status = `Connection lost due to error "${error}". Reconnecting.`;
    document.getElementById("messageInput").disabled = true;
    document.getElementById("sendButton").disabled = true;
    document.getElementById("connectionStatus").innerText = status;
});

Likewise, the onreconnected handler gives developers an opportunity to update the UI once the connection is reestablished.

connection.onreconnected((connectionId) => {
    const status = `Connection reestablished. Connected.`;
    document.getElementById("messageInput").disabled = false;
    document.getElementById("sendButton").disabled = false;
    document.getElementById("connectionStatus").innerText = status;
});

Learn more about customizing and handling reconnection

Automatic reconnect has been partially documented already in the preview release. Check out the deeper docs on the topic, with more examples and details on usage, at https://aka.ms/signalr/auto-reconnect.

Managed gRPC Client

In prior previews, we relied on the Grpc.Core library for client support. The addition of HTTP/2 support in HttpClient in this preview has allowed us to introduce a fully managed gRPC client.

To begin using the new client, add a package reference to Grpc.Net.Client and then you can create a new client.

var httpClient = new HttpClient() { BaseAddress = new Uri("https://localhost:5001") };
var client = GrpcClient.Create<GreeterClient>(httpClient);

gRPC Client Factory

Building on the opinionated pattern we introduced in HttpClientFactory, we’ve added a gRPC client factory for creating gRPC client instances in your project. There are two flavors of the factory that we’ve added: Grpc.Net.ClientFactory and Grpc.AspNetCore.Server.ClientFactory.

The Grpc.Net.ClientFactory is designed for use in non-ASP.NET app models (such as Worker Services) that still use the Microsoft.Extensions.* primitives without a dependency on ASP.NET Core.

In applications that perform service-to-service communication, we often observe that most servers are also clients that consume other services. In these scenarios, we recommend the use of Grpc.AspNetCore.Server.ClientFactory which features automatic propagation of gRPC deadlines and cancellation tokens.

To use the client factory, add the appropriate package reference to your project (Grpc.AspNetCore.Server.Factory or Grpc.Net.ClientFactory) before adding the following code to ConfigureServices().

services
    .AddGrpcClient<GreeterClient>(options =>
    {
        options.BaseAddress = new Uri("https://localhost:5001");
    });

gRPC Interceptors

gRPC exposes a mechanism to intercept RPC invocations on both the client and the server. Interceptors can be used in conjunction with existing HTTP middleware. Unlike HTTP middleware, interceptors give you access to actual request/response objects before serialization (on the client) and after deserialization (on the server) and vice versa for the response. All middlewares run before interceptors on the request side and vice versa on the response side.

Client interceptors

When used in conjunction with the client factory, you can add a client interceptor as shown below.

services
    .AddGrpcClient<GreeterClient>(options =>
    {
        options.BaseAddress = new Uri("https://localhost:5001");
    })
    .AddInterceptor<CallbackInterceptor>();

Server interceptors

Server interceptors can be registered in ConfigureServices() as shown below.

services
    .AddGrpc(options =>
    {
        // This registers a global interceptor
        options.Interceptors.Add<MaxStreamingRequestTimeoutInterceptor>(TimeSpan.FromSeconds(30));
    })
    .AddServiceOptions<GreeterService>(options =>
    {
        // This registers an interceptor for the Greeter service
        options.Interceptors.Add<UnaryCachingInterceptor>();
    });

For examples on how to author an interceptors, take a look at these examples in the grpc-dotnet repo.

Give feedback

We hope you enjoy the new features in this preview release of ASP.NET Core and Blazor! Please let us know what you think by filing issues on GitHub.

Thanks for trying out ASP.NET Core and Blazor!

The post ASP.NET Core and Blazor updates in .NET Core 3.0 Preview 6 appeared first on ASP.NET Blog.

Windows 10 SDK Preview Build 18912 available now!

$
0
0

Today, we released a new Windows 10 Preview Build of the SDK to be used in conjunction with Windows 10 Insider Preview (Build 18912 or greater). The Preview SDK Build 18912 contains bug fixes and under development changes to the API surface area.

The Preview SDK can be downloaded from developer section on Windows Insider.

For feedback and updates to the known issues, please see the developer forum. For new developer feature requests, head over to our Windows Platform UserVoice.

Things to note

  • This build works in conjunction with previously released SDKs and Visual Studio 2017 and 2019. You can install this SDK and still also continue to submit your apps that target Windows 10 build 1903 or earlier to the Microsoft Store.
  • The Windows SDK will now formally only be supported by Visual Studio 2017 and greater. You can download the Visual Studio 2019 here.
  • This build of the Windows SDK will install ONLY on Windows 10 Insider Preview builds.
  • In order to assist with script access to the SDK, the ISO will also be able to be accessed through the following static URL: https://software-download.microsoft.com/download/sg/Windows_InsiderPreview_SDK_en-us_18912_1.iso.

Tools Updates

Message Compiler (mc.exe)

  • Now detects the Unicode byte order mark (BOM) in .mc files. If the .mc file starts with a UTF-8 BOM, it will be read as a UTF-8 file. Otherwise, if it starts with a UTF-16LE BOM, it will be read as a UTF-16LE file. If the -u parameter was specified, it will be read as a UTF-16LE file. Otherwise, it will be read using the current code page (CP_ACP).
  • Now avoids one-definition-rule (ODR) problems in MC-generated C/C++ ETW helpers caused by conflicting configuration macros (e.g. when two .cpp files with conflicting definitions of MCGEN_EVENTWRITETRANSFER are linked into the same binary, the MC-generated ETW helpers will now respect the definition of MCGEN_EVENTWRITETRANSFER in each .cpp file instead of arbitrarily picking one or the other).

Windows Trace Preprocessor (tracewpp.exe)

  • Now supports Unicode input (.ini, .tpl, and source code) files. Input files starting with a UTF-8 or UTF-16 byte order mark (BOM) will be read as Unicode. Input files that do not start with a BOM will be read using the current code page (CP_ACP). For backwards-compatibility, if the -UnicodeIgnore command-line parameter is specified, files starting with a UTF-16 BOM will be treated as empty.
  • Now supports Unicode output (.tmh) files. By default, output files will be encoded using the current code page (CP_ACP). Use command-line parameters -cp:UTF-8 or -cp:UTF-16 to generate Unicode output files.
  • Behavior change: tracewpp now converts all input text to Unicode, performs processing in Unicode, and converts output text to the specified output encoding. Earlier versions of tracewpp avoided Unicode conversions and performed text processing assuming a single-byte character set. This may lead to behavior changes in cases where the input files do not conform to the current code page. In cases where this is a problem, consider converting the input files to UTF-8 (with BOM) and/or using the -cp:UTF-8 command-line parameter to avoid encoding ambiguity.

TraceLoggingProvider.h

  • Now avoids one-definition-rule (ODR) problems caused by conflicting configuration macros (e.g. when two .cpp files with conflicting definitions of TLG_EVENT_WRITE_TRANSFER are linked into the same binary, the TraceLoggingProvider.h helpers will now respect the definition of TLG_EVENT_WRITE_TRANSFER in each .cpp file instead of arbitrarily picking one or the other).
  • In C++ code, the TraceLoggingWrite macro has been updated to enable better code sharing between similar events using variadic templates.

Breaking Changes

Removal of IRPROPS.LIB

In this release irprops.lib has been removed from the Windows SDK. Apps that were linking against irprops.lib can switch to bthprops.lib as a drop-in replacement.

API Updates, Additions and Removals

The following APIs have been added to the platform since the release of Windows 10 SDK, version 1903, build 18362.

Additions:


namespace Windows.Foundation.Metadata {
  public sealed class AttributeNameAttribute : Attribute
  public sealed class FastAbiAttribute : Attribute
  public sealed class NoExceptionAttribute : Attribute
}
namespace Windows.Graphics.Capture {
  public sealed class GraphicsCaptureSession : IClosable {
    bool IsCursorCaptureEnabled { get; set; }
  }
}
namespace Windows.Management.Deployment {
  public enum DeploymentOptions : uint {
    AttachPackage = (uint)4194304,
  }
  public sealed class PackageManager {
    IIterable<Package> FindProvisionedPackages();
    IAsyncOperationWithProgress<DeploymentResult, DeploymentProgress> RegisterPackagesByFullNameAsync(IIterable<string> packageFullNames, DeploymentOptions deploymentOptions);
  }
}
namespace Windows.Networking.BackgroundTransfer {
  public sealed class DownloadOperation : IBackgroundTransferOperation, IBackgroundTransferOperationPriority {
    void RemoveRequestHeader(string headerName);
    void SetRequestHeader(string headerName, string headerValue);
  }
  public sealed class UploadOperation : IBackgroundTransferOperation, IBackgroundTransferOperationPriority {
    void RemoveRequestHeader(string headerName);
    void SetRequestHeader(string headerName, string headerValue);
  }
}
namespace Windows.Security.Authentication.Web.Core {
  public sealed class WebAccountMonitor {
    event TypedEventHandler<WebAccountMonitor, WebAccountEventArgs> AccountPictureUpdated;
  }
}
namespace Windows.Storage {
  public sealed class StorageFile : IInputStreamReference, IRandomAccessStreamReference, IStorageFile, IStorageFile2, IStorageFilePropertiesWithAvailability, IStorageItem, IStorageItem2, IStorageItemProperties, IStorageItemProperties2, IStorageItemPropertiesWithProvider {
    public static IAsyncOperation<StorageFile> GetFileFromPathForUserAsync(User user, string path);
  }
  public sealed class StorageFolder : IStorageFolder, IStorageFolder2, IStorageFolderQueryOperations, IStorageItem, IStorageItem2, IStorageItemProperties, IStorageItemProperties2, IStorageItemPropertiesWithProvider {
    public static IAsyncOperation<StorageFolder> GetFolderFromPathForUserAsync(User user, string path);
  }
}
namespace Windows.UI.Composition.Particles {
  public sealed class ParticleAttractor : CompositionObject
  public sealed class ParticleAttractorCollection : CompositionObject, IIterable<ParticleAttractor>, IVector<ParticleAttractor>
  public class ParticleBaseBehavior : CompositionObject
  public sealed class ParticleBehaviors : CompositionObject
  public sealed class ParticleColorBehavior : ParticleBaseBehavior
  public struct ParticleColorBinding
  public sealed class ParticleColorBindingCollection : CompositionObject, IIterable<IKeyValuePair<float, ParticleColorBinding>>, IMap<float, ParticleColorBinding>
  public enum ParticleEmitFrom
  public sealed class ParticleEmitterVisual : ContainerVisual
  public sealed class ParticleGenerator : CompositionObject
  public enum ParticleInputSource
  public enum ParticleReferenceFrame
  public sealed class ParticleScalarBehavior : ParticleBaseBehavior
  public struct ParticleScalarBinding
  public sealed class ParticleScalarBindingCollection : CompositionObject, IIterable<IKeyValuePair<float, ParticleScalarBinding>>, IMap<float, ParticleScalarBinding>
  public enum ParticleSortMode
  public sealed class ParticleVector2Behavior : ParticleBaseBehavior
  public struct ParticleVector2Binding
  public sealed class ParticleVector2BindingCollection : CompositionObject, IIterable<IKeyValuePair<float, ParticleVector2Binding>>, IMap<float, ParticleVector2Binding>
  public sealed class ParticleVector3Behavior : ParticleBaseBehavior
  public struct ParticleVector3Binding
  public sealed class ParticleVector3BindingCollection : CompositionObject, IIterable<IKeyValuePair<float, ParticleVector3Binding>>, IMap<float, ParticleVector3Binding>
  public sealed class ParticleVector4Behavior : ParticleBaseBehavior
  public struct ParticleVector4Binding
  public sealed class ParticleVector4BindingCollection : CompositionObject, IIterable<IKeyValuePair<float, ParticleVector4Binding>>, IMap<float, ParticleVector4Binding>
}
namespace Windows.UI.ViewManagement {
  public enum ApplicationViewMode {
    Spanning = 2,
  }
}
namespace Windows.UI.WindowManagement {
  public sealed class AppWindow {
    void SetPreferredTopMost();
    void SetRelativeZOrderBeneath(AppWindow appWindow);
  }
  public enum AppWindowPresentationKind {
    Spanning = 4,
  }
  public sealed class SpanningPresentationConfiguration : AppWindowPresentationConfiguration
}

The post Windows 10 SDK Preview Build 18912 available now! appeared first on Windows Developer Blog.

Accelerating smart building solutions with cloud, AI, and IoT

$
0
0

Throughout our Internet of Things (IoT) journey we’ve seen solutions evolve from device-centric models, to spatially-aware solutions that provide real-world context. Last year at Realcomm | IBcon, we announced Azure IoT’s vision for spatial intelligence, diving into scenarios that uniquely join IoT, artificial intelligence (AI), and productivity tools. In the year since, we’ve progressed this vision by introducing new services designed to help enterprise customers across industries optimize the management of their spaces. Across Azure, Dynamics, and Office, Microsoft continues to accelerate results from a growing and diverse set of partners creating smart building solutions on our industry-leading enterprise platform.

This year we’ve returned to Realcomm | IBcon, joined by over 30 partners who have delivered innovative solutions using our spatial intelligence and device security services to provide safety to construction sites, operate buildings more efficiently, utilize space more effectively, and boost occupant productivity and satisfaction. Here we’ll tell you more about a selection of these smart building partners who are accelerating digital transformation in their industries.

Construction

IoT is an invaluable part of the smart building lifecycle, even before the building comes to fruition. On construction sites, it’s imperative for companies to prioritize employee safety while ensuring the job is completed on time and with the utmost quality. Microsoft offers a variety of services that come together to help construction companies onboard devices that can inform them about their site, model their physical world, and visualize data in the right context.

PCL Construction has embraced and led digital transformation in the construction industry with its Job Site Insights application. Job Site Insights sources its data from a variety of IoT sensors in the field, models that data in the context of the physical world using Azure Digital Twins, and then visualizes and interacts with that data through tools and canvases such as Azure Maps, Microsoft Office 365, and PowerBI. By gathering and analyzing IoT data, PCL is improving its processes to increase quality, safety, efficiency, and productivity while positioning itself as a future-ready builder.

PCL’s Job Site Insights uses Azure Digital Twins to model the physical environment and Azure Maps to visualize geospatial data

PCL’s Job Site Insights uses Azure Digital Twins to model the physical environment and Azure Maps to visualize geospatial data to ensure employee safety and keep the project on schedule.

Building operations

Building operators are reducing their costs and increasing their margins by enabling digital feedback loops which power predictive maintenance, process efficiency, and more. Harvard Business Review found that 72 percent of executives say their prime business goals for smart buildings are reducing facilities and operations costs and improving profitability. Microsoft’s services have enabled partners to integrate their solutions to solve the needs of building operators throughout the industry.

ICONICS provides automation software solutions that visualize, historize, analyze, and mobilize real-time information. It uses a variety of Azure IoT services to ingest data from building equipment and environmental sensors, which are presented to facilities operators and managers as dashboards and can be used to alert technicians through Dynamics 365 Field Service if problems such as clogged air filters or burst pipes need to be solved. ICONICS’ data is also used by other Microsoft partners including Willow, whose WillowTwinTM platform uses Azure Digital Twins to integrate, analyze, and manage data at scale, delivering insights to improve the performance and experience of buildings and infrastructure networks. These insights can be used for many essential scenarios, including using machine learning to run safety simulations to determine the best evacuation route, and even modifying digital signage in real time to guide people to an appropriate exit. WillowTwin is commonly leveraged to manage energy utilization, handover buildings from construction to building operator, analyze building performance across an entire portfolio, and manage fault detection and maintenance.

MacDonald-Miller, a facilities management company with mechanical engineers, electricians, plumbers, and HVAC technicians, uses Dynamics 365 Field Service to manage and dispatch field technicians while running the integrated ICONICS and Willow solutions in its own Azure subscription to provide services to its customers for daily operations. In the field, technicians from these companies can use RealWear HMT-1 hands-free industrial wearable displays that attach to their hard hats and allow them to see all the telemetry, faults, and work orders in real time while working on a piece of equipment. Operators can also use voice commands to request more information, to start calls through Microsoft Teams, and to dictate notes as they work.

Infosys is a global leader in next-generation digital services and consulting of smart building solutions using Microsoft offerings. Its SCALE (Sustainable, Connected, Affordable, Learning (Systems), Experiential) framework helps assess, design, implement, and manage smart buildings leveraging data and insights from connected assets. These insights help with energy efficiency management, improved asset security/surveillance, enhanced end user experience, improved building operations, predictive maintenance, and significantly reduced operational costs.

Space utilization

Building owners, operators, and occupants alike have a vested interest in physical space management in smart offices. Many offices in the United States have open floor plans to spur collaboration, while hotdesking and co-working spaces are becoming increasingly common as workers are becoming more mobile. Microsoft’s partners are helping their stakeholders optimize space usage since unused space wastes rent and increases utility and maintenance costs.

Steelcase, a global firm specializing in architecture, furniture and technology products and services designed to help people reach their full potential, started its IoT journey by using Azure Digital Twins as the foundation for its Steelcase Workplace Advisor app, which collects space utilization data and transforms it into actionable insights for a more effective workplace. More recently, Steelcase complemented the same Azure IoT backbone with Microsoft Graph integration to create Steelcase Find, which gives occupants quick access to the best workspaces across their organization so they can spend less time searching and more time collaborating.

Steelcase has accelerated its IoT development with Azure Digital Twins and the Microsoft Graph, building its Steelcase Workplace Advisor app for facility managers (left) and Steelcase Find app for occupants (right).

Steelcase has accelerated its IoT development with Azure Digital Twins and the Microsoft Graph, building its Steelcase Workplace Advisor app for facility managers (left) and Steelcase Find app for occupants (right).

Occupant experience

Building occupants desire engaging spaces, ones which can power personalized experiences while providing fewer distractions and higher productivity. Harvard Business Review found that a majority of building owners and operators are paying close attention to this segment because smart buildings are not only a driver for talent and recruiting, but also a catalyst for employee productivity. Microsoft’s partners are delivering innovative solutions on our platform to empower building occupants.

As a world leader in commercial real estate services, CBRE strives to provide building owners and occupiers with ever-greater experiences and services. One way it does so is through the introduction of CBRE Host, a workforce empowerment platform that offers capabilities including room scheduling, service requests, and wayfinding to add delight and efficiency to employees’ lives. Simultaneously, facility managers are empowered to deliver more timely maintenance, and building owners/investors gain insight into space and service utilization.

CBRE Host is powered by Microsoft Azure Digital Twins and the Microsoft Graph. While remaining agnostic on sensor connections, key shared partners Rigado and Yanzi Networks accelerate Host deployment through their turnkey packages for gateways, access points, occupancy+comfort sensors, and device management capabilities built on the Azure IoT platform. As Host evolves, key tests underway include integrating Azure Spatial Anchors, a mixed reality service that enables employees, guests, and building managers to use a smartphone, tablet, or HoloLens to find and activate virtual anchors in their environment to populate real-time data in the context of the physical world.

CBRE Host helps occupants be more productive by finding available rooms that fit their needs and helping route occupants within their buildings.

CBRE Host helps occupants be more productive by finding available rooms that fit their needs and helping route occupants within their buildings.

Sagegreenlife’s living walls bring the benefits and beauty of nature into man-made spaces. The company needed a way to remotely monitor its irrigation systems and ensure optimal plant wall performance but didn’t have the developer expertise in-house, so it turned to Microsoft and Cradlepoint for help. Today, Sagegreenlife uses Azure IoT Central and Cradlepoint LTE network solutions to detect and resolve issues before they affect plant health. With this IoT solution, Sagegreenlife can provide an exceptional customer experience, deliver new insights across the organization, and scale its business on a highly secure, easy-to-use, customizable platform.

Sagegreenlife uses Azure IoT Central to monitor its irrigation systems and optimize plant wall performance.

Sagegreenlife uses Azure IoT Central to monitor its irrigation systems and optimize plant wall performance.

Device security

Throughout the world’s commercial real estate properties, there are millions of microcontroller-based BACnet devices enabling scenarios that control building systems. While there are significant efforts being made to secure the BACnet messaging protocol, the devices themselves frequently lack sufficient security to ensure they are not vulnerable to being taken over or spoofed, which could lead to unexpected behavior on a building’s network. L&T Technology Services has partnered with the Azure Sphere team to build a guardian module implementation that can protect BACnet devices while translating the messaging protocol into MQTT messages that can be ingested by Azure IoT Hub and IoT Central. With the capabilities that L&T is delivering, device manufacturers and building management organizations can retrofit the 7 Properties of Highly Secure Devices into its solutions.

Next steps

We’re excited to see the accelerated innovation and momentum from partners over the last year as we’ve continued to provide tools to enable developers to create digital feedback loops for building owners, operators, and occupants. Microsoft will continue to empower our partners to deliver smart building solutions with powerful services and platforms to model and sense the physical world, derive insights from spatial data, and create innovative experiences for building owners, operators, and occupants. Together with our partners, we’ve also highlighted five key learnings for accelerating smart buildings solutions. Check out our 30 plus partners at Microsoft’s booth, Microsoft’s Partner Pavilion, and partner booths at Realcomm | IBcon 2019!

Additional resources

Partner list

Select the partner logo to visit their websites and to learn more about their specific solutions.

Partner logos
AVNET Edge Technologies KGS SWITCH
AXIONIZE Hewlett Packard Enterprise logo with green rectangle in left corner Blue L&T Technology Services logo Blue Tridium logo with red triangle above the letter
BENTLEY ICONICS MDM TRIMBLE
Red Bosch logo ICS Emerald green and yello PCL Construction logo VIEW
 Emerald green CBRE logo INFOSYS REALWEAR WILLOW
COGNIZANT Blue Intel logo RELOGIX WIPRO
COHESION IOTIUM RIGADO YANZI
DOMAIN 6 LTRON SAGEGREENLIFE  
Blue and white Eaton logo JOHNSON STEELCASE  

Simplify B2B communications and free your IT staff

$
0
0

Today’s business data ecosystem is a network of customers and partners communicating continuously with each other. The traditional way to do this is by establishing a business-to-business (B2B) relationship. The B2B communication requires a formal agreement between the entities. Then the two sides must agree on the formatting of messages. As a result, service delivery is often delayed by a few months. Due to the complexity, enterprises rely on IT staff to manage this data exchange between partners. The result is a slow order-to-cash process, poor customer experience, loss of market share, and delayed revenue.

The Azure platform offers a wealth of services for partners to enhance, extend, and build industry solutions. Here we describe how one Microsoft partner uses Azure to solve a unique problem.

B2B in need of a makeover

In today’s world, the traditional way of doing B2B is one area ripe for improvement. The old-fashioned delays and frustrating experiences make an enterprise tough to do business with. That experience can lead to competitors gaining an advantage if they offer better agility and faster partner onboarding. Adeptia is a Microsoft partner that is working to accelerate communication between businesses. Their solution promises to speed the integration between entities and regain the advantage.

Complexity is commonplace

A complex business data ecosystem of partners and customers requires IT to build data connections between the enterprise and its partners and customers. This leads to point-to-point connections that are hard to manage and require specific IT skills. As a result, an enterprise takes time to onboard business data with its partners and customers, which causes low agility and delays in delivering services. When time matters, the revenue stream takes a hit.

The complexity takes its toll in other ways. The process is built on a code-intensive data exchange approach. As this has been the norm for a long time, customers and partners have simply endured the painful process. However, it seems anachronistic in this point.

A modern self-service approach

The Adeptia Connect solution is an Enterprise Application Integration (EAI) business application, not a developer tool. As such, the app modernizes the onboarding experience with a self-service approach. As implied, users can initiate new processes on their own, on an as-needed basis. This enables business and operational users to onboard customer and partner data anytime, anywhere without relying on IT staff for building connections leaving them free for other tasks.

Benefits

When you accelerate business data onboarding through self-service, you accelerate service delivery. Immediately, you reduce the time-to-revenue. Best of all, it provides an improved customer experience by making an enterprise easy to do business with. Through this, enterprises build a better relationship with their customers and partners and retain their market share. They succeed by providing rapid value to their customer and partner ecosystem.

The graphic shows the flow of data between partners and customers with an enterprise—with Adeptia in the middle.

Adeptia data flow graphic.

In summary, the benefits of this solution include:

  • A self-service approach that saves time.
  • The release of IT resources from low level integration, freeing them up for other tasks.
  • The semantics of a business application—easier to understand than a development tool.
  • An acceleration of service delivery to fast forward revenues.
  • A delightful customer experience.
  • Efficient interactions with the enterprise that encourages return business.

Collectively, these competitive advantages make the enterprise more agile, and help win a larger market share.

How is Azure used in the solution?

  • The Adeptia Connect Virtual Machine is hosted on an Azure Virtual Machine, benefitting from Microsoft Azure’s worldwide presence and extensive compliance portfolio.
  • Clients can connect to Azure SQL Database, also hosted on Azure.
  • Data is ingested by Azure Data Lake and can be moved to Blob Storage for archiving.

Next steps

  • To learn more about other healthcare solutions, go to the Azure for health page.
  • To find out more about this solution, go to the Azure Marketplace listing for Adeptia Connect, and click Contact me.

Monitoring on Azure HDInsight Part 3: Performance and resource utilization

$
0
0

This is the third blog post in a four-part series on Monitoring on Azure HDInsight. Part 1 is an overview that discusses the three main monitoring categories: cluster health and availability, resource utilization and performance, and job status and logs. Part 2 centered on the first topic, monitoring cluster health and availability. This blog covers the second of those topics, performance and resource utilization, in more depth.


Monitoring performance and resource utilization is a fundamental way to gain better insights into how your cluster is running. You can keep tabs on metrics, such as CPU, memory, and network usage, to better understand how your cluster is handling your workloads and whether you have enough resources to complete the task at hand. Azure HDInsight offers two tools that can be used for monitoring cluster resource utilization: Apache Ambari and integration with Azure Monitor logs. Apache Ambari is included on all Azure HDInsight clusters and provides an easy-to-use web UI that can be used to monitor the cluster and perform configuration changes. Azure Monitor logs collects metrics and logs from multiple resources, including HDInsight clusters, into a Log Analytics workspace. A Log Analytics workspace presents your metrics and logs as structured, queryable tables which can be used to configure custom alerts.

Apache Ambari

Dashboard

The Ambari dashboard contains a slew of widgets that show metrics designed to give a glanceable overview of your cluster. These widgets show general usage metrics, such as cluster CPU, memory, and network usage, as well as metrics specific to certain cluster types, like YARN ResourceManager information for Spark/Hadoop clusters and broker information for Kafka clusters.

ambari_dashboard

The Ambari Dashboard, included on all Azure HDInsight clusters.

Hosts

Ambari also provides a hosts tab that enables you to view utilization metrics on a per-node basis. The hosts tab shows glanceable statistics for all nodes in the cluster. Selecting the name of a node opens a detailed view for that node, which shows graphs for host metrics.

hosts_view
hosts_cpu

The Ambari Hosts view shows detailed utilization information for individual nodes in your cluster.

To drill down further into any particular utilization host metric, select a graph to show a breakdown of metrics displayed in that graph.

Alerts

Ambari also provides several configurable alerts out of the box that can provide notification of specific events. Alerts are shown in the upper-right corner of Ambari on HDInsight 4.0 as a bell icon accompanied by a red badge containing the number of active alert notifications.

Ambari offers many predefined alerts you can use to monitor performance, including:

Alert Name

Description

ResourceManager CPU Utilization

This host-level alert is triggered if CPU utilization of the ResourceManager exceeds certain warning and critical thresholds. It checks the ResourceManager JMX Servlet for the SystemCPULoad property.

HBase Master CPU Utilization

This host-level alert is triggered if CPU utilization of the HBase Master exceeds certain warning and critical thresholds. It checks the HBase Master JMX Servlet for the SystemCPULoad property.

Host Disk Usage

This host-level alert is triggered if the amount of disk space used goes above specific thresholds. The default threshold values are 50 percent for WARNING and 80 percent for CRITICAL.

History Server CPU Utilization

This host-level alert is triggered if the percent of CPU utilization on the History Server exceeds the configured critical threshold. The threshold values are in percent.

The detailed view for each alert shows a description of the alert, the specific criteria or thresholds that will trigger a warning or critical alert, and the check interval for the criteria. The thresholds and check interval can be configured for individual alerts.

alert_details

The Ambari detailed alert view shows the description of the alert and allows you to edit the check interval and thresholds for the alert to fire.

You can also optionally configure email notifications for Ambari alerts. Ambari email notifications can be a good way to monitor alerts when managing many HDInsight clusters.

ambari_email

Configuring Ambari email notifications can be a useful way to be notified of alerts for your clusters.

Azure Monitor logs

Azure Monitor logs enables data generated by multiple resources such as HDInsight clusters, to be collected and aggregated in one place to achieve a unified monitoring experience. As a prerequisite, you will need a Log Analytics Workspace to store the collected data. If you have not already created one, you can follow the instructions for creating a Log Analytics Workspace.

You can then easily configure an HDInsight cluster to send a host of logs and metrics to Log Analytics. Once Azure Monitor logs integration is enabled, you can configure the Log Analytics workspace to collect Linux performance counters from the nodes and send them to your Log Analytics workspace.

HDInsight monitoring solutions

HDInsight offers workload-specific, pre-made monitoring dashboards in the form of solutions that can be used to monitor cluster resource utilization. Learn how to install a monitoring solution. These solutions allow you to monitor metrics like CPU time, available YARN memory, and logical disk writes across multiple clusters. Selecting a graph takes you to the query used to generate it, shown in the logs view.

solution_perf

The HDInsight monitoring solutions provide a simple pre-made dashboard from which you can monitor a host of utilization metrics.

Query metrics in the logs blade

You can also use the logs view in your Log Analytics workspace to query the metrics tables directly.

logs_perf

The Logs blade in a Log Analytics workspace lets you query collected metrics and logs across many clusters.

The computer performance tab in the logs blade of your Log Analytics Workspace lists a number of sample queries related to availability, such as:

Query Name

Description

What data is being collected?

List the collected performance counters and object types Process, Memory, Processor.

Memory and CPU usage

Chart all computers' used memory and CPU, over the last hour.

CPU usage trends over the last day

Calculate CPU usage patterns across all computers, chart by percentiles.

Top 10 computers with the highest disk space

Show the top 10 computers with the highest available disk space.

Azure Monitor alerts

You can also set up Azure Monitor alerts that will trigger when the value of a metric or the results of a query meet certain conditions. You can condition on a query returning a record with a value that is greater than or less than some threshold, or even on the number of results returned by a query. For example, you could create an alert to send an email if CPU usage stays above a defined threshold for a sustained period of time.

There are several types of actions you can choose to trigger when your alert fires, such as an email, SMS, push, voice, an Azure Function, a LogicApp, a Webhook, an ITSM, or an Automation Runbook. You can set multiple actions for a single alert. Find more information about these different types of actions by visiting our documentation, “Create and manage action groups in the Azure portal.”

Finally, you can specify a severity for the alert in addition to the name. The ability to specify severity is a powerful tool that can be used when creating multiple alerts. For example, you could create one alert to raise a Warning (Sev 1) alert if a single head node becomes unavailable and another alert that raises a Critical (Sev 0) alert in the unlikely event that both head nodes go down. Alerts can be grouped by severity when viewed later.

Next steps

Between Apache Ambari and Azure Monitor logs integration, Azure HDInsight offers comprehensive solutions for monitoring the performance and resource utilization of all your clusters. For more information see our documentation, “Monitor cluster performance.”

If you haven’t read the other parts in this series, you can check those out here:

Stay tuned for the next part in the Monitoring on Azure HDInsight blog series.

Smarter edge, smarter world: Discover the autonomous edge

$
0
0

If you want to solve a business problem using a computer, you have to connect to it. The furthest point at which you can connect the “edge” has always been a major frontier of computing. In the 1950s, the edge was where you were close enough to feed punch cards into a computer.

As computers got smaller and cheaper, networking expanded access, and the edge spread beyond centralized computing hubs. Today, mobile connectivity and the cloud have pushed the edge further. Consumers and businesses have anytime access to virtually unlimited computing power. We have the ability to connect billions of small devices, creating an Internet of Things. And we’re starting to see IoT scenarios that demand bringing the computing power to the problem.

That’s where the autonomous edge comes in. In Make Room for The Autonomous Edge in Your IoT Strategy, Forrester defines the autonomous edge as “A family of technologies that distributes application data and services where they can best optimize outcomes in a growing set of connected assets. It includes edge infrastructure and edge analytics software.”

In other words, it brings intelligence to where the problem is. The decisions and actions in autonomous edge computing happen out in the world.

IoT phone home

One challenge is connectivity. Anyone who has had a streaming movie interrupted just before the big plot twist knows that internet access is not guaranteed.

Now, imagine that instead of playing a movie, you need a device to decide whether an oil pump on the Russian steppes is about to explode, or whether a hidden flaw in a high-speed production line is going to create massive waste.

In the first case, you might not have a high-speed internet connection available at all—and lives are at stake. In the second, milliseconds of time could translate to millions of dollars. These are problems ideally suited for autonomous edge solutions.

Autonomy in action: a few examples

Whether it’s in self-driving vehicles, mixed reality, or smart buildings, the autonomous edge has incredible potential to transform our lives for the better. For businesses, it can deliver a wide range of benefits, as the Forrester report shows:

  • Handling present and future AI demands
  • Avoiding network latency and allowing faster responses
  • Reducing the need for expensive network connectivity at remote locations
  • Handling pre-processing for an ever-growing number of IoT devices

Companies are already realizing these benefits with innovative autonomous edge IoT strategies. Take Schneider Electric, for example. Its Realift Rod Pump Control allows oil and gas companies to monitor and configure pump settings and operations remotely. Schneider wanted to push this capability further.

“If you look at most of the controllers that exist in the market today, they are reactive, looking at what is happening now and responding accordingly. We want to be proactive and include predictive analytics at the edge. It’s a real game changer.” - Helenio Gilabert, Director for SCADA and Telemetry at Schneider Electric.

Using Azure Machine Learning and Azure IoT Edge, the company is doing just that. Running predictive models right on the controller, Realift can sense anomalies that show impending problems, change settings, or even shut the pump down to prevent damage.

Processing video streams is another powerful application of autonomous edge. Intelligent algorithms can analyze video and take actions based on what they “see” including counting open parking spots, finding gaps on retail shelves, detecting manufacturing defects, and more.

The problem is that raw video streams are big. Pushing them to the cloud in full can be slow and expensive—especially if you’re talking hundreds or thousands of cameras, or remote areas where bandwidth costs add up quickly.

That’s why Microsoft and Nvidia partnered on a new approach. An edge gateway and advanced camera-stream processing analyze videos locally. The solution gleans the important data and sends it to the cloud as needed rather than sending the videos themselves. This delivers real-time performance and reduces compute costs.

Overcoming the four biggest challenges to a smarter edge

Although the potential business value is huge, there are some unique challenges to overcome. According to the Forrester report, the top four barriers identified in a survey of over 1,900 global telecommunications decision makers include security, organizational barriers, device management, and cost. Let’s take a look at each one in turn.

1. Security

Autonomous edge devices have attack surfaces that are similar to traditional computers. Plus, they run in public places. Extra security measures are critical to protect against the real threat of malware and other attacks. Fortunately, technology is keeping pace. For example, Azure Sphere combines security at the hardware, software, and cloud levels to enable new levels of trust with intelligent IoT devices.

2. Organizational barriers

When it comes to the autonomous edge, not all the challenges are technical. Operational silos can also block progress. Because autonomous edge devices share many similarities with computers, the IT organization may have the skills to manage them, yet lack the authority to do so. Leveraging your information services department’s skills can help reduce the cost and complexity of edge projects.
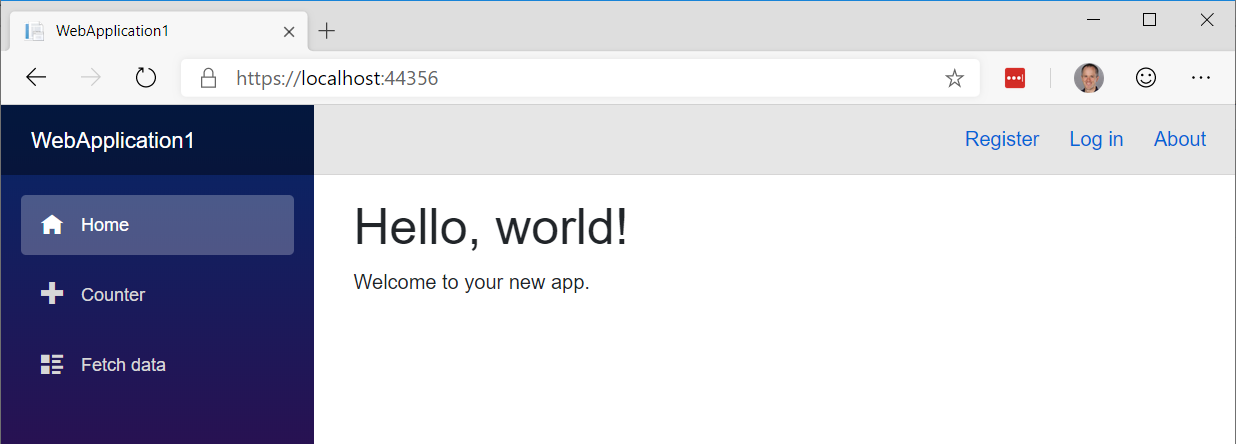
3. Device management

Managing a mobile phone that’s always connected to the internet is one thing. Managing a well pump that connects once a week is another. Thinking through the strategy is important. How often do you need to update the OS or software? Will you push updates over the air, or will technicians install them manually? How do you check the status of the edge device separately from the telemetry it sends to the cloud? It makes sense to start with purpose-built IoT monitoring and management solutions.

4. Cost

The smarter the device, the more expensive it’s likely to be, so weigh the value of autonomy. A simpler approach may be better. Some use cases just need a device that can store data and computing state when disconnected. Some need to actuate a physical object, but don’t require the IoT device to make the decision about when to do so. All the same, keep Moore’s law in mind: What may not be cost effective today may be within reach next quarter.

Find your edge with Azure

At Microsoft, we’ve staked our success on innovation that spans cloud and edge. We can help you get started quickly with solutions such as Azure IoT Edge, a fully managed service that allows you to run IoT workloads at the edge so your devices spend less time communicating with the cloud, react more quickly to local changes, and operate reliably even in extended offline periods.

Learn more about Azure IoT Edge, and how you can use the autonomous edge to your advantage.

Three ways to get notified about Azure service issues

$
0
0

Preparing for the unexpected is part of every IT professional’s and developer’s job. Although rare, service issues like outages and planned maintenance do occur. There are many ways to stay informed, but we’ve identified three effective approaches that have helped our customers respond quickly to service issues and mitigate downtime. All three take advantage of Azure Service Health, a free Azure service that lets you configure alerts to notify you automatically about service issues that might have an impact on your availability.

Figure1

1. Start simple with an email alert to catch all issues

If you’re new to setting up Service Health alerts, you’ll notice that there are many choices to make. Who should I alert? About which services and regions? For which types of health events? Outages? Planned maintenance? Health advisories? And what type of notification should I use? Email, SMS, push notification, webhook, or something else?

The best way to get started with Service Health alerts is to start simple. Set up an alert that will email your key operations professionals about any service issue that could affect any service or region. Since Service Health is personalized, the alert will only fire if there’s an impact to a service or region you use, so you don’t have to worry about unnecessary notifications.

figure2

Once you’ve set up your email alert, see how it goes. Maybe it’s all you need. Simple is good. But if you find that you’re frequently routing information from the notifications you receive to other teams, consider setting up additional alerts for those teams. You can also explore more sophisticated methods of alerting like the following scenarios.

2. Set up a mobile push alert for urgent issues

Not all service issues are created equal. If there’s a potential impact to a critical production workload, you’ll want to find out and respond as quickly as possible. In those situations, email might be insufficient. Instead, we recommend configuring Service Health alerts to send mobile push notifications through the Azure mobile app.

figure3

When you’re setting up a new alert, you’ll see an option in the UI for Azure app push notifications and SMS. We recommend push notifications over SMS because push notifications can contain more information and will provide you with more substantial updates when there’s a service issue.

With a push notification, you’ll learn about critical service issues right on your mobile device and be able to act immediately to start mitigating any impact to your workloads.

3) Connect our alerts with your IT service management tools

Finally, many customers already have ticketing systems and IT service management (ITSM) tools in place. If you already use one of these tools to manage your teams and work, we recommend setting up Service Health alerts using the webhook or ITSM integration. This will allow you to automatically create and assign tickets for Azure service issues.

Two key considerations when setting up a Service Health alert are the appropriate team to notify and the level of urgency of the message. You may wish to route alerts for certain services to specific teams, for example sending Azure SQL Database issues to your database team. You can also route alerts due to region, for example, sending issues in West Europe to your Europe lead. You may even wish to distinguish by subscription, for example, dev/test vs. production. Another important consideration is the level of urgency of the message. You’ll have more time to respond to planned maintenance and health advisories, which are communicated weeks and months in advance, than outages, which by their very nature can only be communicated at the time of the event. Depending upon the urgency you may wish to flag the communication differently in your system so you alert on-call teams.

Set up your Service Health alerts today

Whichever Service Health alerting approach you choose, the important thing is that you’re prepared for the unexpected. Set up your Azure Service Health alerts today in the Azure portal and for more information visit the Azure Service Health documentation. Let us know if you have a suggestion by submitting an idea in our feedback forums here.


How one Azure IoT partner is building connected experiences

$
0
0

We recently spent time with Mesh Systems, a Microsoft Gold Cloud platform partner based in Carmel, Indiana, to understand what a day in the life of an Azure IoT partner looks like. They shared some of their recent IoT customer engagements and talked about the types of everyday challenges Azure IoT partners face like building an IoT solution with legacy endpoints, how to approach tracking assets through a supply chain, and integrating an IoT solution with a business application. Finally, we discussed what best practices have driven the success of their IoT practice.

Connected coffee: building an IoT solution with legacy endpoints

Mesh’s experience in the beverage category caught the interest of a large European company that provides coffee beans and routine maintenance to thousands of coffee machines. The company wanted to innovate by providing their bean supplier with robust consumption data using an IoT solution.

But there was a catch. The company managed machines made by many different manufacturers across many different classes of machines. It would be cost prohibitive to build a custom integration for each machine type. There was no way to connect them to the cloud without expensive rework.

Frontline worker in coffee industry using Azure IoT Central.

“This is a typical brownfield use case,” said Doyle Baxter, Manager of Strategic Alliances, Mesh Systems. "The client understands their business case but the cost of connecting legacy endpoints is sometimes higher than the value of the data. It was a tough nut to crack."

For this use case, Mesh came up with an innovative proposal. Their concept was to identify unique electrical current signatures for different coffee machine processes. The signature of a double shot of espresso would be different from a single shot. Using this current analysis, Mesh could determine the amount of coffee being dispensed.

“There’s work to match up coffee machine actions with current consumption, but the enablement hardware is really inexpensive compared to other connected coffee applications," he said. "Additionally, the same enablement hardware has potential application across other beverage equipment—not just coffee machines."

Connected assets: improving supply chain efficiency

A manufacturer of glass products approached Mesh to investigate an IoT solution for tracking shipping racks. The customer ships their fragile products on expensive, custom-made racks. Unfortunately, the racks often come up missing! All told, the customer writes off more than half a million dollars of lost racks each year.

“We always look for the most cost efficient and easily deployed endpoints, especially in the case of asset tracking,” said Baxter. “In this case, our team specified a small, battery-operated Bluetooth beacon for each rack.” The beacons communicate to low-cost cellular gateways each covering 125,000 to 200,000 square feet.

“Our team designed and manufactured both the beacons and gateways and wrote the embedded software. We built the cloud solution with Azure IoT Central,” Baxter explained. The Mesh team leveraged the continuous data export functionality of IoT Central. The architecture was configured to continuously export data to Azure Blob Storage, Azure Functions, Data Factory, and Azure SQL.

The customer viewed rack movement in a detailed report within a Microsoft Power BI dashboard. With this information, they identified the end customer responsible for the shrinkage. They then coached customers on best practices for managing racks to reduce their lost rack expenses.

Connected construction: integration into business applications

Mesh worked with a construction company that needed to track which employees and contractors were on their construction sites on any given day. The data was critical to meet compliance requirements. This means the company needed to manage the whereabouts of thousands of people over the course of a project. The customer was looking to build one, unified solution for both access control and real-time location.

Mesh proposed a badge access system in which employee badges had Bluetooth beacons that communicated to local gateways and then into Azure over a cellular backhaul. Mesh built its solution with Azure IoT Central, leveraging the continuous data export function.

“A challenge in this project was designing the interface to the project management system in use that was used by the client,” said Baxter. “Sometimes a solution can provide value with its own user interface, but more often than not, the IoT data needs to be integrated into existing business systems.” Mesh worked with its customer to define the integration points and test out communication.

The result was the ability to view both present and absent employees and contractors natively within the company's existing project management system. They used a Power BI dashboard to analyze detailed historical trends.

Partner best practices

Mesh has had a strong pipeline of IoT projects and success moving customers to production. They pointed to their company’s philosophy on proof of concept engagements and best practices. “When we engage with a client on a project, we start with the end in mind,” said Baxter. “We don’t look at proof of concepts as a ‘throw away,’ but rather as a milestone on the journey to scale implementation.”

“Partnership is the name of the IoT game. The IoT stack is simply too deep for one company to provide a turnkey solution without good ecosystem partners. We realize that we are only as successful as our partnerships,” He said. The company has developed strong partnerships with cloud infrastructure, connectivity, and silicon providers.

Mesh brings deep technical skills and a wealth of experience. “We understand the reality of implementing IoT on a large scale – from thousands of sensors and devices being shipped, unboxed, installed and activated to architecting, piloting, and deploying IoT cloud solutions with the latest Azure IoT services,” said Baxter.

Learn by example: How IoT solutions transform industries

$
0
0

Businesses often face similar challenges, from improving productivity and creating a positive customer experience to reducing costs and increasing revenue. By turning to Internet of Things (IoT) solutions, organizations across industries—retail, agriculture, energy, healthcare, and manufacturing—can use data to drive insights and actions, ultimately transforming their business model, increasing their bottom line, and improving customer experiences.

The Microsoft IoT in Action events and webinars provide inspiration in the form of actionable insights, best practices, and real-world examples of how industry leaders transformed their own industries with innovative IoT solutions. Below are a few key examples of how IoT solutions can benefit your business and reasons to get started on your IoT journey today. You can also peruse our collection of on-demand IoT in Action webinars to learn about the latest Azure IoT technology and business models related to your specific industry.

Delivering a positive customer experience

Delivering a positive customer experience is a constant goal and challenge across industries today. Businesses are often looking for ways to ensure that interactions between customers and employees are engaging and frictionless, while also reducing costs. The implementation of IoT solutions can enable businesses to proactively determine customers’ needs and then provide a personalized experience.

The retail industry is increasingly using IoT solutions to collect data and reimagine the retail experience. For example, customers cannot make purchases if they are unable to find the specific item or size that meets their needs. Secure IoT solutions on the intelligent edge and intelligent cloud can help make sure every item is on the right shelf. They can also keep track of items that are moving within the store, for instance, to the fitting rooms and racks outside them.

IoT_WebinarSeries_FACEBOOK_Image3

In a world where online retailers try to get products in front of customers with the fewest number of clicks, brick-and-mortar retailers can also use IoT solutions to minimize the number of steps a customer has to take. This can be accomplished by using cameras and sensors to analyze store traffic patterns and layering this data over inventory and purchase data. From these insights, stores can optimize their physical layout and better enable shoppers to quickly find items and be inspired by complimentary items.

Genetec, a Microsoft partner, has an IoT solution powered by Microsoft Azure that leverages existing store security cameras to provide retailers with customer and operational insights that help improve business outcomes and the in-store experience. For example, their solution can detect increased congestion at checkout terminals to reduce abandonment due to delays checking out and provide customer traffic and flow information for making good merchandising decisions based on that intelligence. Learn more about how you can use Azure to support your IoT solutions in this retail-focused webinar.

Rapidly processing large amounts of complex data

With the amount of data available to businesses, figuring out how to quickly process all the collected data can be a challenge. IoT solutions allow businesses to seamlessly collect and process data, often without interrupting employees and customers. Businesses deploying IoT solutions are able to position themselves to efficiently handle the data needed to meet changing customer expectations and improve productivity.

With the ability to not only collect a wide range of data, but also use it to gain real-time insights, security officials are increasingly turning to IoT technology to increase security in public buildings. For instance, using SoloInsight’s Cloudgate software, which is built on Microsoft Azure, organizations can use self-service kiosks in low-traffic areas to provide a higher level of security than previously possible. Self-service kiosks can also remember previous visitors and employees and immediately grant access to the building, which increases satisfaction. Additionally, IoT visitor management systems can deactivate access to the network and data when a person physically leaves the building.

Watch this public safety webinar for additional insight around how you can use Azure IoT to enable millions of devices and terabytes of data in most regions worldwide.

Viewing real-time data and providing proactive solutions

Previously, businesses could only review historical data and determine solutions for events that had already happened. This approach often resulted in lost productivity, reduced customer satisfaction, and higher costs. Many industries are turning to IoT to give them a real-time view into their businesses and customers. This improves the ability to prevent issues before they occur versus only reacting to events that have already happened.

The manufacturing industry is a prime example of the need to discover anomalies before they become critical issues. Through the use of Azure IoT solutions for discrete manufacturing, companies can connect their systems and products with sensors that gather data, send it to the cloud, and provide real-time insights. This means companies can extend equipment lifespans and efficiency, reduce unplanned downtime, and minimize unexpected maintenance costs.

The healthcare industry is no exception to the need for proactive IoT solutions. Counterfeit drugs and product integrity are among the major issues impacting the industry, resulting in lost income and productivity, as well as negative health impacts. But Azure IoT-enabled healthcare solutions, like Titan Secure from Microsoft partner Wipro, are helping to solve these challenges by providing real-time shipment visibility, data streams, and alerts. Learn more about using IoT solutions to proactively monitor data in this on-demand webinar.

Using IoT to transform your industry

As businesses continue to advance and disrupt their industries through the use of IoT solutions, your business has the opportunity to lead the charge. Start your journey today and begin taking the actions your company needs to transform your industry. By taking the initiative and watching these available on-demand IoT in Action webinars, you can receive practical strategies for implementing and developing solutions using Azure IoT that can advance your business and position you as an industry leader.

Make your data science workflow efficient and reproducible with MLflow

$
0
0

This blog post was co-authored by Parashar Shah, Senior Program Manager, Applied AI Developer COGS.

Title card - Make your data science workflow efficient and reproducible with MLFlow

When data scientists work on building a machine learning model, their experimentation often produces lots of metadata: metrics of models you tested, actual model files, as well as artifacts such as plots or log files. They often try different models and parameters, for example random forests of varying depth, linear models with different regularization rates, or deep learning models with different architectures trained using different learning rates. With all the bookkeeping involved, it is easy to miss a test case, or waste time by repeating an experiment unnecessarily. After they finalize the model that they want to use for predictions, they have to do multiple things in order to create a deployment environment and then create a webservice (http endpoint) from their model.

For small proof-of-concept machine learning projects, data scientists might be able to keep track of their project using manual bookkeeping with spreadsheets and versioned copies of training scripts. However, as their project grows, and they work together with other data scientists as a team, they’ll need a better tracking solution that allows them to:

  • Analyze the performance of the model while tuning parameters.
  • Query the history of experimentation to find the best models to take to production.
  • Revisit and follow up on promising threads of experimentation.
  • Automatically link training runs with related metadata.
  • View snapshots and audit previous training runs.

Once a data scientist has created a model, a model management, and model deployment solution is needed. This solution should allow for:

  • Storing multiple models and multiple versions of the same model in a common workspace.
  • Easy deployment and creation of a scalable web service.
  • Monitoring the deployed web service.

Azure Machine Learning and MLflow

Azure Machine Learning service provides data scientists and developers with the functionality to track their experimentation, deploy the model as a webservice, and monitor the webservice through existing Python SDK, CLI, and Azure Portal interfaces.

MLflow is an open source project that enables data scientists and developers to instrument their machine learning code to track metrics and artifacts. Integration with MLflow is ideal for keeping training code cloud-agnostic while Azure Machine Learning service provides the scalable compute and centralized, secure management and tracking of runs and artifacts.

A diagram showing MLFlow being used for model tracking and performance metric logging

Data scientists and developers can take their existing code, instrumented using MLflow, and simply submit it as a training run to Azure Machine Learning. Behind the scenes, Azure Machine Learning plug-in for MLflow recognizes they’re within a managed training run and connects MLflow tracking to their Azure Machine Learning Workspace. Once the training run has completed, they can view the metrics and artifacts from the run at Azure Portal. Later, they can query the history of your experimentation to compare the models and find the best ones.

A diagram showing MLFlow being used for model deployment

Once the best model has been identified it can be deployed to a Kubernetes cluster (Azure Kubernetes service), from within the same environment using MLflow.

Example use case

At Spark + AI Summit 2019, our team presented an example of training and deploying an image classification model using MLflow integrated with Azure Machine Learning. We used the PyTorch deep learning library to train a digit classification model against MNIST data, while tracking the metrics using MLflow and monitoring them in Azure Machine Learning Workspace. We then saved the model using MLflow’s framework-aware API for PyTorch and deployed it to Azure Container Instance using Azure Machine Learning Model Management APIs.

Where can I use MLflow with Azure Machine Learning?

One of the benefits of Azure Machine Learning service is that it lets data scientists and developers scale up and scale out their training by using compute resources on Azure cloud. They can use MLflow with Azure Machine Learning to track runs on:

  • Their local computer
  • Azure Databricks
  • Machine Learning Compute cluster
  • CPU or GPU enabled virtual machine

MLflow can be used with Azure Machine Learning to deploy models to:

  • Azure Container Instance (ACI)
  • Azure Kubernetes Service (AKS)

Getting started

The following resources give instructions and examples how to get started:

Customers get unmatched security with Windows Server and SQL Server workloads in Azure

$
0
0

Customers such as Allscripts, Chevron, J.B. Hunt, and thousands of others are migrating their important workloads to Azure where they find unmatched security. While understanding cloud security is initially a concern to many, after digging in, customers often tell us the security posture they can set up within Azure is easier to implement and far more comprehensive than what they can provide for in other environments.

Azure delivers multiple layers of security, from the secure foundation in our physical datacenters, to our operational practices, to engineering processes that follow industry standard Mitre guidelines. On top of that, customers can choose from a variety of self-service security services that work for both Azure and on-premises workloads. We employ more than 3,500 cybersecurity professionals and spend $1 billion annually on security to help protect, detect, and respond to threats – delivering security operations that work 24x7x365 for our customers.

Let's look at some examples of how Azure delivers unmatched security for your Windows Server and SQL Server workloads.

The broadest built-in protections across hybrid environments with Azure Security Center

Customers can get the broadest built-in protection available across both cloud and on-premises through Azure Security Center. This includes security recommendations for virtual machines, storage, networking, databases, identity, application services, and IOT – all from a single integrated dashboard.

Azure Security Center leverages the Microsoft Intelligent Security Graph, which collects more than 6.5 trillion signals daily from Microsoft services such as Xbox, Dynamics 365, Office 365, Azure, and our broad partner ecosystem. With Azure Security Center, customers can easily install an agent on Windows Server and get detailed recommendations on which best practices to implement such as installing end-point protection and the latest patches. It also comes with all the capabilities of Microsoft Defender ATP built-in. As a result, you get to tap into our industry-leading threat protection to protect your Windows Server and SQL Server workloads.

Further, Azure Security Center integration will soon be available through Windows Admin Center, a modern Windows Server management solution being used to manage millions of instances today. With a few clicks, you will soon be able secure your Windows Server instances on-premises directly from Windows Admin Center.

Unique platform-level security and governance

Azure’s consistent policy platform makes it easier for you to apply security policies faster across your Windows Server and SQL Server workloads. For every workload you run in Azure, you can easily define a set of security policies and apply them uniformly across your subscriptions or management groups at scale. Using Azure Blueprints, you can literally create a new subscription with all the security settings you need in a few clicks. All of this is possible because Azure has a unique underlying resource management foundation, giving you the confidence that your Windows Server and SQL Server workloads are compliant by design. Best of all, Azure Governance capabilities are available at no additional charge.

Built-in, AI driven Security Information and Event Management (SIEM)

Customers often use SIEM to bring together threat protection information from across the enterprise to enable advanced hunting and threat mitigation. Azure Sentinel is a cloud-native SIEM with built-in AI that enables you to focus on the important threats rather than low fidelity signals. It helps reduce noise drastically—we have seen a reduction of up to 90 percent in alert fatigue from early adopters. It also lets you combine signals from your Windows Server and SQL Server workloads on Azure with all of your other assets including Office 365, on-premises applications, and firewalls to get ahead of bad actors and mitigate threats.

Industry leading confidential computing capabilities

Azure confidential computing offers encryption of data while in use, a protection that has been missing from both on-premises datacenters and public clouds. For certain workloads, it is important to ensure the data is not transparent while it is processed in the CPU. Azure brings this capability through hardware-based enclaves built on top of Intel SGX extensions in the Azure DC series of virtual machines. Microsoft, as the cloud operator, cannot access the data or compute resources inside a secure enclave. Confidential computing also opens up new scenarios like secure block-chain or multi-party machine learning where the data is shared between two parties, but neither has access to the other party’s data due to the secure enclaves. In addition, we have enhanced the Always Encrypted feature in SQL Server 2019 to support secure enclaves and you can build your own applications using this technology with our open SDK.

Unique database security monitoring for your cloud SQL

We use our experience from monitoring more than one million databases over the past few years to offer Advanced Data Security for SQL Database and SQL Server VMs. It includes two key components – vulnerability assessment and Advanced Threat Detection. Vulnerability assessment scans your databases so you can discover, track, and remediate potential database vulnerabilities. Advanced Threat Detection continuously monitors your database for suspicious activities like SQL injection and provides alerts on anomalous database access patterns. Threat alerts and reports from vulnerability assessments also appear in the Azure Security Center threats dashboard.

Free security updates for Windows Server and SQL Server 2008

We understand that customers are still running workloads on SQL Server and Windows Server 2008 and 2008 R2. These versions are approaching end of support in July 2019 and January 2020 respectively. You can automatically get three additional years of free Extended Security Updates if you simply migrate your 2008 and 2008 R2 instances to Azure to ensure they are protected. You can plan your upgrades to newer versions once they are in Azure. Additionally, for SQL Server, you can migrate legacy SQL Server workloads to Azure SQL Database Managed Instances. With this fully managed, version-less service your organization will not face end of support deadlines again.

Get started with Azure for unmatched security in the cloud

Microsoft offers you the training and best practice guidance you need to set up the most powerful protection for your Windows Server and SQL Server workloads in the cloud.

To learn even more best practices on how to take advantage of the built-in tools in Azure to protect your workloads, save the date for the upcoming Azure Security Expert Series webinar coming next Wednesday, June 19, 2019.

XAML Islands v1 – Updates and Roadmap

$
0
0

At Microsoft Build, we announced that the Windows 10 May 2019 Update (version 1903) would include XAML Islands v1.

Below you can find more details on the roadmap and two workstreams in progress to complete the developer experience: the .NET wrappers and Visual Studio 2019 support.

What are XAML Islands?

XAML Islands enable .NET and native Win32 applications to host UWP XAML controls. You can enhance the experience and functionality of your existing desktop applications with the latest UI innovations previously only available for UWP apps. For example, you can use the UWP XAML controls such as ColorPicker, InkCanvas, CalendarView, and NavigationView in your existing C++ Win32, Windows Forms, and WPF applications.

With XAML Islands you can modernize your app at your own pace without having to rewrite your app–just use the UWP XAML controls.

How can I use XAML Islands?

The first component is the UWP XAML hosting API. This is a set of Windows 10 APIs (Windows Runtime classes and COM interfaces) that are shipped within the Windows 10 version 1903. If you have a native C++ Win32 app that is using the Common Controls library (Comctl32.dll) or MFC and you need to modernize your UI, use these APIs.

The second component consists of the .NET wrapped controls and the host controls. Those are a set of UWP XAML hosting API wrappers in the Windows Community Toolkit for both Windows Forms and WPF developers.

What are the requirements for using XAML Islands in my application?

  • Windows 10 version 1903 and above: Regardless you have a native Win32 app or a .NET app, this first version of XAML Islands only works on apps running in the Windows 10 version 1903 and above.
  • Windows 10 SDK version 1903 (10.0.18362): This SDK provides the headers, libraries, metadata, and tools for building Windows 10 apps with XAML Islands.
  • Packaged desktop app: Desktop apps can be packaged into a MSIX to access certain Windows 10 APIs like live tiles and notifications. To package your desktop app you should use the Windows Application Packaging Project. Packaging your app doesn’t mean that your desktop app will run in the UWP reduced-privileged sandbox. Instead, your packaged Win32 app will run in a full-trust process. Packaged apps with XAML Islands will have a streamlined developer experience with Visual Studio 2019.

Note: Unpackaged apps will have a limited support in this release, but some scenarios will be possible.

  • Visual Studio 2019: Only Visual Studio 2019 will have the toolchain necessary for building desktop apps with XAML Islands.
  • .NET Core 3.0: This environment is fully supported for .NET apps. Some scenarios will also work in apps that target the .NET Framework 4.7.2, but there are some limitations for these apps, for example consuming managed 3rd party controls.

What versions of .NET Core and .NET Framework can I target with XAML Islands?

The .NET wrapped controls are supported in .NET Framework and .NET Core 3. The .NET host control (WindowsXamlHost) is available for Windows Forms and WPF. This control allows you to host UWP XAML content. If the UWP XAML content is a control that ships with the Windows 10 platform such as ColorPicker or NavigationView, you can target the .NET Framework 4.7.2 or NET Core 3.

If the UWP XAML content is a UWP user control that is implemented in a 3rd party WinRT component, the version of .NET you can target depends on how the user control was developed. A user control is considered a 3rd party WinRT component if it is defined in one of these ways: in a separate UWP project, in a Nuget Package, or via a link to file.

3P WinRT component vs. desktop host app.

  • If the 3rd party WinRT component is native (written in C++/WinRT), the user control can be consumed by both .NET Framework 4.7.2 and the NET Core 3.
  • If the 3rd party WinRT component is managed (for example, written in C#), the user control can be consumed only by .NET Core 3. The full .NET Framework is not fully supported in this scenario, and it requires some cross compilation to work at all.

This is the matrix of platform support for XAML Islands v1:

Chart showing platform support for XAML Islands v1.

If your app targets .NET Core 3, regardless of whether the 3rd party WinRT component you are hosting is native or managed, you will get a streamlined developer experience. If your app targets the full .NET Framework, you will get a streamlined developer experience only if your 3rd party WinRT component is native.

How can I use XAML Islands in my native C++ Win32 app?

If you’re a C++ developer, you need to use the UWP XAML hosting APIs. These are some basic steps:

  1. First initializes the UWP XAML framework in the current thread (you can use thestatic InitializeForCurrentThreadmethod of the WindowsXamlManager class).
  2. Create a DesktopWindowXamlSource object that requires the HWND of your app. The DesktopWindowXamlSource will create a ChildWindow where you can place the XAML content.
  3. You need to take care of the keyboard focus when users navigate into and out of the XAML Islands. This DesktopWindowXamlSource object exposes event for routing keyboard focus navigation.

You can find more details at: https://docs.microsoft.com/en-us/windows/apps/desktop/modernize/using-the-xaml-hosting-api

How can I use XAML Islands in my .NET App?

The Windows Community Toolkit version 6.0.0 (in preview right now) provides several NuGet packages for Windows Forms and WPF that you can add to your project.

The WindowXamlHost control is a host control in which you can host all kinds of UWP XAML content.

The wrapped controls wrap most of the events and properties of a small set of specific UWP controls into WPF and Windows Forms controls. These wrapped controls are designed to be used as regular Windows Forms and WPF controls so you don’t need to understand UWP concepts. Currently we provide these wrapped controls:

  • InkCanvas wraps the UWP InkCanvas and InkToolbar and provides a surface and toolbars for Ink-based user interaction.
  • MediaPlayerElement enables your .NET apps to use modern audio and video codecs and provide better performance for streaming and rendering media content.
  • MapControl enables you to use the latest innovations from the mapping platform in your apps, such as more photorealistic maps.
  • SwapChainPanel (preview) enables you to add DirectX 12 content in your app.

What modern web view controls are available to desktop applications?

Windows Forms and WPF apps use the WebBrowser control, which uses the Internet Explorer rendering engine and therefore lacks support for HTML5 and other features. The Windows Community Toolkit contains a Windows Forms and WPF wrapper for the UWP WebView control that uses Edge as the rendering engine, so these apps can host web content that requires HTML5.

The Windows Community Toolkit also contains the WebViewCompatible control. This control uses either the WebBrowser or the WebView rendering engine, depending on the version of Windows the app is running on:

  • Apps running on Windows 10, version 1803 and later will use the current WebView rendering engine.
  • Apps running on earlier versions of Windows, like Windows 8.1, will use the older WebBrowser rendering engine.

Are the XAML Islands using a different thread?

No. XAML Islands run on the same UI thread of your desktop app. You can access all the UWP XAML objects from your code behind without doing any marshalling. This is different from Windows Forms and WPF hosted technologies.

Any samples?

XAML Islands Lab is a comprehensive lab that provides step-by-step instructions for using the wrapped controls and host controls in the Windows Community Toolkit to add UWP controls to an existing WPF line-of-business application. This lab includes the complete code for the WPF application as well as detailed instructions for each step in the process.

This C++ Win32 Sample demonstrates a complete implementation of hosting a UWP user control in an unpackaged C++ Win32 application (that is, an application that is not built into an MSIX package).

For a WPF .NET Core 3 app that consumes a UWP project within a User Control you can use this one:

The Windows community Toolkit contains demos to validate the wrapped control and the host control.

What is your roadmap for XAML Islands v1?

1. Windows 10 May 2019 update contains the first release of XAML Islands (v1).

2. The Windows Community Toolkit, v6.0, will contain the WindowsXamlHost and wrapped controls for the .NET Framework.

  • This is planned for this Summer of 2019.
  • There will be a preview of v6.1 that will contain the .NET Core 3 version of the WindowsXamlHost and the wrapped controls. This update will be released to align with the .NET Core 3 release – the second half of 2019.

3. Visual Studio 2019 will get an update in the second half of 2019, aligned with the release of .NET Core 3 that will support XAML Islands v1. Remember that only packaged apps will get a streamlined developer experience.

What is your roadmap for XAML Islands v2?

XAML Islands v2 is intended to ship as a part of WinUI 3.0. Therefore, v2 will support the same Windows 10 versions as WinUI 3.0. We are planning to release v3 major release of WinUI during the first half of 2020. WinUI is an open source project, and you can follow  the latest roadmap and news at: https://github.com/microsoft/microsoft-ui-xaml/blob/master/docs/roadmap.md

What are the best ways for me to give you feedback about XAML Islands?

The post XAML Islands v1 – Updates and Roadmap appeared first on Windows Developer Blog.

Viewing all 5971 articles
Browse latest View live


<script src="https://jsc.adskeeper.com/r/s/rssing.com.1596347.js" async> </script>