Quantcast
Channel: Category Name
Viewing all 5971 articles
Browse latest View live

ASP.NET Core and Blazor updates in .NET Core 3.0 Preview 7

$
0
0

.NET Core 3.0 Preview 7 is now available and it includes a bunch of new updates to ASP.NET Core and Blazor.

Here’s the list of what’s new in this preview:

  • Latest Visual Studio preview includes .NET Core 3.0 as the default runtime
  • Top level ASP.NET Core templates in Visual Studio
  • Simplified web templates
  • Attribute splatting for components
  • Data binding support for TypeConverters and generics
  • Clarified which directive attributes expect HTML vs C#
  • EventCounters
  • HTTPS in gRPC templates
  • gRPC Client Improvements
  • gRPC Metapackage
  • CLI tool for managing gRPC code generation

Please see the release notes for additional details and known issues.

Get started

To get started with ASP.NET Core in .NET Core 3.0 Preview 7 install the .NET Core 3.0 Preview 7 SDK

If you’re on Windows using Visual Studio, install the latest preview of Visual Studio 2019.

Note: .NET Core 3.0 Preview 7 requires Visual Studio 2019 16.3 Preview 1, which is being released shortly.

To install the latest client-side Blazor templates also run the following command:

dotnet new -i Microsoft.AspNetCore.Blazor.Templates::3.0.0-preview7.19365.7

Installing the Blazor Visual Studio extension is no longer required and it can be uninstalled if you’ve installed a previous version. Installing the Blazor WebAssembly templates from the command-line is now all you need to do to get them to show up in Visual Studio.

Upgrade an existing project

To upgrade an existing an ASP.NET Core app to .NET Core 3.0 Preview 7, follow the migrations steps in the ASP.NET Core docs.

Please also see the full list of breaking changes in ASP.NET Core 3.0.

To upgrade an existing ASP.NET Core 3.0 Preview 6 project to Preview 7:

  • Update Microsoft.AspNetCore.* package references to 3.0.0-preview7.19365.7.

That’s it! You should be ready to go.

Latest Visual Studio preview includes .NET Core 3.0 as the default runtime

The latest preview update for Visual Studio (16.3) includes .NET Core 3.0 as the default .NET Core runtime version. This means that if you install the latest preview of Visual Studio then you already have .NET Core 3.0. New project by default will target .NET Core 3.0

Top level ASP.NET Core templates in Visual Studio

The ASP.NET Core templates now show up as top level templates in Visual Studio in the “Create a new project” dialog.
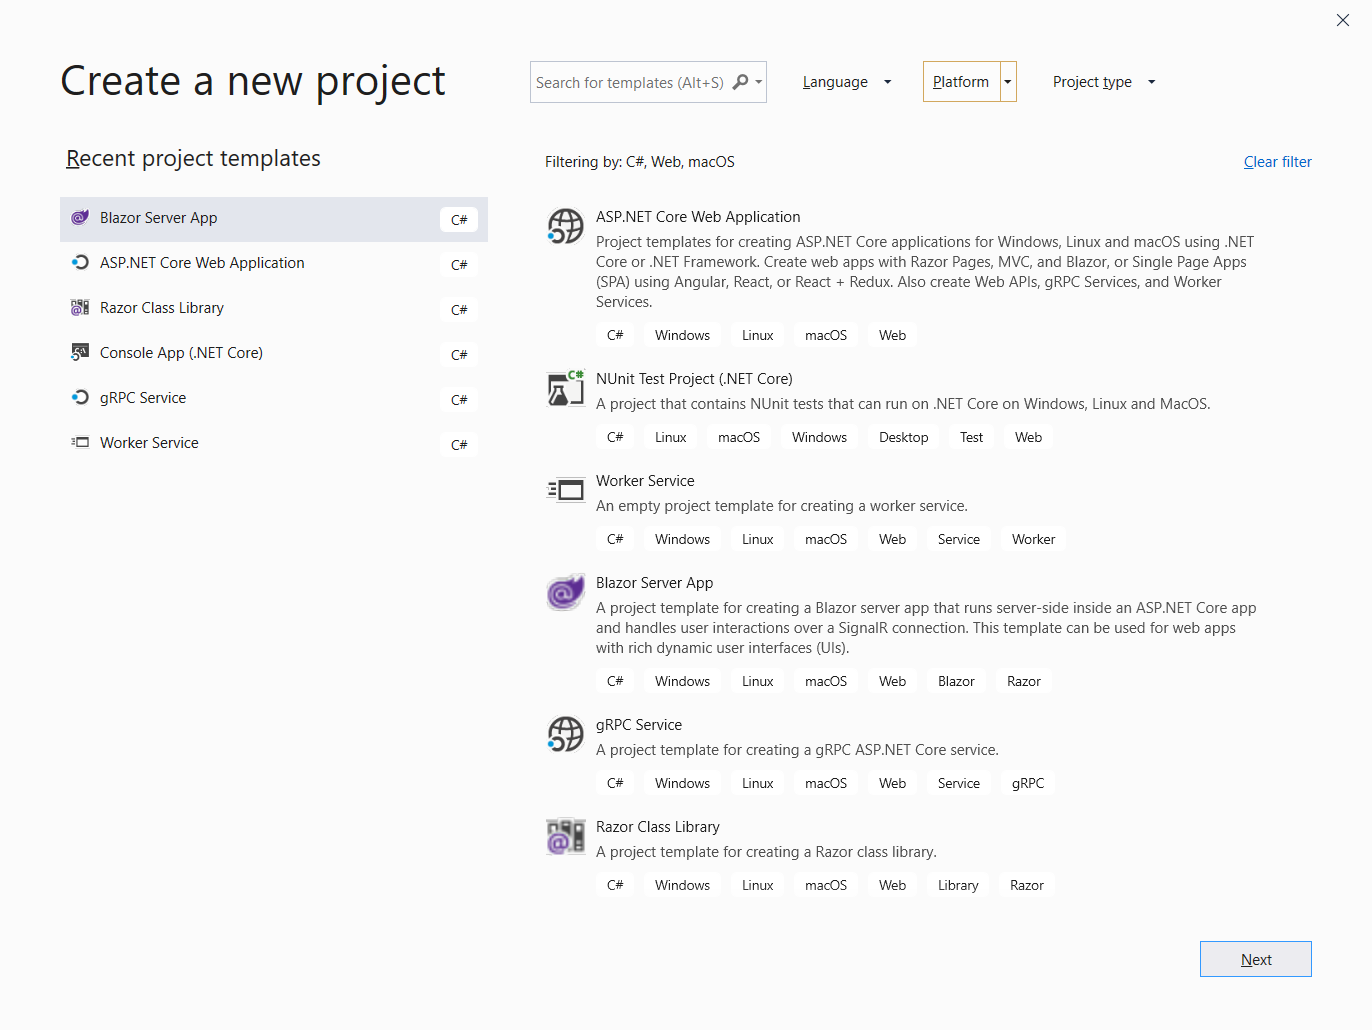
ASP.NET Core templates

This means you can now search for the various ASP.NET Core templates and filter by project type (web, service, library, etc.) to find the one you want to use.

Simplified web templates

We’ve taken some steps to further simplify the web app templates to reduce the amount of code that is frequently just removed.

Specifically:

  • The cookie consent UI is no longer included in the web app templates by default.
  • Scripts and related static assets are now referenced as local files instead of using CDNs based on the current environment.

We will provide samples and documentation for adding these features to new apps as needed.

Attribute splatting for components

Components can now capture and render additional attributes in addition to the component’s declared parameters. Additional attributes can be captured in a dictionary and then “splatted” onto an element as part of the component’s rendering using the new @attributes Razor directive. This feature is especially valuable when defining a component that produces a markup element that supports a variety of customizations. For instance if you were defining a component that produces an <input> element, it would be tedious to define all of the attributes <input> supports like maxlength or placeholder as component parameters.

Accepting arbitrary parameters

To define a component that accepts arbitrary attributes define a component parameter using the [Parameter] attribute with the CaptureUnmatchedAttributes property set to true. The type of the parameter must be assignable from Dictionary<string, object>. This means that IEnumerable<KeyValuePair<string, object>> or IReadOnlyDictionary<string, object> are also options.

@code {
    [Parameter(CaptureUnmatchedAttributes = true)]
    Dictionary<string, object> Attributes { get; set; }
}

The CaptureUnmatchedAttributes property on [Parameter] allows that parameter to match all attributes that do not match any other parameter. A component can only define a single parameter with CaptureUnmatchedAttributes.

Using @attributes to render arbitrary attributes

A component can pass arbitrary attributes to another component or markup element using the @attributes directive attribute. The @attributes directive allows you to specify a collection of attributes to pass to a markup element or component. This is valuable because the set of key-value-pairs specified as attributes can come from a .NET collection and do not need to be specified in the source code of the component.

<input class="form-field" @attributes="Attributes" type="text" />

@code {
    [Parameter(CaptureUnmatchedAttributes = true)]
    Dictionary<string, object> Attributes { get; set; }
}

Using the @attributes directive the contents of the Attribute property get “splatted” onto the input element. If this results in duplicate attributes, then evaluation of attributes occurs from left to right. In the above example if Attributes also contained a value for class it would supersede class="form-field". If Attributes contained a value for type then that would be superseded by type="text".

Data binding support for TypeConverters and generics

Blazor now supports data binding to types that have a string TypeConverter. Many built-in framework types, like Guid and TimeSpan have a string TypeConverter, or you can define custom types with a string TypeConverter yourself. These types now work seamlessly with data binding:

<input @bind="guid" />

<p>@guid</p>

@code {
    Guid guid;
}

Data binding also now works great with generics. In generic components you can now bind to types specified using generic type parameters.

@typeparam T

<input @bind="value" />

<p>@value</p>

@code {
    T value;
}

Clarified which directive attributes expect HTML vs C

In Preview 6 we introduced directive attributes as a common syntax for Razor compiler related features like specifying event handlers (@onclick) and data binding (@bind). In this update we’ve cleaned up which of the built-in directive attributes expect C# and HTML. Specifically, event handlers now expect C# values so a leading @ character is no longer required when specifying the event handler value:

@* Before *@
<button @onclick="@OnClick">Click me</button>

@* After *@
<button @onclick="OnClick">Click me</button>

EventCounters

In place of Windows perf counters, .NET Core introduced a new way of emitting metrics via EventCounters. In preview7, we now emit EventCounters ASP.NET Core. You can use the dotnet counters global tool to view the metrics we emit.

Install the latest preview of dotnet counters by running the following command:

dotnet tool install --global dotnet-counters--version 3.0.0-preview7.19365.2

Hosting

The Hosting EventSourceProvider (Microsoft.AspNetCore.Hosting) now emits the following request counters:

  • requests-per-second
  • total-requests
  • current-requests
  • failed-requests

SignalR

In addition to hosting, SignalR (Microsoft.AspNetCore.Http.Connections) also emits the following connection counters:

  • connections-started
  • connections-stopped
  • connections-timed-out
  • connections-duration

To view all the counters emitted by ASP.NET Core, you can start dotnet counters and specify the desired provider. The example below shows the output when subscribing to events emitted by the Microsoft.AspNetCore.Hosting and System.Runtime providers.

dotnet counters monitor -p <PID> Microsoft.AspNetCore.Hosting System.Runtime

D8GX-5oV4AASKwM

New Package ID for SignalR’s JavaScript Client in NPM

The Azure SignalR Service made it easier for non-.NET developers to make use of SignalR’s real-time capabilities. A frequent question we would get from potential customers who wanted to enable their applications with SignalR via the Azure SignalR Service was “does it only work with ASP.NET?” The former identity of the ASP.NET Core SignalR – which included the @aspnet organization on NPM, only further confused new SignalR users.

To mitigate this confusion, beginning with 3.0.0-preview7, the SignalR JavaScript client will change from being @aspnet/signalr to @microsoft/signalr. To react to this change, you will need to change your references in package.json files, require statements, and ECMAScript import statements. If you’re interested in providing feedback on this move or to learn the thought process the team went through to make the change, read and/or contribute to this GitHub issue where the team engaged in an open discussion with the community.

New Customizable SignalR Hub Method Authorization

With Preview 7, SignalR now provides a custom resource to authorization handlers when a hub method requires authorization. The resource is an instance of HubInvocationContext. The HubInvocationContext includes the HubCallerContext, the name of the hub method being invoked, and the arguments to the hub method.

Consider the example of a chat room allowing multiple organization sign-in via Azure Active Directory. Anyone with a Microsoft account can sign in to chat, but only members of the owning organization should be able to ban users or view users’ chat histories. Furthermore, we might want to restrict certain functionality from certain users. Using the updated features in Preview 7, this is entirely possible. Note how the DomainRestrictedRequirement serves as a custom IAuthorizationRequirement. Now that the HubInvocationContext resource parameter is being passed in, the internal logic can inspect the context in which the Hub is being called and make decisions on allowing the user to execute individual Hub methods.

public class DomainRestrictedRequirement :
    AuthorizationHandler<DomainRestrictedRequirement, HubInvocationContext>,
    IAuthorizationRequirement
{
    protected override Task HandleRequirementAsync(AuthorizationHandlerContext context,
        DomainRestrictedRequirement requirement,
        HubInvocationContext resource)
    {
        if (IsUserAllowedToDoThis(resource.HubMethodName, context.User.Identity.Name) &&
            context.User != null &&
            context.User.Identity != null &&
            context.User.Identity.Name.EndsWith("@jabbr.net", StringComparison.OrdinalIgnoreCase))
        {
            context.Succeed(requirement);
        }

        return Task.CompletedTask;
    }

    private bool IsUserAllowedToDoThis(string hubMethodName,
        string currentUsername)
    {
        return !(currentUsername.Equals("bob42@jabbr.net", StringComparison.OrdinalIgnoreCase) &&
            hubMethodName.Equals("banUser", StringComparison.OrdinalIgnoreCase));
    }
}

Now, individual Hub methods can be decorated with the name of the policy the code will need to check at run-time. As clients attempt to call individual Hub methods, the DomainRestrictedRequirement handler will run and control access to the methods. Based on the way the DomainRestrictedRequirement controls access, all logged-in users should be able to call the SendMessage method, only users who’ve logged in with a @jabbr.net email address will be able to view users’ histories, and – with the exception of bob42@jabbr.net – will be able to ban users from the chat room.

[Authorize]
public class ChatHub : Hub
{
    public void SendMessage(string message)
    {
    }

    [Authorize("DomainRestricted")]
    public void BanUser(string username)
    {
    }

    [Authorize("DomainRestricted")]
    public void ViewUserHistory(string username)
    {
    }
}

Creating the DomainRestricted policy is as simple as wiring it up using the authorization middleware. In Startup.cs, add the new policy, providing the custom DomainRestrictedRequirement requirement as a parameter.

services
    .AddAuthorization(options =>
    {
        options.AddPolicy("DomainRestricted", policy =>
        {
            policy.Requirements.Add(new DomainRestrictedRequirement());
        });
    });

It must be noted that in this example, the DomainRestrictedRequirement class is not only a IAuthorizationRequirement but also it’s own AuthorizationHandler for that requirement. It is fine to split these into separate classes to separate concerns. Yet, in this way, there’s no need to inject the AuthorizationHandler during Startup, since the requirement and the handler are the same thing, there’s no need to inject the handler separately.

HTTPS in gRPC templates

The gRPC templates have been now been updated to use HTTPS by default. At development time, we continue the same certificate generated by the dotnet dev-certs tool and during production, you will still need to supply your own certificate.

gRPC Client Improvements

The managed gRPC client (Grpc.Net.Client) has been updated to target .NET Standard 2.1 and no longer depends on types present only in .NET Core 3.0. This potentially gives us the ability to run on other platforms in the future.

gRPC Metapackage

In 3.0.0-preview7, we’ve introduced a new package Grpc.AspNetCore that transitively references all other runtime and tooling dependencies required for building gRPC projects. Reasoning about a single package version for the metapackage should make it easier for developers to deal with as opposed multiple dependencies that version independently.

CLI tool for managing gRPC code generation

The new dotnet-grpc global tool makes it easier to manage protobuf files and their code generation settings. The global tool manages adding and removing protobuf files as well adding the required package references required to build and run gRPC applications.

Install the latest preview of dotnet-grpc by running the following command:

dotnet tool install --global dotnet-grpc --version 0.1.22-pre2

As an example, you can run following commands to generate a protobuf file and add it to your project for code generation. If you attempt this on a non-web project, we will default to generating a client and add the required package dependencies.

dotnet new proto -o .Protosmailbox.proto
dotnet grpc add-file .Protosmailbox.proto

Give feedback

We hope you enjoy the new features in this preview release of ASP.NET Core and Blazor! Please let us know what you think by filing issues on GitHub.

Thanks for trying out ASP.NET Core and Blazor!

The post ASP.NET Core and Blazor updates in .NET Core 3.0 Preview 7 appeared first on ASP.NET Blog.


Now available: Azure DevOps Server 2019 Update 1, Release Candidate 2

$
0
0

Today, we are announcing the release of Azure DevOps Server 2019 Update 1 RC2. This is our last planned prerelease before our final release of Azure DevOps Server 2019 Update 1. This second release candidate includes some bug fixes since RC1. You can upgrade from Azure DevOps Server 2019 Update 1 RC1 or previous versions of Azure DevOps Server or TFS. You can find the full details in our release notes.

Here are some key links:

We’d love for you to install this release candidate and provide any feedback via Twitter to @AzureDevOps or in our Developer Community.

The post Now available: Azure DevOps Server 2019 Update 1, Release Candidate 2 appeared first on Azure DevOps Blog.

Announcing Entity Framework Core 3.0 Preview 7 and Entity Framework 6.3 Preview 7

$
0
0

Today, we are making new previews of EF Core 3.0 and EF 6.3 available on NuGet.Org.

.NET Core 3.0 Preview 7 and ASP.NET Core 3.0 Preview 7 were also made available today.

We encourage you to install these previews to try the new features, and to validate that all the functionality required by your applications is available and works correctly. As always, we hope you’ll report any issues you find on GitHub.

What is new in EF Core 3.0 Preview 7

Query improvements

In this preview, we have made a lot of progress towards the completion of our new LINQ implementation. For example, the translation of GroupBy, auto-include of owned types, and query tags are now functional again. Also, for the first time in EF Core, we now support SQL translation of LINQ set operators like Union, Concat, Intersect, and Except.

You can still expect some common query functionality to be missing or broken in this preview. Examples of this are the explicitly compiled query API, and global query filters. But all the major pieces should be in place by preview 8, and after that, our focus will be on improving the quality of the release.

If you run into any issues that you don’t see in this list or in the list of bugs already tracked for 3.0, please report it on GitHub.

There are some common workarounds that you might be able to use to get things working:

  • Remember that by-design, LINQ operations that cannot be translated to SQL are no longer automatically evaluated on the client in EF Core 3.0. You may need to switch explicitly to client evaluation if you need to filter data based on an expression that cannot be translated to SQL, using the AsEnumerable() or ToList() extension methods. For example, the following query will no longer work in EF Core 3.0 because one of the predicates in the where clause requires client evaluation:
    var specialCustomers = context.Customers
        .Where(c => c.Name.StartsWith(n) && IsSpecialCustomer(c));

    But if you know it is ok to perform part of the filtering on the client, you can rewrite this as:

    var specialCustomers = context.Customers
        .Where(c => c.Name.StartsWith(n))
        .AsEnumerable()
        .Where(c => IsSpecialCustomer(c));
  • Use the new FromSqlRaw() or FromSqlInterpolated() methods to provide your own SQL translations for anything that isn’t yet supported.
  • Use a nightly build (as detailed below) to verify if the feature is already fixed.

Other major new features

Besides the improved query implementation, preview 7 includes a new API for the interception of database operations. This is very similar to the interception feature that existed in EF 6. It enables writing simple logic that is invoked automatically by EF Core whenever, for example, a database connection is opened, a transaction is committed or a query is executed. Interceptors usually allow you to intercept operations before they happen or after they happen. When you intercept them before they happen, you are allowed to by-pass execution and supply alternate results from the interception logic.

For example, to manipulate command text, create an IDbCommandInterceptor:

public class MyCommandInterceptor : DbCommandInterceptor
{
    public override InterceptionResult? ReaderExecuting(
        DbCommand command, 
        CommandEventData eventData, 
        InterceptionResult? result)
    {
        // Manipulate the command text, etc. here...
        command.CommandText = command.CommandText...
        return result;
    }
}

and register it with your DbContext:

services.AddDbContext(b =>
    b.UseSqlServer(connectionString)
     .AddInterceptors(new MyCommandInterceptor()));

Postponed features

At the same time, some of the features that we had originally planned for 3.0 have been postponed to future release so that we can focus on finishing what is already in flight with good quality. One significant example of this is support for property bag entities (issue #13610) and the ability to ignore parts of the model for migrations (issue #2725).

Getting the preview 7 runtime and tooling

EF Core 3.0 is distributed exclusively as NuGet packages. As usual, add or upgrade the runtime to preview 7 via the NuGet user interface, the Package Manager Console in Visual Studio, or via the dotnet add package command. In all cases, include the option to allow installing pre-release versions.

In 3.0, the dotnet ef CLI tool no longer ships as part of the .NET Core SDK, so before you can execute migration or scaffolding commands, it is necessary to install it as either a global tool or local tool. Due to limitations in the dotnet CLI tooling, installing preview tools requires specifying at least part of the preview version on the installation command, for example to install dotnet ef 3.0 preview as a global tool, you can run:

$ dotnet tool install --global dotnet-ef --version 3.0.0-* 

Breaking changes

All breaking changes in this release are listed in our documentation to make it easier for you to react. We keep the list up to date on every preview, with the most impactful changes near the top of the list. For example, the top most change is the fact that LINQ operations that cannot be translated to SQL are no longer automatically evaluated on the client.

Nightly builds

Given the state of EF Core 3.0 is evolving rapidly, we recommend switching to nightly build of preview 8, for example to try fixes that aren’t included in preview 7. Detailed instructions can be found here.

What’s new in EF 6.3 Preview 7

In this preview we have completed the majority of the work necessary for the EF 6.3 package to work on .NET Core project, and with NuGet PackageReference in all types of projects.

In fact, there are only three main issues still tracked for the EF 6.3 timeframe:

  1. Migration commands for the NuGet Package Manager Console that works on .NET Core projects (issue #231: This is now completed and available in nightly builds. It will be part of preview 8.
  2. An updated EF6 designer for Visual Studio that can work with new project files and in projects that target .NET Core (issue #883: This work hasn’t started yet and is planned for an upcoming update to Visual Studio 2019. In the meantime, we recommend that you work with your EDMX files inside projects that target .NET Framework and then copy the final version of your EDMX to the .NET Core project.
  3. A cross-platform command line experience for migrations commands, similar to dotnet ef but for EF6 (issue #1053: This is work we are considering doing but haven’t committed to it yet. If you would like to see this happen, or if you would like to contribute to it, please send us feedback on the issue.

If you find any unexpected issues with EF 6.3 preview 7, please report it to our GitHub issue tracker.

Weekly status updates

If you’d like to track our progress more closely, we now publish weekly status updates to GitHub. We also post these status updates to our Twitter account, @efmagicunicorns.

Thank you

As always, thank you for trying our preview bits, and thanks to all the contributors that helped in this preview!

The post Announcing Entity Framework Core 3.0 Preview 7 and Entity Framework 6.3 Preview 7 appeared first on .NET Blog.

Skill up on Visual Studio 2019 with Pluralsight

$
0
0

With the launch of Visual Studio 2019 in April, we announced having partnered with Pluralsight to provide new training content to help you build your skills with Visual Studio 2019. We’re thrilled to announce that all 10 courses, spanning over 14 hours of content in the Visual Studio 2019 Path on Pluralsight, are now available. You’ll also be able to benchmark your current skill level with a Pluralsight Skill IQ assessment, which will offer course recommendations.

You can find the 10 courses under the following categories to help you quickly find the right content – whether you’re a beginning developer or experienced professional:

Beginner

These courses are designed to help you master the most common activities in Visual Studio. If you have used prior versions of Visual Studio, check out the What’s New in Visual Studio 2019 course to quickly get up-to-speed on all the new features. If you are new to Visual Studio, you will want to check out the Getting Started with Visual Studio 2019 course. Then, take your debugging skills to the next level with a deep dive on debugging in the last course in this category.

Intermediate

Refine your skills with the courses in this section as you learn to manage your Git repositories using Visual Studio. You can look forward to learning about the testing features available in Visual Studio, the code analysis features, and how Visual Studio helps you migrate solutions to Azure.

Advanced

Set yourself apart with the knowledge you will gain in this section. In just over half an hour, you can learn how to use Visual Studio Live Share. Learn about the advanced debugging features and how to build cloud native solutions in Visual Studio.

Get started today using your Visual Studio Subscription

If you’re a Visual Studio subscriber, you’ll get up to 6 months of free access to Pluralsight included in your subscription. You can activate this benefit in the My Visual Studio portal, which will give you access to the Visual Studio 2019 path and many other courses on Pluralsight. Make sure to check the Pluralsight benefit documentation for more information on activation, eligibility, and frequently asked questions.

The post Skill up on Visual Studio 2019 with Pluralsight appeared first on The Visual Studio Blog.

Caching and faster artifacts in Azure Pipelines

$
0
0

I’m excited to announce the public previews of pipeline caching and pipeline artifacts in Azure Pipelines. Together, these technologies can make every run of your pipeline faster by accelerating the transfer of artifacts between jobs and stages, and by caching the results of common operations like package restores.

Pipeline caching

Pipeline caching introduces a new CacheBeta task that takes a path of files to cache and a cache key. A cache key can be the contents of a file (like a package lockfile), a string of your choice, or a combination of both.

For example, to cache Node.js dependencies installed with Yarn:

steps:
- task: NodeTool@0
  inputs:
    versionSpec: '10.x'
  displayName: 'Install Node.js 10.x'

- task: CacheBeta@0
  inputs:
    key: |
      $(Agent.OS)
      $(Build.SourcesDirectory)/yarn.lock
    path: $(Pipeline.Workspace)/.cache/yarn
  displayName: 'Cache yarn'

- script: yarn install

As we’ve implemented pipeline caching, we’ve learned that every tool behaves differently. So, we’re excited to release this preview and see the cache used in the wild. If you try out the cache and find it doesn’t improve the performance of the step you’re caching, we’d like to hear about it as an issue on azure-pipelines-tasks. If you can create a public repo and pipeline that we can fork to reproduce your issue, all the better. We’ll be listening to these issues and tuning the cache.

We’ve already got some improvements, including preserving file attributes and fallback keys, that we’ll be shipping while the preview is running. We look forward to your ideas and feedback.

There’s a possibility we’ll make breaking changes between v0 and v1 of the task, so we recommend not yet including the cache in production/master branch CI builds.

Learn more about pipeline caching on docs.microsoft.com.

Pipeline artifacts

Pipeline artifacts are the built-in way to move files between jobs and stages of your pipeline and to save files from your pipeline for later use. Pipeline artifacts intelligently deduplicate content and only upload net-new content to the server, which helps speed up repeated builds of the same repository.

To use Pipeline artifacts, just use the publish and download YAML shortcuts, like this:

steps:
- publish: bin
  artifact: binaries

By default, all artifacts published by previous jobs are downloaded at the beginning of subsequent jobs, so it’s not necessary to add a download step. If you want to control this behavior, use the download shortcut, like this:

steps:
- download: none

For most common use cases, the publish and download shortcuts are recommended. However, if you need more control over how your artifacts are downloaded, you can also use the Download Pipeline Artifact and Publish Pipeline Artifact tasks directly.

Learn more about pipeline artifacts on docs.microsoft.com. And, if you run into issues, let us know on Developer Community.

The post Caching and faster artifacts in Azure Pipelines appeared first on Azure DevOps Blog.

Visual Studio 2019 for Mac version 8.2 is now available (and a Preview for 8.3)

$
0
0

Today we are announcing the release of Visual Studio 2019 for Mac version 8.2, as well as Preview 1 of version 8.3. We have a lot of new features and updates in both releases that we’d like to share with you!

If you already have Visual Studio for Mac 2019 installed, you can update to either of these versions using the integrated updater. You can view the release notes for each of these releases at the Release Notes page. You also may be interested in checking our Roadmap to get a sense of our future plans. We hope you have a great experience with these new features, but if you do run into any issues please use Report a Problem to make us aware of them.

Visual Studio 2019 for Mac version 8.2

The 8.2 release has a lot of great features that are now ready for you to use. One big area we continue to invest heavily on is the code editing experience. Let’s start with the improvements to the editors, and then go from there.

Over the past few weeks, we have been working hard to improve the different editor experience in Visual Studio for Mac. In this release, we are including a new editor in the IDE for XAML and AXML files. These editors are the same as those available in Visual Studio on Windows, but the implementation uses the Cocoa APIs to provide a native experience on macOS.

C# Editor

In version 8.1 of Visual Studio 2019 for Mac, we introduced the new C# editor and we continue to add features to further improve the code editing experience in Visual Studio for Mac. With the latest release, we are introducing IntelliSense Type Filtering as well as the ability to include import items in your IntelliSense completion list.

IntelliSense Type Filtering allows you to better organize your completion list to only include the types you are looking for. For example, if you only want to see classes, either clicking the class icon or hitting the hotkey for classes ( ⌥ + C) will limit the results to only classes. You can also include multiple filters.

We’ve also added the ability to add import items to the completion list for IntelliSense, which will populate your list with types from packages which are not yet imported into your project.

Adding a class or other type from the list will then automatically add the import statement to your project, allowing you to focus solely on writing code.

type filtering

XAML Editor

This update includes some notable XAML improvements in the following areas: IntelliSense, performance, reliability, and linting. In the animated gif below you can see the new experience for XAML files.

xaml editor

By adding the new XAML editor, we also included a new XAML Language Service. This is the same language service that is found in Visual Studio. One benefit of this new language service is an improved experience for matching capabilities. As an example, it now supports fuzzy, substring and CamelCase matching. This should help you author your XAML faster and more accurately.

  • Fuzzy Matching: Typing any portion of a string will provide a list of matching and like matches. If you type “stck”, StackLayout will still appear as an option.
  • Substring Matching: Matches will be listed when you type a part of a string, even if it is in the middle of the string. This is a great feature if you recall a section of a command, but not the entire command. Typing “Lay” will match “StackLayout” along with any other string which contains “lay”.
  • Case Insensitive Matching: If you can’t recall the exact casing of a string you’re trying to find, case insensitive matching will ensure you can still find what you’re looking for. With support for this kind of matching, typing “stack” will match to “StackLayout”.

In addition to these updates, you’ll also see a much-improved auto-complete experience for XAML files.

AXML Editor

When developing Android applications, you often find yourself editing .axml files. These files are used to define the Android application’s UI and resources. In this release, we have also updated the editor for these files. The enhancements are similar to those in the XAML editor. Some specific improvements include: IntelliSense, semantic editing of these files, as well as support for go-to-definition. Here is a screenshot of this new editor:

vsmac-axml-editor

Support for .NET Core 3.0 and C# 8.0 Preview

The team has been hard at work to add support for .NET Core 3.0 Preview and C# 8 into Visual Studio for Mac. With this release you’ll find that we officially support .NET Core 3.0 Preview and C# 8. To get started, after installing Visual Studio for Mac, you will need to install a preview of the .NET Core 3.0 SDK. Please note that currently the .NET Core 3.0 SDK is not bundled with the IDE, but we will include it in a future release. After installing the SDK and restarting Visual Studio for Mac, you can create, build, run, debug and publish .NET Core 3.0 applications.

In addition, to enable C# 8 in .NET Core 3.0 SDK, you will need to use the Project Options in Visual Studio for Mac. In Project Options, go to Build > General > Language Options and set the C# language version to Version 8 as per the image below

vsmac-project-options-csharp8

When you’re editing C# 8.0 files in Visual Studio for Mac all the existing functionality will work including IntelliSense and Quick Fixes. For more info on what’s new in C# 8.0, head over to the docs What’s new in C# 8.0.

Visual Studio 2019 for Mac version 8.3 Preview 1

For the first preview release of 8.3, we are focusing on .NET Core improvements. We have several exciting features to share with you here. We would love it if you can try this out and give us some feedback regarding these new capabilities.

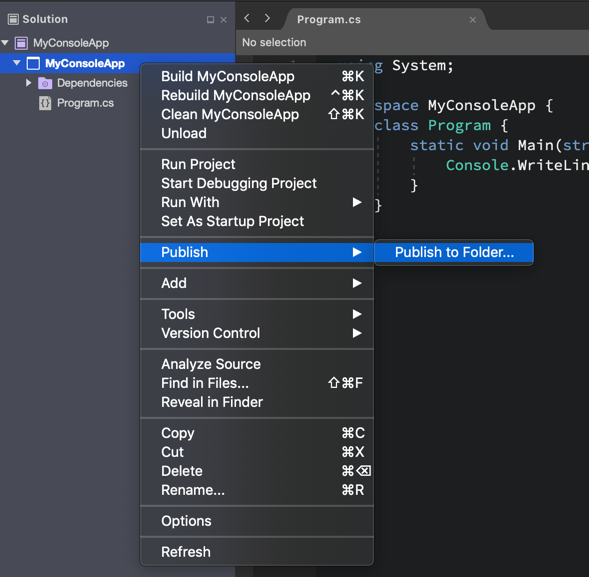
Publish support for .NET Core Console and .NET Standard Library Projects

In a previous release we added the ability to publish an ASP.NET Core project to a folder. In this preview we added support to publish .NET Core Console and .NET Standard Library Projects. For more information on how to use this feature, head over to the docs. Here is a screenshot of this new option when working on a console application.

publish-console-app

After using the Publish to Folder feature, a publish profile is automatically created and becomes available in in the fly-out menu. You can create multiple different profiles, and each will be displayed in the fly-out menu for easy access.

ASP.NET Core: Support for launchSettings.json

When developing ASP.NET Core applications, you can configure how the application is launched for development purposes using the lauchSettings.json file. For more info on this file, see this section of the environments doc. In launchSettings.json, you can configure the URL for the app to listen on as well as environment variables that are applied on run or debug. With this update, we make it easier for you to collaborate on projects with others that may not be using Visual Studio for Mac. Visual Studio, Visual Studio Code and the dotnet CLI (Command Line Interface) already support this file.

ASP.NET Core: File Nesting support

In this preview, we are also adding automatic File Nesting for ASP.NET Core projects. The auto file nesting rules applied are the same as what you find in Visual Studio. With file nesting enabled, you can focus better on the files that you edit most frequently. Generated files, and less frequently edited files will be nested under other related files. Check out the screenshot of the Solution Pad showing the nesting behavior.

file nesting

In a future release we will add the ability to disable automatic file nesting, for those that prefer to view the files as a flat list.

Download and try today

If you haven’t already, please download and try out the 8.2 release today! We hope that this release will allow you to develop your applications more efficiently and that it will give you a better experience overall. We will continue our work on improving the other code editors in the IDE as well as the features we planned on our roadmap.

We would also love for you to download and try out the 8.3 Preview.

If you run into any issues with the 8.2, or the 8.3 Preview release, please use the Report a Problem feature in the IDE.

report a problem context menu

Finally, make sure to follow us on Twitter at @VisualStudioMac and reach out to the team. We look forward to hearing from you. Alternatively, you can head over to Visual Studio Developer Community to track your issues, suggest a feature, ask questions, and find answers from others. We use your feedback to continue to improve Visual Studio for Mac 2019, so thank you again on behalf of our entire team.

Download

The post Visual Studio 2019 for Mac version 8.2 is now available (and a Preview for 8.3) appeared first on The Visual Studio Blog.

Visual Studio 2019 version 16.2 Generally Available and 16.3 Preview 1

$
0
0

Today we are making Visual Studio 2019 version 16.2 generally available, as well as Preview 1 of version 16.3. You can download both versions from VisualStudio.com. If you already have Preview installed, you can alternatively click the notification bell from inside Visual Studio to update. We’ve highlighted some notable features below, but you can also see a list of all the changes in the current release notes or the Preview release notes.

What to expect in Visual Studio version 16.2

Test Explorer

Test Explorer provides better handling of large test sets, easier filtering, more discoverable commands, tabbed playlist views, and customizable columns to fine-tune test information displayed.


Version 16.2 supports debugging JavaScript in the new Microsoft Edge Insider browser for ASP.NET and ASP.NET Core projects.  To do this, install the browser, set a breakpoint in the application’s JavaScript and start a debug session.


This image shows the expanded Test Explorer .
Improved Test Explorer


.NET developer productivity

There are improvements in .NET developer productivity as version 16.2 brings back the Sort Usings refactoring option. Developers also have the ability to convert switch statements to switch expressions and also generate a parameter for a variable from the Quick Actions menu.

In addition, there is an enriched experience of creating and configuring Azure SignalR services when enabling real-time communication in web applications.

C++

In the C++ space, changes include Clang/LLVM support for MSBuild projects, incremental build for Windows Subsystem for Linux, and a new C++ quick action to install missing packages in CMake projects using vcpkg.

CMake projects using vcpkg
C++ quick action to install missing packages in CMake projects using vcpkg


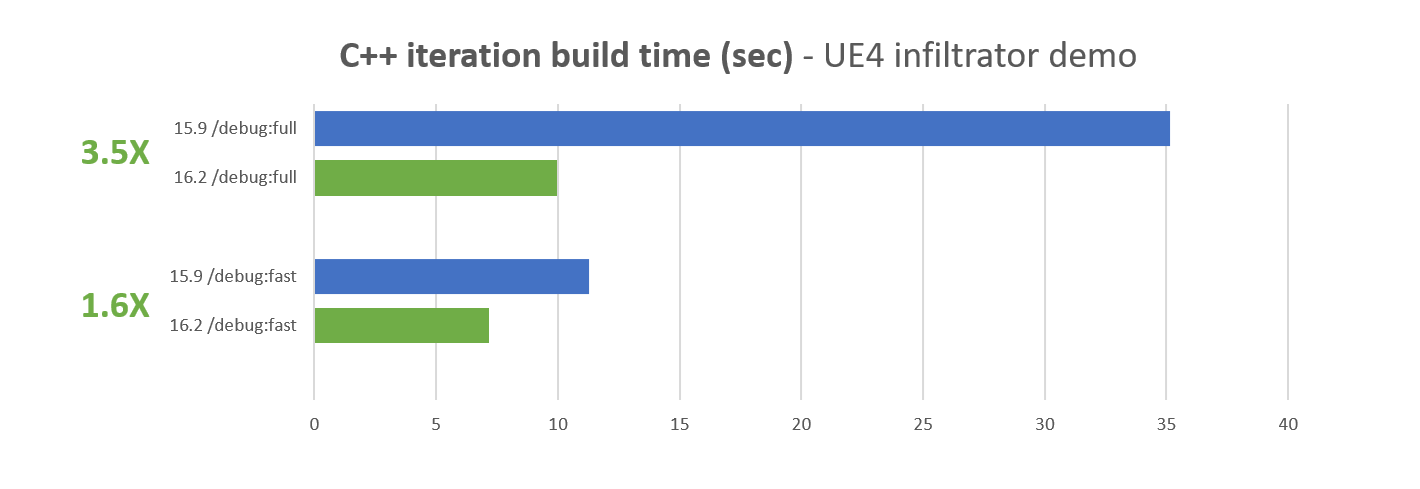
Changes in the throughput of the C++ linker significantly improve iteration build times for the largest of input.  This should result in an improvement to all codebases.  Internal measurements taken on the C++ team saw 2X ranges for /debug:fast and /incremental, while /debug:full typically ranged from 3X to 6X and up.  More information is available on the C++ Team Blog.

C++ Iteration Build Time Demo
Improvements to the C++ linker.


Usability

To enhance usability, users who opted to hide their toolbars in Visual Studio receive additional vertical space. Upon hiding all toolbars, the Live Share, Feedback and Badge icons are moved to the top.  The steps to restore the toolbar are View > Toolbars and select the desired toolbar.

Adding and removing toolbar selections
Increased usability of the toolbar


A list of preview features is findable under Tools > Options > Environment > Preview Features.  This page also allows users to learn about upcoming features as well as participate in surveys to provide additional perspectives on future changes.

Looking forward to 16.3 Preview 1: .NET Core 3.0 Preview and C++

.NET Core 3.0 Preview

Version 16.3 Preview 1 has added support for .NET Core 3.0 Preview.  Additional features include .NET Core project templates like Worker and gRPC for building microservices or Blazor for building client web apps using C#.

Improved Search

Because the ability to search in Visual Studio is a key driver for discoverability, there is an added search box in the start window for users to quickly locate recently used projects, solutions, and folders. The most recently used code containers also integrate with Visual Studio global search so they can be found there as well. This is a direct result of it being one of the highest voted feature requests.  Thanks for all of the feedback!

Improved search feature example

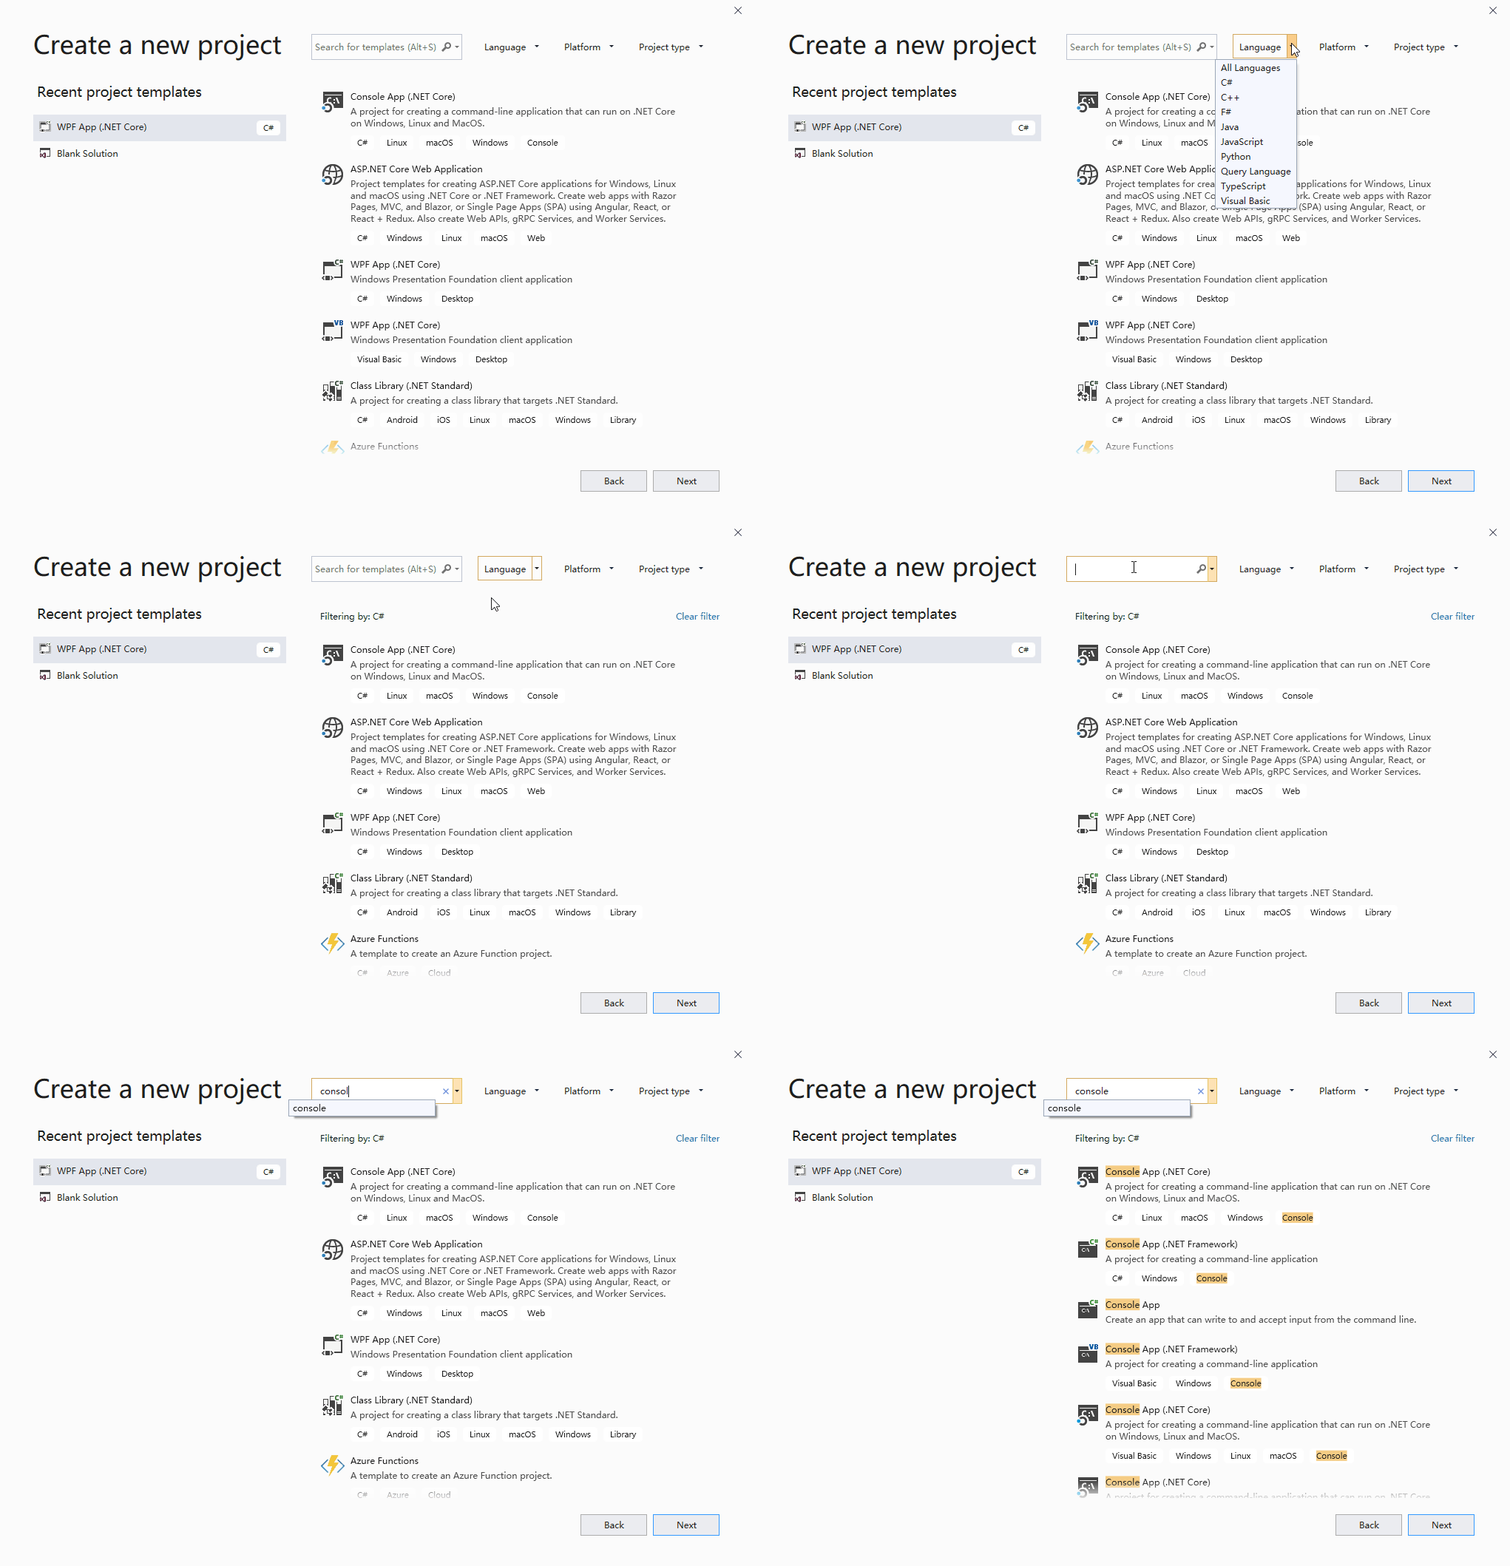
Finding the right project template should be easier than previous iterations.  Template search in the New Project Dialog now supports fuzzy search allowing for typos and plurals while also highlighting matching keywords and ranking results based on relevance.

Recent project search example

Visual Studio will now pick up any updates made to the templates via the .NET CLI and, as a result, the two are kept in sync. New tooling is included in support of the new templates.  Examples include publishing worker projects to container registries and managing Open API & gRPC service references.

This version of Visual Studio also includes many productivity improvements. C++ projects now have IntelliSense member lists filtered based on type qualifiers. Developers have the ability to toggle line comments with a quick command (Ctrl + K, Ctrl + /). .NET projects load more asynchronously and renaming classes in the editor can also rename the containing file. Furthermore, debugging and profiling includes better Edit and Continue support.  There is also auto-expanding of the hot path in the performance profiler and the ability to move both forwards and backward in the profiler during an investigation.

Give it a try today and let us know what you think!

Everyone is encouraged to update to Visual Studio 2019 version 16.2 by downloading directly from VisualStudio.com or updating via the notification bell inside Visual Studio. An alternative option includes the Visual Studio Installer for updates. Try out the 16.3 Preview 1 release by downloading it online or updating from within the IDE from a previous Preview Channel release.

Most noteworthy, Visual Studio teams are continuously driven by feedback, so we look forward to hearing what you have to say about our latest releases. If you discover any issues, make sure to let us know by using the Report a Problem tool in Visual Studio. Additionally, you can head over to Visual Studio Developer Community to track your issues, suggest a feature, ask questions, and find answers from others. We use your feedback to continue to improve Visual Studio 2019, so thank you again on behalf of our entire team.

The post Visual Studio 2019 version 16.2 Generally Available and 16.3 Preview 1 appeared first on The Visual Studio Blog.

Visual Studio Code C/C++ Extension: July 2019 Update

$
0
0

The July 2019 update of the Visual Studio Code C/C++ extension is now available. This release includes many new features, including semantic colorization and improvements to the IntelliSense Configuration Settings Editor UI and IntelliSense cache. For a full list of this release’s improvements, check out our release notes on GitHub.

Semantic Colorization

Semantic colorization support has been one of the top asks on our GitHub repo for the past few years. We faced many challenges in creating support for semantic colorization for the C/C++ extension since there is no VS Code API for semantic source highlighting and no support for semantic colorization in the VS Code language server protocol. We also can’t access a theme’s colors programmatically, so this support was even more challenging to make possible. Luckily, we were able to devise a way to overcome these challenges by managing our own set of tokens and their ranges, using TextEditorDecorations, and directly parsing theme files and VS Code settings to determine which colors to apply. With that, we are excited to share semantic colorization support!

GitHub issue for semantic colorization with 108 upvotes since September 2016

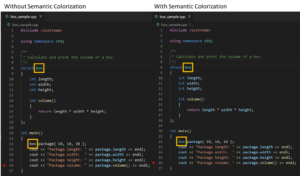
Semantic colorization support provides colorization to tokens even when they are out of context, thus providing colorization beyond that of syntax. For example, if you use a variable name outside of the place in which the variable is declared, you will see colorization:

Box coloring in right side of screenshot where it is outside variable declaration

In the above example, we see our struct is now colorized when it is defined as ‘box’ and when it is used in our main function.

Themes

The colors can be mapped using the existing support for theming and color customization in VS Code. Documentation on Theming in VS Code can be found here. Colors are associated with TextMate scopes. You can read more about the C/C++ extension IntelliSense tokens and scopes in our colorization documentation.

Many of the tokens recognized by IntelliSense do not directly map to existing scopes in VS Code’s default C/C++ TextMate grammar, so those will not be colored by existing VS Code themes. You can customize your color settings in Visual Studio Code, however. There are two ways in which you can do this – via global settings or on a per-theme basis. Theme authors can also make use of these scopes when creating a new color theme.

Customize Colors in Global Setting

In your settings.json file you can customize the colors for all themes by overriding the tokenColorCustomizations setting:

"editor.tokenColorCustomizations": {
        "textMateRules": [
            {
                "scope": "entity.name.type.class",
                "settings": {
                    "foreground": "#FF0000",
                    "fontStyle": "italic bold underline"
                }
            }
        ]
    }

Customize Colors for a Theme

You can also customize colors on a per-theme basis. In this example, we override the Visual Studio Dark theme settings:

"editor.tokenColorCustomizations": {
        "[Visual Studio Dark]": {
            "textMateRules": [
                {
                    "scope": "entity.name.type.class",
                    "settings": {
                        "foreground": "#FF0000",
                        "fontStyle": "italic bold underline"
                    }
                }
            ]    
        }


We created templates to customize Visual Studio Dark and Visual Studio Light themes in our documentation for easier colorization customization.

IntelliSense Configuration settings editor UI

The goal of the settings editor UI is to provide an alternative interface to the c_cpp_properties.json file for configuring IntelliSense for the C/C++ extension. The interface is simple and clear, and thus makes IntelliSense configuration easier to understand. Based on your feedback, we made a few improvements to the IntelliSense Configuration settings editor UI.

Select, Edit, and Add Configurations

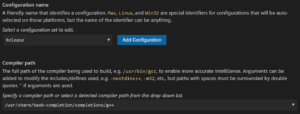
There are a variety of reasons you may benefit from multiple IntelliSense configurations. For example, you may be using debug and release builds. In this case, having IntelliSense configured for debugging and release can improve your editing experience when switching between build types. To more easily get started with multiple configurations, we added an option to select the configuration you’d like to work with:

Select a configuration

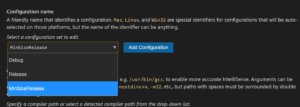
Further, you can edit the settings of the selected configuration:

Edit selected configuration

Finally, you can add configurations via the settings editor UI:

Add a configuration

select and edit the newly added configuration

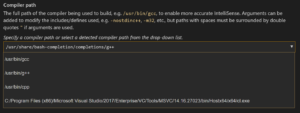
List of Detected Compiler Paths

You can also now see a list of detected compiler paths in the UI under the “compiler path” dropdown text field.

Select from compiler path list

We hope these improvements to the IntelliSense Configuration settings editor UI will help you more easily configure IntelliSense with the C/C++ extension.

IntelliSense Cache

We introduced IntelliSense Caching in the C/C++ extension March 2019 update. The purpose of it is to cache header information to improve IntelliSense speed. We received a lot of feedback on the default size for IntelliSense caching via an issue filed in our GitHub repo. After a productive conversation, we devised a proposal for changes to the default path. We have improved this feature in the July 2019 update.

The Default Path

Previously, the default path for the IntelliSense cache was in the “.vscode” folder of the project workspace (${workspaceFolder}/.vscode). Changing the default path enables us to address concerns of the cache on source control for the workspace folder. Furthermore, since the cache size limit is applied to a cache location, having one location reduces the overall disk space usage of the cache.

Now, the default for the C_Cpp.intelliSenseCachePath setting is “~/.vscode-cpptools” on Linux and macOS and “%LocalAppData%/Microsoft/vscode-cpptools” on Windows.

Note, the extension will automatically remove any caches previously added to the ${workspaceFolder}/.vscode folder if you were using the old IntelliSense cache path default.

Tell Us What You Think

Download the C/C++ extension for Visual Studio Code, give it a try, and let us know what you think. If you run into any issues, or have any suggestions, please report them on the Issues section of our GitHub repository. Set the C_CppProperties.UpdateChannel in your Visual Studio Code settings to “Insiders” to get early builds of our extension.

We can be reached via the comments below or via email (visualcpp@microsoft.com). You can also find our team – and me – on Twitter (@VisualC or @tara_msft).

The post Visual Studio Code C/C++ Extension: July 2019 Update appeared first on C++ Team Blog.


Remote SSH access with Visual Studio Code

Azure publishes guidance for secure cloud adoption by governments

$
0
0

Governments around the world are in the process of a digital transformation, actively investigating solutions and selecting architectures that will help them transition many of their workloads to the cloud. There are many drivers behind the digital transformation, including the need to engage citizens, empower employees, transform government services, and optimize government operations. Governments across the world are also looking to improve their cybersecurity posture to secure their assets and counter the evolving threat landscape.

To help governments worldwide get answers to common cloud security related questions, Microsoft published a white paper, titled Azure for Secure Worldwide Public Sector Cloud Adoption. This paper addresses common security and isolation concerns pertinent to worldwide public sector customers. It also explores technologies available in Azure to help safeguard unclassified, confidential, and sensitive workloads in the public multi-tenant cloud in combination with Azure Stack and Azure Data Box Edge deployed on-premises and at the edge for fully disconnected scenarios involving highly sensitive data. The paper addresses common customer concerns, including:

  • Data residency and data sovereignty
  • Government access to customer data, including CLOUD Act related questions
  • Data encryption, including customer control of encryption keys
  • Access to customer data by Microsoft personnel
  • Threat detection and prevention
  • Private and hybrid cloud options
  • Cloud compliance and certifications
  • Conceptual architecture for classified workloads

Azure can be used by governments worldwide to meet rigorous data protection requirements.

For governments and the public sector industry worldwide, Microsoft provides Azure – a public multi-tenant cloud services platform that government agencies can use to deploy a variety of solutions. A multi-tenant cloud platform implies that multiple customer applications and data are stored on the same physical hardware. Azure uses logical isolation to segregate each customer's applications and data from those of others. This approach provides the scale and economic benefits of multi-tenant cloud services while rigorously helping prevent customers from accessing one another's data or applications.

A hyperscale public cloud provides resiliency in times of natural disaster or other disturbances. The cloud provides capacity for failover redundancy and empowers sovereign nations with flexibility regarding global resiliency planning. A hyperscale public cloud also offers a feature-rich environment incorporating the latest cloud innovations such as artificial intelligence, machine learning, Internet of Things (IoT) services, intelligent edge, and more. This rich feature set helps government customers increase efficiency and unlock insights into their operations and performance.

Using Azure’s public cloud capabilities, customers benefit from rapid feature growth, resiliency, and the cost-effective operation of the hyperscale cloud while still obtaining the levels of isolation, security, and confidence required to handle workloads across a broad spectrum of data classifications, including unclassified and classified data. Leveraging Azure isolation technologies, as well as intelligent edge capabilities (such as Azure Stack and Azure Data Box Edge), customers can process confidential and sensitive data in secure isolated infrastructure within Azure’s multi-tenant regions or highly sensitive data at the edge under the customer’s full operational control.

To get answers to common cloud security related questions, government customers worldwide should review Azure for Secure Worldwide Public Sector Cloud Adoption. To learn more about how Microsoft helps customers meet their own compliance obligations across regulated industries and markets worldwide, review “Microsoft Azure compliance offerings.

Microsoft Office 365 now available from new South Africa cloud datacenters

Accessing virtual machines behind Azure Firewall with Azure Bastion

$
0
0

Azure Virtual Network enables a flexible foundation for building advanced networking architectures. Managing heterogeneous environments with various types of filtering components, such as Azure Firewall or your favorite network virtual appliance (NVA), requires a little bit of planning.

Azure Bastion, which is currently in preview, is a fully managed platform as a service (PaaS) that provides secure and seamless remote desktop protocol (RDP) and secure shell (SSH) access to your virtual machines (VMs) directly through the Azure portal. Azure Bastion is provisioned directly in your virtual network, supporting all VMs attached without any exposure through public IP addresses.

When you deploy Azure Firewall, or any NVA, you invariably force tunnel all traffic from your subnets. Applying a 0.0.0.0/0 user-defined route can lead to asymmetric routing for ingress and egress traffic to your workloads in your virtual network.

While not trivial, you often find yourself creating and managing a growing set of network rules, including DS NAT, forwarding, and so on, for all your applications to resolve this. Although this can impact all your applications, RDP and SSH are the most common examples. In this scenario, the ingress traffic from the Internet may come directly to your virtual machine within your virtual network, but egress traffic will end up going to the NVA. Since most NVAs are stateful, it ends up dropping this traffic as it did not initially receive it.

Azure Bastion, allows for simplified set up of RDP/SSH to your workloads within virtual networks containing stateful NVAs or Azure Firewall with force tunneling enabled. In this blog, we will look at how to make that work seamlessly.

Having deployed both Azure Bastion and Azure Firewall in your virtual network, let us look at how you can configure Azure Bastion to work in this scenario.

Azure Bastion architecture

Configuring Azure Bastion

When deploying Azure Firewall, or a virtual appliance, you may end up associating your RouteTable, which was created while deploying Azure Firewall, to all subnets in your virtual network. You may even be including the AzureBastionSubnet subnet as well. 

This applies a user-defined route to the AzureBastionSubnet subnet which directs all Azure Bastion traffic to Azure Firewall, thereby blocking traffic required for Azure Bastion. To avoid this, configuring Azure Bastion is very easy, but do not associate the RouteTable to AzureBastionSubnet subnet.

myRoute table in Microsoft Azure

As you would have noticed above, myRouteTable is not associated with the AzureBastionSubnet, but with other subnets like Workload-SN.

The AzureBastionSubnet subnet is secure platform managed subnet, and no other Azure Resource can deploy in this subnet except Azure Bastion. All connections to Azure Bastion are enforced through the Azure Active Directory token-based authentication with 2FA, and all traffic is encrypted/over HTTPS. 

Azure Bastion is internally hardened and allows traffic only through port 443, saving you the task of applying additional network security groups (NSGs) or user-defined routes to the subnet.

With this, the RDP/SSH requests will land on Azure Bastion. Configured using the example above, the default route (0.0.0.0/0) does not apply to AzureBastionSubnet as it's not associated with this subnet. Based on the incoming RDP/SSH requests, Azure Bastion connects to your virtual machines in other subnets, like Workload-SN, which do have a default route associated. The return traffic from your virtual machine will go directly to Azure Bastion, instead of going to the NVA, in your virtual network as the return traffic is directed to a specific private IP in your virtual network. The specific private IP address in your virtual network makes it a more specific route and hence, takes precedence over the force-tunnel route to the NVA, making your RDP/SSH traffic work seamlessly with Azure Bastion when a NVA or Azure Firewall is deployed in your virtual network.

We are grateful and appreciate the engagement and excitement of customers and community and are looking forward to your feedback in further improving the service and making it generally available soon.

Improved Linker Fundamentals in Visual Studio 2019

$
0
0

On the C++ team we’ve heard loud and clear from users that build times are a pain point. So we’ve continued our focus on improving the step, linking, that dominates F5 build times. Fast F5 build times, or iteration build times, are a key contributor to developer productivity and we felt that there was a large opportunity so we narrowed in on changes that we felt could move the needle 2x or more.  This is on top of the significant improvements we made to the tool chain to speed up link times in the VS 2019 16.0 release.   Let me give a teaser of the kinds of wins we were able to achieve.

Unreal Engine 4 Inflitrator demo release build times


This shows a 3.5X win in 16.2 vs. 15.9 for a /debug:full build of the release configuration of the UE4 infiltrator demo and a 1.6X win using /debug:fastlink.  This is a middle of the road win given the other workloads we measured.  The fastlink win in particular was a little weak.  So what did we do?  We went back to basics.

What did we do: Improved Fundamentals

Link.exe is responsible for combining a disparate and large set of data into the executable and PDB and is fundamentally a serial process (mostly). After our changes in VS2019 16.0 to reduce the size of the debug input, as well as improvements to our type hashing strategy, we went back to basics and improved our core data structure and algorithm implementations.  With this change all our internal data structures have been updated to give better cache performance and memory utilization, as well as implement aggressive memoization of intermediate data to eliminate redundant computation.  These changes are at the base of the linker and the entire C++ ecosystem and, happily, show wins across nearly all the scenarios we track.  Do you use /debug:full? It’s faster. Do you use /debug:fastlink? It’s faster too.  Additionally, recompile scenarios that use link /incremental also follow the trend and are faster as well.

A key objective with these changes, as with any changes we make to the MSVC toolset, was to maintain compatibility.  All of the changes we made preserved interoperability so if you have an older library or PDB that is binary compatible with VS everything will continue to work.

Show me the numbers

One of our key outcomes we wanted from this effort was to improve iteration build times for our largest inputs.  These typically are large dlls or exes that combine a large number of objs with static libs and other components. There are a lot of places where project sizes get big, but there were two main areas where we found good examples to analyze and improve.

Open Source Projects

There are several large OSS projects that we track for general correctness representative of long link times.  For each of the workloads below we looked through the builds and found the link command that took the most time, and then created a link repro for it. To model the single obj rebuild and link time each of these link repros were then run in isolation. The times below are for each of the individual link repros and show the comparison between VS 2017 15.9 and VS 2019 16.2 Preview 2 “all up”.  Note: the tables are split out into one for Debug time as well as one for Release with debug info time, also a description of /debug:fastlink is available on the VC blog.

Debug iteration builds time for Chrome.dll, clang.exe, mongod.exe mysqld.exe and UE4Game.exe

Release iteration builds time for chrome.dll, clang.exe, mongod.exe, mysqld.exe, and UE4Game.exe

These are the links to the source of the workloads we used in the above experiments.

  • Chrome (commit 2a88e68bd7498b185675098bcd0addf2c7b7808 ) * this is an older time stamp that still builds with MSVC.
  • Clang
  • MongoDB
  • MySQL
  • UE4Game (requires github signin and approval)

AAA Games

Many AAA games are great examples of large monolithic exes, and because we worked closely with some of the game studios working on AAA titles for Xbox One we can show numbers – but with the names removed.  “Beta” and “Charlie” are large games that showed long link times and are representative of large production C++ source bases.  These were some of our most challenging linker inputs.


AAA games /debug:full link times for large inhouse games.

As you can see from the graph the improvements can scale with the size of the input.  This can change depending on project specifics but we see this general trend across all the data.

Here’s the Summary

We did a major renovation and cleanup of the component that is the dominant part of the iteration build time.  These changes show wins in the 2X range for /debug:fastlink and /incremental, while /debug:full is typically 3X-6X and up.  (We’ve seen 10X wins on some workloads). These wins will show up in a wide variety of workloads and are fully compatible with other binaries produced by MSVC.

Is there any more?

Link times still dominate F5 and we’re still looking for ways to speed this up.  At this point we think that a lot of the low hanging fruit is plucked so we are focusing on how the toolchain as a whole manages intermediate build products and debug info.  So stay tuned for more.

Take it for a test drive

We’d love for you to download Visual Studio 2019 16.2 and give it a try. As always, we welcome your feedback. We can be reached via the comments below or via email (visualcpp@microsoft.com). If you encounter problems with Visual Studio or MSVC, or have a suggestion for us, please let us know through Help > Send Feedback > Report A Problem / Provide a Suggestion in the product, or via Developer Community. You can also find us on Twitter (@VisualC) and Facebook (msftvisualcpp).


The post Improved Linker Fundamentals in Visual Studio 2019 appeared first on C++ Team Blog.

Share packages publicly from Azure Artifacts – Public Preview

$
0
0

Azure Artifacts, part of Azure DevOps, offers the ability to host and share Maven, npm, NuGet, and Python package feeds within your organization. Over time, one of the most consistent requests we’ve heard from our users was for the ability to share packages from Azure Artifacts with users outside of your Azure DevOps organization.

As anticipated during Microsoft Build 2019, today I’m excited to announce the public preview of public feeds in Azure Artifacts.

Public feeds allow you to share your packages with anyone on the Internet. NuGet, npm, Maven, and Python packages stored in public feeds can be accessed without authentication by anyone, including anonymous users who aren’t logged into an Azure DevOps account.

You can create a public feed by going to the Artifacts tab in a public project and clicking + New Public Feed near the top of the UI. All packages stored in the public feed can be accessed by anyone by following the steps in the Connect to feed dialog. Anonymous access is read-only, and users still need to the correct permissions in order to push new packages to public feeds.

The first 2 GB of public packages are free, just like with private Azure Artifacts feeds. Additional storage is charged per GB per month according to the pricing page.

To learn more about public feeds, check out our feeds documentation, or if you want to dive in, go straight to our tutorial on sharing packages publicly.

During the public preview, we’re eager to hear any and all feedback so that we can improve public feeds as much as possible before the GA release. Please feel free to reach out to me on Twitter with any thoughts or suggestions. Happy sharing!

The post Share packages publicly from Azure Artifacts – Public Preview appeared first on Azure DevOps Blog.

Discover how Microsoft 365 can help health providers adapt in an era of patient data protection and sharing

$
0
0

For years, patient data management has meant one thing—secure the data. Market and regulatory changes now require that providers go beyond securing the data to also sharing the data. Open data sharing can contribute to quality of care, patient safety, cost management, and patient trust. Learn how Microsoft 365 is the right cloud platform to support these objectives.

The post Discover how Microsoft 365 can help health providers adapt in an era of patient data protection and sharing appeared first on Microsoft 365 Blog.


Top Stories from the Microsoft DevOps Community – 2019.07.26

$
0
0

It is summer in the Northern Hemisphere, and I hope you are enjoying the lovely weather.
For that moment when you need a break from the fun outdoor activities with your friends and family, here are some great posts from the Azure DevOps community for you to enjoy!

Working with Audit logs in Azure DevOps
We have recently announced a Preview of Audit Logs in Azure DevOps. While it may be too early to rely on this feature in production, you can start getting familiar with it. This post from Mohit Goyal walks you through configuring auditing, managing audit logs access, and getting the audit logs out via the REST API. Thanks, Mohit, for putting it together!

Home Grown IoT – Automated DevOps
IoT scenarios tend to present unique challenges, especially when it comes to automation. This post from Aaron Powell details using Azure Pipelines and IoT Edge to do the Build and Release for a Raspberry PI application. And you can even browse to Aaron’s public Azure DevOps project to review the pipelines!

Reap What You Sow – IaC, Terraform, & Azure DevOps
This post from Napoleon I. Jones walks us through deploying infrastructure as code to Azure using Terraform, with the deployment automated with Azure Pipelines classic editor. Perhaps the next challenge could be bringing it all together in a YAML pipeline!

Export Work Item Information to Word Document
Always wanted to be able to create documentation directly from your Work Items? This walkthrough from Gian Maria Ricci is a collection of shorter posts on how to get the Work Item information from Azure Boards using the Azure DevOps REST API into a Word Document. For extra credit, you can even retrieve attachments and images from the work item.

If you’ve written an article about Azure DevOps or find some great content about DevOps on Azure, please share it with the #AzureDevOps hashtag on Twitter!

The post Top Stories from the Microsoft DevOps Community – 2019.07.26 appeared first on Azure DevOps Blog.

System.Text.Json and new built-in JSON support in .NET Core

$
0
0

In a world where JSON (JavaScript Object Notation) is everywhere it's long been somewhat frustrating that .NET didn't have built-in JSON support. JSON.NET is great and has served us well but it's remained a 3rd party dependency for basic stuff like an ASP.NET web site or a simple console app.

Back in 2018 plans were announced to move JSON into .NET Core 3.0 as an intrinsic supported feature, and while they're at it, get double the performance or more with Span<T> support and no memory allocations. ASP.NET in .NET Core 3.0 removes the JSON.NET dependency but still allows you to add it back in a single line if you'd like.

NOTE: This is all automatic and built in with .NET Core 3.0, but if you’re targeting .NET Standard or .NET Framework. Install the System.Text.Json NuGet package (make sure to include previews and install version 4.6.0-preview6.19303.8 or higher). In order to get the integration with ASP.NET Core, you must target .NET Core 3.0.

It's very clean as well. Here's a simple example.

using System;

using System.Text.Json;
using System.Text.Json.Serialization;

namespace verysmall
{
class WeatherForecast
{
public DateTimeOffset Date { get; set; }
public int TemperatureC { get; set; }
public string Summary { get; set; }
}

class Program
{
static void Main(string[] args)
{
var w = new WeatherForecast() { Date = DateTime.Now, TemperatureC = 30, Summary = "Hot" };
Console.WriteLine(JsonSerializer.Serialize<WeatherForecast>(w));
}
}
}

The default options result in minified JSON as well.

{"Date":"2019-07-27T00:58:17.9478427-07:00","TemperatureC":30,"Summary":"Hot"}      

Of course, when you're returning JSON from a Controller in ASP.NET it's all automatic and with .NET Core 3.0 it'll automatically use the new System.Text.Json unless you override it.

Here's an example where we pull out some fake Weather data (5 randomly created reports) and return the array.

[HttpGet]

public IEnumerable<WeatherForecast> Get()
{
var rng = new Random();
return Enumerable.Range(1, 5).Select(index => new WeatherForecast
{
Date = DateTime.Now.AddDays(index),
TemperatureC = rng.Next(-20, 55),
Summary = Summaries[rng.Next(Summaries.Length)]
})
.ToArray();
}

The application/json is used and JSON is returned by default. If the return type was just string, we'd get text/plain. Check out this YouTube video to learn more details about System.Text.Json works and how it was designed. I'm looking forward to working with it more!


Sponsor: Get the latest JetBrains Rider with WinForms designer, Edit & Continue, and an IL (Intermediate Language) viewer. Preliminary C# 8.0 support, rename refactoring for F#-defined symbols across your entire solution, and Custom Themes are all included.


© 2019 Scott Hanselman. All rights reserved.
     

Integrating Cosmos DB with OData (Part 1)

$
0
0

We talked in previous articles about the pluggability of OData with any storage technology regardless of its schema, whether it’s a SQL-based storage, NoSQL, In-Memory or simply a file on a hard-drive.

This power of OData enables developers to work with powerful, planet-scale storage technologies such as Cosmos DB.

In this article we are going to deep dive into one of three ways you can integrate Cosmos DB with OData but before we start, let’s talk a little bit about Cosmos DB, it’s capabilities and why it’s important to be able to expose that storage powerful through an API with OData.


What is Cosmos DB?

Azure Cosmos DB is Microsoft’s globally distributed, multi-model database service. It enables you to elastically and independently scale throughput and storage across any number of Azure regions worldwide. You can elastically scale throughput and storage, and take advantage of fast, single-digit-millisecond data access using your favorite API including SQL, MongoDB, Cassandra, Tables, or Gremlin.

Cosmos DB is a perfect solution for the hot category of storage, specifically data that needs to be accessed frequently and be retrieved as fast as possible.


Cosmos DB with OData

When planning to integrate Cosmos DB with OData, there are three different ways you can follow to accomplish that level of integration based on your preference and whichever model fits the application you’re developing.

If you don’t have any specific preference when it comes to integrating Cosmos DB with OData, I highly recommend you try them all, and judge for yourself which approach is easier and best fits your needs.


Let’s talk about the first of these approaches in this article.


First Approach: Pre-Built ASP.NET Core Solution

Cosmos DB in Azure Portal comes with some amazing options that enables you to download a full solution with full CRUD operations and UI to interact with Cosmos DB.

In order for you to do that, go to your Azure portal and create a new Cosmos DB resource as follows:


  1. Click on “Create a resource” button at the top left corner in your Azure Portal:

  1. Search for Azure Cosmos DB, then click “Create” button.

  1. When you click the “Create” button, you will be presented with a bunch of options to select which API you’d like to choose to interact with Cosmos DB – for the first and second approach we are going to select “Core (SQL)” as our option as follows:

You might need to create a new resource group and select an account name – for this demo I have named my account studentsdb.

Make sure your account name is all lowercase.

After that’s done, click “Review + create” button to create your new Cosmos DB instance.

The creation process of a Cosmos DB instance might take between 1 – 5 minutes depends on what type of configuration you’ve chosen to build your instance.

  1. When the creation is completed – go to the quick start option on the left side menu, you will be presented with the following options to work with Cosmos DB.
  2. Select “.NET Core” option then click the “Create ‘Items’ Contains” button – it will create a sample container for you to work with.
  3. Once the items container is created, click the “Download” button to download a full ASP.NET Core MVC solution for full CRUD operations to interact with the sample container you just created.
  4. Now that you have downloaded the solution, build the solution, then try to run the solution to make sure all the configurations are set correctly, all dependencies are downloaded and that you can actually interact with the container in your Cosmos DB instance – in this demo I’m going to add a couple of records in the ToDoList.
    (Note: you might be prompted by Visual Studio 2019 that you’re opening a solution downloaded from the internet – since Azure portal is a trusted source go ahead and click OK)

To verify the records you’ve created have been successfully persisted, you can go back to your Azure portal and click “Open Data Explorer” button to check the records you created, the following screenshots shows you the data navigation and retrieval on the data explorer window in Azure:

This completes and verifies the setup portion of this first approach.

Now, let’s go ahead an utilize the CRUD operations code to build a new API and integrate OData.

You will notice that the solution we downloaded from Azure Portal implements the Repository pattern, which offer all CRUD operations needed to run an API.

For this demo, we will focus on the following code in ItemController.cs file:

private readonly IDocumentDBRepository<todo.Models.Item> Respository;
        public ItemController(IDocumentDBRepository<todo.Models.Item> Respository)
        {
            this.Respository = Respository;
        }

        [ActionName("Index")]
        public async Task<IActionResult> Index()
        {
            var items = await Respository.GetItemsAsync(d => !d.Completed);
            return View(items);
        }

We will create an API controller let’s call it ItemsController.cs and use the exact same code snippet above to build an endpoint that returns all items from Cosmos DB in JSON format – our new controller would look something like this:

using System.Collections.Generic;
using System.Threading.Tasks;
using Microsoft.AspNetCore.Mvc;
using todo;
using todo.Models;

namespace quickstartcore.Controllers
{
    [Produces("application/json")]
    [Route("api/Items")]
    public class ItemsController : Controller
    {
        private readonly IDocumentDBRepository<Item> Respository;
        public ItemsController(IDocumentDBRepository<Item> Respository)
        {
            this.Respository = Respository;
        }

        // GET: api/Items
        [HttpGet]
        public async Task<IEnumerable<Item>> Get()
        {
            return await Respository.GetItemsAsync(d => !d.Completed);
        }
    }
}

Let’s verify our endpoint is functional by hitting the endpoint in the browser or using a tool like Postman, your response for hitting an endpoint:

http://localhost:1234/api/items

Your response should look something like this:

[
    {
        "id": "3f0beb77-dd24-4b51-a921-6a34c60e7b4b",
        "name": "Brush your teeth",
        "description": "brush your teeth tonight",
        "isComplete": false
    },
    {
        "id": "739c3cef-58b6-48a6-ad8f-21b485bb326f",
        "name": "Organize Office",
        "description": "Organize your office",
        "isComplete": false
    }
]

Now that we have implemented and verified our controller endpoint is functional, let’s do the exact same steps we’ve done in this article to implement OData in our solution, I will summarize these steps here as follows:

  1. Add a Nuget package Microsoft.AspNetCore.OData to your solution.
  2. Add OData service in your startup.cs file, then enable dependency injection along with the functions you want OData to provide through your API, here’s an example of how your file should look like:
    using System.Linq;
    using Microsoft.AspNet.OData.Extensions;
    using Microsoft.AspNetCore.Builder;
    using Microsoft.AspNetCore.Hosting;
    using Microsoft.Extensions.Configuration;
    using Microsoft.Extensions.DependencyInjection;
    using Microsoft.Extensions.Logging;
    using todo;
    
    namespace quickstartcore
    {
        public class Startup
        {
            public Startup(IHostingEnvironment env)
            {
                var builder = new ConfigurationBuilder()
                    .SetBasePath(env.ContentRootPath)
                    .AddJsonFile("appsettings.json", optional: true, reloadOnChange: true)
                    .AddJsonFile($"appsettings.{env.EnvironmentName}.json", optional: true)
                    .AddEnvironmentVariables();
                Configuration = builder.Build();
            }
    
            public IConfigurationRoot Configuration { get; }
            public void ConfigureServices(IServiceCollection services)
            {
                // Add framework services.
                services.AddMvc();
    
                services.AddSingleton<IDocumentDBRepository<todo.Models.Item>>(new DocumentDBRepository<todo.Models.Item>());
                services.AddOData();
            }
    
            public void Configure(IApplicationBuilder app, IHostingEnvironment env, ILoggerFactory loggerFactory)
            {
                loggerFactory.AddConsole(Configuration.GetSection("Logging"));
                loggerFactory.AddDebug();
    
                if (env.IsDevelopment())
                {
                    app.UseDeveloperExceptionPage();
                    app.UseBrowserLink();
                }
                else
                {
                    app.UseExceptionHandler("/Home/Error");
                }
    
                app.UseStaticFiles();
    
                app.UseMvc(routes =>
                {
                    routes.MapRoute(
                        name: "default",
                        template: "{controller=Item}/{action=Index}/{id?}");
    
                    routes.EnableDependencyInjection();
                    routes.Select().Filter().OrderBy().Expand();
                });
            }
        }
    }
  3. Let’s update our controller (ItemsController.cs) to enable OData query – your controller file should look as follows:
    using System.Collections.Generic;
    using System.Threading.Tasks;
    using Microsoft.AspNet.OData;
    using Microsoft.AspNetCore.Mvc;
    using todo;
    using todo.Models;
    
    namespace quickstartcore.Controllers
    {
        [Produces("application/json")]
        [Route("api/Items")]
        public class ItemsController : Controller
        {
            private readonly IDocumentDBRepository<Item> Respository;
            public ItemsController(IDocumentDBRepository<Item> Respository)
            {
                this.Respository = Respository;
            }
    
            // GET: api/Items
            [HttpGet]
            [EnableQuery()]
            public async Task<IEnumerable<Item>> Get()
            {
                return await Respository.GetItemsAsync(d => !d.Completed);
            }
        }
    }
  4. Let’s verify our new endpoint with OData integration by hitting an endpoint like:
    http://localhost:36442/api/items?$select=name

    And your response should look as follows:
    [
        {
            "name": "Brush your teeth"
        },
        {
            "name": "Organize Office"
        }
    ]


By seeing this result, we verified OData is functional on your API retrieving and processing data from your Cosmos DB instance container.
In the next article, we will discuss working with OData & Cosmos DB using the EntityFramework in ASP.NET Core API.

Final Notes

  1. You can download the solution I used to run this demo from here (Don’t forget to update the endpoint & key values in DocumentDBRepository.cs file.
  2. The current demo uses ASP.NET Core 2.2 example, but there are so many other options including classic ASP.NET MVC applications that I encourage you to try out.
  3. The current demo uses Item as a model, you will need to modify the solution slightly to work with whatever model you want to run your application.
  4. I highly recommend following this link to learn more about Cosmos DB and it’s capabilities, huge thanks to Cosmos DB team for providing such a great documentation around such powerful technology.
  5. I also highly recommend staying up-to-date with all the new updates in Cosmos DB by following this link to their blog.


The post Integrating Cosmos DB with OData (Part 1) appeared first on OData.

MSVC Backend Updates in Visual Studio 2019 version 16.2

$
0
0

In Visual Studio 2019 version 16.2 we continue to improve the C++ backend with build throughput improvements and new and improved optimizations. These build on top of our MSVC backend improvements in Visual Studio 2019 version 16.0 which we previously announced. We will be following up on many of the improvements here with their own blog posts.

Build Throughput Improvements

  • Linker improvements speeding up iteration build times with debug info by 3x (or more) on large projects. (Numbers shown are for the Unreal Engine shipping configuration)

Graph showing 3.5x speedup over 15.9 on /debug:full and 1.6x speedup on /debug:fast

  • Link times also improved under /INCREMENTAL by 2x.

New and Improved Optimizations

Inliner Improvements
  • Small functions will be inlined more if it has a branch in it and is called from a branch in a loop.
Improved Code Generation and Optimization of Intrinsics
  • Removed the overhead of some common mathematical functions (
    std::isnan
    ,
    std::ldiv
    ,
    std::lldiv
    ) by replacing the function calls with inline assembly instructions.
  • For x86/x64 targets the optimizer will recognize some vector intrinsics working only on the lowest element and do optimizations on them including building FMA (fused multiply-add) and doing constant folding.
Vectorizer Improvements
  • Tiny reduction loops (smaller than 12 iterations) will be vectorized for
    /arch:AVX
      and up if the elements perfectly fit the vector size.
  • Improved the code sequence generated for loops with a pointer induction variable when the auto vectorization attempt on these loops fails.
New Analysis Passes
  • Improved analysis of control flow to remove more complicated instances of branches that are provably true/false.
  • Added a new flow-sensitive restrict pointer analysis. A restrict pointer will be handled differently in regions where it can escape, i.e. be accessed outside of the current scope, than regions where it is safe to use as “restrict” pointer.
General Optimizer Improvements
  • Enable copy elision in functions where multiple objects are returned by value.
  • Improved optimization of pointer subtractions when using LTCG compilation. A pointer subtraction includes a division, which can now be optimized away in certain cases.
  • Improved optimizations to generate and simplify FMA instructions for x86/x64 platforms. This includes enabling FMA for global variables with vector type.
  • Improved code generation for C++20’s spaceship operator, which is available under
    /std:c++latest
     : better constant propagation of known values used in comparisons (e.g.
    std::strong_ordering::less
     ), and compile-time computation of constant assembly instruction results.
  • Improved memset code generation by calling the faster CRT version where appropriate instead of expanding its definition inline. Loops that store a constant value that is formed of the same byte (e.g. 0xABABABAB) now also use the CRT version of memset.
  • Improved optimization to merge identical exception handling states, saving size for C++ programs. Note: This only works under FrameHandler4, which will become the default in Visual Studio 2019 version 16.3.

We’d love for you to download Visual Studio 2019 and give it a try. As always, we welcome your feedback. We can be reached via the comments below or via email (visualcpp@microsoft.com). If you encounter problems with Visual Studio or MSVC, or have a suggestion for us, please let us know through Help > Send Feedback > Report A Problem / Provide a Suggestion in the product, or via Developer Community. You can also find us on Twitter (@VisualC) and Facebook (msftvisualcpp).


The post MSVC Backend Updates in Visual Studio 2019 version 16.2 appeared first on C++ Team Blog.

Announcing general availability for the Azure Security Center for IoT

$
0
0

As organizations pursue digital transformation by connecting vital equipment or creating new connected products, IoT deployments will get bigger and more common. In fact, IDC forecasts that IoT will continue to grow at double digit rates until IoT spending surpasses $1 trillion in 2022. As these IoT deployments come online, newly connected devices will expand the attack surface available to attackers, creating opportunities to target the valuable data generated by IoT.

Organizations understand the risks and are rightly worried about IoT. Bain’s research shows that security concerns are the top reason organizations have slowed or paused IoT rollouts*. Because IoT requires integrating many different technologies (heterogenous devices must be linked to IoT cloud services that connect to analytics services and business applications), organizations face the challenge of securing both the pieces of their IoT solution and the connections between those pieces. Attackers target weak spots; even one weak device configuration, cloud service, or admin account can provide a way into your solution. Your organization must monitor for threats and misconfigurations across all parts of your IoT solution: devices, cloud services, the supporting infrastructure, and the admin accounts who access them.

To give your organization IoT threat protection and security posture management across your entire IoT solution, we’re announcing the general availability of Azure Security Center for IoT. Azure Security Center allows you to protect your end-to-end IoT deployment by identifying and responding to emerging threats, as well as finding issues in your configurations before attackers can use them to compromise your deployment. As organizations use Azure Security Center for IoT to manage their security roadblocks, they remove the barriers keeping them from business transformation:

“With Azure Security Center for IoT, we can both address very real IoT threat models with the velocity of Azure and gain management control over the fastest scaling part of our business, which allows me to focus on delivering outcomes rather than hot fixing devices.” – Alex Kreilein, CISO RapidDeploy

Building secure IoT solutions with Azure Security Center

Securing IoT is challenging for many reasons: IoT deployments are complicated, creating opportunity for integration errors that attackers can exploit; IoT devices are heterogenous and often lack proper security measures; organizations may not have the skillsets or SecOps headcount to take on a new IoT security workload; and IoT deployments are difficult to monitor using traditional IT security tools. When organizations choose Microsoft for their IoT deployments, however, they get secure-by-design devices and services such as Azure Sphere and IoT Hub, end-to-end integration and monitoring from device to cloud, and the expertise from Microsoft and our partners to build a secure solution that meets their exact use case.

Azure Security Center for IoT builds on Microsoft’s secure-by-design IoT services with threat protection and security posture management designed for securing entire IoT deployments, including Microsoft and 3rd party devices. Azure Security Center is the first IoT security service from a major cloud provider that enables organizations to prevent, detect, and help remediate potential attacks on all the different components that make up an IoT deployment: from small sensors, to edge computing devices and gateways, to Azure IoT Hub, and on to the compute, storage, databases, and AI/ML workloads that organizations connect to their IoT deployments. This end-to-end protection is vital to secure IoT deployments. Although devices may be a common target for attackers, the services that store your data and the admins who manage your IoT solution are also valuable targets.

An image showing the Overview tab in Azure Security Center.

As IoT threats evolve due to creative attackers analyzing the new devices, use cases, and applications the industry creates, Microsoft’s unique threat intelligence, sourced from the more than 6 trillion signals that Microsoft collects every day, keeps your organization ahead of attackers. Azure Security Center creates a list of potential threats, ranked by importance, so security pros and IoT admins can remediate problems across devices, IoT services, connected Azure services, and the admins who use them.

Azure Security Center also creates ranked lists of possible misconfigurations and insecure settings, allowing IoT admins and security pros to fix the most important issues in their IoT security posture first. To create these security posture suggestions, Azure Security Center draws from Microsoft’s unique threat intelligence, as well as the industry standards. Customers can also port their data into SIEMs such as Azure Sentinel, allowing security pros to combine IoT security data with data from across the organization for artificial intelligence or advanced analysis.

Organizations can monitor their entire IoT solution, stay ahead of evolving threats, and fix configuration issues before they become threats. When combined with Microsoft’s secure-by-design devices, services, and the expertise we share with you and your partners, Azure Security Center for IoT provides an important way to reduce the risk of IoT while achieving your business goals. 

Next steps


*Used with permission from Bain & Company

Viewing all 5971 articles
Browse latest View live


<script src="https://jsc.adskeeper.com/r/s/rssing.com.1596347.js" async> </script>