Quantcast
Channel: Category Name
Viewing all 5971 articles
Browse latest View live

Getting Started with GitHub Actions in Visual Studio

$
0
0

GitHub Actions uses a clean new syntax for expressing workflows based on YAML scripts—so you can edit, reuse, share, and fork them like code. By including actions in your repositories, others would be able to easily test and build projects using the same actions used on the original projects.

GitHub Actions allows you to build, test, and deploy applications in your language of choice including .NET, C/C++, and Python. Feel free to explore all the supported languages. This blog will go over the steps needed to add actions to a new Visual Studio project and automate deployment to a Linux environment using Visual Studio.

As of the date of this post GitHub Actions is still a beta feature. In order for you to try it out, you will need to sign up for the beta first. Feel free to jump to step 4 if you already have a project published on GitHub.

1- Start by creating any new Visual Studio project. For this blog, I am creating a new Flask Web Project. For more information on how to get started with Flask in Visual Studio take a look at this documentation: Get started with the Flask web framework in Visual Studio

New Flask Project
New Flask Project


2- Let’s make sure that our app runs locally without any issues by selecting Debug > Start Debugging (F5) or by using the Web Server button on the toolbar.


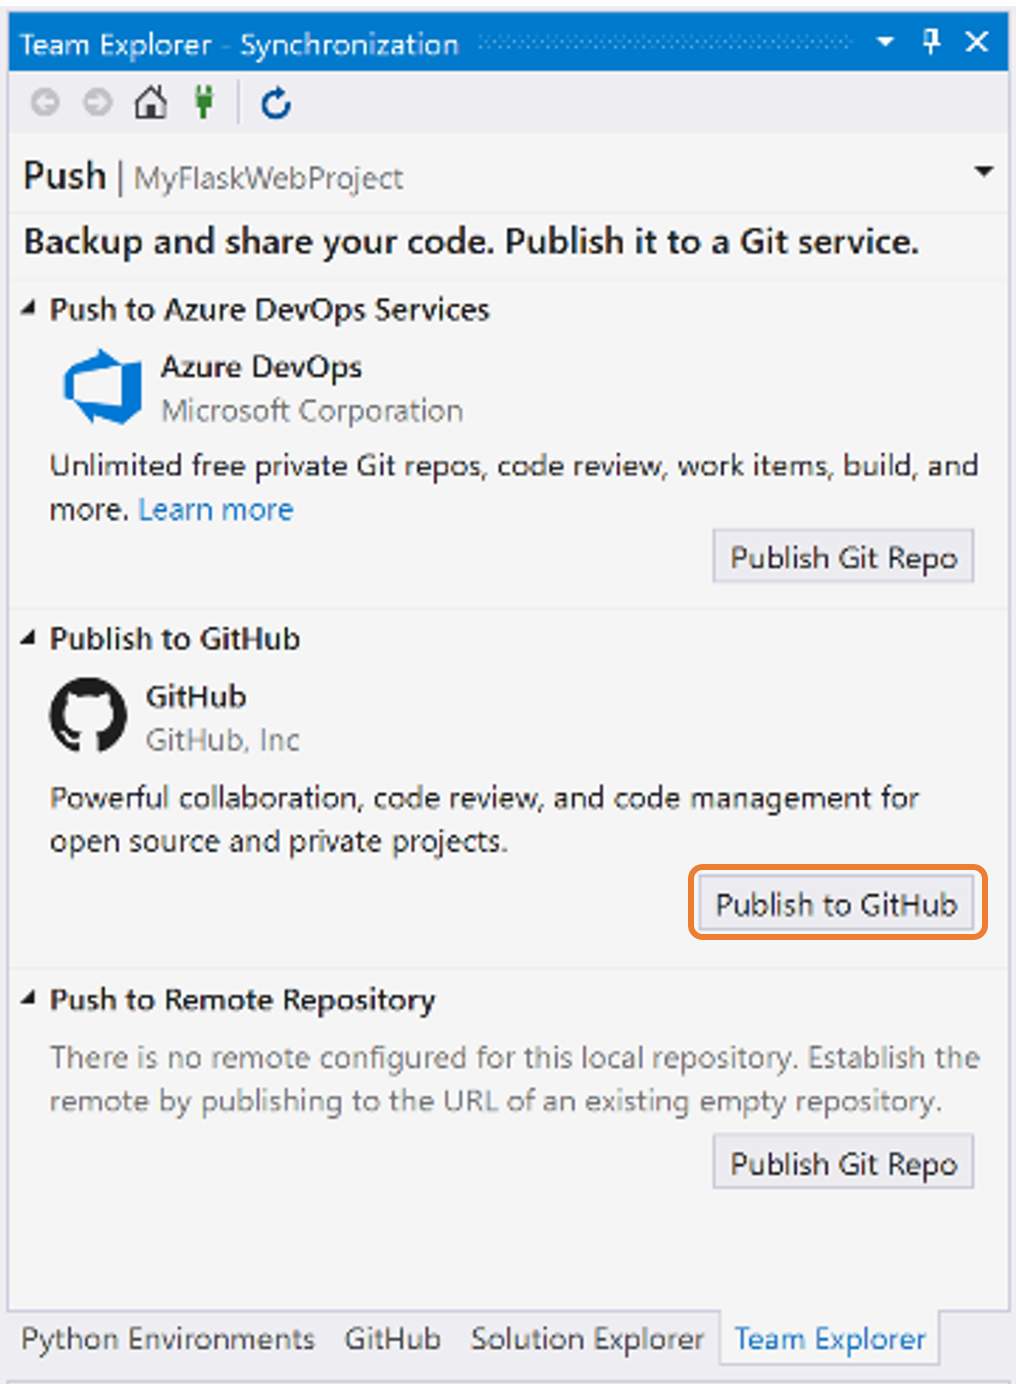
3- Use the Add to Source Control option on the right-hand side of the status bar to Publish to GitHub as shown below.

Team Explorer
Team Explorer


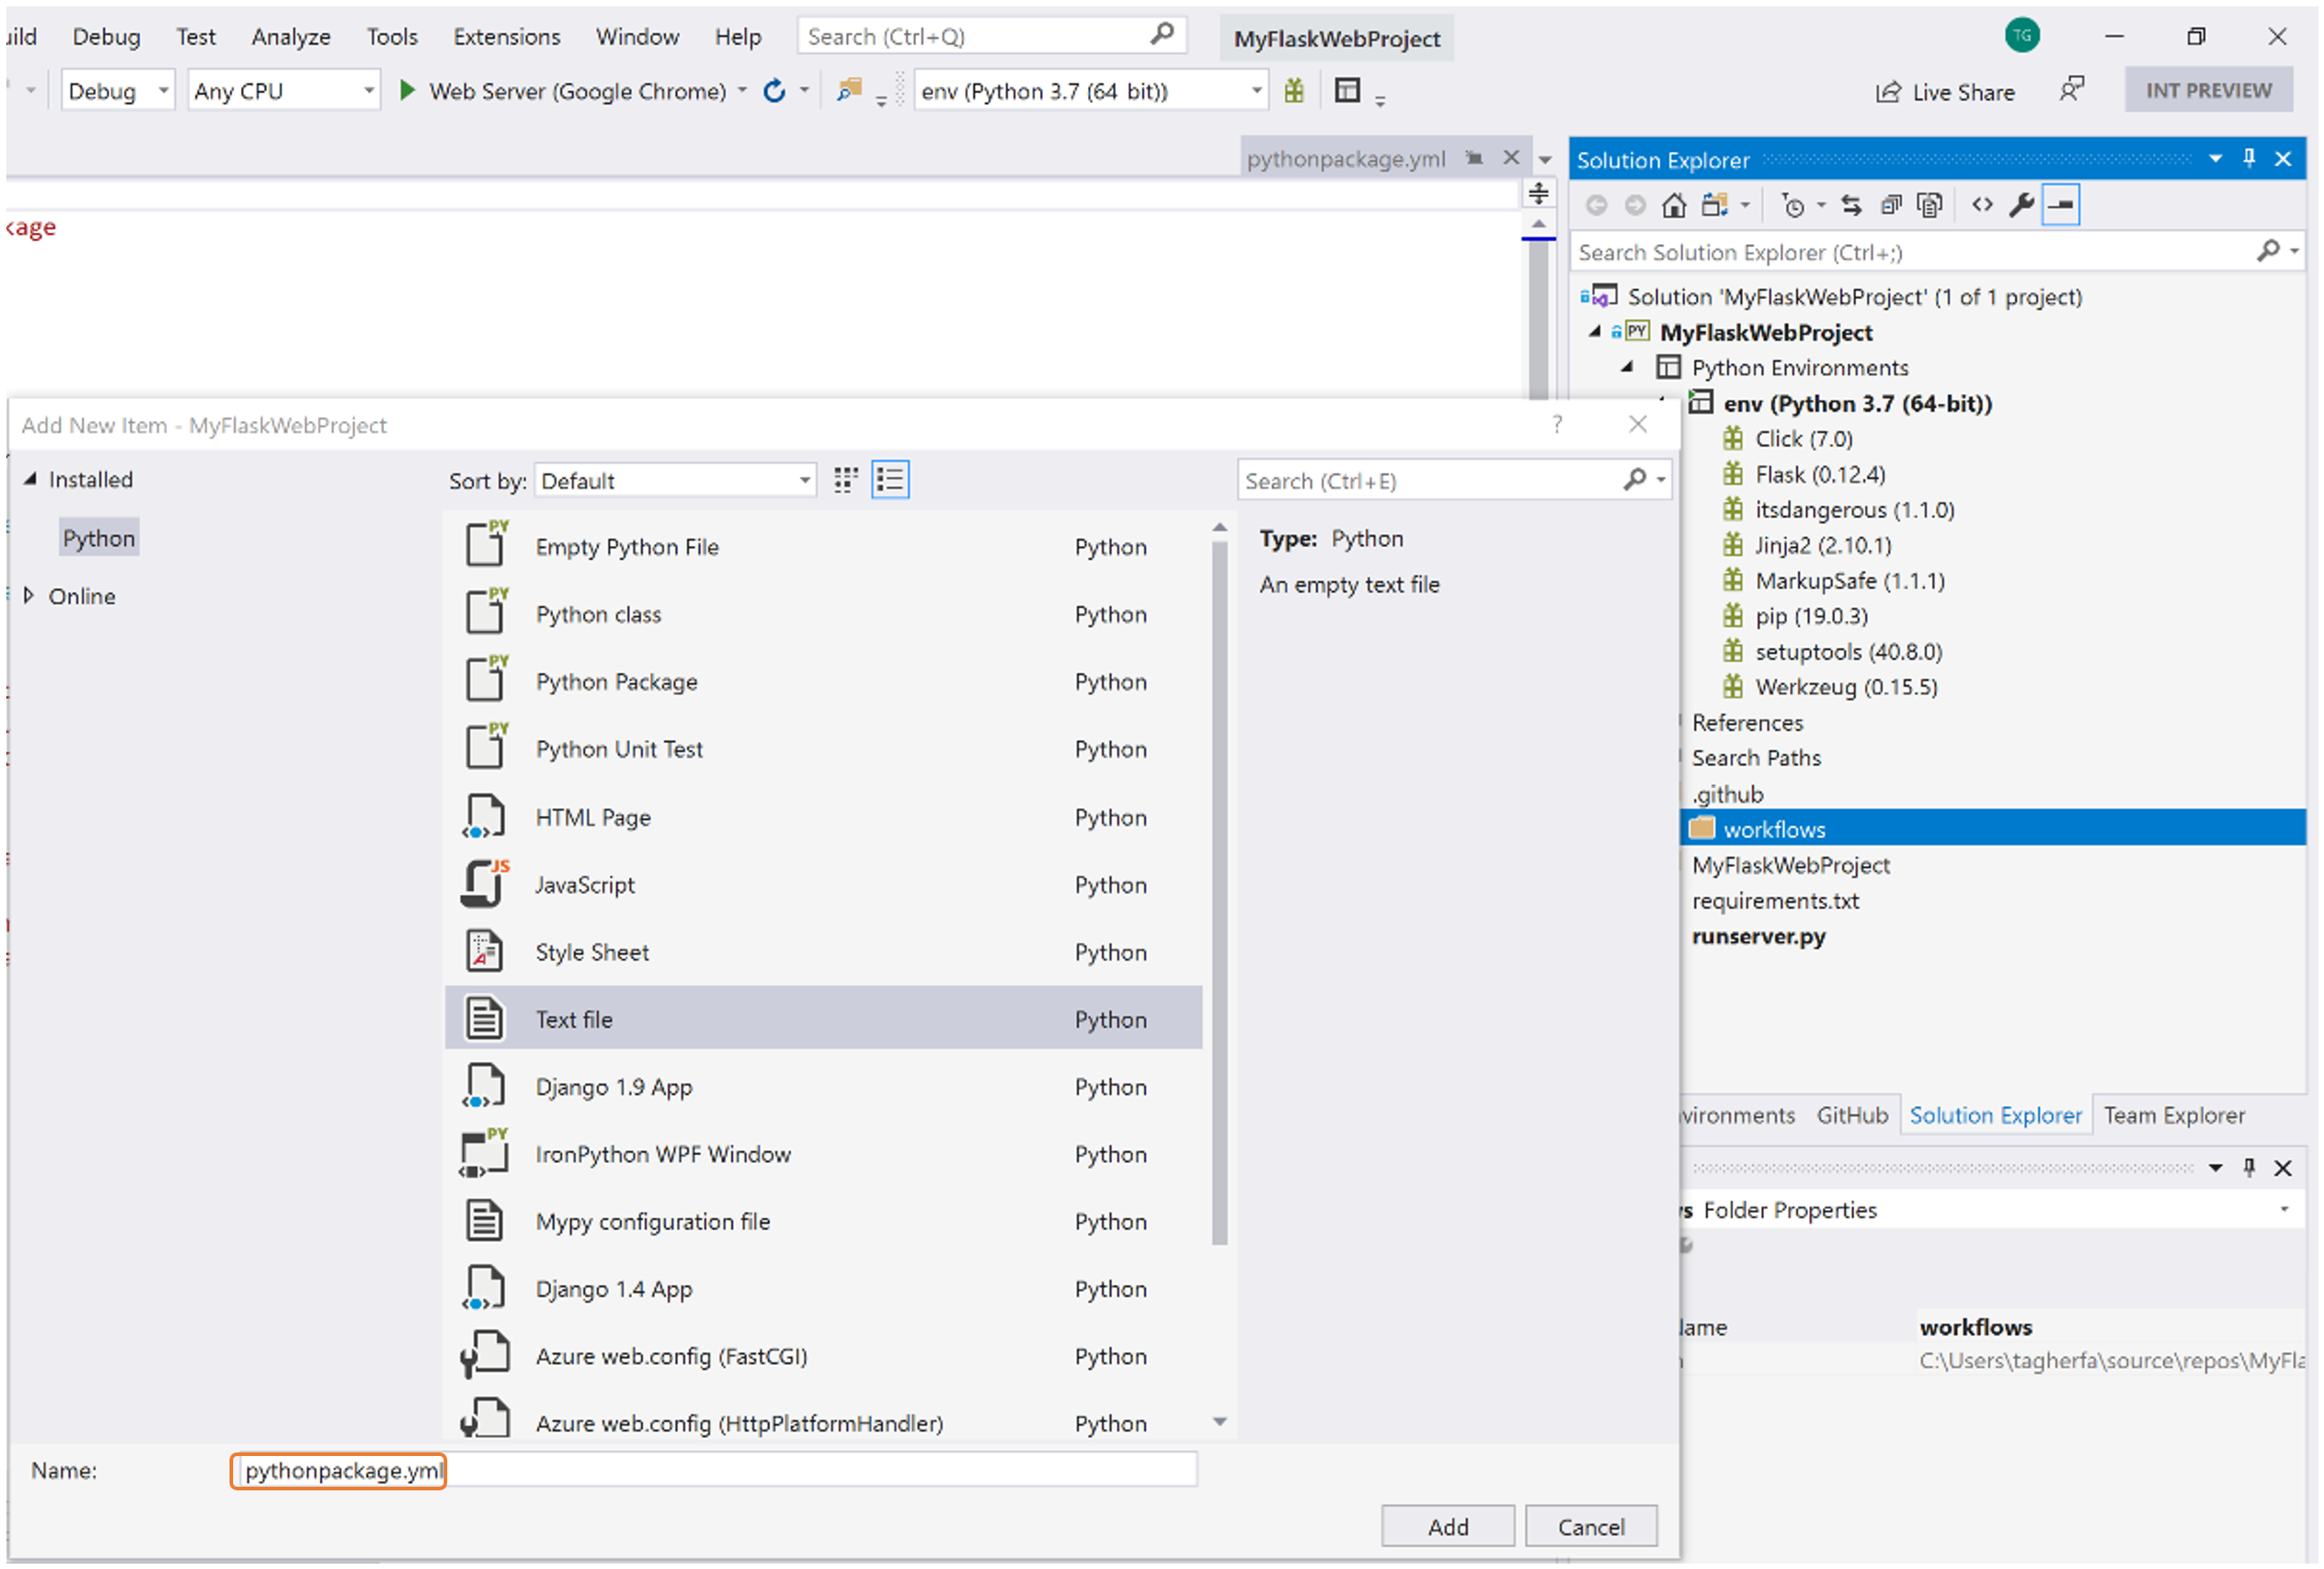
4- To add an Actions script, create a new YAML file for your workflow in a new directory called .github/workflows as shown below.

Actions File
Actions File


For this tutorial I am using the following basic YAML script that allows us to deploy our Flask web app on the latest version of Ubuntu using four different Python versions. To learn more about writing GitHub Actions take a look at the following two links:

name: Python package

on: [push]

jobs:
  build:

    runs-on: ubuntu-latest
    strategy:
      max-parallel: 4
      matrix:
        python-version: [2.7, 3.5, 3.6, 3.7]

    steps:
    - uses: actions/checkout@master
    - name: Set up Python ${{ matrix.python-version }}
      uses: actions/setup-python@v1
      with:
        version: ${{ matrix.python-version }}
    - name: Install dependencies
      run: |
        python -m pip install --upgrade pip
        pip install -r requirements.txt


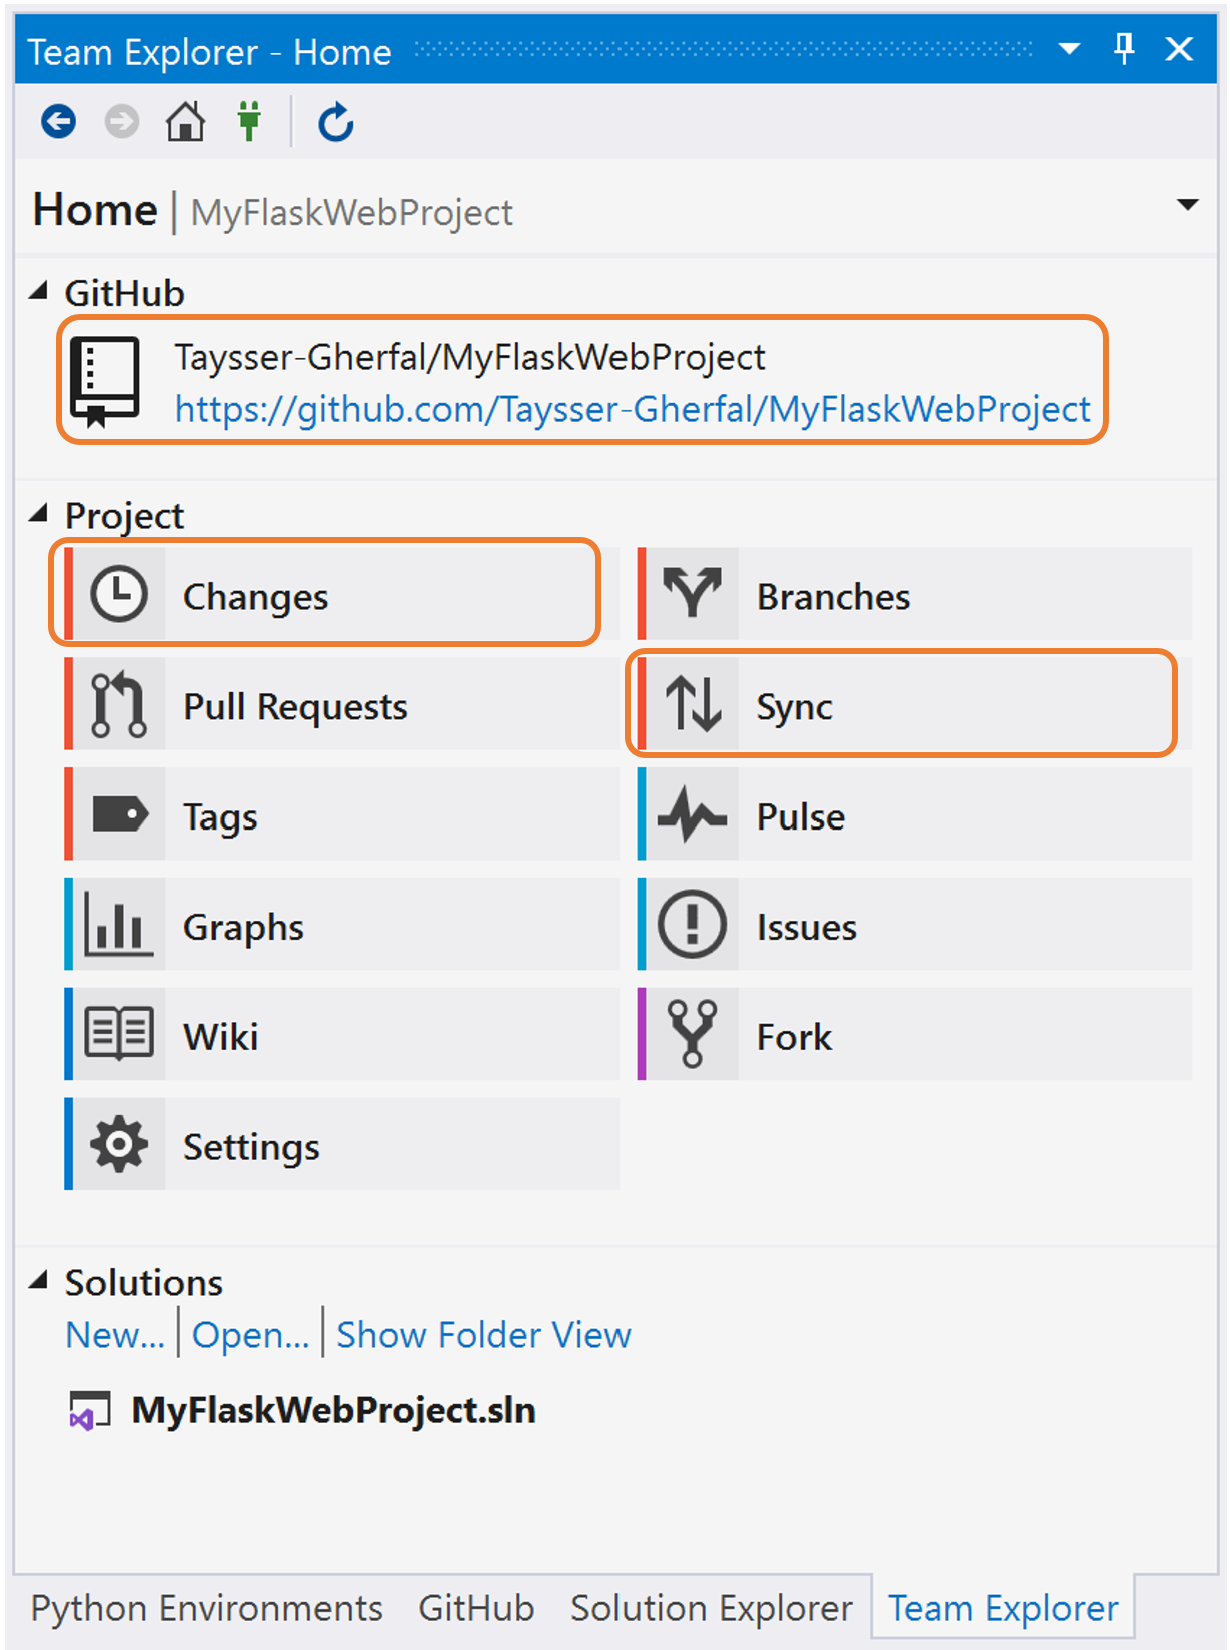
5- After saving your YAML script, make sure to commit and push your changes using Team Explorer’s Changes and Sync. After that visit your GitHub repository by clicking on the URL that shows under the GitHub title as shown below.

Team Explorer - Home Page
Team Explorer – Home Page


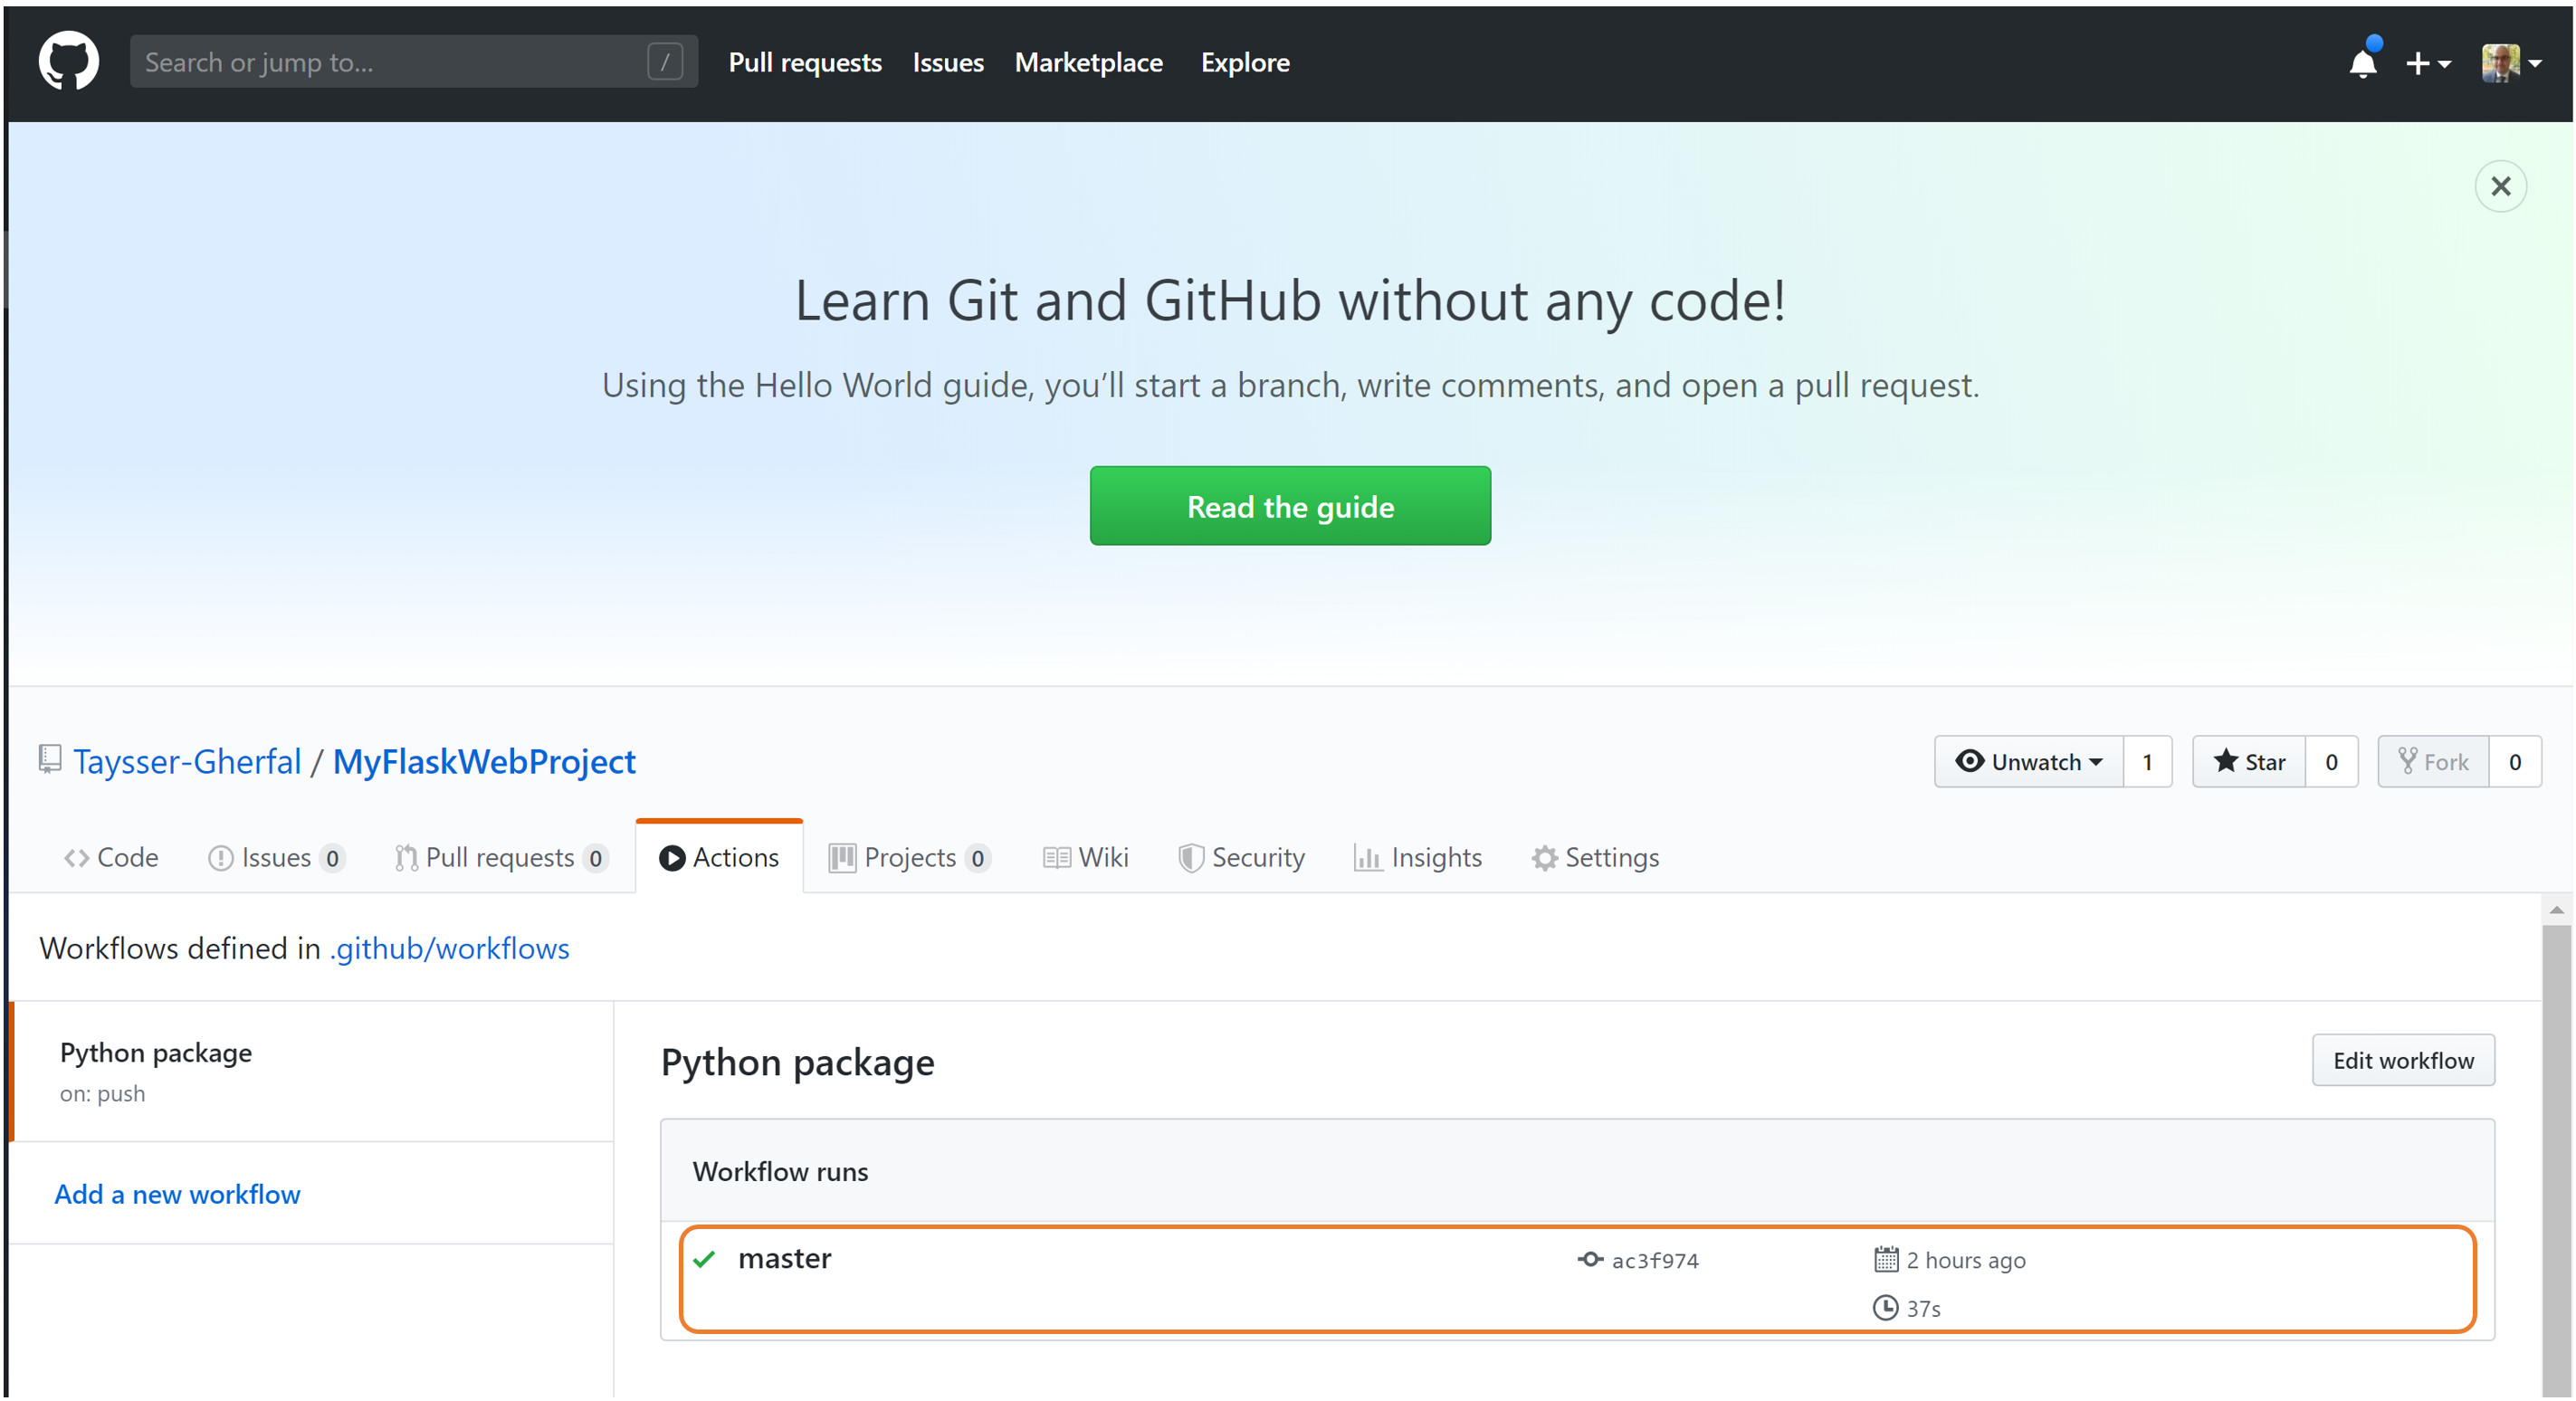
6- On your GitHub repository click on Actions and select your workflow to see more details about your workflow. As you can see below, our code runs successfully on the four different versions of Python.

GitHub Actions
GitHub Actions


GitHub Actions Workflows


7- With GitHub Actions you can quickly build, test, and deploy code from GitHub repositories to the cloud with Azure. To do that lets create a new workflow by making an Azure_Deploy.yml file under the same directory .github/workflows as shown below:

on: push

jobs:
  build-and-deploy:
    runs-on: ubuntu-latest
    steps:
    # checkout the repo
    - uses: actions/checkout@master
    
    # install dependencies, build, and test
    - name: Set up Python ${{ matrix.python-version }}
      uses: actions/setup-python@v1
      with:
        version: ${{ matrix.python-version }}
    - name: Install dependencies
      run: |
        python -m pip install --upgrade pip
        pip install -r requirements.txt
        
    # deploy web app using publish profile credentials
    - uses: azure/appservice-actions/webapp@master
      with: 
        app-name: MyFlaskApp
        publish-profile: ${{ secrets.azureWebAppPublishProfile }}


8- Deploying to Azure requires an Azure account. If you don’t have one, you can get started today with a free Azure account! And follow these steps to configure your deployment credentials:

    • Download the publish profile for the WebApp from the portal. For more information on how to do that take a look at Create the publish settings file in Azure App Service
    • Define a new GitHub secret under your repository settings and paste the contents for the downloaded publish profile file into the secret’s value field. Make sure the title of your secret matches the publish-profile value on your YAML script. In my case it is azureWebAppPublishProfile


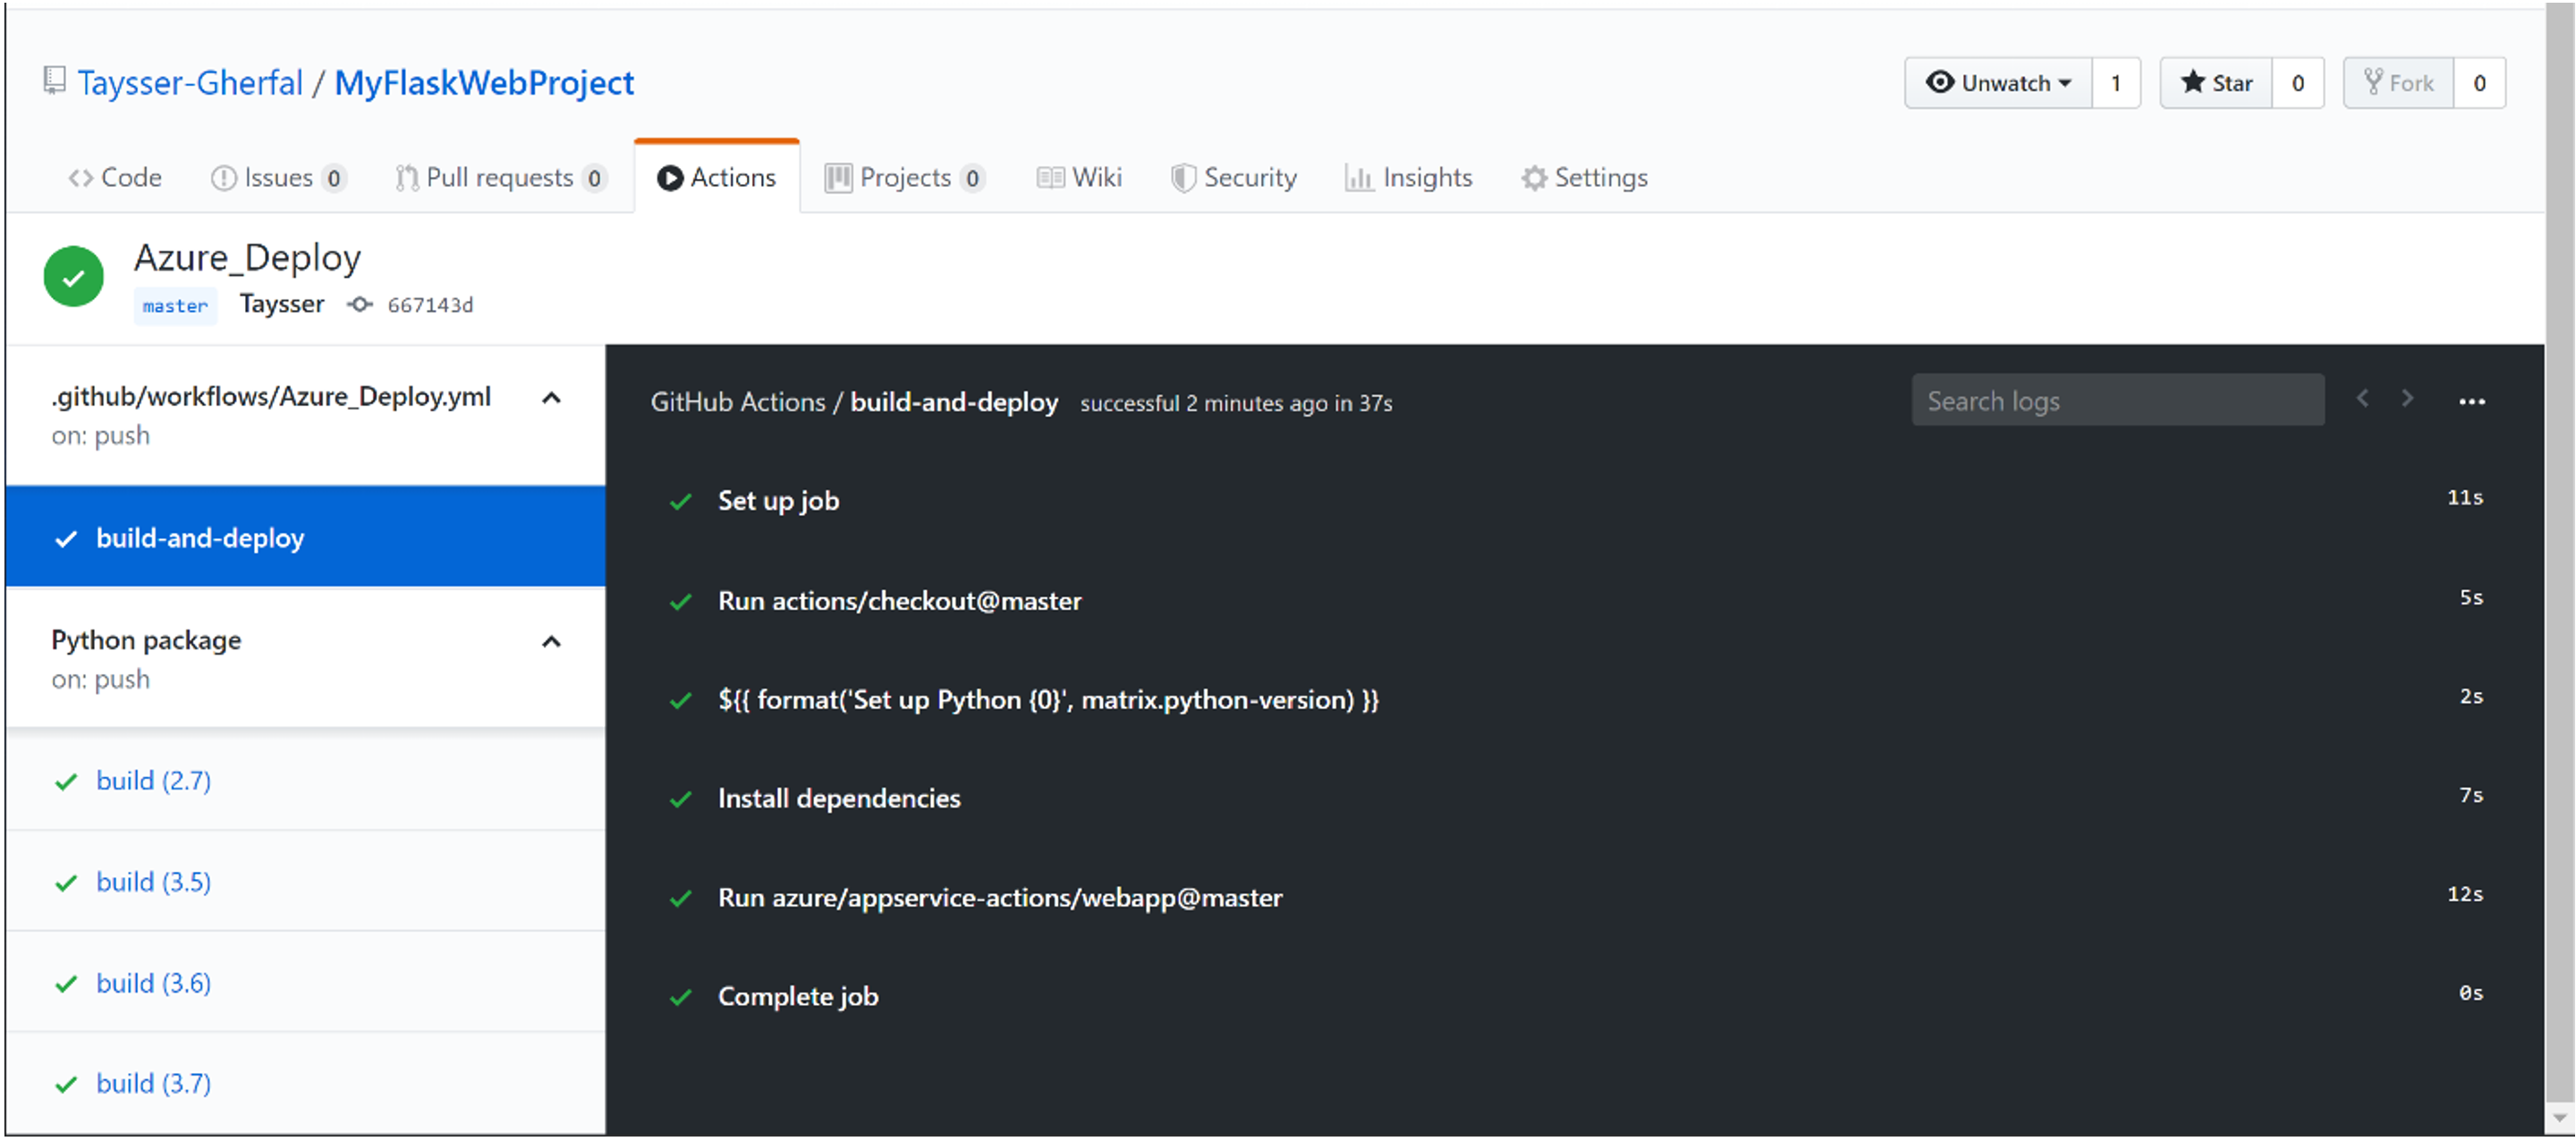
9- The last step would be to commit and push your changes using Team Explorer’s Changes and Sync sections as shown on step-5. After that, visit Actions on your GitHub repository to make sure that all of your Actions are working correctly.

GitHub Deploy Actions Workflows


To learn more about deploying your GitHub code to the cloud take a look at the GitHub Actions for Azure blog and try out the GitHub Actions for Azure. If you encounter a problem during the preview, please open an issue on the GitHub repository for the specific action.


We Need Your Feedback!

As always, let us know of any issues you run into by using the Report a Problem tool in Visual Studio. You can also head over to Visual Studio Developer Community to track your issues, suggest a feature, ask questions, and find answers from others. We use your feedback to continue to improve Visual Studio 2019, so thank you again on behalf of our entire team.

The post Getting Started with GitHub Actions in Visual Studio appeared first on The Visual Studio Blog.


Review: UniFi from Ubiquiti Networking is the ultimate prosumer home networking solution

$
0
0

UniFi mapI LOVE my Amplifi Wi-Fi Mesh Network. I've had it for two years and it's been an absolute star performer. We haven't had a single issue. Rock solid. That's really saying something. From unboxing to installation to running it (working from home for a tech company, so you know I'm pushing this system) it's been totally stable. I recommend Amplifi unreservedly to any consumer or low-key pro-sumer who has been frustrated with their existing centrally located router giving them reliable wi-fi everywhere in their home.

That said...I recently upgraded my home internet service provider. For the last 10 years I've had fiber optic to the house with 35 Mbp/s up/down and it's been great. Then I called them a a few years back and got 100/100. The whole house was presciently wired by me for Gigabit back in 2007 (!) with a nice wiring closet and everything. Lately 100/100 hasn't been really cutting it when I'm updating a dozen laptops for a work event, copying a VM to the cloud while my spouse is watching 4k netflix and two boys are updating App Store apps. You get the idea. Modern bandwidth requirements and life has changed since 2007. We've got over 40 devices on the network now and many are doing real work.

I called an changed providers to a cable provider that offered true gigabit. However, I was rarely getting over 300-400 Mbp/s on my Amplifi. There is a "hardware NAT" option that really helps, but short of running the Amplifi in Bridged Mode and losing a lot of its epic features, it was clear that I was outgrowing this prosumer device.

Give I'm a professional working at home doing stuff that is more than the average Joe or Jane, what's a professional option?

UniFi from Ubiquiti

Amplifi is the consumer/prosumer line from Ubiquiti Networks and UniFi (UBNT) is the professional line.  You'll literally find these installed at business or even sports stadiums. This is serious gear.

Let me be honest. I knew UniFi existed. Knew (I thought) all about it and I resisted. My friends and fellow nerds insisted it was easy but I kept seeing massive complex network diagrams and convinced myself it wasn't worth the hassle.

My friends, I was wrong. It's not hard. If you are doing business at home, have a gigabit network pipe, a wired home network, and/or have a dozen or more network devices, you're a serious internet person and you might want to consider serious internet networking gear.

Everything is GREAT

Now, UniFi is more expensive than Amplifi as it's pro gear. While an Amplifi Mesh WiFi system is just about $300-350 USD, UniFi Pro gear will cost more and you'll need stuff to start out and it won't always feel intuitive as you plan your system. It is worth it and I'm thrilled with the result. The flexibility and customizability its offered has been epic. There are literally no internet issues in our house or property anymore. I've even been able to add wired and wireless non-cloud-based security cameras throughout the property. Additionally, remember how the house is already wired in nearly every room with Cat6 (or Cat5e) cabling? UniFi has reintroduced me to the glorious world of PoE+ (Power over Ethernet) and removed a half dozen AC wall plugs from my system.

Plan your Network

You can test out the web-based software yourself LIVE at https://demo.ui.com and see what managing a large network would be like. Check out their map of the FedEx Forum Stadium and how they get full coverage. You can see a simulated map of my house (not really my house) in the screenshot above. When you set up a controller you can place physical devices (ones you have) and test out virtual devices (ones you are thinking of buying) and see what they would look like on a real map of your home (supplied by you). You can even draw 3D walls and describe their material (brick, glass, steel) and their dB signal loss.

UniFi.beginner.950

When you are moving to UniFi you'll need:

  • USG - UniFi Security Gateway - This has 3 gigabit points and has a WAN port for your external network (plug your router into this) and a LAN port for your internal network (plug your internal switch into this).
    • This is the part that doles out DHCP.
  • UniFi Cloud Key or Cloud Key Gen2 Plus
    • It's not intuitive what the USG does vs the Cloud Key but you need both. I got the Gen2 because it includes a 1TB hard drive that allows me to store my security video locally. It also is itself a PoE client so I don't need to plug it into the wall. I just wired it with a single Ethernet cable to the PoE switch below and left it in the wiring closet. There's a smaller cheaper Cloud Key if you don't need a hard drive.
    • You don't technically need a Cloud Key I believe, as all the UniFi Controller Software is free and you can run it in on any machine you have laying around. Folks have run them on any Linux or Windows machine they have, or even on a Synology or other NAS. I like the idea of having it "just work" so I got the Cloud Key.
  • UniFi Switch (of some kind and number of ports)
    • 8 port 150 watt UniFi Switch
    • 24 port UniFi Switch - 24 ports may be overkill for most but it's only 8 lbs and will handle even the largest home network. And it's under $200 USD right now on Amazon
    • 24 port UniFi Switch with PoE - I got this one because it has 250W of PoE power. If you aren't interested in power over ethernet you can save money with the non-PoE version or a 16 port version but I REALLY REALLY recommend you use PoE because the APs work better with it.
      PoE switch showing usage on many ports

Now once you've got the administrative infrastructure above, you just need to add whatever UniFi APs - access points - and/or optional cameras that you want!

NOTE/TIP - A brilliant product from Ubiquiti that I think is flying under the radar is the Unifi G3 Flex PoE camera. It's just $75 and it's tiny but it's absolutely brilliant. Full 1080p video and night vision. I'll talk about the magic of PoE later on but you can just plug this in anywhere in the house - no AC adapter - and you've got a crystal clear security camera or cameras anywhere in the house. They are all powered from the PoE switch!

I had a basic networking closet I put the USG Gateway into the closet with a patch cable to the cable modem (the DOCSIS 3.1 cable modem that I bought because I got tired of renting it from the service provider) then added the Switch with PoE, and plugged the Cloud Key into it. Admin done.

Here's the lovely part.

Since I have cable throughout the house, I can just plug in the UniFi Access Points in various room and they get power immediately. I can try different configs and test the signal strength. I found the perfect config after about 4 days of moving things around and testing on the interactive map. The first try was fine but I strove for perfect.

There's lots of UniFi Access Points to choose from. The dual radio Pro version can get pretty expensive if you have a lot so I got the Lite PoE AP. You can also get a 5 pack of the nanoHD UniFi Access Points.

These Access Points are often mounted in the ceiling in pro installations, and in a few spots I really wanted something more subtle AND I could use a few extra Ethernet ports. Since I already had an Ethernet port in the wall, I could just wall mount the UniFi Wall Mounted AP. It's both a wireless AP that radiates outward into the room AND it turns your one port into two, or you can get one that becomes a switch with more ports and extends your PoE abilities. So I can add this to a room, plug a few devices in AND a PoE powered Camera with no wall-warts or AC adapters!

NOTE: I did need to add a new ethernet RJ45 connector to plug into the female connector of the UniFi in-wall AP. Just be sure to plan and take inventory. You may already have full cables with connectors pulled to your rooms. Be aware.

There are a TON of great Wireless AP options from UniFi so make sure you explore them all and understand what you want.

In-Wall AP

Here's the resulting setup and choices I made, as viewed in the UniFi Controller Software:

List of Ubnt devices

I have the Gateway, the Switch with PoE, and five APs. Three are the disc APs and two are in-wall APs. They absolutely cover and manage my entire two story house and yards front and back. It's made it super easy for me to work from home and be able to work effectively from any room. My kids and family haven't had any issues with any tablets or phones.

As of the time of these writing I have 27 wireless devices on the system and 11 wired (at least those are the ones that are doing stuff at this hour).

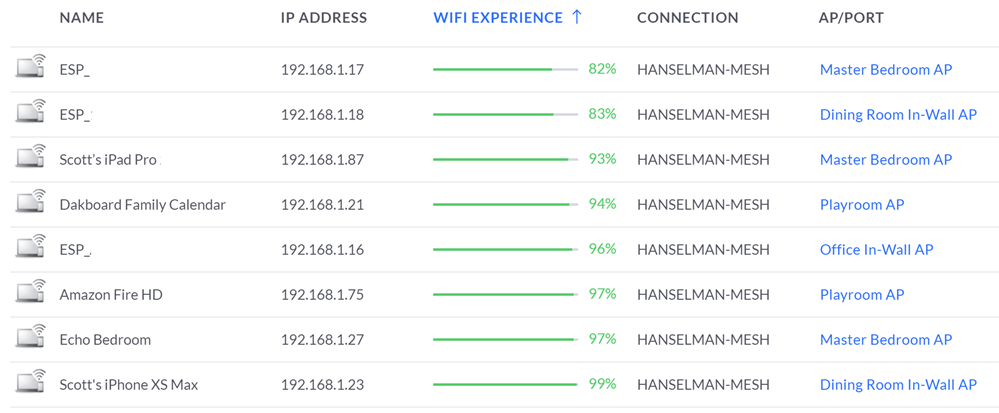
My devices as viewed in the UniFi controller

Note how it will tell you how each device's WiFi experience is. I use this Experience information to help me manage the network and see if the APs are appropriately placed. There is a TON of great statistics and charts and graphics. It's info-rich to say the LEAST.

NOTE: To answer a common question - In an installation like this you've got a single SSID even though there's lots of APs and your devices will quietly and automatically roam between them!
Log showing roaming between APs

The iPhone app is very full-featured as well and when you've got deep packet introspection turn on you can see a ton of statistical information at the price of a smidge of throughput performance.

iPhone StatsiPhone Bandwidth

I have had NO problem hitting 800-950Mbs over wired and I feel like there's no real limit to the perf of this system. I've done game streaming over Steam and Xbox game streaming for hours without a hiccup. Netflix doesn't buffer anymore, even on the back porch.

a lot of bandwidth with no drops

You can auto-optimize, or you can turn off a plethora of feature and manage everything manually. I was able to twitch a few APs to run their 2.4Ghz Wi-Fi radios on less crowded channels in order to get out of the way of the loud neighbors on channel 11.

I have a ton of control over the network now, unlimited expandability and it has been a fantastically stable network. All the APs are wire backed and the wireless bandwidth is rock solid. I've been extremely impressed with the clean roaming from room to room while streaming from Netflix. It's a tweakers (ahem) dream network.

* I use Amazon referral links and donate the little money to my kids' school. You support charter schools when you use these links.


Sponsor: Get the latest JetBrains Rider with WinForms designer, Edit & Continue, and an IL (Intermediate Language) viewer. Preliminary C# 8.0 support, rename refactoring for F#-defined symbols across your entire solution, and Custom Themes are all included.


© 2019 Scott Hanselman. All rights reserved.
     

Top Stories from the Microsoft DevOps Community – 2019.08.23

$
0
0

This week is the last week before DevOpsDays Chicago – a conference I help organize. I am really looking forward to spending two days with the Chicago tech community, learning about our common challenges and success stories. We can always aspire to help each other thrive, no matter which company and background we come from.

The Chicago event is sold out, but if you are interested in such events, there may be a DevOpsDays conference near you. And, of course, we will share the talk recordings online in the future.

In the meantime, here are some great blogs from the Azure DevOps community to entertain you over the weekend!

Sample report for Azure DevOps
In this short post, Gian Maria Ricci shows the integration between Azure DevOps and PowerBI, using an OData query that connects to our REST API. This integration greatly extends our reporting capabilities, and gives you full flexibility in terms of what data you choose to consume, and the ways you visualize it!

AzureDevOps: CICD for PowerBI Reports
And it isn’t just that PowerBI can extend Azure DevOps capabilities. The opposite is also true! In this post, Jayendran Arumugam creates a CI/CD pipeline for PowerBI reports using Azure DevOps. Nice work getting the whole process automated!

Azure DevOps YAML build for Mono Repository with multiple projects
As microservices are growing ever more popular, companies have to manage increasing numbers of repositories and pipelines per product. While this gives you logical separation and true independence for each service, it can become difficult to manage. One of the suggested solutions is having a single repository “to rule them all” – a mono-repo. While a mono-repo may or may not be the right choice for your product, moving to one is an interesting challenge to tackle. In this blog, Bojan Nikolic tells us about his adventures while moving from 40 “microservice” repositories to a mono-repo, and configuring the corresponding builds in Azure YAML Pipelines.

Azure DevOps Agents as Container Instances
If you need an easier way to create custom Build Agent images, I am sure you considered the possibility of running Azure Pipelines on containers. In this post, Ben Gelens describes the process of configuring Azure Pipelines Agents to run on Azure Container Instances (ACI) for both Linux and Windows containers. This way, you can speed up your Builds by spinning up agents with all the dependencies already installed!

If you’ve written an article about Azure DevOps or find some great content about DevOps on Azure, please share it with the #AzureDevOps hashtag on Twitter!

The post Top Stories from the Microsoft DevOps Community – 2019.08.23 appeared first on Azure DevOps Blog.

Azure and VMware innovation and momentum

$
0
0

Since announcing Azure VMware Solutions at Dell Technologies World this spring, we’ve been energized by the positive feedback we’ve received from our partners and customers who are beginning to move their VMware workloads to Azure. One of these customers is Lucky Brand, a leading retailer that is embracing digital transformation while staying true to its rich heritage. As part of their broader strategy to leverage the innovation possible in the cloud, Lucky Brand is transitioning several VMware workloads to Azure.

“We’re seeing great initial ROI with Azure VMware Solutions. We chose Microsoft Azure as our strategic cloud platform and decided to dramatically reduce our AWS footprint and 3rd Party co-located data centers. We have a significant VMware environment footprint for many of our on-premises business applications.

The strategy has allowed us to become more data driven and allow our merchants and finance analysts the ability to uncover results quickly and rapidly with all the data in a central cloud platform providing great benefits for us in the competitive retail landscape. Utilizing Microsoft Azure and VMware we leverage a scalable cloud architecture and VMware to virtualize and manage the computing resources and applications in Azure in a dynamic business environment.

Since May, we’ve been successfully leveraging these applications on the Azure VMware Solution by CloudSimple platform. We are impressed with the performance, ease of use and the level of support we have received by Microsoft and its partners.” 

Kevin Nehring, CTO, Lucky Brand

Expanding to more regions worldwide and adding new capabilities

Based on customer demand, we are excited to announce that we will expand Azure VMware Solutions to a total of eight regions across the US, Western Europe, and Asia Pacific by end of year.

In addition to expanding to more regions, we are continuing to add new capabilities to Azure VMware Solutions and deliver seamless integration with native Azure services. One example is how we’re expanding the supported Azure VMware Solutions storage options to include Azure NetApp Files by the end of the year. This new capability will allow IT organizations to more easily run storage intensive workloads on Azure VMware Solutions. We are committed to continuously innovating and delivering capabilities based on customer feedback.

Broadening the ecosystem

It is amazing to see the market interest in Azure VMware Solutions and the partner ecosystem building tools and capabilities that support Azure VMware Solutions customer scenarios.

RiverMeadow now supports capabilities to accelerate the migration of VMware environments on Azure VMware Solutions.

“I am thrilled about our ongoing collaboration with Microsoft. Azure VMware Solutions enable enterprise customers to get the benefit of cloud while still running their infrastructure and applications in a familiar, tried and trusted VMware environment. Add with the performance and cost benefits of VMware on Azure, you have a complete solution. I fully expect to see substantial enterprise adoption over the short term as we work with Microsoft’s customers to help them migrate even the most complex workloads to Azure.”

Jim Jordan, President and CEO, RiverMeadow

Zerto has integrated its IT Resilience Platform with Azure VMware Solutions, delivering replication and failover capabilities between Azure VMware Solution by CloudSimple, Azure and any other Hyper-V or VMware environments, keeping the same on-premises environment configurations, and reducing the impact of disasters, logical corruptions, and ransomware infections.

"Azure VMware Solution by CloudSimple, brings the familiarity and simplicity of VMware into Azure public cloud. Every customer and IT pro using VMware will be instantly productive with minimal or no Azure competency. With Zerto, VMware customers gain immediate access to simple point and click disaster recovery and migration capabilities between Azure VMware Solutions, the rest of Azure, and on-premises VMware private clouds. Enabled by Zerto, one of Microsoft's top ISVs and an award-winning industry leader in VMware-based disaster recovery and cloud migration, delivers native support for Azure VMware Solutions. "

Peter Kerr, Vice President of Global Alliances, Zerto

Veeam Backup & Replication™ software is specialized in supporting VMware vSphere environments, their solutions will help customers meet the backup demands of organizations deploying Azure VMware Solutions.

“As a leading innovator of Cloud Data Management solutions, Veeam makes it easy for our customers to protect their virtual, physical, and cloud-based workloads regardless of where those reside. Veeam’s support for Microsoft Azure VMware Solutions by CloudSimple further enhances that position by enabling interoperability and portability across multi-cloud environments. With Veeam Backup & Replication, customers can easily migrate and protect their VMware workloads in Azure as part of a cloud-first initiative, create an Azure-based DR strategy, or simply create new Azure IaaS instances – all with the same proven Veeam solutions they already use today.”  

Ken Ringdahl, Vice President of Global Alliances Architecture, Veeam Software

Join us at VMworld

If you plan to attend VMworld this week in San Francisco, stop by our booth and witness Azure VMware Solutions in action; or sit down for a few minutes and listen to one of our mini theater presentations addressing a variety of topics such as Windows Virtual Desktop, Windows Server, and SQL Server on Azure in addition to Azure VMware Solutions!

Learn more about Azure VMware Solutions.

Azure Load Balancer becomes more efficient

$
0
0

Azure introduced an advanced, more efficient Load Balancer platform in late 2017. This platform adds a whole new set of abilities for customer workloads using the new Standard Load Balancer. One of the key additions the new Load Balancer platform brings, is a simplified, more predictable and efficient outbound connectivity management.

While already integrated with Standard Load Balancer, we are now bringing this advantage to the rest of Azure deployments. In this blog, we will explain what it is and how it makes life better for all our consumers. An important change that we want to focus on is the outbound connectivity behavior pre and post platform integration as this is a very important design point for our customers.

Load Balancer and Source NAT

Azure deployments use one or more of three scenarios for outbound connectivity, depending on the customer’s deployment model and the resources utilized and configured. Azure uses Source Network Address Translation (SNAT) to enable these scenarios. When multiple private IP addresses or roles share the same public IP (public IP address assign to Load Balancer, used for outbound rules or automatically assigned public IP address for standalone virtual mahines), Azure uses port masquerading SNAT (PAT) to translate private IP addresses to public IP addresses using the ephemeral ports of the public IP address. PAT does not apply when Instance Level Public IP addresses (ILPIP) are assigned.

For the cases where multiple instances share a public IP address, each instance behind an Azure Load Balancer VIP is pre-allocated a fixed number of ephemeral ports used for PAT (SNAT ports), needed for masquerading outbound flows. The number of pre-allocated ports per instance is determined by the size of backend pool, see the SNAT algorithm section for details.

Differences between legacy and new SNAT algorithms

The platform improvements also involved improvements in the way the SNAT algorithm works in Azure. The table below does a side-by-side comparison of these allocation modes and their properties

  Legacy SNAT Port Allocation
(Legacy Basic SKU Deployments)
New SNAT Port Allocation
(Recent Basic SKU deployments and Standard SKU deployments)
Applicability Services deployed before September 2017 use this allocation mode Services deployed after September 2017 use this allocation mode.
Pre-allocation 160
(smaller number for tenants larger than 300 instances)

For SNAT port allocation according to the back-end pool size and the pool boundaries, visit SNAT port pre-allocation.

An image of back-end instnace count vs Ephermeral port count

In case outbound rules are used, the pre-allocation will be equal to the ports defined in the outbound rules. If the ports are exhausted on a subset of instances they will not be allocated any SNAT ports.

Max ports No ceiling;
Dynamic, on-demand allocation of a small number of ports until all are exhausted.
No throttling of requests.
All available SNAT ports are allocated dynamically on-demand.
Some throttling of requests is applied (per instance per sec.)
Scale up

Port re-allocation is done.

Existing connections might drop on re-allocation.

Static SNAT ports are always allocated to the new instance.

If backend pool boundary is changed, or ports are exhausted, port reallocation is done.

Existing connections might drop on re-allocation.

Scale Down Port re-allocation is done. If backend pool boundary is changed, port reallocation is done to allocate additional ports to all.
Use Cases
  • Noisy neighbors could consume all ports and starve remaining instances/tenants.
  • Management of Port allocation is nearly impossible without any throttling.
  • Much better customization & control over the SNAT port allocation.
  • Higher pre-allocation to cover the majority of customer scenarios.
  • highly predictable port allocation and application behavior.

Platform Integration & impact on SNAT port allocation

We’re working on the integration of the two platforms to extend reliability and efficiency and enable capabilities like telemetry and SKU upgrade for the customers. As a result of this integration, all the users across Azure will be moved to the new SNAT port allocation algorithm. This integration exercise is in progress and expected to finish before Spring 2020.

What type of SNAT allocation do I get after platform integration?

Let’s categorize these into different scenarios:

  1. Legacy SNAT port allocation is the older mode of SNAT port allocation and is being used by deployments made before September 2017. This mode allocates a small number of SNAT ports (160) statically to instances behind a Load Balancer and relies on SNAT failures and dynamic on-demand allocations afterwards.
    • After platform integration, these deployments will be moved to the new SNAT allocation in the new platform as described in section A above. However, we’ll ensure a port allocation equal to a maximum of <Static port allocation, Dynamic port allocation in older platform> in the new platform after migration.
  2. New SNAT port allocation mode in the older platform was introduces in early 2018. This mode is same as the new SNAT port allocation Mode described above.
    • After platform integration, these deployments will remain unchanged, ensuring the preservation of SNAT port allocation from the older platform.

How does it impact my services or my existing outbound flows?

  1. In majority of the cases, where the instances are consuming less than the default pre-allocated SNAT ports, there will be no impact to the existing flows.
  2. In a small number of the customer deployments, which are using a significantly higher number of SNAT ports (received via Dynamic allocation), there might be a temporary drop of a portion of flows, which depend on additional dynamic port allocation. This should auto-correct within a few seconds.

What should I do right now?

Review and familiarize yourself with the scenarios and patterns described in Managing SNAT port exhaustion for guidance on how to design for reliable and scalable scenarios.

How do I ensure no disruption for upcoming critical period?

The platform integration & resulting port allocation algorithm is an Azure platform level change. However, we do understand that you are running critical production workloads in Azure and want to ensure this level of service logic changes are not implemented during critical periods and avoiding any service disruption. In such scenarios, please create a Load Balancer support case from the portal with your deployment information, and we’ll work with you to ensure no disruption to your services.

Harnessing the power of the Location of Things with Azure Maps

$
0
0

The Internet of Things (IoT) is the beginning of accessing planetary-scale insights. With the mass adoption of IoT and the very near future explosion of sensors, connectivity, and computing, humanity is on the cusp of a fully connected, intelligent world. We will be part of the generation that realizes the data-rich, algorithmically deterministic lifestyle the world has never seen. The inherent value of this interconnectedness lies within the constructs of human nature to thrive. Bringing all of this information together with spatial intelligence has been challenging to say the least. Until today.

Today, we’re unveiling a cross-Azure IoT collaboration simplifying the use of location and spatial intelligence used in conjunction with IoT messaging. The result is the means for customers to use Azure IoT services to stay better informed about their “things” in terms of space. Azure IoT customers can now implement IoT spatial analytics using Azure Maps. Providing spatial intelligence to IoT devices means greater insights into not just what’s happening, but where it’s happening.

The map shows four points where the vehicle was outside the geofence, logged at regular time intervals.

Azure Maps provides geographic context for information and, as it pertains to IoT, thus geographic insights based on IoT information. Customers are using Azure Maps and Azure IoT for monitoring movement of assets and cross reference the “things” with their location. For example, assume a truck is delivering refrigerated goods from New York City to Washington DC. A route is calculated to determine the path and duration the truck should take to deliver the goods. From the route, a geofence can be created and stored in Azure Maps. The black box on the truck tracking the vehicle would provide Azure IoT Hub to determine if the truck ever leaves the predetermined path. If it does, this could signal that something is wrong—a detour could be disastrous for refrigerated goods. Notifications of detours could be setup and communicated through Azure Event Grid and sent over email, text, or a myriad of other communication mediums.

When we talk about Azure IoT, we often talk about data (from sensors) which leads to insights (when computed) which leads to actions (a result of insights). With The Location of Things, we’re now talking about data from sensors which leads to insights which leads to actions and where they are needed. Knowing where to take actions has massive implications in terms of cost efficacy and time management. When you know where you have issues or opportunities, you can then make informed decisions of where to deploy resources, where to deploy inventory, or where to withdraw them. Run this over time and with enough data and you have artificial intelligence you could deploy at the edge to help with real-time decision making. Have enough data coming in fast enough and you’d be making decisions fast enough to predict future opportunities and issues—and where to deploy resources before you need them.

Location is a powerful component of providing insights. If you have a means of providing location via your IoT messages you can start doing so immediately. If you don’t have location natively, you’d be surprised at how you can get location associated with your sensors and device location. RevIP, Wi-Fi, and cell tower triangulation all provide a means of getting location into your IoT messages. Get that location data into the cloud and start gaining spatial insights today.

Latency is the new currency of the Cloud: Announcing 31 new Azure edge sites

$
0
0

Providing users fast and reliable access to their cloud services, apps, and content is pivotal to a business’ success.

The latency when accessing cloud-based services can be the inhibitor to cloud adoption or migration. In most cases, this is caused by commercial internet connections that aren’t tailored to today’s global cloud needs. Through deployment and operation of globally and strategically placed edge sites, Microsoft dramatically accelerates the performance and experience when you are accessing apps, content, or services such as Azure and Office 365 on the Microsoft global network.

Edges optimize network performance through local access points to and from the vast Microsoft global network, in many cases providing 10x the acceleration to access and consume cloud-based content and services from Microsoft.

What is the network edge?

Solely providing faster network access isn’t enough, and applications need intelligent services to expedite and simplify how a global audience accesses and experiences their offerings. Edge sites provide application development teams increased visibility and higher availability to access services that improve how they deliver global applications.

Edge sites benefit infrastructure and development teams in multiple key areas

  • Improved optimization for application delivery through Azure Front Door (AFD.) Microsoft recently announced AFD, which allows customers to define, manage, accelerate, and monitor global routing for web traffic with customizations for the best performance and instant global failover for application accessibility.
  • An enhanced customer experience via high-bandwidth access to Azure Blob storage, web applications, and live video-on-demand streams. Azure Content Delivery Network delivers high-bandwidth content by caching objects to the consumer’s closest point of presence.
  • Private connectivity and dedicated performance through Azure ExpressRoute. ExpressRoute provides up to 100 gigabits per second of fully redundant bandwidth directly to the Microsoft global network at select peering locations across the globe, making connecting to and through Azure a seamless and integrated experience for customers.

A diagram of an Azure Edge Site.

New edge sites

Today, we’re announcing the addition of 31 new edge sites, bringing the total to over 150 across more than 50 countries. We’re also adding 14 new meet-me sites to Azure ExpressRoute to further enable and expand access to dedicated private connections between customers’ on-premises environments and Azure.

A map showing upcoming and live edges.

More than two decades of building global network infrastructure have given us a keen awareness of globally distributed edge sites and their critical role in a business’ success.

By utilizing the expanding network of edge sites, Microsoft provides more than 80 percent of global GDP with an experience of sub-30 milliseconds latency. We are adding new edges every week, and our ambition is to provide this level of performance to all of our global audience.

This expansion proves its value further when workloads move to the cloud or when Microsoft cloud services such as Azure, Microsoft 365, and Xbox are used. By operating over a dedicated, premium wide-area-network, our customers avoid transferring customer data over the public internet, which ensures security, optimizes traffic, and increases performance.

New edge sites

Country

City

Colombia

Bogota

Germany

Frankfurt
Munich

India

Hyderabad

Indonesia

Jakarta

Kenya

Nariobi

Netherlands

Amsterdam

New Zealand

Auckland

Nigeria

Lagos

Norway

Stavanger

United Kingdom

London

United States

Boston
Portland

Vietnam

Saigon

Upcoming edge sites

Country

City

Argentina

Buenos Aires

Egypt

Cairo

Germany

Dusseldorf

Israel

Tel Aviv

Italy

Rome

Japan

Tokyo

Norway

Oslo

Switzerland

Geneva

Turkey

Istanbul

United States

Detroit
Jacksonville
Las Vegas
Minneapolis
Nashville
Phoenix
Quincy (WA)
San Diego

New ExpressRoute meet-me sites

Country

City

Canada

Vancouver

Colombia

Bogota

Germany

Berlin
Dusseldorf

Indonesia

Jakarta

Italy

Milan

Mexico

Queretaro (Mexico City)

Norway

Oslo
Stavanger

Switzerland

Geneva

Thailand


Bangkok

United States

Minneapolis
Phoenix
Quincy (WA)

With this latest announcement, Microsoft continues to offer cloud customers the fastest and most accessible global network, driving a competitive advantage for organizations accessing the global market and increased satisfaction for consumers.

Explore the Microsoft global network to learn about how it can benefit your organization today.

Get more fresh content on Visual Studio’s YouTube channel

$
0
0

Whether you like short how-to videos or longer deep dives, the Visual Studio YouTube channel has something for you. With fresh content published several times a week, there are always new and interesting videos to help you stay current on everything Visual Studio.

The channel receives content from Channel 9, the Visual Studio product teams, and other sources. It’s a great one-stop-shop for staying up to date on the latest news and tutorials on Visual Studio.

The videos range from very short 3-minute screen capture tutorials to longer technical deep dives in the TV show format. Here’s a screenshot of some of the latest videos, to give you an idea of the type of content you can expect to find:

Related channels

Not that into Visual Studio? No problem, there’s a channel for every type of developer:

And your favorite products:

Hit the subscribe button

So, head on over to the Visual Studio YouTube channel and make sure to subscribe so you won’t miss out on any new videos. Are there any types of videos you’d like to see us make? If so, let us know in the comments below.

The post Get more fresh content on Visual Studio’s YouTube channel appeared first on The Visual Studio Blog.


Redesigning Configuration Refresh for Azure App Configuration

$
0
0

Overview

Since its inception, the .NET Core configuration provider for Azure App Configuration has provided the capability to monitor changes and sync them to the configuration within a running application. We recently redesigned this functionality to allow for on-demand refresh of the configuration. The new design paves the way for smarter applications that only refresh the configuration when necessary. As a result, inactive applications no longer have to monitor for configuration changes unnecessarily.
 

Initial design : Timer-based watch

In the initial design, configuration was kept in sync with Azure App Configuration using a watch mechanism which ran on a timer. At the time of initialization of the Azure App Configuration provider, users could specify the configuration settings to be updated and an optional polling interval. In case the polling interval was not specified, a default value of 30 seconds was used.

public static IWebHost BuildWebHost(string[] args)
{
    WebHost.CreateDefaultBuilder(args)
        .ConfigureAppConfiguration((hostingContext, config) =>
        {
            // Load settings from Azure App Configuration
            // Set up the provider to listen for changes triggered by a sentinel value
            var settings = config.Build();
            string appConfigurationEndpoint = settings["AzureAppConfigurationEndpoint"];

            config.AddAzureAppConfiguration(options =>
            {
                options.ConnectWithManagedIdentity(appConfigurationEndpoint)
                        .Use(keyFilter: "WebDemo:*")
                        .WatchAndReloadAll(key: "WebDemo:Sentinel", label: LabelFilter.Null);
            });

            settings = config.Build();
        })
        .UseStartup<Startup>()
        .Build();
}

For example, in the above code snippet, Azure App Configuration would be pinged every 30 seconds for changes. These calls would be made irrespective of whether the application was active or not. As a result, there would be unnecessary usage of network and CPU resources within inactive applications. Applications needed a way to trigger a refresh of the configuration on demand in order to be able to limit the refreshes to active applications. Then unnecessary checks for changes could be avoided.

This timer-based watch mechanism had the following fundamental design flaws.

  1. It could not be invoked on-demand.
  2. It continued to run in the background even in applications that could be considered inactive.
  3. It promoted constant polling of configuration rather than a more intelligent approach of updating configuration when applications are active or need to ensure freshness.
     

New design : Activity-based refresh

The new refresh mechanism allows users to keep their configuration updated using a middleware to determine activity. As long as the ASP.NET Core web application continues to receive requests, the configuration settings continue to get updated with the configuration store.

The application can be configured to trigger refresh for each request by adding the Azure App Configuration middleware from package Microsoft.Azure.AppConfiguration.AspNetCore in your application’s startup code.

public void Configure(IApplicationBuilder app, IHostingEnvironment env)
{
    app.UseAzureAppConfiguration();
    app.UseMvc();
}

At the time of initialization of the configuration provider, the user can use the ConfigureRefresh method to register the configuration settings to be updated with an optional cache expiration time. In case the cache expiration time is not specified, a default value of 30 seconds is used.

public static IWebHost BuildWebHost(string[] args)
{
    WebHost.CreateDefaultBuilder(args)
        .ConfigureAppConfiguration((hostingContext, config) =>
        {
            // Load settings from Azure App Configuration
            // Set up the provider to listen for changes triggered by a sentinel value
            var settings = config.Build();
            string appConfigurationEndpoint = settings["AzureAppConfigurationEndpoint"];

            config.AddAzureAppConfiguration(options =>
            {
                options.ConnectWithManagedIdentity(appConfigurationEndpoint)
                        .Use(keyFilter: "WebDemo:*")
                        .ConfigureRefresh((refreshOptions) =>
                        {
                            // Indicates that all settings should be refreshed when the given key has changed
                            refreshOptions.Register(key: "WebDemo:Sentinel", label: LabelFilter.Null, refreshAll: true);
                        });
            });

            settings = config.Build();
        })
        .UseStartup<Startup>()
        .Build();
}

In order to keep the settings updated and avoid unnecessary calls to the configuration store, an internal cache is used for each setting. Until the cached value of a setting has expired, the refresh operation does not update the value. This happens even when the value has changed in the configuration store.  

Try it now!

For more information about Azure App Configuration, check out the following resources. You can find step-by-step tutorials that would help you get started with dynamic configuration using the new refresh mechanism within minutes. Please let us know what you think by filing issues on GitHub.

Overview: Azure App configuration
Tutorial: Use dynamic configuration in an ASP.NET Core app
Tutorial: Use dynamic configuration in a .NET Core app
Related Blog: Configuring a Server-side Blazor app with Azure App Configuration

The post Redesigning Configuration Refresh for Azure App Configuration appeared first on ASP.NET Blog.

Windows 10 SDK Preview Build 18965 available now!

$
0
0

Today, we released a new Windows 10 Preview Build of the SDK to be used in conjunction with Windows 10 Insider Preview (Build 18965 or greater). The Preview SDK Build 18965 contains bug fixes and under development changes to the API surface area.

The Preview SDK can be downloaded from developer section on Windows Insider.

For feedback and updates to the known issues, please see the developer forum. For new developer feature requests, head over to our Windows Platform UserVoice.

Things to note:

  • This build works in conjunction with previously released SDKs and Visual Studio 2017 and 2019. You can install this SDK and still also continue to submit your apps that target Windows 10 build 1903 or earlier to the Microsoft Store.
  • The Windows SDK will now formally only be supported by Visual Studio 2017 and greater. You can download the Visual Studio 2019 here.
  • This build of the Windows SDK will install on only on Windows 10 Insider Preview builds.
  • In order to assist with script access to the SDK, the ISO will also be able to be accessed through the following static URL: https://software-download.microsoft.com/download/sg/Windows_InsiderPreview_SDK_en-us_18965_1.iso.

Tools Updates

Message Compiler (mc.exe)

  • Now detects the Unicode byte order mark (BOM) in .mc files. If the If the .mc file starts with a UTF-8 BOM, it will be read as a UTF-8 file. Otherwise, if it starts with a UTF-16LE BOM, it will be read as a UTF-16LE file. If the -u parameter was specified, it will be read as a UTF-16LE file. Otherwise, it will be read using the current code page (CP_ACP).
  • Now avoids one-definition-rule (ODR) problems in MC-generated C/C++ ETW helpers caused by conflicting configuration macros (e.g. when two .cpp files with conflicting definitions of MCGEN_EVENTWRITETRANSFER are linked into the same binary, the MC-generated ETW helpers will now respect the definition of MCGEN_EVENTWRITETRANSFER in each .cpp file instead of arbitrarily picking one or the other).

Windows Trace Preprocessor (tracewpp.exe)

  • Now supports Unicode input (.ini, .tpl, and source code) files. Input files starting with a UTF-8 or UTF-16 byte order mark (BOM) will be read as Unicode. Input files that do not start with a BOM will be read using the current code page (CP_ACP). For backwards-compatibility, if the -UnicodeIgnore command-line parameter is specified, files starting with a UTF-16 BOM will be treated as empty.
  • Now supports Unicode output (.tmh) files. By default, output files will be encoded using the current code page (CP_ACP). Use command-line parameters -cp:UTF-8 or -cp:UTF-16 to generate Unicode output files.
  • Behavior change: tracewpp now converts all input text to Unicode, performs processing in Unicode, and converts output text to the specified output encoding. Earlier versions of tracewpp avoided Unicode conversions and performed text processing assuming a single-byte character set. This may lead to behavior changes in cases where the input files do not conform to the current code page. In cases where this is a problem, consider converting the input files to UTF-8 (with BOM) and/or using the -cp:UTF-8 command-line parameter to avoid encoding ambiguity.

TraceLoggingProvider.h

  • Now avoids one-definition-rule (ODR) problems caused by conflicting configuration macros (e.g. when two .cpp files with conflicting definitions of TLG_EVENT_WRITE_TRANSFER are linked into the same binary, the TraceLoggingProvider.h helpers will now respect the definition of TLG_EVENT_WRITE_TRANSFER in each .cpp file instead of arbitrarily picking one or the other).
  • In C++ code, the TraceLoggingWrite macro has been updated to enable better code sharing between similar events using variadic templates.

Signing your apps with Device Guard Signing

Breaking Changes

Removal of api-ms-win-net-isolation-l1-1-0.lib

In this release api-ms-win-net-isolation-l1-1-0.lib has been removed from the Windows SDK. Apps that were linking against api-ms-win-net-isolation-l1-1-0.lib can switch to OneCoreUAP.lib as a replacement.

Removal of IRPROPS.LIB

In this release irprops.lib has been removed from the Windows SDK. Apps that were linking against irprops.lib can switch to bthprops.lib as a drop-in replacement.

API Updates, Additions, and Removals

The following APIs have been added to the platform since the release of Windows 10 SDK, version 1903, build 18362.

Additions:


namespace Windows.AI.MachineLearning {
  public sealed class LearningModelSessionOptions {
    bool CloseModelOnSessionCreation { get; set; }
  }
}
namespace Windows.ApplicationModel {
  public sealed class AppInfo {
    public static AppInfo Current { get; }
    Package Package { get; }
    public static AppInfo GetFromAppUserModelId(string appUserModelId);
    public static AppInfo GetFromAppUserModelIdForUser(User user, string appUserModelId);
  }
  public interface IAppInfoStatics
  public sealed class Package {
    StorageFolder EffectiveExternalLocation { get; }
    string EffectiveExternalPath { get; }
    string EffectivePath { get; }
    string InstalledPath { get; }
    bool IsStub { get; }
    StorageFolder MachineExternalLocation { get; }
    string MachineExternalPath { get; }
    string MutablePath { get; }
    StorageFolder UserExternalLocation { get; }
    string UserExternalPath { get; }
    IVectorView<AppListEntry> GetAppListEntries();
    RandomAccessStreamReference GetLogoAsRandomAccessStreamReference(Size size);
  }
}
namespace Windows.ApplicationModel.Background {
  public sealed class BluetoothLEAdvertisementPublisherTrigger : IBackgroundTrigger {
    bool IncludeTransmitPowerLevel { get; set; }
    bool IsAnonymous { get; set; }
    IReference<short> PreferredTransmitPowerLevelInDBm { get; set; }
    bool UseExtendedFormat { get; set; }
  }
  public sealed class BluetoothLEAdvertisementWatcherTrigger : IBackgroundTrigger {
    bool AllowExtendedAdvertisements { get; set; }
  }
}
namespace Windows.ApplicationModel.ConversationalAgent {
  public sealed class ActivationSignalDetectionConfiguration
  public enum ActivationSignalDetectionTrainingDataFormat
  public sealed class ActivationSignalDetector
  public enum ActivationSignalDetectorKind
  public enum ActivationSignalDetectorPowerState
  public sealed class ConversationalAgentDetectorManager
  public sealed class DetectionConfigurationAvailabilityChangedEventArgs
  public enum DetectionConfigurationAvailabilityChangeKind
  public sealed class DetectionConfigurationAvailabilityInfo
  public enum DetectionConfigurationTrainingStatus
}
namespace Windows.ApplicationModel.DataTransfer {
  public sealed class DataPackage {
    event TypedEventHandler<DataPackage, object> ShareCanceled;
  }
}
namespace Windows.Devices.Bluetooth {
  public sealed class BluetoothAdapter {
    bool IsExtendedAdvertisingSupported { get; }
    uint MaxAdvertisementDataLength { get; }
  }
}
namespace Windows.Devices.Bluetooth.Advertisement {
  public sealed class BluetoothLEAdvertisementPublisher {
    bool IncludeTransmitPowerLevel { get; set; }
    bool IsAnonymous { get; set; }
    IReference<short> PreferredTransmitPowerLevelInDBm { get; set; }
    bool UseExtendedAdvertisement { get; set; }
  }
  public sealed class BluetoothLEAdvertisementPublisherStatusChangedEventArgs {
    IReference<short> SelectedTransmitPowerLevelInDBm { get; }
  }
  public sealed class BluetoothLEAdvertisementReceivedEventArgs {
    BluetoothAddressType BluetoothAddressType { get; }
    bool IsAnonymous { get; }
    bool IsConnectable { get; }
    bool IsDirected { get; }
    bool IsScannable { get; }
    bool IsScanResponse { get; }
    IReference<short> TransmitPowerLevelInDBm { get; }
  }
  public enum BluetoothLEAdvertisementType {
    Extended = 5,
  }
  public sealed class BluetoothLEAdvertisementWatcher {
    bool AllowExtendedAdvertisements { get; set; }
  }
  public enum BluetoothLEScanningMode {
    None = 2,
  }
}
namespace Windows.Devices.Bluetooth.Background {
  public sealed class BluetoothLEAdvertisementPublisherTriggerDetails {
    IReference<short> SelectedTransmitPowerLevelInDBm { get; }
  }
}
namespace Windows.Devices.Display {
  public sealed class DisplayMonitor {
    bool IsDolbyVisionSupportedInHdrMode { get; }
  }
}
namespace Windows.Devices.Input {
  public sealed class PenButtonListener
  public sealed class PenDockedEventArgs
  public sealed class PenDockListener
  public sealed class PenTailButtonClickedEventArgs
  public sealed class PenTailButtonDoubleClickedEventArgs
  public sealed class PenTailButtonLongPressedEventArgs
  public sealed class PenUndockedEventArgs
}
namespace Windows.Devices.Sensors {
  public sealed class Accelerometer {
    AccelerometerDataThreshold ReportThreshold { get; }
  }
  public sealed class AccelerometerDataThreshold
  public sealed class Barometer {
    BarometerDataThreshold ReportThreshold { get; }
  }
  public sealed class BarometerDataThreshold
  public sealed class Compass {
    CompassDataThreshold ReportThreshold { get; }
  }
  public sealed class CompassDataThreshold
  public sealed class Gyrometer {
    GyrometerDataThreshold ReportThreshold { get; }
  }
  public sealed class GyrometerDataThreshold
  public sealed class Inclinometer {
    InclinometerDataThreshold ReportThreshold { get; }
  }
  public sealed class InclinometerDataThreshold
  public sealed class LightSensor {
    LightSensorDataThreshold ReportThreshold { get; }
  }
  public sealed class LightSensorDataThreshold
  public sealed class Magnetometer {
    MagnetometerDataThreshold ReportThreshold { get; }
  }
  public sealed class MagnetometerDataThreshold
}
namespace Windows.Foundation.Metadata {
  public sealed class AttributeNameAttribute : Attribute
  public sealed class FastAbiAttribute : Attribute
  public sealed class NoExceptionAttribute : Attribute
}
namespace Windows.Globalization {
 public sealed class Language {
    string AbbreviatedName { get; }
    public static IVector<string> GetMuiCompatibleLanguageListFromLanguageTags(IIterable<string> languageTags);
  }
}
namespace Windows.Graphics.Capture {
  public sealed class GraphicsCaptureSession : IClosable {
    bool IsCursorCaptureEnabled { get; set; }
  }
}
namespace Windows.Graphics.DirectX {
  public enum DirectXPixelFormat {
    SamplerFeedbackMinMipOpaque = 189,
    SamplerFeedbackMipRegionUsedOpaque = 190,
  }
}
namespace Windows.Graphics.Holographic {
  public sealed class HolographicFrame {
    HolographicFrameId Id { get; }
  }
  public struct HolographicFrameId
  public sealed class HolographicFrameRenderingReport
  public sealed class HolographicFrameScanoutMonitor : IClosable
  public sealed class HolographicFrameScanoutReport
  public sealed class HolographicSpace {
    HolographicFrameScanoutMonitor CreateFrameScanoutMonitor(uint maxQueuedReports);
  }
}
namespace Windows.Management.Deployment {
  public sealed class AddPackageOptions
  public enum DeploymentOptions : uint {
    StageInPlace = (uint)4194304,
  }
  public sealed class PackageManager {
    IAsyncOperationWithProgress<DeploymentResult, DeploymentProgress> AddPackageByUriAsync(Uri packageUri, AddPackageOptions options);
    IIterable<Package> FindProvisionedPackages();
    PackageStubPreference GetPackageStubPreference(string packageFamilyName);
    IAsyncOperationWithProgress<DeploymentResult, DeploymentProgress> RegisterPackageByNameAsync(string name, RegisterPackageOptions options);
    IAsyncOperationWithProgress<DeploymentResult, DeploymentProgress> RegisterPackageByUriAsync(Uri manifestUri, RegisterPackageOptions options);
    IAsyncOperationWithProgress<DeploymentResult, DeploymentProgress> RegisterPackagesByFullNameAsync(IIterable<string> packageFullNames, DeploymentOptions deploymentOptions);
    void SetPackageStubPreference(string packageFamilyName, PackageStubPreference useStub);
    IAsyncOperationWithProgress<DeploymentResult, DeploymentProgress> StagePackageByUriAsync(Uri packageUri, StagePackageOptions options);
  }
  public enum PackageStubPreference
  public enum PackageTypes : uint {
    All = (uint)4294967295,
  }
  public sealed class RegisterPackageOptions
  public enum RemovalOptions : uint {
    PreserveRoamableApplicationData = (uint)128,
  }
  public sealed class StagePackageOptions
  public enum StubPackageOptions
}
namespace Windows.Media.Audio {
  public sealed class AudioPlaybackConnection : IClosable
  public sealed class AudioPlaybackConnectionOpenResult
  public enum AudioPlaybackConnectionOpenResultStatus
  public enum AudioPlaybackConnectionState
}
namespace Windows.Media.Capture {
  public sealed class MediaCapture : IClosable {
    MediaCaptureRelativePanelWatcher CreateRelativePanelWatcher(StreamingCaptureMode captureMode, DisplayRegion displayRegion);
  }
  public sealed class MediaCaptureInitializationSettings {
    Uri DeviceUri { get; set; }
    PasswordCredential DeviceUriPasswordCredential { get; set; }
  }
 public sealed class MediaCaptureRelativePanelWatcher : IClosable
}
namespace Windows.Media.Capture.Frames {
  public sealed class MediaFrameSourceInfo {
    Panel GetRelativePanel(DisplayRegion displayRegion);
  }
}
namespace Windows.Media.Devices {
  public sealed class PanelBasedOptimizationControl
}
namespace Windows.Media.MediaProperties {
  public static class MediaEncodingSubtypes {
    public static string Pgs { get; }
    public static string Srt { get; }
    public static string Ssa { get; }
    public static string VobSub { get; }
  }
  public sealed class TimedMetadataEncodingProperties : IMediaEncodingProperties {
    public static TimedMetadataEncodingProperties CreatePgs();
    public static TimedMetadataEncodingProperties CreateSrt();
    public static TimedMetadataEncodingProperties CreateSsa(byte[] formatUserData);
    public static TimedMetadataEncodingProperties CreateVobSub(byte[] formatUserData);
  }
}
namespace Windows.Networking.BackgroundTransfer {
  public sealed class DownloadOperation : IBackgroundTransferOperation, IBackgroundTransferOperationPriority {
    void RemoveRequestHeader(string headerName);
    void SetRequestHeader(string headerName, string headerValue);
  }
  public sealed class UploadOperation : IBackgroundTransferOperation, IBackgroundTransferOperationPriority {
    void RemoveRequestHeader(string headerName);
    void SetRequestHeader(string headerName, string headerValue);
  }
}
namespace Windows.Networking.Connectivity {
  public enum NetworkAuthenticationType {
    Owe = 12,
  }
}
namespace Windows.Networking.NetworkOperators {
  public interface INetworkOperatorTetheringAccessPointConfiguration2
  public interface INetworkOperatorTetheringManagerStatics4
  public sealed class NetworkOperatorTetheringAccessPointConfiguration : INetworkOperatorTetheringAccessPointConfiguration2 {
    TetheringWiFiBand Band { get; set; }
    bool IsBandSupported(TetheringWiFiBand band);
    IAsyncOperation<bool> IsBandSupportedAsync(TetheringWiFiBand band);
  }
  public sealed class NetworkOperatorTetheringManager {
    public static void DisableNoConnectionsTimeout();
    public static IAsyncAction DisableNoConnectionsTimeoutAsync();
    public static void EnableNoConnectionsTimeout();
    public static IAsyncAction EnableNoConnectionsTimeoutAsync();
    public static bool IsNoConnectionsTimeoutEnabled();
  }
  public enum TetheringWiFiBand
}
namespace Windows.Networking.PushNotifications {
  public static class PushNotificationChannelManager {
    public static event EventHandler<PushNotificationChannelsRevokedEventArgs> ChannelsRevoked;
  }
  public sealed class PushNotificationChannelsRevokedEventArgs
  public sealed class RawNotification {
    IBuffer ContentBytes { get; }
  }
}
namespace Windows.Security.Authentication.Web.Core {
  public sealed class WebAccountMonitor {
    event TypedEventHandler<WebAccountMonitor, WebAccountEventArgs> AccountPictureUpdated;
  }
}
namespace Windows.Storage {
  public static class KnownFolders {
    public static IAsyncOperation<StorageFolder> GetFolderAsync(KnownFolderId folderId);
    public static IAsyncOperation<KnownFoldersAccessStatus> RequestAccessAsync(KnownFolderId folderId);
    public static IAsyncOperation<KnownFoldersAccessStatus> RequestAccessForUserAsync(User user, KnownFolderId folderId);
  }
  public enum KnownFoldersAccessStatus
  public sealed class StorageFile : IInputStreamReference, IRandomAccessStreamReference, IStorageFile, IStorageFile2, IStorageFilePropertiesWithAvailability, IStorageItem, IStorageItem2, IStorageItemProperties, IStorageItemProperties2, IStorageItemPropertiesWithProvider {
    public static IAsyncOperation<StorageFile> GetFileFromPathForUserAsync(User user, string path);
  }
  public sealed class StorageFolder : IStorageFolder, IStorageFolder2, IStorageFolderQueryOperations, IStorageItem, IStorageItem2, IStorageItemProperties, IStorageItemProperties2, IStorageItemPropertiesWithProvider {
    public static IAsyncOperation<StorageFolder> GetFolderFromPathForUserAsync(User user, string path);
  }
}
namespace Windows.Storage.Provider {
  public sealed class StorageProviderFileTypeInfo
  public sealed class StorageProviderSyncRootInfo {
    IVector<StorageProviderFileTypeInfo> FallbackFileTypeInfo { get; }
  }
  public static class StorageProviderSyncRootManager {
    public static bool IsSupported();
  }
}
namespace Windows.System {
  public enum UserWatcherUpdateKind
}
namespace Windows.UI.Composition.Interactions {
  public sealed class InteractionTracker : CompositionObject {
    int TryUpdatePosition(Vector3 value, InteractionTrackerClampingOption option, InteractionTrackerPositionUpdateOption posUpdateOption);
  }
  public enum InteractionTrackerPositionUpdateOption
}
namespace Windows.UI.Composition.Particles {
  public sealed class ParticleAttractor : CompositionObject
  public sealed class ParticleAttractorCollection : CompositionObject, IIterable<ParticleAttractor>, IVector<ParticleAttractor>
  public class ParticleBaseBehavior : CompositionObject
  public sealed class ParticleBehaviors : CompositionObject
  public sealed class ParticleColorBehavior : ParticleBaseBehavior
  public struct ParticleColorBinding
  public sealed class ParticleColorBindingCollection : CompositionObject, IIterable<IKeyValuePair<float, ParticleColorBinding>>, IMap<float, ParticleColorBinding>
  public enum ParticleEmitFrom
  public sealed class ParticleEmitterVisual : ContainerVisual
  public sealed class ParticleGenerator : CompositionObject
  public enum ParticleInputSource
  public enum ParticleReferenceFrame
  public sealed class ParticleScalarBehavior : ParticleBaseBehavior
  public struct ParticleScalarBinding
  public sealed class ParticleScalarBindingCollection : CompositionObject, IIterable<IKeyValuePair<float, ParticleScalarBinding>>, IMap<float, ParticleScalarBinding>
  public enum ParticleSortMode
  public sealed class ParticleVector2Behavior : ParticleBaseBehavior
  public struct ParticleVector2Binding
  public sealed class ParticleVector2BindingCollection : CompositionObject, IIterable<IKeyValuePair<float, ParticleVector2Binding>>, IMap<float, ParticleVector2Binding>
  public sealed class ParticleVector3Behavior : ParticleBaseBehavior
  public struct ParticleVector3Binding
  public sealed class ParticleVector3BindingCollection : CompositionObject, IIterable<IKeyValuePair<float, ParticleVector3Binding>>, IMap<float, ParticleVector3Binding>
  public sealed class ParticleVector4Behavior : ParticleBaseBehavior
  public struct ParticleVector4Binding
  public sealed class ParticleVector4BindingCollection : CompositionObject, IIterable<IKeyValuePair<float, ParticleVector4Binding>>, IMap<float, ParticleVector4Binding>
}
namespace Windows.UI.Input {
  public sealed class CrossSlidingEventArgs {
    uint ContactCount { get; }
  }
  public sealed class DraggingEventArgs {
    uint ContactCount { get; }
  }
  public sealed class GestureRecognizer {
    uint HoldMaxContactCount { get; set; }
    uint HoldMinContactCount { get; set; }
    float HoldRadius { get; set; }
    TimeSpan HoldStartDelay { get; set; }
    uint TapMaxContactCount { get; set; }
    uint TapMinContactCount { get; set; }
    uint TranslationMaxContactCount { get; set; }
    uint TranslationMinContactCount { get; set; }
  }
  public sealed class HoldingEventArgs {
    uint ContactCount { get; }
    uint CurrentContactCount { get; }
  }
  public sealed class ManipulationCompletedEventArgs {
    uint ContactCount { get; }
    uint CurrentContactCount { get; }
  }
  public sealed class ManipulationInertiaStartingEventArgs {
    uint ContactCount { get; }
  }
  public sealed class ManipulationStartedEventArgs {
    uint ContactCount { get; }
  }
  public sealed class ManipulationUpdatedEventArgs {
    uint ContactCount { get; }
    uint CurrentContactCount { get; }
  }
  public sealed class RightTappedEventArgs {
    uint ContactCount { get; }
  }
  public sealed class SystemButtonEventController : AttachableInputObject
  public sealed class SystemFunctionButtonEventArgs
  public sealed class SystemFunctionLockChangedEventArgs
  public sealed class SystemFunctionLockIndicatorChangedEventArgs
  public sealed class TappedEventArgs {
    uint ContactCount { get; }
  }
}
namespace Windows.UI.Input.Inking {
  public sealed class InkModelerAttributes {
    bool UseVelocityBasedPressure { get; set; }
  }
}
namespace Windows.UI.Text {
  public enum RichEditMathMode
  public sealed class RichEditTextDocument : ITextDocument {
    void GetMath(out string value);
    void SetMath(string value);
    void SetMathMode(RichEditMathMode mode);
  }
}
namespace Windows.UI.ViewManagement {
  public sealed class ApplicationView {
    bool CriticalInputMismatch { get; set; }
    ScreenCaptureDisabledBehavior ScreenCaptureDisabledBehavior { get; set; }
    bool TemporaryInputMismatch { get; set; }
    void ApplyApplicationUserModelID(string value);
  }
  public enum ScreenCaptureDisabledBehavior
  public sealed class UISettings {
   event TypedEventHandler<UISettings, UISettingsAnimationsEnabledChangedEventArgs> AnimationsEnabledChanged;
    event TypedEventHandler<UISettings, UISettingsMessageDurationChangedEventArgs> MessageDurationChanged;
  }
  public sealed class UISettingsAnimationsEnabledChangedEventArgs
  public sealed class UISettingsMessageDurationChangedEventArgs
}
namespace Windows.UI.ViewManagement.Core {
  public sealed class CoreInputView {
    event TypedEventHandler<CoreInputView, CoreInputViewHidingEventArgs> PrimaryViewHiding;
    event TypedEventHandler<CoreInputView, CoreInputViewShowingEventArgs> PrimaryViewShowing;
  }
  public sealed class CoreInputViewHidingEventArgs
  public enum CoreInputViewKind {
    Symbols = 4,
  }
  public sealed class CoreInputViewShowingEventArgs
  public sealed class UISettingsController
}
namespace Windows.UI.Xaml.Controls {
  public class HandwritingView : Control {
    UIElement HostUIElement { get; set; }
    public static DependencyProperty HostUIElementProperty { get; }
    CoreInputDeviceTypes InputDeviceTypes { get; set; }
    bool IsSwitchToKeyboardButtonVisible { get; set; }
    public static DependencyProperty IsSwitchToKeyboardButtonVisibleProperty { get; }
    double MinimumColorDifference { get; set; }
    public static DependencyProperty MinimumColorDifferenceProperty { get; }
    bool PreventAutomaticDismissal { get; set; }
    public static DependencyProperty PreventAutomaticDismissalProperty { get; }
    bool ShouldInjectEnterKey { get; set; }
    public static DependencyProperty ShouldInjectEnterKeyProperty { get; }
    event TypedEventHandler<HandwritingView, HandwritingViewCandidatesChangedEventArgs> CandidatesChanged;
    event TypedEventHandler<HandwritingView, HandwritingViewContentSizeChangingEventArgs> ContentSizeChanging;
    void SelectCandidate(uint index);
    void SetTrayDisplayMode(HandwritingViewTrayDisplayMode displayMode);
  }
  public sealed class HandwritingViewCandidatesChangedEventArgs
  public sealed class HandwritingViewContentSizeChangingEventArgs
  public enum HandwritingViewTrayDisplayMode
}
namespace Windows.UI.Xaml.Core.Direct {
  public enum XamlEventIndex {
    HandwritingView_ContentSizeChanging = 321,
  }
  public enum XamlPropertyIndex {
    HandwritingView_HostUIElement = 2395,
    HandwritingView_IsSwitchToKeyboardButtonVisible = 2393,
    HandwritingView_MinimumColorDifference = 2396,
    HandwritingView_PreventAutomaticDismissal = 2397,
    HandwritingView_ShouldInjectEnterKey = 2398,
  }
}

The post Windows 10 SDK Preview Build 18965 available now! appeared first on Windows Developer Blog.

dotnet new worker – Windows Services or Linux systemd services in .NET Core

$
0
0

dotnet new workerYou've long been able to write Windows Services in .NET and .NET Core, and you could certainly write a vanilla Console App and cobble something together for a long running headless service as well. However, the idea of a Worker Process, especially a long running one is a core part of any operating system - Windows, Linux, or Mac.

Now that open source .NET Core is cross-platform, it's more than reasonable to want to write OS services in .NET Core. You might write a Windows Service with .NET Core or a systemd process for Linux with it as well.

Go grab a copy of .NET Core 3.0 - as of the time of this writing it's very close to release, and Preview 8 is supported in Production.

If you're making a Windows Service, you can use the Microsoft.Extensions.Hosting.WindowsService package and tell your new Worker that its lifetime is based on ServiceBase.

public static IHostBuilder CreateHostBuilder(string[] args) =>

Host.CreateDefaultBuilder(args)
.UseWindowsService()
.ConfigureServices(services =>
{
services.AddHostedService<Worker>();
});

If you're making a Linux worker and using systemd you'd add the Microsoft.Extensions.Hosting.Systemd package and tell your new Worker that its lifetime is managed by systemd!

public static IHostBuilder CreateHostBuilder(string[] args) =>

Host.CreateDefaultBuilder(args)
.UseSystemd()
.ConfigureServices((hostContext, services) =>
{
services.AddHostedService<Worker>();
});

The Worker template in .NET Core makes all this super easy and familiar if you're used to using .NET already. For example, logging is built in and regular .NET log levels like LogLevel.Debug or LogLevel.Critical are automatically mapped to systemd levels like Debug and Crit so I could run something like sudo journalctl -p 3 -u testapp and see my app's logs, just alike any other Linux process because it is!

You'll notice that a Worker doesn't look like a Console App. It has a Main but your work is done in a Worker class. A hosted service or services is added with AddHostedService and then a lot of work is abstracted away from you. The Worker template and BackgroundService base class brings a lot of the useful conveniences you're used to from ASP.NET over to your Worker Service. You get dependency injection, logging, process lifetime management as seen above, etc, for free!

public class Worker : BackgroundService

{
private readonly ILogger<Worker> _logger;

public Worker(ILogger<Worker> logger)
{
_logger = logger;
}

protected override async Task ExecuteAsync(CancellationToken stoppingToken)
{
while (!stoppingToken.IsCancellationRequested)
{
_logger.LogInformation("Worker running at: {time}", DateTimeOffset.Now);
await Task.Delay(1000, stoppingToken);
}
}
}

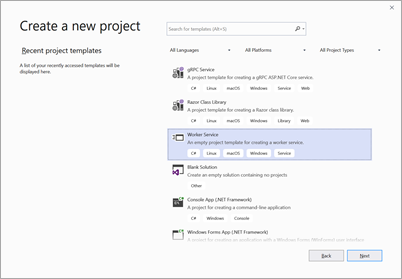
This is a very useful template and it's available from the command line as "dotnet new worker" or from File New Project in Visual Studio 2019 Preview channel.

Also check out Brady Gaster's excellent blog post on running .NET Core workers in containers in Azure Container Instances (ACI). This is super useful if you have some .NET Core and you want to Do A Thing in the cloud but you also want per-second billing for your container.


Sponsor: Get the latest JetBrains Rider with WinForms designer, Edit & Continue, and an IL (Intermediate Language) viewer. Preliminary C# 8.0 support, rename refactoring for F#-defined symbols across your entire solution, and Custom Themes are all included.


© 2019 Scott Hanselman. All rights reserved.
     

Microsoft Azure available from new cloud regions in Switzerland

$
0
0

UBS Group, Swiss Re Group, Swisscom, and others turn to Microsoft for their digital transformations

Cityscape of Zurich, Switzerland

Today, we’re announcing the availability of Azure from our new cloud regions in Switzerland. These new regions and our ongoing global expansion are in response to customer demand as more industry leaders choose Microsoft’s cloud services to further their digital transformations. As we enter new markets, we work to address scenarios where data residency is of critical importance, especially for highly regulated industries seeking the compliance standards and extensive security offered by Azure.

Additionally, Office 365—the world’s leading cloud-based productivity solution—and Dynamics 365 and Power Platform—the next generation of intelligent business applications and tools—will be offered from these new cloud regions to advance even more customers on their cloud journeys.  

Trusted Microsoft cloud services

Microsoft cloud services delivered from a given geography, such as our new regions in Switzerland, offer scalable, highly available, and resilient cloud services while helping enterprises and organizations meet their data residency, security, and compliance needs. We have deep expertise protecting data and empowering customers around the globe to meet extensive security and privacy requirements by offering the broadest set of compliance certifications and attestations in the industry.

Accelerating cloud adoption in Switzerland

In Switzerland, where we’ve been operating for 30 years, Azure is now available from new cloud datacenter regions located near Zurich and Geneva. More than 30 customer and partner organizations are already using these Azure services. Companies becoming more efficient, innovative, and productive through their usage of Azure in Switzerland include:

  • UBS Group, the world’s largest wealth manager, is using Microsoft Azure cloud technology to modernize many critical business applications, to leverage digital channels, and to rethink how its global workforce collaborates.
  • The Swiss Re Group, one of the world’s leading providers of reinsurance, insurance, and other forms of insurance-based risk transfer, has chosen us as a strategic partner and preferred public cloud provider. Through their use of technology and our partnership, Swiss Re strives to make insurance simpler and more accessible than ever.
  • Swisscom, the national telecommunications provider, is now offering its customers managed public cloud services delivered via our global infrastructure and new Swiss cloud regions. Swisscom will be the first Swiss telecommunications provider to offer ExpressRoute, a secure, highly available, high-performance, and private connection to Azure services.

Additional customers now taking advantage of Azure services in this new region include BKW, City of Zug, die Mobiliar, Exploris Health, and Skyguide to name a few.

These types of investments help us deliver on our continued commitment to serve our customers, reach new ones, and elevate their businesses through the transformative capabilities of the Microsoft Azure cloud platform.

Please contact your Microsoft representative to learn more about opportunities in Switzerland or follow this link to learn about Microsoft Azure.

PyTorch on Azure: Full support for PyTorch 1.2

$
0
0

Congratulations to the PyTorch community on the release of PyTorch 1.2! Last fall, as part of our dedication to open source AI, we made PyTorch one of the primary, fully supported training frameworks on Azure. PyTorch is supported across many of our AI platform services and our developers participate in the PyTorch community, contributing key improvements to the code base. Today we would like to share the many ways you can use PyTorch 1.2 on Azure and highlight some of the contributions we’ve made to help customers take their PyTorch models from training to production.

PyTorch 1.2 on Azure

Getting started with PyTorch on Azure is easy and a great way to train and deploy your PyTorch models. We’ve integrated PyTorch 1.2 in the following Azure services so you can utilize the latest features:

From PyTorch to production

PyTorch is a popular open-source deep learning framework for creating and training models. It is built to use the power of GPUs for faster training and is deeply integrated with Python, making it easy to get started. However, deploying trained models to production has historically been a pain point for customers. For production environments, using Python for the core computations may not be suitable due to performance and multi-threading requirements. To address this challenge, we collaborated with the PyTorch community to make it easier to use PyTorch trained models in production.

PyTorch’s JIT compiler transitions models from eager mode to graph mode using tracing, TorchScript, or a mix of both. We then recommend using PyTorch’s built-in support for ONNX export. ONNX stands for Open Neural Network Exchange and is an open standard format for representing machine learning models. ONNX models can be inferenced using ONNX Runtime. ONNX Runtime is an inference engine for production scale machine learning workloads that are open source, cross platform, and highly optimized. Written in C++, it runs on Linux, Windows, and Mac. Its small binary size makes it suitable for a range of target devices and environments. It’s accelerated on CPU, GPU, and VPU thanks to Intel and NVIDIA who have integrated their accelerators with ONNX Runtime.

Training and production with PyTorch and ONNX Runtime

In PyTorch 1.2, we contributed enhanced ONNX export capabilities:

  • Support for a wider range of PyTorch models, including object detection and segmentation models such as mask RCNN, faster RCNN, and SSD
  • Support for models that work on variable length inputs
  • Export models that can run on various versions of ONNX inference engines
  • Optimization of models with constant folding
  • End-to-end tutorial showing export of a PyTorch model to ONNX and running inference in ONNX Runtime

You can deploy your own PyTorch models to various production environments with ONNX Runtime. Learn more at the links below:

Next steps

We are very excited to see PyTorch continue to evolve and improve. We are proud of our support for and contributions to the PyTorch community. PyTorch 1.2 is now available on Azure—start your free trial today.

We look forward to hearing from you as you use PyTorch on Azure.

New to Microsoft 365 in August—updates to Excel, PowerPoint, Yammer, and more

How the .NET Team uses Azure Pipelines to produce Docker Images

$
0
0

Producing Docker images for .NET might not seem like that big of a deal.  Once you’ve got a Dockerfile defined, just run docker build and docker push and you’re done, right?  Then just rinse and repeat when new versions of .NET are released and that should be all that’s needed.  Well, it’s not quite that simple. 

When you factor in the number of Linux distros and Windows versions, different processor architectures, and different .NET versions, you end up with a substantial matrix of images that need to be built and published.  Then consider that some images have dependencies on others which implies a specific order in which to build the images.  And on top of all that, we need to ensure the images are published as quickly as possible so that customers can get their hands on newly released product versions and security fixes.  Oh, and by the way, in addition to the .NET Core images we also produce .NET Core nightly images for preview releases, images for developers of .NET Core, as well as images for .NET Framework. This is starting to look a little daunting.  Let’s dive into what goes into producing the .NET Docker images. 

To keep things “simple”, let’s just consider the Docker images for .NET Core.  The same infrastructure is used amongst all the types of images we produce but keep in mind that the scope of the work is greater than described here. 

The full set of .NET Core images are derived from the following matrix: 

  • Linux: 3 distros / 7 versions 
  • Windows: 4 versions 
  • Architectures: AMD64, ARM32, ARM64 
  • .NET Core: 3 versions 

In total, 119 distinct images with 309 tags (281 simple and 28 shared) are being produced todayThis matrix is constantly evolving as new OS and .NET versions are released. 

Anatomy of our Pipeline 

Our CI/CD pipeline is implemented using Azure Pipelines with the core YAML-based source located here. It’s divided into three stages: build, test, and publish. Build and test each run multiple jobs in parallel. This parallelism dramatically reduces the pipeline’s execution time from start to finish by an order of magnitude versus running the jobs sequentially. 

Build Agents 

Since we’ve got jobs running in parallel, we also need a number of build agents that can fulfill the execution of those jobs. There is a self-hosted agent pool that we use for producing .NET images which consists of a variety of virtual machines and physical hardware to meet our platform and perf demands. 

For Linux AMD64 builds, we use the Hosted Ubuntu 1604 pool provided by Azure DevOps. That pool meets our performance needs and makes things simple from an operations standpoint. 

For Windows AMD64 builds, we have custom Azure VMs configured as Azure Pipeline self-hosted agents that are running four different Windows versions (five agents for each version). 

For ARM builds, things get a bit trickierWe need to build and test the Docker images on ARM-based hardware.  Since the Azure Pipeline agent software’s support for ARM is limited to Linux/ARM32, we use AMD-based Linux machines as the agents that send commands to remote Linux and Windows ARM devices.  Each of those devices runs a Docker daemon.  The agent machines act as proxies to send Docker commands to the remote daemons running on the ARM devices. For Linux, we use NVIDA Jetson devices that run on the AArch64 architecture which are capable of building images that target either ARM32 or ARM64.  For Windows, we have SolidRun HummingBoard ARM devices. 

Image Matrix Generation 

One of the key features of Azure Pipelines that we rely on is the matrix strategy for build jobs. It allows a variable number of build jobs to be generated based on an image matrix that is defined by our pipeline.  An illustration of a very simplified matrix is the following YAML: 

3.0-runtime-deps-disco-graph:
  imageBuilderPaths: 3.0/runtime-deps/disco 3.0/runtime/disco 3.0/aspnet/disco
  osType: linux
  architecture: amd64
3.0-sdk-disco:
  imageBuilderPaths: –path 3.0/sdk/disco
  osType: linux
  architecture: amd64 

This matrix would cause two build jobs to execute in parallel, each running the same set of steps but with different inputs.  The inputs consist of variables defined by the matrix.  The first job, as identified by 3.0-runtime-deps-disco-graphhas a variable named imageBuilderPaths that indicates to the build steps that the .NET Core 3.0 Docker images for runtime-depsruntime, and aspnet on Ubuntu Disco are to be built.  The reason those images are built in a single job is because there are dependencies amongst them.  The runtime image depends on runtime-deps and the aspnet image depends on the runtime image; there’s no parallelism that can be done within this graph.  The sdk image, however, can be built in parallel with the others because it doesn’t depend on them; it depends on buildpack-deps:disco-scm, an official Docker image. 

The goal is to produce a matrix that splits things apart such that operations are executed in parallel whenever possible.  You might be thinking that such a matrix has got to be a real headache to maintain.  And you’d be right.  That’s why we don’t maintain a statically defined matrix.  It’s generated for us dynamically at build time by a multi-purpose tool we’ve created called Image Builder. With this toolwe can execute a command that will consume a custom manifest file and outputs a matrix that is consumed by Azure Pipelines.  The manifest file contains a bunch of metadata about all the images we need to produce and includes information like the file paths to the Dockerfiles and the tags to be assigned to the images. 

We don’t just generate one matrix either.  Separate matrices are generated based on the platform and architecture.  For example, there are separate matrices for Linux/AMD64, Linux/ARM32, Windows Nano Server 1809/ARM32, etc.  The output from Image Builder labels each matrix with its corresponding platform/architecture identifier.  This identifier determines which build agents will run that particular matrix. As an example, the pipeline is configured to run the Linux/AMD64 matrix on the Hosted Ubuntu 1604 agent pool. 

Build Stage 

The build stage of the pipeline is responsible for building the Docker imagesThere are 64 jobs that are executed which account for the different platform and product version combinations as well as image dependenciesExamples of job names include “Build-2.2-aspnet-Windows-NanoServer1809-AMD64”, “Build-2.1-runtime-deps-graph-Linux-bionic-ARM32v7”, and “Build-3.0-sdk-Linux-bionic-AMD64”. 

The first step of this process is to call Image Builder to generate the build matrices.  Each matrix produces a set of jobs that build the set of Docker images as described by their portion of the matrix.  Remember the imageBuilderPaths variable contained in the matrix example mentioned earlier? This value is fed into Image Builder so that it knows which Docker images it should buildIt also uses the metadata in the manifest file to know which tags should be defined for these images. This includes the definition of simple tags (platform-specific and map to a single image) and shared tags (not platform-specific and can map to multiple images). 

Because a build agent begins a job in a clean state and has no state from its previous run, there needs to be an external storage mechanism for the Docker images that are produced.  For that reason, each job pushes the images it has built to a staging location in an Azure Container Registry (ACR) so they can later be pulled by the agents running in the test stage and eventually published.  In some cases, a given image may be used by multiple test jobs so having it available to be pulled from an external source is necessary. 

Test Stage 

Now that all the images have been built it’s time to test them. This is done with a set of smoke tests that verify the basics, such as being able to create and build a project with the SDK image and run it with the runtime image. Even though these tests are very basic, they have sometimes caught product issues and enabled us to halt publishing a .NET Core update. 

Like the build stage, the test stage is split into a set of 34 jobs that run in parallelEach test job is responsible for testing a specific .NET Core version on a specific operating system version on a specific architecture.  Examples of job names include Test-2.1-Windows-NanoServer1809-AMD64”, Test-2.2-Linux-alpine3.9-AMD64and Test-3.0-Linux-bionic-ARM64v8.  Notice that the breakdown of jobs is different compared to the build stage as the tests have dependencies on images that are different than the build jobs. For example, even though an SDK image might be able to be built independently of the runtime image, both images are needed together in order to test them because of how our test scenarios are authoredThere are not separate jobs that test just the runtime image and just the SDK image; rather, there is one job that tests them both for a given platform/architecture/.NET version. That means each test job selectively pulls down only the images it requires from the staging location in ACR. 

Publish Stage 

Once it’s known that all the images are in a good state from the test stage, we can move on to publishing them to Microsoft Container Registry (MCR). Publishing runs relatively quickly (the entire stage only takes about 3 minutes) because the images are efficiently transferred from ACR to MCR within shared Azure infrastructure. MCR detects this transfer and makes the images available for public consumption. 

Included with publishing the images are a few other supplemental steps.  The first is to publish the image manifests to support multi-arch using the Docker manifest tool.  Next, the README files on Docker Hub are updated to reflect the latest content from the repo’s README files.  Lastly, a JSON file is updated that keeps track of metadata about the latest images that have been published.  This file serves several purposesone of which is to provide a way to determine when we need to re-build an image due to its base image being updated.  More on that in a future blog post. 

Conclusion 

It is a testament to the power and flexibility of Azure Pipelines to enable us to produce Docker images at the scale and breadth of platforms that we requireIf you’re interested in the nitty-gritty details, check out our pipeline infrastructure. 

What are the systems that you have in place for producing your organization’s Docker images?  Did this post spark any ideas on changes you could make to your process?  Let us know in the comments. And if you’re a consumer of our Docker images, let us know how we’re doing either in the comments or at our GitHub repo. 

Happy containerizing! 

The post How the .NET Team uses Azure Pipelines to produce Docker Images appeared first on .NET Blog.


Totally unsupported hacks – Add Windows Terminal to the Win+X Shortcut menu

$
0
0

You shouldn't do this and if you choose to do this you may hurt yourself or one of your beloved pets.

You have been warned.

The Windows+X hotkey has been around for many years as is a simple right-click style context list of Developer/Administrator stuff that your techies might need in the course of human events.

There's one obscure setting in Settings | Taskbar where you can set the main option for the Command Prompt to be replaced with PowerShell, although that was flipped to "on" by default many years ago.

Replace Command Prompt with PowerShell

I want Windows Terminal in that Win+X menu.

Fast Forward to a world with lots of alternative console hosts, Linux running on Windows natively, not to mention cross-platform open source PowerShell Core, AND the new open source Windows Terminal (that you can just go download right now in the Windows Store) we find ourselves in a middle place. We want to replace the default console with the Windows Terminal everywhere as the default but that's gonna be a while.

Until then, we can integrate the Windows Terminal into our lives in a few obvious ways.

  • Pin Windows Terminal to your taskbar
  • Train yourself to Win+R and run "wt" rather than "cmd.exe" at wt.exe is a shim that launches the store-based Windows Terminal.
  • Add Windows Terminal to the Win+X menu.

It is that last one that concerns me today.

The Win+X implementation is a totally bonkers thing that I just don't understand with its origins lost to the mist of forgotten time.

You can go check out C:UsersUSERNAMEAppDataLocalMicrosoftWindowsWinX and find it full of LNK files. Just drop yours in there, right? Well, I say nay nay!

They didn't want just anyone dropping stuff in there so to add a new application to Windows+X you need to:

  • Make or find a LNK file for your application.
    • BUT! Your lnk file can't (today?) be a LNK to a Windows Store app - more on that later. They appear to be ignored today.
  • Store a special hash in your LNK file per Rafael's excellent writeup here so that they are considered "Approved Links."
  • Make a new Group 4 folder in the WinX folder above OR update Group 3 and copy your link in there considering the numbering scheme.
    • Note the ordering in the registry at HKEY_LOCAL_MACHINESOFTWAREMicrosoftWindowsCurrentVersionShellCompatibilityInboxApp

OR

Here's my WinXGroup3 folder . Note the shortcut at the top there.

image

I wanted to find a link to the Windows Terminal but it's harder than it looks. I can't find a real LNK file anywhere on my system. BUT I was able to find a synthetic one and make a copy by going "Win+R" and running "shell:AppsFolder" which brings you to a magic not-a-folder folder.

Not a folder folder

That is a folder of lies. I tried making a copy of this LNK, moving it to my deskop, hashing it with Rafael's util but it's ignored, presumably because it's a Windows Store LNK. Instead, I'll head out to cmd.exe and type "where wt.exe" to find the wt.exe shim and make a link to that!

C:Usersscott>where wt.exe

C:UsersscottAppDataLocalMicrosoftWindowsAppswt.exe

These files are also lies, but lies of a another type. Zero byte lies.

Zero Byte Lies

Right-click wt.exe and Create Shortcut. Then drag that shortcut out of there and into somewhere else like your Desktop. You can then use hashlnk and move it to the WinX folder.

OR, you can use this scary and totally unsupported utility hosted at a questionable website that you have no business visiting. It's called Win+X Menu Editor and it was a chore to download. So much so that I'm going to hide a copy in my DropBox for the day in the near future when this utility and website disappear.

Be careful when you go download this utility, the site is full of scary links that say Download Now but they are all lies. You want the subtle text link that points to a ZIP file, just above the Donate button that says "Download Win+X Menu Editor."

In this utility you can add an item that points to your new WT.LNK file and it will use Rafael's code and copy the LNK file to the right place and re-number stuff if needed. Again, be careful as you never know. You might mess up your whole life with stuff like this. It worked for me.

Win+X Menu Editor

And there you go.

Windows Terminal in the WIN+X menu

Lovely. Now IMHO in some ideal future this should just happen out of the box, but until then it's nice to know I can do it myself.


Sponsor: Looking for a tool for performance profiling, unit test coverage, and continuous testing that works cross-platform on Windows, macOS, and Linux? Check out the latest JetBrains Rider!


© 2019 Scott Hanselman. All rights reserved.
     

Azure Marketplace new offers – Volume 42

$
0
0

We continue to expand the Azure Marketplace ecosystem. For this volume, 86 new offers successfully met the onboarding criteria and went live. See details of the new offers below:

Applications

360 VR Museum

360°VR Museum: The 360°VR Museum is a virtual exhibition platform that allows users to view HD 360-degree re-creations of local and international exhibitions where visitors can move around freely using a mouse or touch screen input. This application is available only in Korean.

Apache Airflow Helm Chart

Apache Airflow Helm Chart: Apache Airflow is a tool to express and execute workflows as directed acyclic graphs. It includes utilities to schedule tasks, monitor task progress, and handle task dependencies.

Apache Superset (Ubuntu)

Apache Superset (Ubuntu): Websoft9 Superset stack is a preconfigured, ready-to-run image for running the Apache Superset data exploration and visualization web application on Azure.

Ataccama ONE Data Quality Management

Ataccama ONE: Data Quality Management: Employ smart, automated metadata discovery algorithms to know the state of your data quality; empower data users to make smarter, more informed decisions; and prevent costly mistakes with Ataccama ONE.

Avid Media Composer Azure Test Drive

Avid Media Composer Azure Test Drive: Experience editing in the cloud with Avid Media Composer on Azure. This Test Drive includes one NV12 virtual machine with Avid Media Composer 2018.12, sample media, and Teradici Cloud Access software installed.

CallidusCloud WorkFlow

CallidusCloud Workflow: CallidusCloud Workflow includes everything you need to organize, automate, execute, and analyze business processes to connect people, data, and daily activities.

CentOS 6.10

CentOS 6.10: This secure, cost-efficient, and quick to deploy distribution of Linux is based on CentOS and provided by Northbridge Secure. Enjoy the power of Microsoft Azure from any device in a matter of hours.

Citrix ADC 13

Citrix ADC 13.0: Providing operational consistency and a smooth user experience, Citrix ADC is an enterprise-grade application delivery controller that delivers your applications quickly, reliably, and securely – with deployment and pricing flexibility to meet your unique needs.

Citynet

Citynet: Citynet is a monthly subscription-based SaaS application that enables cities to upload their unstructured city council data to Azure, where it's automatically and semantically indexed and made available for natural language querying.

cleverEAI by Sunato

cleverEAI by Sunato: cleverEAI monitors all BizTalk integration processes. View your workflows in real time, analyze, and reprocess failed instances immediately. This VM image contains a complete BizTalk environment, configured automatically by the cleverEAI installation package.

CMFlex Cloud ERP

CMFlex: The CMFlex SaaS solution can be operated in different browsers and devices via the web, allowing you to manage your business from anywhere with accurate, real-time information. This application is available only in Portuguese.

Compliant FileVision

Compliant FileVision: Compliant FileVision is a policy management solution that empowers you to implement consistent, efficient, and sustainable processes for managing the lifecycle of corporate policies and standards, incidents, service improvement requests, and procedures.

Data Protector

Data Protector: Micro Focus Data Protector is an enterprise-grade backup and DR solution for large, complex, heterogeneous IT environments. Built on a scalable architecture that combines security and analytics, it enables users to meet continuity needs reliably and cost-effectively.

FileMage Gateway

FileMage Gateway: FileMage Gateway is a secure cloud file transfer solution that seamlessly connects legacy SFTP, FTPS, and FTP protocols to Azure Blob Storage.

Forms Connect

Forms Connect: Forms Connect enables you to digitize paper processes by capturing images and data and storing them in Office 365. This solution is ideal for HR and finance teams looking to solve the challenges of capturing information from the field and moving it to Azure.

Global Product Authentication Service

Global Product Authentication Service: Global Product Authentication Service is an innovative cloud‐based brand protection, track-and-trace, and consumer engagement service that drives business value by addressing challenges organizations face when operating in global markets.

Graylog (Ubuntu)

Graylog (Ubuntu): Websoft9 Graylog stack is a preconfigured, ready-to-run image for running log systems on Azure. Graylog captures, stores, and enables real-time analysis of terabytes of machine data.

HealthCloud

HealthCloud: The HealthCloud platform enables organizations and partners to easily develop highly interoperable solutions across the healthcare value chain. Its API-driven methodology delivers consolidated health data and patient-centric records from a wide range of sources.

Hibun Information leakage Prevention

Hibun Information Leak Prevention Solution: Protect confidential data from various information leaks, including theft, loss of device, insider fraud, and information theft by targeted cyberattacks.

Hyperlex

Hyperlex: Hyperlex is a Software-as-a-Service solution for contract management and analysis with AI that identifies legal documents and their important information for retrieval, saving your organization considerable time and resources. This application is available only in French.

Hysolate for Privileged User Devices

Hysolate for Privileged User Devices: Privileged Access Workstations (PAWs) provide a dedicated operating system for sensitive tasks that is protected from attacks and threat vectors. Hysolate makes PAWs practical to adopt at scale without degrading productivity.

Hystax Backup and Disaster Recovery to Azure

Hystax Backup and Disaster Recovery to Azure: Hystax Backup and Disaster Recovery to Azure delivers consistent replication, storage-agnostic snapshots, and orchestration functionality with enterprise-grade recovery point objective and recovery time objective.

Imago-ai Intelligent Chatbot

Imago.ai Intelligent Chatbot: Intelligent Chatbot on Microsoft Azure includes an interactive chatbot interface allowing clients to plug into any digital media as well as a dashboard that combines user behaviors and history to provide business insights.

InnGage Citypoints

InnGage Citypoints: InnoWave’s InnGage Citypoints gamification application on Microsoft Azure recognizes and rewards citizens who adopt good citizenship practices.

Intellicus BI Server V18.1 (25 Users - Linux)

Intellicus BI Server V18.1 (25 Users - Linux): Intellicus BI Server on Microsoft Azure is an end-to-end self-service business intelligence platform that offers advanced reporting and analytics capabilities, a semantic layer, and integrated ETL capabilities.

Intellicus BI Server V18.1 (50 Users - Linux)

Intellicus BI Server V18.1 (50 Users - Linux): Intellicus BI Server on Microsoft Azure is an end-to-end self-service business intelligence platform that offers advanced reporting and analytics capabilities, a semantic layer, and integrated ETL capabilities.

Intellicus BI Server V18.1 (100 Users - Linux)

Intellicus BI Server V18.1 (100 Users - Linux): Intellicus BI Server on Microsoft Azure is an end-to-end self-service business intelligence platform that offers advanced reporting and analytics capabilities, a semantic layer, and integrated ETL capabilities.

Jamcracker CSB Service Provider Version 7.0.3

Jamcracker CSB Service Provider Version 7.0.3: This solution automates order management, provisioning, and billing and can be easily integrated to support enterprise ITSM, billing, ERP, and identity systems including Active Directory and Active Directory Federation Services.

Jenkins (Ubuntu)

Jenkins (Ubuntu): Jenkins is an automation server with a broad plugin ecosystem for supporting practically every tool as a part of the delivery pipeline. Websoft9 Jenkins stack is a preconfigured, ready-to-run image for running Jenkins on Azure.

Jenkins on Windows Server 2016

Jenkins on Windows Server 2016: Jenkins is a leading open source CI/CD server that enables the automation of building, testing, and shipping software projects. Jenkins on Windows Server 2016 includes all plugins needed to deploy any service to Azure.

KNIME Server Small

KNIME Server Small: KNIME Server, KNIME's flagship collaboration product, offers shared repositories, advanced access management, flexible execution, web enablement, and commercial support. Share data, nodes, metanodes, and workflows throughout your company.

Knowage Community Edition (Ubuntu)

Knowage Community Edition (Ubuntu): Websoft9 Knowage is a preconfigured, ready-to-run image for deployment Knowage on Azure. Knowage Community Edition includes all analytical capabilities and guarantees a full end user experience.

Lustre on Azure

Lustre on Azure: Lustre on Azure is a scalable, parallel file system built for high performance computing (HPC). It is ideally suited for dynamic, pay-as-you-go applications from rapid simulation and prototyping to peak HPC workloads.

Machine Translation

Machine Translation: Tilde Machine Translation offers custom systems to fit each client's needs, delivering human-like translations that help save time and money, facilitate processes, and maximize sales.

NGINX Plus Enterprise Edition

NGINX Plus Enterprise Edition: NGINX Plus brings enterprise-ready features such as application load balancing, monitoring, and advanced management to your Azure application stack, helping you deliver applications with the performance, security, and scale of Azure.

Odoo Community Edition (Ubuntu)

Odoo Community Edition (Ubuntu): Websoft9 Odoo stack is a preconfigured, ready-to-run image for Odoo on Azure. The Odoo suite of web-based, open source business apps includes CRM, website builder, e-commerce, warehouse management, project management, and more.

OMNIA Low-code Platform

OMNIA Low-code Platform: Model your applications using a business language based on economic theory, greatly reducing your product's development cycles from conception to deployment.

Omnia Retail

Omnia Retail: Omnia is a leading SaaS solution for integrated dynamic pricing and online marketing automation. It helps retailers regain control, save time, and drive profitable growth.

OXID eShop e-commerce platform

OXID eShop e-commerce platform: ESYON's OXID SaaS solution on Azure offers powerful, modern shop software with many out-of-the-box functions for B2B, B2C, and internationalization.

Package Be Cloud RGDP Azure - PIA

Package Be Cloud RGDP Azure - PIA: Designed to facilitate your compliance process, Be Cloud's tool can be adapted to your specific needs or to your business sector. This application is available only in French.

POINTR - Customer & Marketing Analytics

POINTR - Customer & Marketing Analytics: POINTR is a customer and marketing analytics application built using Microsoft Azure and Power BI. It delivers customer intelligence and actionable insights from personalized marketing campaigns via an intuitive interface.

Population Health Management Solution

Population Health Management Solution: BroadReach creates simple solutions to complex health challenges. By combining expert consulting and powered Vantage technologies, BroadReach gives clients the innovative edge to transform health outcomes.

Portability

Portability: Onecub is a personal data portability tool for the GDPR right to portability (article 20), providing companies with an all-in-one service to offer controlled, innovative portability to their clients.

Postgres Pro Enterprise Database 11

Postgres Pro Enterprise Database 11: Postgres Pro Standard Database comes with SQL and NoSQL support. Postgres Pro Enterprise Database contains more features on top of Postgres Pro Standard Database to work with large databases and process lots of transactions.

Power BI voor Exact Online

Power BI voor Exact Online: Power BI for Exact Online is a powerful business analysis application configured and optimized for Exact Online's business administration and accounting environment. This application is available only in the Netherlands.

Power BI voor Twinfield

Power BI voor Twinfield: Power BI for Twinfield is a powerful business analysis application configured and optimized for Twinfield's business administration and accounting environment. This application is available only in the Netherlands.

Realtime Sales Radar

Realtime Sales Radar: Track developments and sales figures of your online platforms in real time with the help of this HMS consulting service and data collection in the Azure cloud.

ReportServer on Ubuntu

ReportServer on Ubuntu: Websoft9 offers a preconfigured and ready-to-run image for ReportServer, a modern and versatile business intelligence (OSBI) platform, on Azure.

SentryOne Test

SentryOne Test: SentryOne Test (formerly LegiTest) is a comprehensive, automated data testing framework that allows you to test all your data-centric applications in an easy-to-use platform.

Service Management Automation X

Service Management Automation X: Micro Focus SMAX is an application suite for service and asset management, built from the ground up to include machine learning and analytics.

Snyk Cloud Security Platform

Snyk Cloud Security Platform: This Snyk solution lets developers securely use open source software while accelerating migration to Azure of micro-services and containerized and serverless workloads.

Social Intranet Analytics - with Netmind Core

Social Intranet Analytics - with Netmind Core: Get a detailed overview of the use, acceptance, multilocation collaboration, and interactions on your social intranet with Netmind Core from Mindlab.

sospes

sospes: Sospes allows staff to report workplace incidents (injuries, property damage, environmental hazards, security threats) and generates management and regulatory reports.

StoreHippo

StoreHippo: StoreHippo is a SaaS e-commerce platform used by customers across more than 15 countries and 35 business verticals. StoreHippo offers scalability and flexibility for next-gen businesses.

SyAudit for Medical Record Audits

SyAudit for Medical Record Audits: This solution from SyTrue scans medical records and highlights key data by record type to let auditors quickly validate findings through a modernized workflow.

Tidal Migrations -Premium Insights for Database

Tidal Migrations - Premium Insights for Database: Analyze your databases and uncover roadblocks to Azure cloud migration with this add-on to your Tidal Migrations subscription.

Trac - Issue Tracking System (Ubuntu)

Trac - Issue Tracking System (Ubuntu): This stack from Websoft9 is a preconfigured image for Trac on Azure. Trac is an enhanced wiki and issue tracking system for software development projects.

Unsupervised Anomaly Detection Module

Unsupervised Anomaly Detection Module: This IoT Edge Module (with Python) from BRFRame automatically categorizes dataset anomalies, eliminating manual work that can take time and lead to inaccuracies.

Video Inteligencia para Seguridad y Prevencion

Video Inteligencia para Seguridad y Prevención: This video analytics solution acts as the brain of a security system, enabling decision-making in real time. This application is available only in Spanish.

VM Explorer

VM Explorer: Micro Focus VM Explorer is an easy-to-use and reliable backup solution, offering fast VM and granular restore, replication, and verification of VMware vSphere and Microsoft Hyper-V environments.

winsafe

winsafe: Winsafe from Nextronic is an IoT dashboard platform that can locate static or mobile end-devices positioned in outdoor or indoor areas without a dedicated infrastructure.

Consulting Services

Advanced DevOps Automation with CI-CD 10-Day Imp

Advanced DevOps Automation with CI/CD: 10-Day Imp.: Leveraging InCycle’s Azure DevOps Accelerators, InCycle cloud architects will ensure customers realize modern CI/CD pipelines, IT governance, and minimum time to production.

App Modernization Implementation - 3-Week Imp

App Modernization Implementation - 3-Week Imp.: Based on InCycle’s proprietary Modern App Factory approach and Accelerators, InCycle’s Azure architects will analyze your environment, co-define your goals, and develop a cloud adoption strategy and roadmap.

Application Portfolio Assessment - Briefing 1-day

Application Portfolio Assessment – Briefing: 1-day: HCL Technologies' free one-day briefing ensures customers understand HCL’s Cloud Assessment Framework and how it performs assessment in a proven methodology for migration to Microsoft Azure.

Azure AI & Bots  2-Hr Assessment

Azure AI & Bots: 2-Hr Assessment: This Neudesic assessment will provide a recommendation on how Microsoft Azure can be used to meet a key business need with an AI-powered bot using Neudesic's agile, repeatable approach to accelerate delivery time and value.

Azure Architecture Assessment - 2-day workshop

Azure Architecture Assessment - 2-day workshop: In this assessment, Cloud Valley's cloud architects gather functional and operational requirements, see how they align with your current business goals, and propose a technological solution.

Azure back-up and DR workshop - 2.5 days

Azure back-up and DR workshop - 2.5 days: Acora's team will review your on-premises or cloud environment to provide a recommended approach for migrating to Azure Backup and Azure Site Recovery.

Azure Cloud Readiness 2-Week Assessment

Azure Cloud Readiness: 2-Week Assessment: Emtec evaluates business processes and technology infrastructure to assess current investments and identify potential areas that are ripe for successful cloud migration and adoption.

Azure Management Services 10-Wk Implementation

Azure Management Services: 10-Wk Implementation: Catapult Systems' Azure Management Services allow users to continuously optimize their cloud environment. In this assessment, Catapult helps you pick the option that best fits the objectives for your cloud environment.

Azure Migration - 2 Day Assessment

Azure Migration - 2 Day Assessment: This Third I assessment is driven by an in-depth review of your existing solution architecture to help identify a suitable modern data warehouse to match your solution needs.

Azure Migration 2.5 day Workshop

Azure Migration: 2.5 day Workshop: Acora will review your technical capability and readiness for a migration to Azure and provide recommendations on the cost, resources, and time needed to move with minimal downtime.

Citrix Workspace on Azure 5 Day Proof of Concept

Citrix Workspace on Azure: 5 Day Proof of Concept: Get a custom proof of concept of Citrix Cloud Workspace Integrated with Microsoft Azure along with design and cost estimates to enable your organization to move forward with the solution.

Cloud Foundation Assessment 6 Wk Assessment

Cloud Foundation Assessment: 6 Wk Assessment: This Anglepoint assessment will help you optimize your environment before you migrate to the cloud to ensure the most cost-effective solution that maximizes throughput and availability.

Cloud Journey Assessment- 4 Weeks

Cloud Journey Assessment - 4 Weeks: In this four-week assessment, Dedalus will determine the Azure dependencies for each of your applications to prioritize which applications and systems are the best candidates for migration.

Cloud Migration -8 week implementation

Cloud Migration - 8 week implementation: CloudOps will help develop an Azure migration and cloud-native strategy that meets your current workload and security requirements while enabling you to scale to the future needs of your business.

Cloud Optimized WAN Engagement 4-day Assessment

Cloud Optimized WAN Engagement: 4-day Assessment: Equinix will help develop a customized WAN strategy focusing on improved latency, performance, security, and flexibility while providing clear insights into your expected return on investment or total cost of ownership.

DataDebut Cloud Analytics 5-Day Proof of Concept

DataDebut Cloud Analytics: 5-Day Proof of Concept: This POC engagement helps boost your understanding of cloud concepts and offerings so that you can identify potential future value of enhancing your data platform, define your path to cloud-native data analytics, and more.

DataGuide Cloud Analytics Intro 1-Day Assessment

DataGuide Cloud Analytics Intro: 1-Day Assessment: Intended for solution architects, project and program managers, and key stakeholders, this free engagement gives your organization an overview of Azure data analytics and how they can greatly enhance your data estate.

DataVision Project Discovery 5-Day Assessment

DataVision Project Discovery: 5-Day Assessment: This Azure data project discovery provides in-depth analysis, design, and planning, enabling you to employ future-proof architectures, identify the best approach for the rationalization of existing data assets, and more.

Equinix Cloud Exchange 2-day Implementation

Equinix Cloud Exchange: 2-day Implementation: Equinix's Cloud Enablement services make it easy to complete the setup and configuration necessary to activate your connection to the Azure cloud.

ExpressRoute Connectivity Strategy 3-day Workshop

ExpressRoute Connectivity Strategy: 3-day Workshop: This Equinix workshop empowers customers to implement an Azure ExpressRoute connectivity strategy tailored for their specific needs and is a fast-track path to optimized Azure consumption.

Onboarding Services - USA 4 weeks implementation

Onboarding Services - USA: 4 weeks implementation: Anunta's Onboarding Services on Azure ensure end-to-end management of virtual desktop workload transition to the cloud, including implementation, Active Directory configuration, image creation, app configuration, and more.

Palo Alto Test Drive on Azure 1-2 Day Workshop

Palo Alto Test Drive on Azure: 1/2 Day Workshop: See how easy it is to securely extend your corporate datacenter to Azure using Palo Alto Networks Next Generation VM-Series firewalls with security features to protect applications and data from threats.

Predica Azure Migration 5-Day Proof of Concept

Predica Azure Migration 5-Day Proof of Concept: In this cloud migration proof of concept, Predica will guide you through the process of workload migration, ensuring you get the most from your Microsoft Azure implementation.

Security & Compliance Assessment - 4 Wk Assessment

Security & Compliance Assessment - 4 Wk Assessment: This Logicworks offering will help you assess your Azure environment against compliance frameworks and receive automated reporting, vulnerability scanning, and a remediation roadmap to help you improve security.

Spyglass-Azure Security- 10 Wk Implementation

Spyglass/Azure Security - 10 Wk. Implementation: Catapult's Spyglass service jump-starts your cloud security by deploying Microsoft's security tools and leveraging security experts, best practices, and centralized security dashboards.

Announcing TypeScript 3.6

$
0
0

Today we’re happy to announce the availability of TypeScript 3.6!

For those unfamiliar, TypeScript is a language that builds on JavaScript by adding optional static types. These typescan be checked by the TypeScript compiler to catch common errors in your programs (like misspelling properties and calling functions the wrong way). Tools like the TypeScript compiler and Babel can then be used to transform TypeScript code that uses all the latest and greatest standard features to standards-compliant ECMAScript code that will work on any browser or runtime (even much older ones that support ES3 or ES5).

TypeScript goes beyond just type-checking and new ECMAScript features though. Editor tooling is considered a first-class citizen and is an integral part of the TypeScript project, powering things like code completions, refactorings, and quick fixes in a series of different editors. In fact, if you’ve already edited JavaScript files in Visual Studio or Visual Studio Code, that experience is actually provided by TypeScript, so you might’ve already been using TypeScript without knowing it!

To learn more, you can check out the TypeScript website. But to just get started, you can get it through NuGet, or use npm with the following command:

npm install -g typescript

You can also get editor support by

Support for other editors will likely be rolling in in the near future.

Let’s explore what’s in 3.6!

Stricter Generators

TypeScript 3.6 introduces stricter checking for iterators and generator functions. In earlier versions, users of generators had no way to differentiate whether a value was yielded or returned from a generator.

function* foo() {
    if (Math.random() < 0.5) yield 100;
    return "Finished!"
}

let iter = foo();
let curr = iter.next();
if (curr.done) {
    // TypeScript 3.5 and prior thought this was a 'string | number'.
    // It should know it's 'string' since 'done' was 'true'!
    curr.value
}

Additionally, generators just assumed the type of yield was always any.

function* bar() {
    let x: { hello(): void } = yield;
    x.hello();
}

let iter = bar();
iter.next();
iter.next(123); // oops! runtime error!

In TypeScript 3.6, the checker now knows that the correct type for curr.value should be string in our first example, and will correctly error on our call to next() in our last example. This is thanks to some changes in the Iterator and IteratorResult type declarations to include a few new type parameters, and to a new type that TypeScript uses to represent generators called the Generator type.

The Iterator type now allows users to specify the yielded type, the returned type, and the type that next can accept.

interface Iterator<T, TReturn = any, TNext = undefined> {
    // Takes either 0 or 1 arguments - doesn't accept 'undefined'
    next(...args: [] | [TNext]): IteratorResult<T, TReturn>;
    return?(value?: TReturn): IteratorResult<T, TReturn>;
    throw?(e?: any): IteratorResult<T, TReturn>;
}

Building on that work, the new Generator type is an Iterator that always has both the return and throw methods present, and is also iterable.

interface Generator<T = unknown, TReturn = any, TNext = unknown>
        extends Iterator<T, TReturn, TNext> {
    next(...args: [] | [TNext]): IteratorResult<T, TReturn>;
    return(value: TReturn): IteratorResult<T, TReturn>;
    throw(e: any): IteratorResult<T, TReturn>;
    [Symbol.iterator](): Generator<T, TReturn, TNext>;
}

To allow differentiation between returned values and yielded values, TypeScript 3.6 converts the IteratorResult type to a discriminated union type:

type IteratorResult<T, TReturn = any> = IteratorYieldResult<T> | IteratorReturnResult<TReturn>;

interface IteratorYieldResult<TYield> {
    done?: false;
    value: TYield;
}

interface IteratorReturnResult<TReturn> {
    done: true;
    value: TReturn;
}

In short, what this means is that you’ll be able to appropriately narrow down values from iterators when dealing with them directly.

To correctly represent the types that can be passed in to a generator from calls to next(), TypeScript 3.6 also infers certain uses of yield within the body of a generator function.

function* foo() {
    let x: string = yield;
    console.log(x.toUpperCase());
}

let x = foo();
x.next(); // first call to 'next' is always ignored
x.next(42); // error! 'number' is not assignable to 'string'

If you’d prefer to be explicit, you can also enforce the type of values that can be returned, yielded, and evaluated from yield expressions using an explicit return type. Below, next() can only be called with booleans, and depending on the value of done, value is either a string or a number.

/**
 * - yields numbers
 * - returns strings
 * - can be passed in booleans
 */
function* counter(): Generator<number, string, boolean> {
    let i = 0;
    while (true) {
        if (yield i++) {
            break;
        }
    }
    return "done!";
}

var iter = counter();
var curr = iter.next()
while (!curr.done) {
    console.log(curr.value);
    curr = iter.next(curr.value === 5)
}
console.log(curr.value.toUpperCase());

// prints:
//
// 0
// 1
// 2
// 3
// 4
// 5
// DONE!

For more details on the change, see the pull request here.

More Accurate Array Spread

In pre-ES2015 targets, the most faithful emit for constructs like for/of loops and array spreads can be a bit heavy. For this reason, TypeScript uses a simpler emit by default that only supports array types, and supports iterating on other types using the --downlevelIteration flag. Under this flag, the emitted code is more accurate, but is much larger.

--downlevelIteration being off by default works well since, by-and-large, most users targeting ES5 only plan to use iterative constructs with arrays. However, our emit that only supported arrays still had some observable differences in some edge cases.

For example, the following example

[...Array(5)]

is equivalent to the following array.

[undefined, undefined, undefined, undefined, undefined]

However, TypeScript would instead transform the original code into this code:

Array(5).slice();

This is slightly different. Array(5) produces an array with a length of 5, but with no defined property slots!

1 in [undefined, undefined, undefined] // true
1 in Array(3) // false

And when TypeScript calls slice(), it also creates an array with indices that haven’t been set.

This might seem a bit of an esoteric difference, but it turns out many users were running into this undesirable behavior. Instead of using slice() and built-ins, TypeScript 3.6 introduces a new __spreadArrays helper to accurately model what happens in ECMAScript 2015 in older targets outside of --downlevelIteration. __spreadArrays is also available in tslib (which is worth checking out if you’re looking for smaller bundle sizes).

For more information, see the relevant pull request.

Improved UX Around Promises

Promises are one of the most common ways to work with asynchronous data nowadays. Unfortunately, using a Promise-oriented API can often be confusing for users. TypeScript 3.6 introduces some improvements for when Promises are mis-handled.

For example, it’s often very common to forget to .then() or await the contents of a Promise before passing it to another function. TypeScript’s error messages are now specialized, and inform the user that perhaps they should consider using the await keyword.

interface User {
    name: string;
    age: number;
    location: string;
}

declare function getUserData(): Promise<User>;
declare function displayUser(user: User): void;

async function f() {
    displayUser(getUserData());
//              ~~~~~~~~~~~~~
// Argument of type 'Promise<User>' is not assignable to parameter of type 'User'.
//   ...
// Did you forget to use 'await'?
}

It’s also common to try to access a method before await-ing or .then()-ing a Promise. This is another example, among many others, where we’re able to do better.

async function getCuteAnimals() {
    fetch("https://reddit.com/r/aww.json")
        .json()
    //   ~~~~
    // Property 'json' does not exist on type 'Promise<Response>'.
    //
    // Did you forget to use 'await'?
}

The intent is that even if a user is not aware of await, at the very least, these messages provide some more context on where to go from here.

In the same vein of discoverability and making your life easier – apart from better error messages on Promises, we now also provide quick fixes in some cases as well.

Quick fixes being applied to add missing 'await' keywords.

For more details, see the originating issue, as well as the pull requests that link back to it.

Better Unicode Support for Identifiers

TypeScript 3.6 contains better support for Unicode characters in identifiers when emitting to ES2015 and later targets.

const 𝓱𝓮𝓵𝓵𝓸 = "world"; // previously disallowed, now allowed in '--target es2015'

import.meta Support in SystemJS

TypeScript 3.6 supports transforming import.meta to context.meta when your module target is set to system.

// This module:

console.log(import.meta.url)

// gets turned into the following:

System.register([], function (exports, context) {
  return {
    setters: [],
    execute: function () {
      console.log(context.meta.url);
    }
  };
});

get and set Accessors Are Allowed in Ambient Contexts

In previous versions of TypeScript, the language didn’t allow get and set accessors in ambient contexts (like in declare-d classes, or in .d.ts files in general). The rationale was that accessors weren’t distinct from properties as far as writing and reading to these properties; however, because ECMAScript’s class fields proposal may have differing behavior from in existing versions of TypeScript, we realized we needed a way to communicate this different behavior to provide appropriate errors in subclasses.

As a result, users can write getters and setters in ambient contexts in TypeScript 3.6.

declare class Foo {
    // Allowed in 3.6+.
    get x(): number;
    set x(val: number): void;
}

In TypeScript 3.7, the compiler itself will take advantage of this feature so that generated .d.ts files will also emit get/set accessors.

Ambient Classes and Functions Can Merge

In previous versions of TypeScript, it was an error to merge classes and functions under any circumstances. Now, ambient classes and functions (classes/functions with the declare modifier, or in .d.ts files) can merge. This means that now you can write the following:

export declare function Point2D(x: number, y: number): Point2D;
export declare class Point2D {
    x: number;
    y: number;
    constructor(x: number, y: number);
}

instead of needing to use

export interface Point2D {
    x: number;
    y: number;
}
export declare var Point2D: {
    (x: number, y: number): Point2D;
    new (x: number, y: number): Point2D;
}

One advantage of this is that the callable constructor pattern can be easily expressed while also allowing namespaces to merge with these declarations (since var declarations can’t merge with namespaces).

In TypeScript 3.7, the compiler will take advantage of this feature so that .d.ts files generated from .js files can appropriately capture both the callability and constructability of a class-like function.

For more details, see the original PR on GitHub.

APIs to Support --build and --incremental

TypeScript 3.0 introduced support for referencing other and building them incrementally using the --build flag. Additionally, TypeScript 3.4 introduced the --incremental flag for saving information about previous compilations to only rebuild certain files. These flags were incredibly useful for structuring projects more flexibly and speeding builds up. Unfortunately, using these flags didn’t work with 3rd party build tools like Gulp and Webpack. TypeScript 3.6 now exposes two sets of APIs to operate on project references and incremental program building.

For creating --incremental builds, users can leverage the createIncrementalProgram and createIncrementalCompilerHost APIs. Users can also re-hydrate old program instances from .tsbuildinfo files generated by this API using the newly exposed readBuilderProgram function, which is only meant to be used as for creating new programs (i.e. you can’t modify the returned instance – it’s only meant to be used for the oldProgram parameter in other create*Program functions).

For leveraging project references, a new createSolutionBuilder function has been exposed, which returns an instance of the new type SolutionBuilder.

For more details on these APIs, you can see the original pull request.

New TypeScript Playground

The TypeScript playground has received a much-needed refresh with handy new functionality! The new playground is largely a fork of Artem Tyurin‘s TypeScript playground which community members have been using more and more. We owe Artem a big thanks for helping out here!

The new playground now supports many new options including:

  • The target option (allowing users to switch out of es5 to es3, es2015, esnext, etc.)
  • All the strictness flags (including just strict)
  • Support for plain JavaScript files (using allowJS and optionally checkJs)

These options also persist when sharing links to playground samples, allowing users to more reliably share examples without having to tell the recipient “oh, don’t forget to turn on the noImplicitAny option!”.

In the near future, we’re going to be refreshing the playground samples, adding JSX support, and polishing automatic type acquisition, meaning that you’ll be able to see the same experience on the playground as you’d get in your personal editor.

As we improve the playground and the website, we welcome feedback and pull requests on GitHub!

Semicolon-Aware Code Edits

Editors like Visual Studio and Visual Studio Code can automatically apply quick fixes, refactorings, and other transformations like automatically importing values from other modules. These transformations are powered by TypeScript, and older versions of TypeScript unconditionally added semicolons to the end of every statement; unfortunately, this disagreed with many users’ style guidelines, and many users were displeased with the editor inserting semicolons.

TypeScript is now smart enough to detect whether your file uses semicolons when applying these sorts of edits. If your file generally lacks semicolons, TypeScript won’t add one.

For more details, see the corresponding pull request.

Smarter Auto-Imports

JavaScript has a lot of different module syntaxes or conventions: the one in the ECMAScript standard, the one Node already supports (CommonJS), AMD, System.js, and more! For the most part, TypeScript would default to auto-importing using ECMAScript module syntax, which was often inappropriate in certain TypeScript projects with different compiler settings, or in Node projects with plain JavaScript and require calls.

TypeScript 3.6 is now a bit smarter about looking at your existing imports before deciding on how to auto-import other modules. You can see more details in the original pull request here.

Breaking Changes

Class Members Named "constructor" Are Now Constructors

As per the ECMAScript specification, class declarations with methods named constructor are now constructor functions, regardless of whether they are declared using identifier names, or string names.

class C {
    "constructor"() {
        console.log("I am the constructor now.");
    }
}

A notable exception, and the workaround to this break, is using a computed property whose name evaluates to "constructor".

class D {
    ["constructor"]() {
        console.log("I'm not a constructor - just a plain method!");
    }
}

DOM Updates

Many declarations have been removed or changed within lib.dom.d.ts. This includes (but isn’t limited to) the following:

  • The global window is no longer defined as type Window – instead, it is defined as type Window & typeof globalThis. In some cases, it may be better to refer to its type as typeof window.
  • GlobalFetch is gone. Instead, use WindowOrWorkerGlobalScope
  • Certain non-standard properties on Navigator are gone.
  • The experimental-webgl context is gone. Instead, use webgl or webgl2.

If you believe a change has been made in error, please file an issue!

JSDoc Comments No Longer Merge

In JavaScript files, TypeScript will only consult immediately preceding JSDoc comments to figure out declared types.

/**
 * @param {string} arg
 */
/**
 * oh, hi, were you trying to type something?
 */
function whoWritesFunctionsLikeThis(arg) {
    // 'arg' has type 'any'
}

Keywords Cannot Contain Escape Sequences

Previously keywords were allowed to contain escape sequences. TypeScript 3.6 disallows them.

while (true) {
    u0063ontinue;
//  ~~~~~~~~~~~~~
//  error! Keywords cannot contain escape characters.
}

What’s Next?

To get an idea of what the team will be working on, check out the 6-month roadmap for July to December of this year.

As always, we hope that this release of TypeScript makes coding a better experience and makes you happier. If you have any suggestions or run into any problems, we’re always interested so feel free to open an issue on GitHub.

Happy Hacking!

– Daniel Rosenwasser and the TypeScript Team

The post Announcing TypeScript 3.6 appeared first on TypeScript.

Track the health of your disaster recovery with Log Analytics

$
0
0

Once you adopt Azure Site Recovery, monitoring of your setup can become a very involved exercise. You’ll need to ensure that the replication for all protected instances continue and that virtual machines are always ready for failover. While Azure Site Recovery solves this need by providing point-in-time health status, active health alerts, and the latest 72 hour trends, it still needs several man hours to keep track and analyze these signals. The problem is aggravated when the number of protected instances grow. It often needs a team of disaster recovery operators to do this for hundreds of virtual machines.

We have heard through multiple feedback forums that customers receive too many alerts. Even with these alerts, long-term corrective actions were difficult to identify as there is no single pane to look at historical data. Customers have reached out to us with a need to track various metrics such as recovery point objective (RPO) health over time, data change rate (churn) of machine disks over time, current state of the virtual machine, and test failover status as some of the basic requirements. It is also important for customers to be notified for alerts as per your enterprise’s business continuity and disaster recovery compliance needs.

The integrated solution with logs in Azure Monitor and Log Analytics

Azure Site Recovery brings to you an integrated solution for monitoring and advanced alerting powered by logs in Azure Monitor. You can now send the diagnostic logs from the Site Recovery vault to a workspace in Log Analytics. The logs are, also known as Azure Monitor logs, visible in the Create diagnostic setting blade as of today.

The logs are generated for Azure Virtual Machines, as well as any VMware or physical machines protected by Azure Site Recovery.

Diagnostic Settings

Once the data starts feeding in the workspace, the logs can be queried using Kusto Query Language to produce historical trends, point-in-time snapshots, as well as disaster recovery admin level and executive level dashboards for a consolidated view. The data can be fed into a workspace from multiple Site Recovery vaults. Below are a few example use cases that can be currently solved with this integration:

  • Snapshot of replication health of all protected instances in a pie chart
  • Trend of RPO of a protected instance over time
  • Trend of data change rate of all disks of a protected instance over time
  • Snapshot of test failover status of all protected instances in a pie chart
  • Summarized view as shown in the Replicated Items blade
  • Alert if status of more than 50 protected instances turns critical
  • Alert if RPO exceeds beyond 30 minutes for more than 50 protected instances
  • Alert if the last disaster recovery drill was conducted more than 90 days ago
  • Alert if a particular type of Site Recovery job fails

Sample use cases

Sample Use Cases

These are just some examples to begin with. Dig deeper into the capability with many more such examples captured in the documentation “Monitor Site Recovery with Azure Monitor Logs.” Dashboard solutions can also be built on this data to fully customize the way you monitor your disaster recovery setup. Below is a sample dashboard:

Dashboard Solution in Log Analytics

Azure natively provides you the high availability and reliability for your mission-critical workloads, and you can choose to improve your protection and meet compliance requirements using the disaster recovery provided by Azure Site Recovery. Getting started with Azure Site Recovery is easy, check out pricing information and sign up for a free Microsoft Azure trial. You can also visit the Azure Site Recovery forum on MSDN for additional information and to engage with other customers.

Enabling DevSecOps with Synopsys and Microsoft

$
0
0

This article was contributed by Ed Wong, Business Development Director at Synopsys

Since 2014, the strategic partnership between Microsoft and Synopsys has enabled development teams to write better, more secure code before it is released to production. With our integrations, development teams can easily manage risks throughout the Software Development Life Cycle (SDLC) by using Synopsys’ industry-leading application security testing solutions in Microsoft’s DevOps solutions, including Azure DevOps and Visual Studio.

In the cloud computing era, Synopsys and Microsoft have extended this collaboration further, providing developers a clear solution for security and quality in cloud software—whether internally developed, from a third party, or open source. Synopsys and Microsoft deliver security to DevOps with these joint integrations:

  • Synopsys Detect for Azure DevOps supports native scanning in Azure DevOps for static code analysis (SAST) and open source software detection (SCA).
    • Run Coverity SAST as part of your build pipeline to identify security and quality issues.
    • Invoke Black Duck SCA to perform a component scan during the build pipeline.
    • View comprehensive Coverity SAST and Black Duck SCA scan results to identify and prioritize any software issues.
  • Code Sight for Visual Studio enables developers to find bugs and quality defects inline while coding.
  • Black Duck for Visual Studio identifies security and license compliance issues for open source packages.
  • Seeker for Azure DevOps monitors web app interactions in the background during functional, quality assurance, and user acceptance testing to quickly process hundreds of thousands of web application requests, providing real-time web vulnerability results with higher accuracy than traditional dynamic scanning tools.

By tightly integrating the Synopsys suite of application security solutions with Azure DevOps and Visual Studio, development teams can secure all application code—regardless of where it’s built or deployed.

Synopsys + Microsoft = Secure DevOps for Azure Customers

The partnership between Synopsys and Microsoft delivers a seamless, integrated toolset to build and deploy secure apps faster. Synopsys solutions can be deployed on-premises or in Azure, and can be invoked from Azure DevOps (including Azure DevOps Server), and other CI/CD tools.

By using Synopsys’ industry-leading application security testing solutions, developers can automate security in their Microsoft ecosystem, while maintaining productivity and managing risk in the SDLC.

Learn more in our free webinar

Interested in learning more about our partnership to build and deploy secure apps in the cloud?

Synopsys and Microsoft are organizing a joint webinar “Automating Pipeline Security With Synopsys and Azure DevOps” on September 12, 2019 at 12:00 pm EDT, with Sasha Rosenbaum (@DivineOps) and Tomas Gonzalez (@SW_Integrity). Sign up today for free.

You can also meet Synopsys at Booth 1801 at Microsoft Ignite, November 4–8 in Orlando, Florida.

The post Enabling DevSecOps with Synopsys and Microsoft appeared first on Azure DevOps Blog.

Viewing all 5971 articles
Browse latest View live


<script src="https://jsc.adskeeper.com/r/s/rssing.com.1596347.js" async> </script>