Quantcast
Channel: Category Name
Viewing all 5971 articles
Browse latest View live

Top Stories from the Microsoft DevOps Community – 2019.08.30

$
0
0

Sasha has been out at DevOpsDays Chicago this week so my turn to pick the highlights from the amazing Azure DevOps community across my feeds. Worth mentioning that while DevOpsDays Chicago has finished, there are plenty of local DevOpsDays happening across the globe. Next week it’s the turn of Cape Town where Rory Preddy will be showing you how to integrated Accessibility Insights into your CI/CD pipeline in Azure. Remember, DevOps is about improving the flow of value to all your end users not just the temporarily unimpaired. Building accessibility into your pipelines is a great way to make sure your team see it as adding value rather than make it feel like just a compliance checkbox for them.

PyTest Extension Updates

The irrepressible Anthony Shaw has updated his fantastic PyTest extension that adds rich test visualization capabilities to Azure Pipelines for Python users. The latest update brings lots of improvements into the test report. You now see the rest run, the time taken for each test module and for each specific test. Docstring support has been improved as well allowing you to see what the test module does and you get to see docstrings for the test function inside the UI.Parametrized test cases cloned from the properties of the host test function. If you supply a reason when using the pytest.mark.skipit marker that that is also passed through into the report. Any keyword filters, market filters or file path filters are shown along with the actual command used to run pytest.

Azure Pipelines and Python Virtual Environments

If you are doing Python projects, when testing them you will often be using Virtual Environment and you might have struggled getting them to work in your CI/CD Pipelines. In this short post, Dirk Avery explains how to do this correctly inside of Azure Pipelines.

Migrating from Jira to Azure DevOps

While we work well with Jira and you can have excellent traceability from Azure Pipelines through something like Jenkins and into Jira, we’re seeing more and more teams looking at migrating from Jira into Azure Boards. Chevron have an excellent case study on their experiences doing this here. Peter Rombouts has published an interesting post documenting his teams experiences moving from Jira to Azure DevOps while making use of the excelent (and open source) Jira to Azure DevOps work item migration tool from the clever folks at Solidify.

How the .NET Team produces Docker Images

We’ve all seen the basic demos on how to create docker images from Azure Pipelines – it’s easy right? Just run docker build & docker push and you are done? What about when you are building the Docker images used for 7 versions of Linux across 3 different distributions, 4 versions of Windows, 3 supported versions of your software and support for x64, AMD32 + AMD64? Soon you end up with over 100 images with over 300 tags. That’s exactly the challenge faced by the .NET Team. Matt Thalman has a fantastic post where he explains how his team create the Docker images for .NET – and the great part is that their YAML pipeline is all open source and available on GitHub so you can follow along in code with Matt’s excellent post as a guide. (Spoiler alert: the matrix tag saves the day again)

Pipelines for PowerShell GUI with externally managed data

Christof Van Geendertaelen shares a nice approach he took to create a easily maintainable administration UI where we has separated responsibility of concerns of the UI from the data it uses and also created an Azure Pipeline to ensure maintenance of the script is done using CI/CD. I’m personally always feeling like I’m dabbling with PowerShell so it’s great to learn more from the experts, and this is a really interesting approach that hopefully really sets up his customer for success in maintaining the script after he has left.

Deploying to a Particle Internet Button using Azure DevOps

Anyone that knows me knows that I have a penchant for IoT. From Brian the Build Bunny to my Raspberry Pi powered pumpkin to Das Deployer. I love hooking up the real world into the DevOps pipeline. However doing these types of projects barely qualifies as IoT as the Raspberry Pi’s I tend to use are such powerful ARM based devices. Dan Benitah has been posting on Hackster.io about building a pipeline to deploy to his Particle based devices and it’s worth a read for a real example of IoT deployments.

Finally – we’re about to hit the fall conference season, as well as DevOpsDays events you’ll see folks from the Azure DevOps team at a load of events including WinOps, All Things Open, Code.Talks, All Day DevOps, Microsoft Ignite and GitHub Universe. Feel free to stop them and say ‘Hi’ – we’re often known to have stickers with us!

If you’ve written an article about Azure DevOps or find some great content about DevOps on Azure, please share it with us using the #AzureDevOps hashtag on Twitter!

The post Top Stories from the Microsoft DevOps Community – 2019.08.30 appeared first on Azure DevOps Blog.


Azure IoT Tools August Update: IoT Plug and Play tooling public preview and more!

$
0
0

Welcome to the August update of Azure IoT Tools! 

In this release of August, we have made several feature and improvements! 

IoT Plug and Play tooling public preview 

On August 22, 2019, we released a preview of IoT Plug and PlayIoT solution developers can start using Azure IoT Central or Azure IoT Hub to build solutions that integrate seamlessly with IoT devices enabled with IoT Plug and Play. IoT Device partners will also benefit from investments in developer tooling to support IoT Plug and Play. The Azure IoT Tools extension for Visual Studio Code adds IntelliSense for easy authoring of IoT Play and Play device models. It also enables code generation to create C device code that implements the IoT Plug and Play model and provides the logic to connect to IoT Central, without customers having to worry about provisioning or integration with IoT Device SDKs. The new tooling capabilities also integrates with the model repository service for seamless publishing of device models. For details, checkout this announcement for more information about IoT Plug and Play. You could also checkout this quickstart guide on how to use a device capability model to create an IoT Plug and Play device. 

Arm64 preview in Azure IoT Tools extension for Visual Studio Code 

With the release of IoT Edge 1.0.8Azure IoT Edge is supported on ARM64 IoT Edge devices. Last month, we have released the support of developing and debugging ARM64 IoT Edge C# custom modules in Visual Studio Code. In this month, we are glad to share with you that we have added support for more languages including C, Node.js and JavaFor more details, you could checkout this blog post for more information. 

Try it out 

Please don’t hesitate to give it a try! If you have any feedback, feel free to reach us at https://github.com/microsoft/vscode-azure-iot-tools/issues. We will continuously improve our IoT developer experience to empower every IoT developers on the planet to achieve more! 

The post Azure IoT Tools August Update: IoT Plug and Play tooling public preview and more! appeared first on The Visual Studio Blog.

Update on removing Flash from Microsoft Edge and Internet Explorer

$
0
0

In 2017, we published a roadmap to remove Adobe Flash from Microsoft Edge and Internet Explorer by 2020. Since that post, we announced our intent to build Microsoft Edge on the Chromium open source project. In this post, we will provide an update on what to expect for the Flash retirement in Microsoft browsers.

Here’s what you can expect for each Microsoft browser:

In the next version of Microsoft Edge (built on Chromium), we will continue to retire Flash in the same timeframe as other Chromium based browsers. You can learn more of that timeline in this blog post. Flash will initially be disabled, and the user will need to re-enable Flash on a site-by-site basis; Flash will be completely removed from the browser towards the end of 2020. Group policies are available for enterprise admins and IT pros to change the Flash behavior prior to that date.

For both the in-market version of Microsoft Edge (built on EdgeHTML) and Internet Explorer 11, the current experience will continue as-is through 2019. We plan to fully remove Flash by December 2020.

Colleen Williams, Senior Program Manager, Microsoft Edge

The post Update on removing Flash from Microsoft Edge and Internet Explorer appeared first on Microsoft Edge Blog.

Deploying a MSDeploy-packaged Web application to a Linux Azure App Service with Azure DevOps

$
0
0

For bizarre and unknown historical reasons, when using MSDeploy to make a ZIP package to upload a website to a web server you get a massively deep silly path like yada/yada/C_C/Temp/package/WebApplication1/obj/Release/Package/PackageTmp. I use .NET Core so I usually do a "dotnet publish" and get a sane path for my build artifacts in my CI/CD (Continues Integration/Continuous Deployment) pipeline.

I'm using the original pipeline editor on free Azure DevOps (I'm still learning DevOps YAML for this, and this visual pipeline editor IMHO is more friendly for getting started.

However, I'm using a "Visual Studio Build" task which is using MSDeploy and these MSBuild arguments.

/p:DeployOnBuild=true 

/p:WebPublishMethod=Package
/p:PackageAsSingleFile=true
/p:SkipInvalidConfigurations=true
/p:PackageLocation="$(build.artifactstagingdirectory)\"

Azure Dev OpsLater on in the process I'm taking this package/artifact - now named "drop.zip" and I'm publishing it to Azure App Service.

I'm using the "Azure App Service Deploy" task in the DevOps release pipeline and it works great when publishing to a Windows Azure App Service Plan. Presumably because it's using, again, MSDeploy and it knows about these folders.

However, I wanted to also deploy to a Linux Azure App Service. Recently there was a massive (near 35%) price drop for Premium App Services. I'm running an S1 and I can move to a P1V2 and get double the memory, move to SSDs, and get double the perf for basically the same money. I may even be able to take TWO of my S1s and pack all my websites (19 at this point) into just one Premium. It'll be faster and way cheaper.

Trick is, I'll need to move my Windows web apps to Linux web app. That's cool, since I'm using .NET Core - in my case 2.1 and 2.2 - then I'll just republish. I decided to take my existing Azure DevOps release pipeline and just add a second task to publish to Linux for testing. If it works I'll just disable the Windows one. No need to rebuild the whole pipeline from scratch.

Unfortunately the Linux Azure App Service has its deployment managed as a straight ZIP deployment; it was ending up with a TON of nested folders from MSDeploy!

NOTE: If I'm giving bad advice or I am missing something obvious, please let me know in the comments! Perhaps there's a "this zip file has a totally bonkers directory structure, fix it for Linux" checkbox that I missed?

I could redo the whole build pipeline and build differently, but I'd be changing two variables and it already works today on Windows.

I could make another build pipeline for Linux and build differently, but that sounds tedious and again, a second variable. I have a build artifact now, it's just in a weird structure.

How did I know the build artifact had a weird folder structure? I remember that I could just download any build artifact and look at it! Seems obvious when you say it but it's a good reminder that all these magical black box processes that move data from folder to folder are not black boxes - you can always check the result of a step. The output of one step becomes the input to the next.

downloading an artifact from Azure DevOps

I should probably have a Windows Build and Linux Build (two separate build agents) but the site isn't complex enough and it doesn't do anything that isn't clearly cross-platform friendly.

Anthony Chu suggested that I just remove the folders by restructuring the zip file (unzipping/zipping it). Could be a simple way to get both Windows and Linux publishing from a single artifact. I can fix it all up with a fresh build and release pipeline another time when I have the energy to learn this YAML format. (Speaking of the Azure DevOps YAML which doesn't have a friendly editor or validator, not speaking of YAML as a generic concept)

Unzipping and zipping up MSDeploy mess

I unzip the weird folder structure, then zip it back up from a new root. It then cleanly deploys to the Linux Azure App Service from the same artifact I made built for the Windows App Service.

Ironically here's a YAML view of the tasks, although I build them with the visual editor.

steps:

- task: ExtractFiles@1
displayName: 'Extract files - MSDeploy Crap'
inputs:
destinationFolder: linuxdrop
steps:
- task: ArchiveFiles@2
displayName: 'Archive linuxdrop/Content/D_C/a/1/s/hanselminutes.core/obj/Release/netcoreapp2.2/PubTmp/Out'
inputs:
rootFolderOrFile: 'linuxdrop/Content/D_C/a/1/s/hanselminutes.core/obj/Release/netcoreapp2.2/PubTmp/Out'
includeRootFolder: false
steps:
- task: AzureRmWebAppDeployment@4
displayName: 'Azure App Service Deploy: hanselminutes-core-linux'
inputs:
azureSubscription: 'Azure MSDN)'
appType: webAppLinux
WebAppName: 'hanselminutes-linux'
packageForLinux: '$(Build.ArtifactStagingDirectory)/$(Build.BuildId).zip'
RuntimeStack: 'DOTNETCORE|2.2'

Just to be clear, this isn't standard and it's a pretty rare edge case and it may not work for everyone but isn't it nice to google for a super rare edge case and instead of feeling all alone you find an answer?


Sponsor: Looking for a tool for performance profiling, unit test coverage, and continuous testing that works cross-platform on Windows, macOS, and Linux? Check out the latest JetBrains Rider!


© 2019 Scott Hanselman. All rights reserved.
     

Sign up now! Bing Maps APIs Developer Webinar

$
0
0

Bing Maps APIs offer advanced business solutions that go beyond standard mapping services, helping businesses deliver applications with greater location intelligence, improved business performance, and innovative user experiences. On September 24th, Grey Matter Licensing Specialists will team up with Microsoft Technical Program Managers to bring you a Bing Maps APIs webinar focusing on geospatial-intelligent insights and mapping logistics for your existing telematics or CRM solution, websites, and more.

In this webinar you will learn about:

  • The portfolio of Bing Maps APIs intelligent tools, geospatial services and fleet management solutions
  • An overview and demo of the recently released Multi-Itinerary Optimization API
  • How easy it is to integrate and license Bing Maps APIs

Don’t miss the opportunity to learn from and chat directly with our Microsoft Mapping experts. Microsoft Bing Maps APIs speakers include:

  • Justine Coates - Senior PM Manager
  • Erik Lindeman - Senior PM Manager
  • Ashley Song - Senior PM Manager

Sign up:

Tuesday, September 24, 2019 15:00 pm - 16:00 pm BST Register now

More details:

Grey Matter is a valued Microsoft partner and authorized distributor for Bing Maps APIs. To learn more about the Bing Maps APIs portfolio of services, visit https://www.microsoft.com/maps.

Using WSL 2 with Visual Studio Code

Beyond the printed form: Unlocking insights from documents with Form Recognizer

$
0
0

Data extraction from printed forms is by now a tried and true technology. Form Recognizer extracts key value pairs, tables and text from documents such as W2 tax statements, oil and gas drilling well reports, completion reports, invoices, and purchase orders. However, real-world businesses often rely on a variety of documents for their day-to-day needs that are not always cleanly printed.

We are excited to announce the addition of handwritten and mixed-mode (printed and handwritten) support. Starting now, handling handwritten and mixed-mode forms is the new norm.

Extracting data from handwritten and mixed-mode content with Form Recognizer

Entire data sets that were inaccessible in the past due to the limitations of extraction technology now become available. The handwritten and mixed-mode capability of Form Recognizer is available in preview and enables you to extract structured data out of handwritten text filled in forms such as:

  • Medical forms: New patient information, doctor notes.
  • Financial forms: Account opening forms, credit card applications.
  • Insurance: Claim forms, liability forms.
  • Manufacturing forms: Packaging slips, testing forms, quality forms.
  • And more.

By using our vast experience in optical character recognition (OCR) and machine learning for form analysis, our experts created a state-of-the-art solution that goes beyond printed forms. The OCR technology behind the service supports both handwritten and printed. Expanding the scope of Form Recognizer allows you to tap into previously uncharted territories, by making new sources of data available to you. You may extract valuable business information from newly available data, keeping you ahead of your competition.

Whether you are using Form Recognizer for the first time or already integrated it into your organization, you will now have an opportunity to create new business applications:

  • Expand your available data set: If you are only extracting data from machine printed forms, expand your total data set to mixed-mode forms and historic handwritten forms.
  • Create one application for a mix of documents: If you use a mix of handwritten and printed forms, you can create one application that applies across all your data.
  • Avoid manual digitization of handwritten forms: Original forms may be fed to Form Recognizer without any pre-processing, extracting the same key-value pairs and table data you would get from a machine-printed form to reduce costs, errors, and time.

Our customer: Avanade

Avanade values people as their most important asset. They are always on the lookout for talented and passionate professionals to grow their organization. One way they find these people is by attending external events, which may include university career fairs, trade shows, or technical conferences to name a few. 

During these events they often take the details of those interested in finding out more about Avanade, as well as their permission to contact them at a later date. Normally this is completed with a digital form using a set of tablets. But when the stand is particularly busy, they use a short paper form that attendees can fill in with their handwritten details. Unfortunately, these forms needed to be manually entered into the marketing database, requiring a considerable amount of time and resources. With the volume of potential new contacts at these events, multiplied by the number of events Avanade attends, this task can be daunting.

Azure Form Recognizer’s new handwritten support simplifies the process, giving Avanade peace of mind knowing no contact is lost and the information is there for them immediately.

In addition, Avanade integrated Form Recognizer as a skill within their cognitive search solution, enabling them to quickly use the service in their existing platform and follow-up with new leads, while their competitors may be spending time digitizing their handwritten forms.

Am image of a handwritten form and the data extracted via Form Recognizer.

“Azure Form Recognizer takes a vast amount of effort out of the process, changing the task from data entry to data validation. By integrating Form Recognizer with Azure Search, we are also immediately able to use the service in our existing platforms. If we need to find and check a form for any reason, for example to check for a valid signature there, we can simply search by any of the fields like name or job title and jump straight to that form. In our initial tests, using Form Recognizer has reduced the time taken to digitize the forms and double check the entries by 35 percent, a number we only expect to get better as we work to optimize our tools to work hand in hand with the service, and add in more automation.” - Fergus Kidd, Emerging Technology Engineer, Avanade

Getting started

To learn more about Form Recognizer and the rest of the Azure AI ecosystem, please visit our website and read the documentation.

Get started by contacting us.

For additional questions please reach out to us at formrecog_contact@microsoft.com

Azure Cost Management updates – August 2019

$
0
0

Whether you're a new student, thriving startup, or the largest enterprise, you have financial constraints and you need to know what you're spending, where, and how to plan for the future. Nobody wants a surprise when it comes to the bill, and this is where Azure Cost Management comes in.

We're always looking for ways to learn more about your challenges and how Azure Cost Management can help you better understand where you're accruing costs in the cloud, identify and prevent bad spending patterns, and optimize costs to empower you to do more with less. Here are a few of the latest improvements and updates based on your feedback:

Let's dig into the details.


Create targeted budgets with filters and forecast costs

Azure Cost Management budgets allow you to track and keep an eye on spending at any level of the organization. Budgets can be created on any scope above your Azure resources, from the billing account or a management group down to the resource groups where you're managing your apps. Now, with the ability to create filtered budgets in the Azure portal, you can easily monitor costs for anything from the entire organization to a single resource.

Let's say you're building out a prototype that requires a large VM for a month. You've estimated how much time you'll need and got approval for that based on prices in the Azure pricing calculator. Create a budget in the parent resource group filtered down to that resource and specify 25, 50, 75, and 100 percent thresholds to get notified as you're approaching weekly limits. And don't forget to setup auto-shutdown for nights and weekends, to ensure you don't blow that the first week.

On the other hand, you may need to track costs across multiple resource groups in multiple subscriptions, for test and production environments, for a specific app. To do this, tag all your resources with a specific tag, like Application, and ask your billing account or management group admin to create a budget filtered down to that that tag.

Of course, that's not all. You can create a budget filtered down to any property available within cost analysis, whether that's based on the resource hierarchy (e.g. resource group, subscription), meter hierarchy (e.g. service, meter category), or additional resource metadata (e.g. location, tags).

In addition to creating filtered budgets, you can also see a trend and forecast of costs based on those filters to help you plan ahead and set a realistic budget based on historical usage patterns.

If you haven't setup a budget yet, create one today and get notified before you go over your planned spending.

Create a Cost Management budget with filters based on your forecast costs


What's new in Azure Cost Management Labs

We introduced Cost Management Labs last month to give you a sneak peek at what's coming in Azure Cost Management, get early feedback, and help us better understand how you use the service, so we can deliver more tuned and optimized experiences. Here are a few features you can see in Azure Cost Management Labs:

  • Save and share customized views is now available in public portal.
    Save private and shared views with the Save and Save as commands in cost analysis, then use the view menu (between the scope and date pills) to switch between all private, shared, and built-in views.
  • Download charts as an image
    Open the desired view, then click the Export command at the top, select the PNG option, and click the Download charts button.
  • Dark theme support in cost analysis
    Support for the Azure portal dark theme was added to cost analysis in early August. We're making the last few final touches and expect this to be available from the full portal in early September.

Of course, that's not all. Every change in Azure Cost Management is available in Azure Cost Management Labs a week before it's in the full Azure portal. We're very eager to hear your thoughts and understand what you'd like to see next. Try Azure Cost Management Labs today.


Save and share customized views in cost analysis

The announcement for saving and sharing customized views in Cost Management Labs launched last month. Now, you can enjoy these same views from the Azure portal. If you missed last month’s update, here's what you missed:

Customizing a view in cost analysis is easy. Pick the date range you need, group the data to see a breakdown, choose the right visualization, and you're ready to go. Pin your view to a dashboard for one-click access, then share the dashboard with your team so everyone can track cost from a single place.

An image showing how to use the pin button to save customized views in cost analysis.

You can also share a direct link to your customized view so others can copy and personalize it for themselves:

An image showing how to share customized views in cost analysis.

Both sharing options offer flexibility, but you need something more convenient. Now you can save customized views and share them with others, directly from within cost analysis.

To do this, start by selecting a built-in view, customize it, and click the Save as command. You'll need Azure Cost Management Contributor access (or greater) to the scope to share views, but anyone can save private views, pin them to a dashboard, or share a URL. You can create up to 50 shared views per scope and up to 50 private views across scopes.

An image showing how to use save customized views in cost analysis.

All views are accessible from the view menu. You'll see your private views first, then those shared across the scope, and lastly the built-in views which are always available.

Am image showing the view menu of all saved views, private and shared.

Try saving your own customized views today and let us know what you'd like to see next. We're looking forward to learning about your ideas.


Dark theme support in cost analysis

If any Azure portal theme were to have a cult following, it'd be the dark theme. Whether you're interested in the dark theme for accessibility, power efficiency on a mobile device, or simply prefer the aesthetics, you need a consistent, end-to-end experience. Anything that takes out of that is jarring and forces you to take a second for your eyes to adjust. And there's nothing as eye-opening as switching from dark to light themes.  The good news is, cost analysis now supports the Azure portal dark theme in Azure Cost Management Labs.

DarkTheme


More flexibility for creating and managing subscriptions

As your organization grows, so does your reliance on the cloud. More teams are asking for access, which leads to extra overhead for creating and managing subscriptions. You need more flexibility to build a sustainable, scalable governance strategy.

With increased requirements coming from internal teams, many organizations are creating subscriptions (instead of resource groups) for individual teams to give them more flexibility to build the Azure solutions they need. This also simplifies governance reporting scenarios, as cost and compliance naturally rolls up to subscriptions and management groups. To better support this, you can now create up to 200 subscriptions per Enterprise Agreement (EA) enrollment account (increased from 50).

You already know you can create EA and MCA subscriptions with the Microsoft.Subscription/createSubscription API. Originally, this required at least one subscription to be created from the portal. This limitation has been removed and you can now create your first subscription directly from the API without opening the portal. You can also add subscriptions to a management group from the CreateSubscription API, which will help streamline automation scenarios for organizations using management groups for organizational reporting or policy assignment.

You can also request and track billing ownership transfers for pay-as-you-go (PAYG) and MCA subscriptions from directly within the Azure portal, with an option to keep the subscription in the current directory and retaining all Azure Role-based access control (RBAC) role assignments. Previously, transferring subscriptions reset RBAC access, which required additional overhead to reconfigure access. The new options should offer additional flexibility, depending on your needs. Transferring EA subscriptions can be performed from the Enterprise portal and will be available from the Azure portal in a future update.


Update tags for App Service environments

In our June update, we mentioned the App Service team added support for tags in usage data for App Service environments. We've heard reports of this not working for some organizations. If you are still missing tags for your App Service environments, please update the tags on those resources. Simply add a new tag, save your tag changes, then remove it, if you don't want to keep it. That should do it. You should see tags in your usage within the next 8-12 hours.

To learn more about data refresh times, see Understand Azure Cost Management data.


New videos

For those visual learners out there, there are 3 new videos you should take a look at:


Documentation updates

Here are the latest documentation updates:

Want to keep an eye on all documentation updates? Check out the Azure Cost Management doc change history in the azure-docs repository on GitHub. If you see something missing, select Edit at the top of the doc and submit a quick pull request.


What's next?

These are just a few of the big updates from the last month. We're always listening and making constant improvements based on your feedback, so please keep the feedback coming.

Follow @AzureCostMgmt on Twitter and subscribe to the YouTube channel for updates, tips, and tricks. As always, share your ideas and vote up others in the Azure Cost Management feedback forum.


Reduce disaster recovery time with Azure Site Recovery

$
0
0

Companies and cloud solutions teams by and large understand the need for a disaster recovery solution. One of the first steps while defining and choosing a disaster recovery plan is to perform a business impact analysis. This process helps in identifying applications that support critical business processes, the impact to the business in case of an outage, and guides in developing the right disaster recovery strategy for your business. Once you perform the analysis and identify critical applications, the next step is to chart down your disaster recovery strategy. This usually translates into:

  1. Identifying the right employees or admins who will handle the disaster recovery segment
  2. Setting targets for recover time objectives (RTOs) and recovery point objectives (RPOs)
  3. Identifying the right product or service based on the needs
  4. Identifying all the required software and hardware resources needed
  5. Frequently testing the disaster recovery strategy
  6. Making continuous improvements to improve the RPO and RTO, identifying and rectifying failure points if any

Configuring disaster recovery of Azure Virtual Machines using Azure Site Recovery

With the best in class RTO and RPO, Azure Site Recovery is one of the leaders in the space of disaster recovery. Being a first-class solution in Azure also gives the service, the edge to enable, test, and perform disaster recovery for customers in just a few clicks. One of the key differentiators while choosing a disaster recovery solution is the availability of integrations with additional resources to achieve parity between source and target. This essentially also reduces the RTO as it reduces the number of manual steps required once the virtual machine is brought up online in the target. The failure points are also minimized with this.

Let’s take a look at a common architecture model.

Typical architecture of IaaS virtual machine based application with connections to an on-premises site

As a disaster recovery administrator, there are multiple components that you would need to handle to ensure that a target disaster recovery site is activated with similar configurations in the event of a disaster. Other than the virtual machines, it also includes the internal load balancers, the network security groups, and the public IPs that are used to access the virtual machines from outside of Azure. With Azure Site Recovery, while configuring for disaster recovery for your virtual machines, you can also provide the input for corresponding network resources in the target, which will be honored at the time of failover. This takes away the complexities of having to deal with scripts or manual steps and reduces the RTO significantly. The service is also intelligent enough to allow selection of only those target resources that comply with the target virtual machine that will be created, thereby reducing the points of failover.

edit-networking-properties

Azure natively provides you the high availability and reliability for your mission-critical workloads, and you can choose to improve your protection and meet compliance requirements using the disaster recovery provided by Azure Site Recovery. Getting started with Azure Site Recovery is easy, check out pricing information and sign up for a free Microsoft Azure trial. You can also visit the Azure Site Recovery forum on MSDN for additional information and to engage with other customers.

Petrofac transforms large-scale construction with Azure IoT

$
0
0

A Petrofac engineer working, surrounded by pipes.

Figure 1. Petrofac is a leading oilfield services company

Petrofac unlocks value for energy customers

Petrofac, designs, builds, operates, and maintains oil, gas, and renewable energy assets. The company is committed to digital transformation. It looks to unlock value for itself and its clients using technologies like artificial intelligence (AI), Internet of Things (IoT), automation, machine learning, predictive analytics, digital twin, and Edge computing.

“This is an exciting time for Petrofac,” explains Fady Sleiman, Chief Digital Officer, Petrofac. “We are working to incorporate digital platforms within our business and combine these with our engineering and operations know-how to underpin our competitiveness in the marketplace and improve our capability and effectiveness.”

Partnering to transform large-scale construction

When considering the impact of digital technology within its construction activities Petrofac turned to Accenture Digital’s Industry X.0 team to create a solution that would increase safety, productivity, and efficiency at its project sites during the critical construction and commissioning phases.

Petrofac’s project supervisors need to answer questions like, “Are my welders well distributed on available work-fronts today?” or “Has my concrete mixer arrived?” or ‘’Do we have adequate safety supervision at the boiler’s area?’’ on projects which can be spread out over the size of a large city involving thousands of people, hundreds of tons of materials, and heavy equipment movement. Accenture Digital worked with Petrofac to develop a Connected Construction solution using Azure IoT to provide these insights.

“Azure IoT enabled us to build out a solution with Edge analytics and PaaS cloud components. These were instrumented using a range of connectivity solutions to enable us to meet the scale requirements for the project,” said Yen-Sze Soon, Managing Director, Accenture Digital – Industry X.0.

Accenture architected a solution to collect and transmit data from tags on workers and equipment. The site data was integrated with project data like milestones, productivity, planning, permitting, weather, and documents as well as historical data, to provide a live, one-stop dashboard.  The dashboard provides operational visibility into precise details of the project, all accessed in one place (see Figure 2.)

“The live dashboard displays project KPIs, build progress, total number of people and equipment on site, and weather alerts. It even flags deviations schedule and planned production compliance,” said Daniel Atbir, Vice President, Construction, Petrofac.

Figure 2 one stop view

Figure 2. An example of the one-stop view of a construction project

Project tracking to increase productivity

With the new dashboard, site supervisors track productivity across construction zones or within construction crews (See Figure 3.) They can pinpoint bottlenecks and deviations and take appropriate remedial action.

During the initial trial, the team observed that productivity dropped significantly before and after lunch. Looking at the worker heatmap, the team realized that productivity was slowing down because workers were leaving the construction site. They were driving a distance to get lunch. Petrofac responded by building an onsite cafeteria. Productivity and welfare increased.

Figure 3 map of manpower

Figure 3. An example of a map of manpower in construction zones

Pursuing better outcomes for worker safety

If a worker requires assistance on the job, he or she can activate an alarm signal on the digital tag each worker wears. The site supervisor and health, safety, and environment (HSE) team receives the alert and can provide immediate assistance. “With real-time alerts and knowing the worker’s exact location, our teams respond more quickly for better outcomes,” explains Daniel.

Optimizing the use of high-value equipment

Knowing the location of equipment seems simple. But on a large-scale infrastructure project, it can be a challenge. By tagging high-value equipment and having locations transmitted and known in real-time, Connected Construction is enabling Petrofac to support its subcontractors to optimize the use of equipment in a more collaborative way. Equipment is optimally allocated to increase productivity and, therefore, construction progress.

An engineer at a large scale construciton facility.

Figure 4.  Petrofac gains valuable insights from Connected Construction

Summary

Petrofac and Accenture Digital implemented the Connected Construction solution on a large scale to increase productivity, safety, and efficiency. Accenture and Avanade won the Microsoft Internet of Things Partner of the Year award based on their involvement with the  Petrofac project and commitment to Azure IoT. “Thanks to Accenture’s industry innovation and the Microsoft Azure IoT platform, our Connected Construction initiative is providing valuable insights for Petrofac,” added Fady.

Learn more about Azure IoT and Azure IoT Edge.

Join us for .NET Conf 2019, Sept 23-25

$
0
0

.NET Conf is back again this year and will be live streaming to a device near you September 23-25 on www.dotnetconf.net! .NET Conf is a FREE, 3 day virtual developer event co-organized by the .NET community and Microsoft. This year .NET Core 3.0 will launch at .NET Conf 2019! Come celebrate and learn about the new release. You won’t want to miss this one.

Here’s a sneak peak of what you can expect.

Conference-at-a-Glance

This year we’re trying something new with the format of our online conference. We’ll have over 75 live sessions this year with the last 24 hours featuring speakers in their local time zones on our Visual Studio Twitch and Mixer channels. It was really difficult choosing the sessions. We invited speakers from all 7 continents and we’ll be hosting them all night and day remotely from our studios in Redmond. Our partners are also hosting two virtual attendee parties and a technical treasure hunt where you can win prizes by answering .NET trivia questions and solving technical challenges.

Check out the full schedule and speakers here!

Day 1 – September 23
9:00 – 10:00 Keynote broadcasted from Microsoft Studios
10:00 – 17:00 Sessions broadcasted from Microsoft Studios
17:00 – 18:00 Virtual Attendee Party! Engage with our partners on Twitter and win prizes.


Day 2 – September 24
9:00 – 17:00 Sessions broadcasted from Microsoft Studios
17:00 – 23:59 Community Sessions in local time zones around the world


Day 3 – September 25
0:00 – 4:00 Community Sessions in local time zones around the world
4:00 – 5:00 Virtual Attendee Party! Engage with our partners on Twitter and win prizes.
5:30 – 17:00 Community Sessions in local time zones around the world

All times listed in Pacific Daylight Time (UTC -7).

.NET Conf Local Events

We’ve partnered with organizers around the globe, including our .NET Foundation meetup groups, to pull together local in-person events and watch parties between September 23 through the end of October. There are now 168 events worldwide! Join your fellow developers in a city near you to learn more about .NET and have fun together.

Attend a local event!

.NET Conf local events map

Keep in the loop by following the hashtag #dotNETConf on Twitter and help spread the word. And don’t forget to tune into www.dotnetconf.net on September 23rd.

Save the date!

The post Join us for .NET Conf 2019, Sept 23-25 appeared first on .NET Blog.

Announcing ML.NET 1.4 Preview and Model Builder updates (Machine Learning for .NET)

$
0
0

We are excited to announce ML.NET 1.4 Preview and updates to Model Builder and CLI.

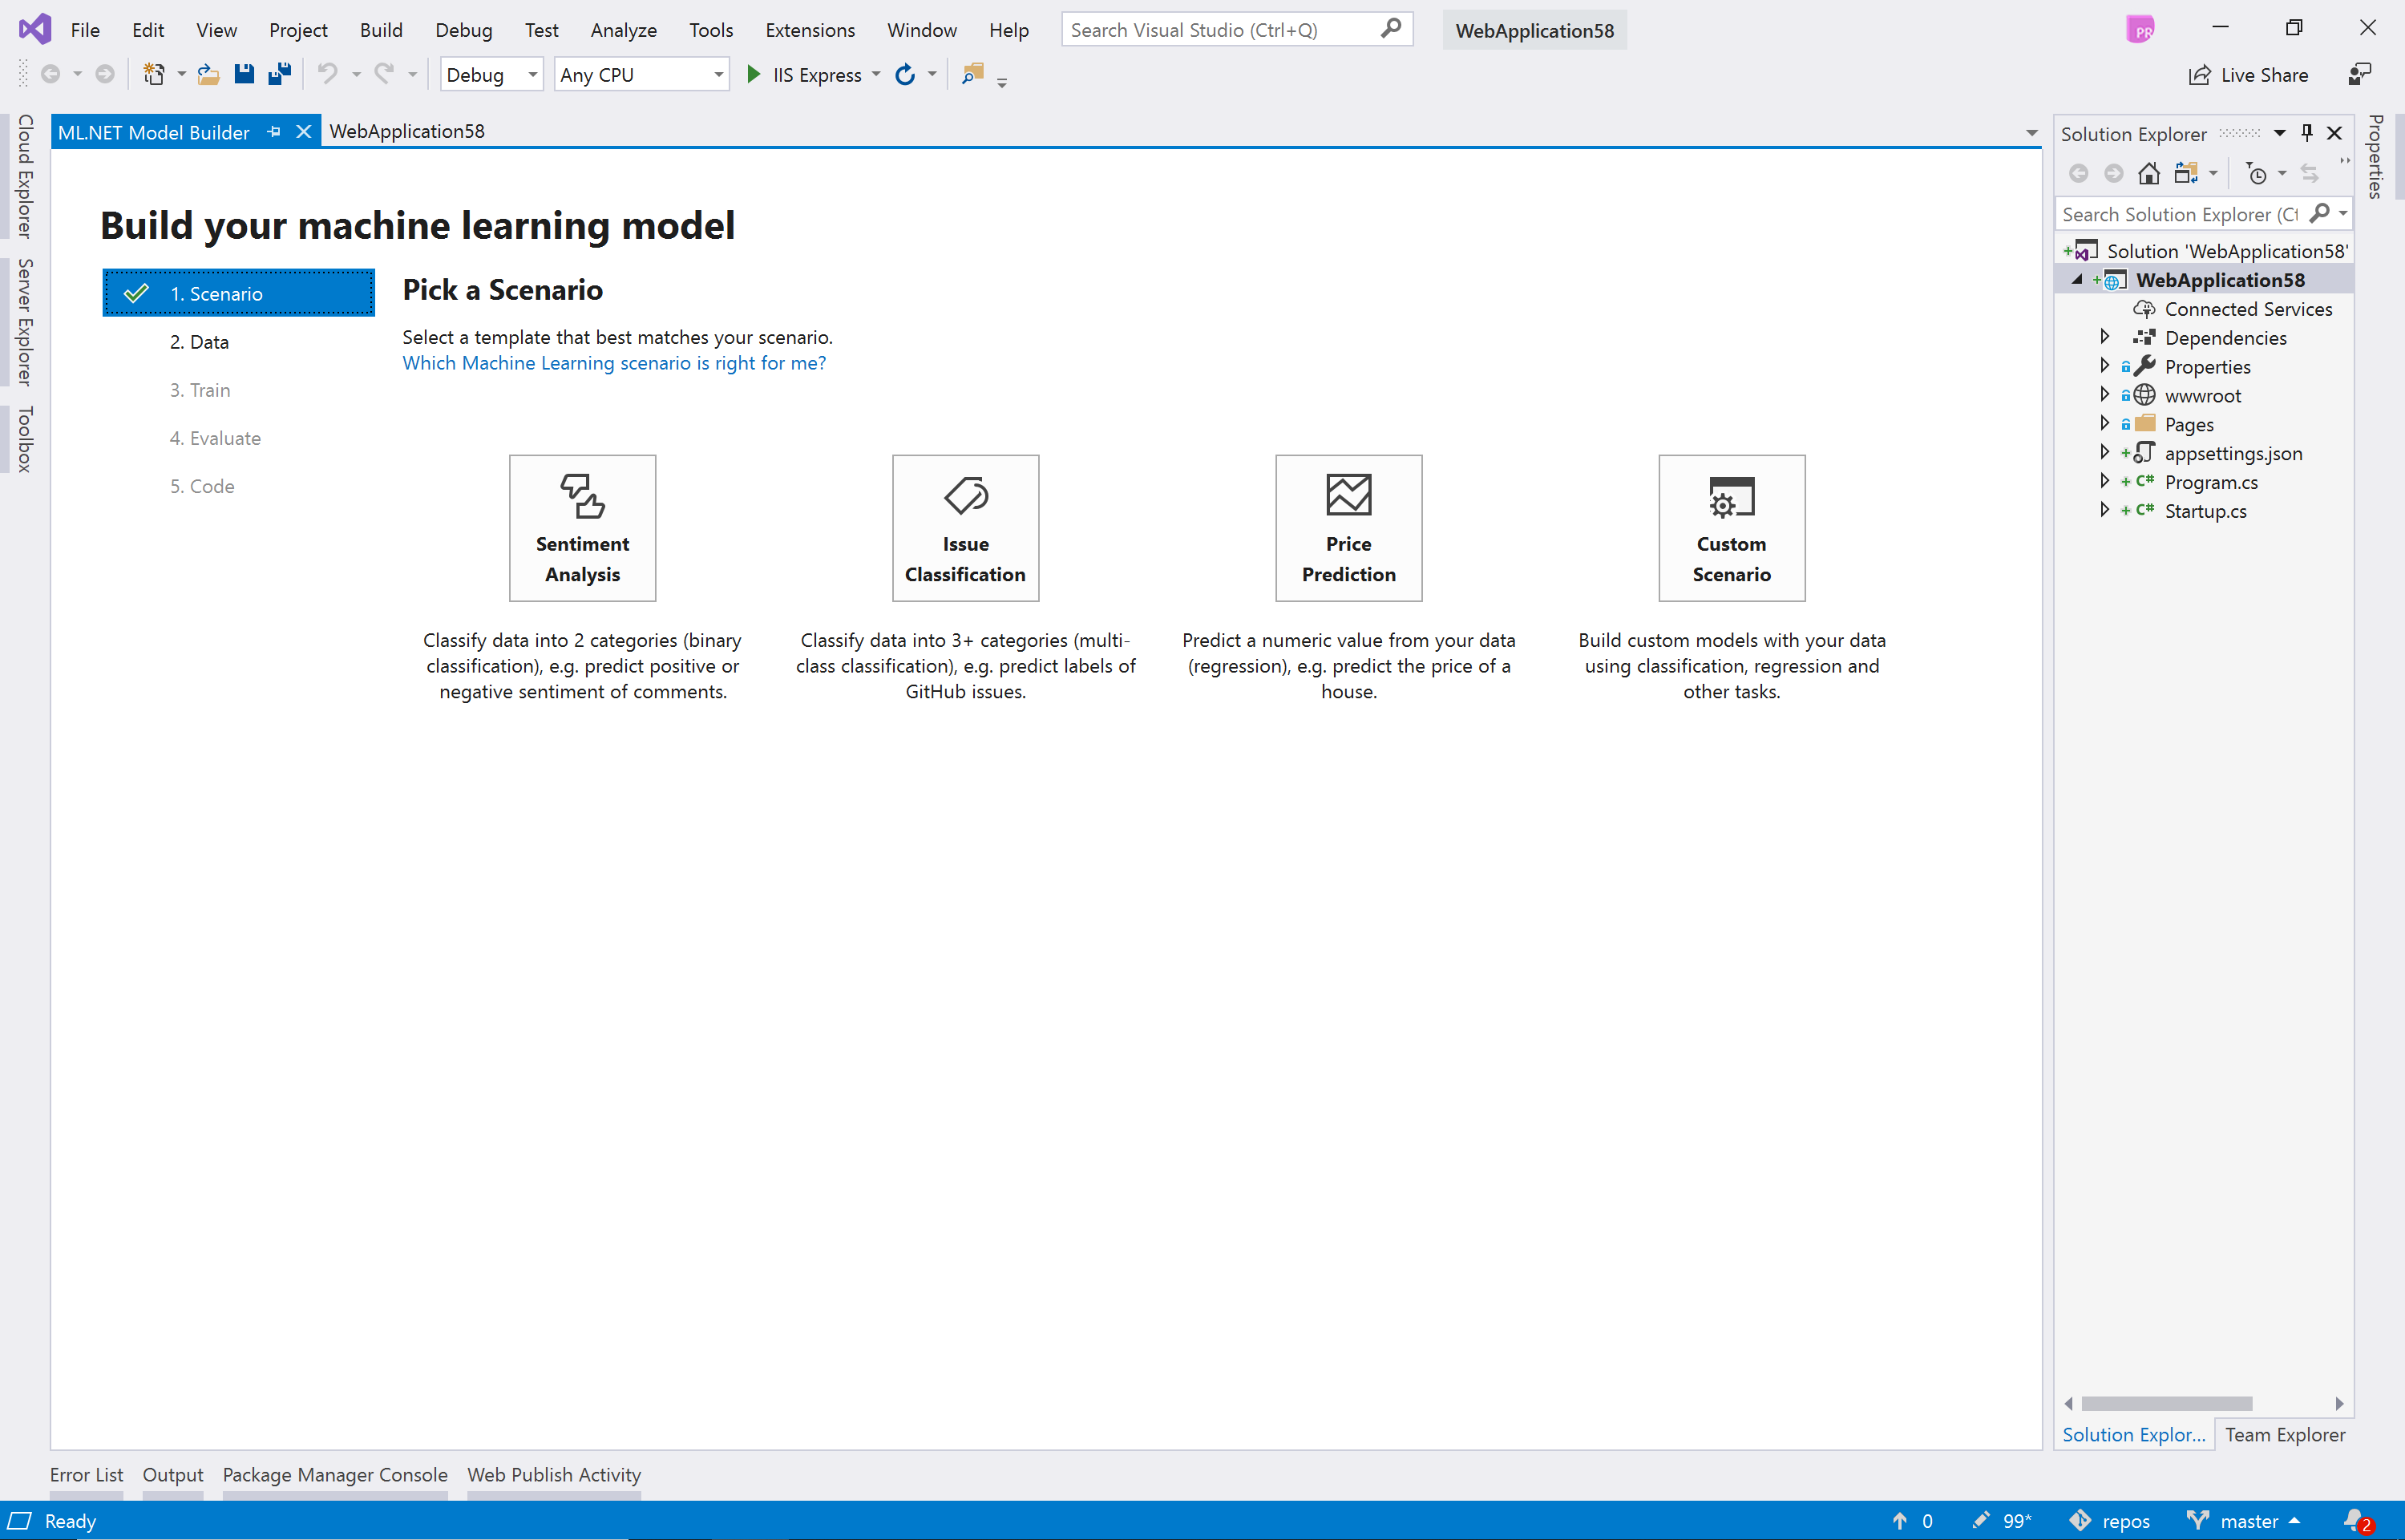
ML.NET is an open-source and cross-platform machine learning framework for .NET developers. ML.NET also includes Model Builder (a simple UI tool) and CLI to make it super easy to build custom Machine Learning (ML) models using Automated Machine Learning (AutoML).

Using ML.NET, developers can leverage their existing tools and skillsets to develop and infuse custom ML into their applications by creating custom machine learning models for common scenarios like Sentiment Analysis, Price Prediction, Sales Forecast prediction, Image Classification and more!

Following are some of the key highlights in this update:

ML.NET Updates

ML.NET 1.4 Preview is a backwards compatible release with no breaking changes so please update to get the latest changes.

In addition to bug fixes described here, in ML.NET 1.4 Preview we have released some exciting new features that are described in the following sections.

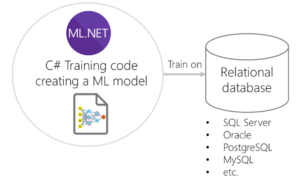
Database Loader (Preview)

DatabaseLoader in ML.NET

This feature introduces a native database loader that enables training directly against relational databases. This loader supports any relational database provider supported by System.Data in .NET Core or .NET Framework, meaning that you can use any RDBMS such as SQL Server, Azure SQL Database, Oracle, SQLite, PostgreSQL, MySQL, Progress, IBM DB2, etc.

In previous ML.NET releases, since ML.NET 1.0, you could also train against a relational database by providing data through an IEnumerable collection by using the LoadFromEnumerable() API where the data could be coming from a relational database or any other source. However, when using that approach, you as a developer are responsible for the code reading from the relational database (such as using Entity Framework or any other approach) which needs to be implemented properly so you are streaming data while training the ML model, as in this previous sample using LoadFromEnumerable().

However, this new Database Loader provides a much simpler code implementation for you since the way it reads from the database and makes data available through the IDataView is provided out-of-the-box by the ML.NET framework so you just need to specify your database connection string, what’s the SQL statement for the dataset columns and what’s the data-class to use when loading the data. It is that simple!

Here’s example code on how easily you can now configure your code to load data directly from a relational database into an IDataView which will be used later on when training your model.

//Lines of code for loading data from a database into an IDataView for a later model training

string connectionString = @"Data Source=YOUR_SERVER;Initial Catalog= YOUR_DATABASE;Integrated Security=True";
string commandText = "SELECT * from SentimentDataset";
DatabaseLoader loader = mlContext.Data.CreateDatabaseLoader();
DatabaseSource dbSource = new DatabaseSource(SqlClientFactory.Instance, connectionString, commandText);

IDataView trainingDataView = loader.Load(dbSource);

// ML.NET model training code using the training IDataView
//...

public class SentimentData
{
    public string FeedbackText;
    public string Label;
}

This feature is in preview and can be accessed via the Microsoft.ML.Experimental v0.16-Preview nuget package available here.

For further learning see this complete sample app using the new DatabaseLoader.

Image classification with deep neural networks retraining (Preview)

This new feature enables native DNN transfer learning with ML.NET, targeting image classification as our first high level scenario.

For instance, with this feature you can create your own custom image classifier model by natively training a TensorFlow model from ML.NET API with your own images.

Image classifier scenario – Train your own custom deep learning model with ML.NET


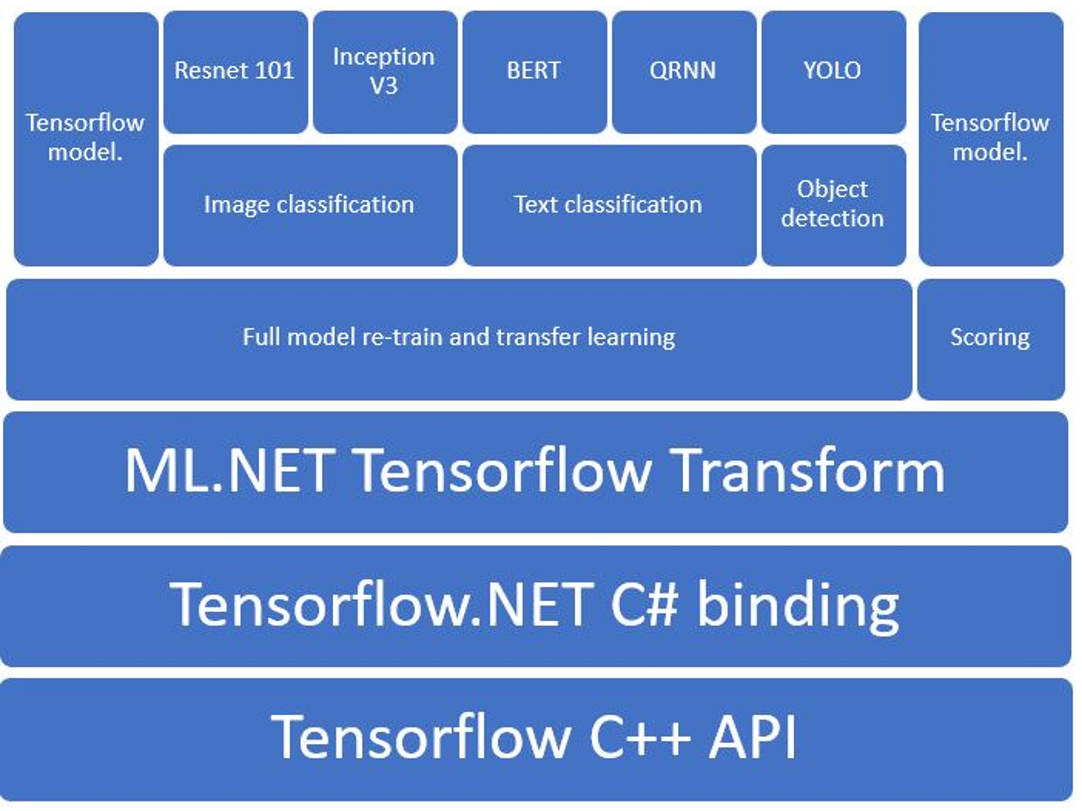
In order to use TensorFlow, ML.NET is internally taking dependency on the Tensorflow.NET library.

The Tensorflow.NET library is an open source and low level API library that provides the .NET Standard bindings for TensorFlow. That library is part of the SciSharp stack libraries.

Microsoft (the ML.NET team) is closely working with the TensorFlow.NET library team not just for providing higher level APIs for the users in ML.NET (such as our new ImageClassification API) but also helping to improve and evolve the Tensorflow.NET library as an open source project.

We would like to acknowledge the effort and say thank you to the Tensorflow.NET library team for their agility and great collaboration with us.

The stack diagram below shows how ML.NET implements these new DNN training features. Although we currently only support training TensorFlow models, PyTorch support is in the roadmap.

As the first main scenario for high level APIs, we are currently focusing on image classification. The goal of these new high-level APIs is to provide powerful and easy to use interfaces for DNN training scenarios like image classification, object detection and text classification.

The below API code example shows how easily you can train a new TensorFlow model which under the covers is based on transfer learning from a selected architecture (pre-trained model) such as Inception v3 or Resnet.

Image classifier high level API code using transfer learning from Inceptionv3 pre-trained model

var pipeline = mlContext.Transforms.Conversion.MapValueToKey(outputColumnName: "LabelAsKey", inputColumnName: "Label")
               .Append(mlContext.Model.ImageClassification("ImagePath", "LabelAsKey",
                            arch: ImageClassificationEstimator.Architecture.InceptionV3));  //Can also use ResnetV2101
                            
// Train the model
ITransformer trainedModel = pipeline.Fit(trainDataView);

The important line in the above code is the one using the mlContext.Model.ImageClassification classifier trainer which as you can see is a high level API where you just need to select the base pre-trained model to derive from, in this case Inception v3, but you could also select other pre-trained models such as Resnet v2101. Inception v3 is a widely used image recognition model trained on the ImageNet dataset. Those pre-trained models or architectures are the culmination of many ideas developed by multiple researchers over the years and you can easily take advantage of it now.

The DNN Image Classification training API is still in early preview and we hope to get feedback from you that we can incorporate in the next upcoming releases.

For further learning see this sample app training a custom TensorFlow model with provided images.

Enhanced for .NET Core 3.0

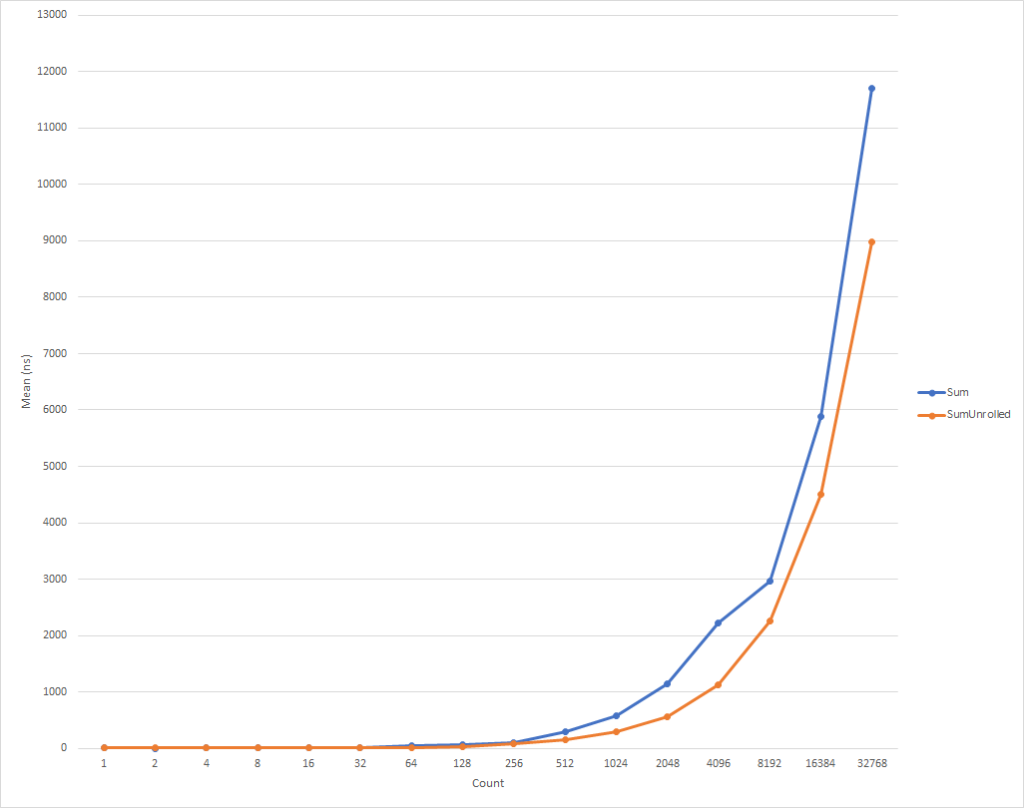
ML.NET is now building for .NET Core 3.0. This means ML.NET can take advantage of the new features when running in a .NET Core 3.0 application. The first new feature we are using is the new hardware intrinsics feature, which allows .NET code to accelerate math operations by using processor specific instructions.

Of course, you can still run ML.NET on older versions, but when running on .NET Framework, or .NET Core 2.2 and below, ML.NET uses C++ code that is hard-coded to x86-based SSE instructions. SSE instructions allow for four 32-bit floating-point numbers to be processed in a single instruction. Modern x86-based processors also support AVX instructions, which allow for processing eight 32-bit floating-point numbers in one instruction. ML.NET’s C# hardware intrinsics code supports both AVX and SSE instructions and will use the best one available. This means when training on a modern processor, ML.NET will now train faster because it can do more concurrent floating-point operations than it could with the existing C++ code that only supported SSE instructions.

Another advantage the C# hardware intrinsics code brings is that when neither SSE nor AVX are supported by the processor, for example on an ARM chip, ML.NET will fall back to doing the math operations one number at a time. This means more processor architectures are now supported by the core ML.NET components. (Note: There are still some components that don’t work on ARM processors, for example FastTree, LightGBM, and OnnxTransformer. These components are written in C++ code that is not currently compiled for ARM processors.)

For more information on how ML.NET uses the new hardware intrinsics APIs in .NET Core 3.0, please check out Brian Lui’s blog post Using .NET Hardware Intrinsics API to accelerate machine learning scenarios.

Model Builder in VS and CLI updated to latest GA version

The Model Builder tool in Visual Studio and the ML.NET CLI (both in preview) have been updated to use the latest ML.NET GA version (1.3) and addresses lots of customer feedback. Learn more about the changes here.

Model Builder updated to latest ML.NET GA version

Model Builder uses the latest GA version of ML.NET (1.3) and therefore the generated C# code also references ML.NET 1.3.

Improved support for other OS cultures

This addresses many frequently reported issues where developers want to use their own local culture OS settings to train a model in Model Builder. Please read this issue for more details.

Customer feedback addressed for Model Builder

There were many issues fixed in this release. Learn more in the release notes.

New sample apps

Coinciding with this new release, we’re also announcing new interesting sample apps covering additional scenarios:

  Sales forecast scenario based on Time Series SSA (Single Spectrum Analysis)
  Credit Card Fraud Detection scenario based on Anomaly Detection PCA
  Search engine sorted results scenario based on Ranking task
  Model Explainability and feature importance
  Database Loader (Native Database Loader for relational databases)
  Deep Learning training: Image Classification DNN re-train (Transfer Learning)
Scalable ML.NET model on ASP.NET Core Razor web app (C#)
  Scalable ML.NET model on Azure Function (C#)


New ML.NET video playlist at YouTube

We have created a ML.NET Youtube playlist at the .NET foundation channel with a list made of selected videos, each video focusing on a single and particular ML.NET feature, so it is great for learning purposes.

Access here the ML.NET Youtube playlist.


Try ML.NET and Model Builder today!

Summary

We are excited to release these updates for you and we look forward to seeing what you will build with ML.NET. If you have any questions or feedback, you can ask them here for ML.NET and Model Builder.

Happy coding!

The ML.NET team.

This blog was authored by Cesar de la Torre and Eric Erhardt plus additional contributions of the ML.NET team.


Acknowledgements

  • As mentioned above, we would like to acknowledge the effort and say thank you to the Tensorflow.NET library team for their agility and great collaboration with us. Special kudos for Haiping (Oceania2018.)
  • Special thanks for Jon Wood (@JWood) for his many and great YouTube videos on ML.NET that we’re also pointing from our ML.NET YouTube playlist mentioned in the blog post. Also, thanks for being an early adopter and tester for the new DatabaseLoader.


The post Announcing ML.NET 1.4 Preview and Model Builder updates (Machine Learning for .NET) appeared first on .NET Blog.

Windows 10 SDK Preview Build 18970 available now!

$
0
0

Today, we released a new Windows 10 Preview Build of the SDK to be used in conjunction with Windows 10 Insider Preview (Build 18970 or greater). The Preview SDK Build 18970 contains bug fixes and under development changes to the API surface area.

The Preview SDK can be downloaded from developer section on Windows Insider.

For feedback and updates to the known issues, please see the developer forum. For new developer feature requests, head over to our Windows Platform UserVoice.

Things to note:

  • This build works in conjunction with previously released SDKs and Visual Studio 2017 and 2019. You can install this SDK and still also continue to submit your apps that target Windows 10 build 1903 or earlier to the Microsoft Store.
  • The Windows SDK will now formally only be supported by Visual Studio 2017 and greater. You can download the Visual Studio 2019 here.
  • This build of the Windows SDK will install on only on Windows 10 Insider Preview builds.
  • In order to assist with script access to the SDK, the ISO will also be able to be accessed through the following static URL: https://software-download.microsoft.com/download/sg/Windows_InsiderPreview_SDK_en-us_18970_1.iso.

Tools Updates:

Message Compiler (mc.exe)

  • Now detects the Unicode byte order mark (BOM) in .mc files. If the If the .mc file starts with a UTF-8 BOM, it will be read as a UTF-8 file. Otherwise, if it starts with a UTF-16LE BOM, it will be read as a UTF-16LE file. If the -u parameter was specified, it will be read as a UTF-16LE file. Otherwise, it will be read using the current code page (CP_ACP).
  • Now avoids one-definition-rule (ODR) problems in MC-generated C/C++ ETW helpers caused by conflicting configuration macros (e.g. when two .cpp files with conflicting definitions of MCGEN_EVENTWRITETRANSFER are linked into the same binary, the MC-generated ETW helpers will now respect the definition of MCGEN_EVENTWRITETRANSFER in each .cpp file instead of arbitrarily picking one or the other).

Windows Trace Preprocessor (tracewpp.exe)

  • Now supports Unicode input (.ini, .tpl, and source code) files. Input files starting with a UTF-8 or UTF-16 byte order mark (BOM) will be read as Unicode. Input files that do not start with a BOM will be read using the current code page (CP_ACP). For backwards-compatibility, if the -UnicodeIgnore command-line parameter is specified, files starting with a UTF-16 BOM will be treated as empty.
  • Now supports Unicode output (.tmh) files. By default, output files will be encoded using the current code page (CP_ACP). Use command-line parameters -cp:UTF-8 or -cp:UTF-16 to generate Unicode output files.
  • Behavior change: tracewpp now converts all input text to Unicode, performs processing in Unicode, and converts output text to the specified output encoding. Earlier versions of tracewpp avoided Unicode conversions and performed text processing assuming a single-byte character set. This may lead to behavior changes in cases where the input files do not conform to the current code page. In cases where this is a problem, consider converting the input files to UTF-8 (with BOM) and/or using the -cp:UTF-8 command-line parameter to avoid encoding ambiguity.

TraceLoggingProvider.h

  • Now avoids one-definition-rule (ODR) problems caused by conflicting configuration macros (e.g. when two .cpp files with conflicting definitions of TLG_EVENT_WRITE_TRANSFER are linked into the same binary, the TraceLoggingProvider.h helpers will now respect the definition of TLG_EVENT_WRITE_TRANSFER in each .cpp file instead of arbitrarily picking one or the other).
  • In C++ code, the TraceLoggingWrite macro has been updated to enable better code sharing between similar events using variadic templates.

Signing your apps with Device Guard Signing

Breaking Changes

Removal of api-ms-win-net-isolation-l1-1-0.lib

In this release api-ms-win-net-isolation-l1-1-0.lib has been removed from the Windows SDK. Apps that were linking against api-ms-win-net-isolation-l1-1-0.lib can switch to OneCoreUAP.lib as a replacement.

Removal of IRPROPS.LIB

In this release irprops.lib has been removed from the Windows SDK. Apps that were linking against irprops.lib can switch to bthprops.lib as a drop-in replacement.

API Updates, Additions and Removals

The following APIs have been added to the platform since the release of Windows 10 SDK, version 1903, build 18362.

Additions:


namespace Windows.AI.MachineLearning {
  public sealed class LearningModelSessionOptions {
    bool CloseModelOnSessionCreation { get; set; }
  }
}
namespace Windows.ApplicationModel {
  public sealed class AppInfo {
    public static AppInfo Current { get; }
    Package Package { get; }
    public static AppInfo GetFromAppUserModelId(string appUserModelId);
    public static AppInfo GetFromAppUserModelIdForUser(User user, string appUserModelId);
  }
  public interface IAppInfoStatics
  public sealed class Package {
    StorageFolder EffectiveExternalLocation { get; }
    string EffectiveExternalPath { get; }
    string EffectivePath { get; }
    string InstalledPath { get; }
    bool IsStub { get; }
    StorageFolder MachineExternalLocation { get; }
    string MachineExternalPath { get; }
    string MutablePath { get; }
    StorageFolder UserExternalLocation { get; }
    string UserExternalPath { get; }
    IVectorView<AppListEntry> GetAppListEntries();
    RandomAccessStreamReference GetLogoAsRandomAccessStreamReference(Size size);
  }
}
namespace Windows.ApplicationModel.Background {
  public sealed class BluetoothLEAdvertisementPublisherTrigger : IBackgroundTrigger {
    bool IncludeTransmitPowerLevel { get; set; }
    bool IsAnonymous { get; set; }
    IReference<short> PreferredTransmitPowerLevelInDBm { get; set; }
    bool UseExtendedFormat { get; set; }
  }
  public sealed class BluetoothLEAdvertisementWatcherTrigger : IBackgroundTrigger {
    bool AllowExtendedAdvertisements { get; set; }
  }
}
namespace Windows.ApplicationModel.ConversationalAgent {
  public sealed class ActivationSignalDetectionConfiguration
  public enum ActivationSignalDetectionTrainingDataFormat
  public sealed class ActivationSignalDetector
  public enum ActivationSignalDetectorKind
  public enum ActivationSignalDetectorPowerState
  public sealed class ConversationalAgentDetectorManager
  public sealed class DetectionConfigurationAvailabilityChangedEventArgs
  public enum DetectionConfigurationAvailabilityChangeKind
  public sealed class DetectionConfigurationAvailabilityInfo
  public enum DetectionConfigurationTrainingStatus
}
namespace Windows.ApplicationModel.DataTransfer {
  public sealed class DataPackage {
    event TypedEventHandler<DataPackage, object> ShareCanceled;
  }
}
namespace Windows.Devices.Bluetooth {
  public sealed class BluetoothAdapter {
    bool IsExtendedAdvertisingSupported { get; }
    uint MaxAdvertisementDataLength { get; }
  }
}
namespace Windows.Devices.Bluetooth.Advertisement {
  public sealed class BluetoothLEAdvertisementPublisher {
    bool IncludeTransmitPowerLevel { get; set; }
    bool IsAnonymous { get; set; }
    IReference<short> PreferredTransmitPowerLevelInDBm { get; set; }
    bool UseExtendedAdvertisement { get; set; }
  }
  public sealed class BluetoothLEAdvertisementPublisherStatusChangedEventArgs {
    IReference<short> SelectedTransmitPowerLevelInDBm { get; }
  }
  public sealed class BluetoothLEAdvertisementReceivedEventArgs {
    BluetoothAddressType BluetoothAddressType { get; }
    bool IsAnonymous { get; }
    bool IsConnectable { get; }
    bool IsDirected { get; }
    bool IsScannable { get; }
    bool IsScanResponse { get; }
    IReference<short> TransmitPowerLevelInDBm { get; }
  }
  public enum BluetoothLEAdvertisementType {
    Extended = 5,
  }
  public sealed class BluetoothLEAdvertisementWatcher {
    bool AllowExtendedAdvertisements { get; set; }
  }
  public enum BluetoothLEScanningMode {
    None = 2,
  }
}
namespace Windows.Devices.Bluetooth.Background {
  public sealed class BluetoothLEAdvertisementPublisherTriggerDetails {
    IReference<short> SelectedTransmitPowerLevelInDBm { get; }
  }
}
namespace Windows.Devices.Display {
  public sealed class DisplayMonitor {
    bool IsDolbyVisionSupportedInHdrMode { get; }
  }
}
namespace Windows.Devices.Input {
  public sealed class PenButtonListener
  public sealed class PenDockedEventArgs
  public sealed class PenDockListener
  public sealed class PenTailButtonClickedEventArgs
  public sealed class PenTailButtonDoubleClickedEventArgs
  public sealed class PenTailButtonLongPressedEventArgs
  public sealed class PenUndockedEventArgs
}
namespace Windows.Devices.Sensors {
  public sealed class Accelerometer {
    AccelerometerDataThreshold ReportThreshold { get; }
  }
  public sealed class AccelerometerDataThreshold
  public sealed class Barometer {
    BarometerDataThreshold ReportThreshold { get; }
  }
  public sealed class BarometerDataThreshold
  public sealed class Compass {
    CompassDataThreshold ReportThreshold { get; }
  }
  public sealed class CompassDataThreshold
  public sealed class Gyrometer {
    GyrometerDataThreshold ReportThreshold { get; }
  }
  public sealed class GyrometerDataThreshold
  public sealed class Inclinometer {
    InclinometerDataThreshold ReportThreshold { get; }
  }
  public sealed class InclinometerDataThreshold
  public sealed class LightSensor {
    LightSensorDataThreshold ReportThreshold { get; }
  }
  public sealed class LightSensorDataThreshold
  public sealed class Magnetometer {
    MagnetometerDataThreshold ReportThreshold { get; }
  }
  public sealed class MagnetometerDataThreshold
}
namespace Windows.Foundation.Metadata {
  public sealed class AttributeNameAttribute : Attribute
  public sealed class FastAbiAttribute : Attribute
  public sealed class NoExceptionAttribute : Attribute
}
namespace Windows.Globalization {
  public sealed class Language {
    string AbbreviatedName { get; }
    public static IVector<string> GetMuiCompatibleLanguageListFromLanguageTags(IIterable<string> languageTags);
  }
}
namespace Windows.Graphics.Capture {
  public sealed class GraphicsCaptureSession : IClosable {
    bool IsCursorCaptureEnabled { get; set; }
  }
}
namespace Windows.Graphics.DirectX {
  public enum DirectXPixelFormat {
    SamplerFeedbackMinMipOpaque = 189,
    SamplerFeedbackMipRegionUsedOpaque = 190,
  }
}
namespace Windows.Graphics.Holographic {
  public sealed class HolographicFrame {
    HolographicFrameId Id { get; }
  }
  public struct HolographicFrameId
  public sealed class HolographicFrameRenderingReport
  public sealed class HolographicFrameScanoutMonitor : IClosable
  public sealed class HolographicFrameScanoutReport
  public sealed class HolographicSpace {
    HolographicFrameScanoutMonitor CreateFrameScanoutMonitor(uint maxQueuedReports);
  }
}
namespace Windows.Management.Deployment {
  public sealed class AddPackageOptions
  public enum DeploymentOptions : uint {
    StageInPlace = (uint)4194304,
  }
  public sealed class PackageManager {
    IAsyncOperationWithProgress<DeploymentResult, DeploymentProgress> AddPackageByUriAsync(Uri packageUri, AddPackageOptions options);
    IIterable<Package> FindProvisionedPackages();
    PackageStubPreference GetPackageStubPreference(string packageFamilyName);
    IAsyncOperationWithProgress<DeploymentResult, DeploymentProgress> RegisterPackageByNameAsync(string name, RegisterPackageOptions options);
    IAsyncOperationWithProgress<DeploymentResult, DeploymentProgress> RegisterPackageByUriAsync(Uri manifestUri, RegisterPackageOptions options);
    IAsyncOperationWithProgress<DeploymentResult, DeploymentProgress> RegisterPackagesByFullNameAsync(IIterable<string> packageFullNames, DeploymentOptions deploymentOptions);
    void SetPackageStubPreference(string packageFamilyName, PackageStubPreference useStub);
    IAsyncOperationWithProgress<DeploymentResult, DeploymentProgress> StagePackageByUriAsync(Uri packageUri, StagePackageOptions options);
  }
  public enum PackageStubPreference
  public enum PackageTypes : uint {
    All = (uint)4294967295,
  }
  public sealed class RegisterPackageOptions
  public enum RemovalOptions : uint {
    PreserveRoamableApplicationData = (uint)128,
  }
  public sealed class StagePackageOptions
  public enum StubPackageOptions
}
namespace Windows.Media.Audio {
  public sealed class AudioPlaybackConnection : IClosable
  public sealed class AudioPlaybackConnectionOpenResult
  public enum AudioPlaybackConnectionOpenResultStatus
  public enum AudioPlaybackConnectionState
}
namespace Windows.Media.Capture {
  public sealed class MediaCapture : IClosable {
    MediaCaptureRelativePanelWatcher CreateRelativePanelWatcher(StreamingCaptureMode captureMode, DisplayRegion displayRegion);
  }
  public sealed class MediaCaptureInitializationSettings {
    Uri DeviceUri { get; set; }
    PasswordCredential DeviceUriPasswordCredential { get; set; }
  }
  public sealed class MediaCaptureRelativePanelWatcher : IClosable
}
namespace Windows.Media.Capture.Frames {
  public sealed class MediaFrameSourceInfo {
    Panel GetRelativePanel(DisplayRegion displayRegion);
  }
}
namespace Windows.Media.Devices {
  public sealed class PanelBasedOptimizationControl
}
namespace Windows.Media.MediaProperties {
  public static class MediaEncodingSubtypes {
    public static string Pgs { get; }
    public static string Srt { get; }
    public static string Ssa { get; }
    public static string VobSub { get; }
  }
  public sealed class TimedMetadataEncodingProperties : IMediaEncodingProperties {
    public static TimedMetadataEncodingProperties CreatePgs();
    public static TimedMetadataEncodingProperties CreateSrt();
    public static TimedMetadataEncodingProperties CreateSsa(byte[] formatUserData);
    public static TimedMetadataEncodingProperties CreateVobSub(byte[] formatUserData);
  }
}
namespace Windows.Networking.BackgroundTransfer {
  public sealed class DownloadOperation : IBackgroundTransferOperation, IBackgroundTransferOperationPriority {
    void RemoveRequestHeader(string headerName);
    void SetRequestHeader(string headerName, string headerValue);
  }
  public sealed class UploadOperation : IBackgroundTransferOperation, IBackgroundTransferOperationPriority {
    void RemoveRequestHeader(string headerName);
    void SetRequestHeader(string headerName, string headerValue);
  }
}
namespace Windows.Networking.Connectivity {
  public enum NetworkAuthenticationType {
    Owe = 12,
  }
}
namespace Windows.Networking.NetworkOperators {
  public interface INetworkOperatorTetheringAccessPointConfiguration2
  public interface INetworkOperatorTetheringManagerStatics4
  public sealed class NetworkOperatorTetheringAccessPointConfiguration : INetworkOperatorTetheringAccessPointConfiguration2 {
    TetheringWiFiBand Band { get; set; }
    bool IsBandSupported(TetheringWiFiBand band);
    IAsyncOperation<bool> IsBandSupportedAsync(TetheringWiFiBand band);
  }
  public sealed class NetworkOperatorTetheringManager {
    public static void DisableNoConnectionsTimeout();
    public static IAsyncAction DisableNoConnectionsTimeoutAsync();
    public static void EnableNoConnectionsTimeout();
    public static IAsyncAction EnableNoConnectionsTimeoutAsync();
    public static bool IsNoConnectionsTimeoutEnabled();
  }
  public enum TetheringWiFiBand
}
namespace Windows.Networking.PushNotifications {
  public static class PushNotificationChannelManager {
    public static event EventHandler<PushNotificationChannelsRevokedEventArgs> ChannelsRevoked;
  }
  public sealed class PushNotificationChannelsRevokedEventArgs
  public sealed class RawNotification {
    IBuffer ContentBytes { get; }
  }
}
namespace Windows.Security.Authentication.Web.Core {
  public sealed class WebAccountMonitor {
    event TypedEventHandler<WebAccountMonitor, WebAccountEventArgs> AccountPictureUpdated;
  }
}
namespace Windows.Storage {
  public static class KnownFolders {
    public static IAsyncOperation<StorageFolder> GetFolderAsync(KnownFolderId folderId);
    public static IAsyncOperation<KnownFoldersAccessStatus> RequestAccessAsync(KnownFolderId folderId);
    public static IAsyncOperation<KnownFoldersAccessStatus> RequestAccessForUserAsync(User user, KnownFolderId folderId);
  }
  public enum KnownFoldersAccessStatus
  public sealed class StorageFile : IInputStreamReference, IRandomAccessStreamReference, IStorageFile, IStorageFile2, IStorageFilePropertiesWithAvailability, IStorageItem, IStorageItem2, IStorageItemProperties, IStorageItemProperties2, IStorageItemPropertiesWithProvider {
    public static IAsyncOperation<StorageFile> GetFileFromPathForUserAsync(User user, string path);
  }
  public sealed class StorageFolder : IStorageFolder, IStorageFolder2, IStorageFolderQueryOperations, IStorageItem, IStorageItem2, IStorageItemProperties, IStorageItemProperties2, IStorageItemPropertiesWithProvider {
    public static IAsyncOperation<StorageFolder> GetFolderFromPathForUserAsync(User user, string path);
  }
}
namespace Windows.Storage.Provider {
  public sealed class StorageProviderFileTypeInfo
  public sealed class StorageProviderSyncRootInfo {
    IVector<StorageProviderFileTypeInfo> FallbackFileTypeInfo { get; }
  }
  public static class StorageProviderSyncRootManager {
    public static bool IsSupported();
  }
}
namespace Windows.System {
  public enum UserWatcherUpdateKind
}
namespace Windows.UI.Composition.Interactions {
  public sealed class InteractionTracker : CompositionObject {
    int TryUpdatePosition(Vector3 value, InteractionTrackerClampingOption option, InteractionTrackerPositionUpdateOption posUpdateOption);
  }
  public enum InteractionTrackerPositionUpdateOption
}
namespace Windows.UI.Composition.Particles {
  public sealed class ParticleAttractor : CompositionObject
  public sealed class ParticleAttractorCollection : CompositionObject, IIterable<ParticleAttractor>, IVector<ParticleAttractor>
  public class ParticleBaseBehavior : CompositionObject
  public sealed class ParticleBehaviors : CompositionObject
  public sealed class ParticleColorBehavior : ParticleBaseBehavior
  public struct ParticleColorBinding
  public sealed class ParticleColorBindingCollection : CompositionObject, IIterable<IKeyValuePair<float, ParticleColorBinding>>, IMap<float, ParticleColorBinding>
  public enum ParticleEmitFrom
  public sealed class ParticleEmitterVisual : ContainerVisual
  public sealed class ParticleGenerator : CompositionObject
  public enum ParticleInputSource
  public enum ParticleReferenceFrame
  public sealed class ParticleScalarBehavior : ParticleBaseBehavior
  public struct ParticleScalarBinding
  public sealed class ParticleScalarBindingCollection : CompositionObject, IIterable<IKeyValuePair<float, ParticleScalarBinding>>, IMap<float, ParticleScalarBinding>
  public enum ParticleSortMode
  public sealed class ParticleVector2Behavior : ParticleBaseBehavior
  public struct ParticleVector2Binding
  public sealed class ParticleVector2BindingCollection : CompositionObject, IIterable<IKeyValuePair<float, ParticleVector2Binding>>, IMap<float, ParticleVector2Binding>
  public sealed class ParticleVector3Behavior : ParticleBaseBehavior
  public struct ParticleVector3Binding
  public sealed class ParticleVector3BindingCollection : CompositionObject, IIterable<IKeyValuePair<float, ParticleVector3Binding>>, IMap<float, ParticleVector3Binding>
  public sealed class ParticleVector4Behavior : ParticleBaseBehavior
  public struct ParticleVector4Binding
  public sealed class ParticleVector4BindingCollection : CompositionObject, IIterable<IKeyValuePair<float, ParticleVector4Binding>>, IMap<float, ParticleVector4Binding>
}
namespace Windows.UI.Input {
  public sealed class CrossSlidingEventArgs {
    uint ContactCount { get; }
 }
  public sealed class DraggingEventArgs {
    uint ContactCount { get; }
  }
  public sealed class GestureRecognizer {
    uint HoldMaxContactCount { get; set; }
    uint HoldMinContactCount { get; set; }
    float HoldRadius { get; set; }
    TimeSpan HoldStartDelay { get; set; }
    uint TapMaxContactCount { get; set; }
    uint TapMinContactCount { get; set; }
    uint TranslationMaxContactCount { get; set; }
    uint TranslationMinContactCount { get; set; }
  }
  public sealed class HoldingEventArgs {
    uint ContactCount { get; }
    uint CurrentContactCount { get; }
  }
  public sealed class ManipulationCompletedEventArgs {
    uint ContactCount { get; }
    uint CurrentContactCount { get; }
  }
  public sealed class ManipulationInertiaStartingEventArgs {
    uint ContactCount { get; }
  }
  public sealed class ManipulationStartedEventArgs {
    uint ContactCount { get; }
  }
  public sealed class ManipulationUpdatedEventArgs {
    uint ContactCount { get; }
    uint CurrentContactCount { get; }
  }
  public sealed class RightTappedEventArgs {
    uint ContactCount { get; }
  }
  public sealed class SystemButtonEventController : AttachableInputObject
  public sealed class SystemFunctionButtonEventArgs
  public sealed class SystemFunctionLockChangedEventArgs
  public sealed class SystemFunctionLockIndicatorChangedEventArgs
  public sealed class TappedEventArgs {
    uint ContactCount { get; }
  }
}
namespace Windows.UI.Input.Inking {
  public sealed class InkModelerAttributes {
    bool UseVelocityBasedPressure { get; set; }
  }
}
namespace Windows.UI.Text {
  public enum RichEditMathMode
  public sealed class RichEditTextDocument : ITextDocument {
    void GetMath(out string value);
    void SetMath(string value);
    void SetMathMode(RichEditMathMode mode);
  }
}
namespace Windows.UI.ViewManagement {
  public sealed class ApplicationView {
    bool CriticalInputMismatch { get; set; }
    ScreenCaptureDisabledBehavior ScreenCaptureDisabledBehavior { get; set; }
    bool TemporaryInputMismatch { get; set; }
    void ApplyApplicationUserModelID(string value);
  }
  public enum ScreenCaptureDisabledBehavior
  public sealed class UISettings {
    event TypedEventHandler<UISettings, UISettingsAnimationsEnabledChangedEventArgs> AnimationsEnabledChanged;
    event TypedEventHandler<UISettings, UISettingsMessageDurationChangedEventArgs> MessageDurationChanged;
  }
  public sealed class UISettingsAnimationsEnabledChangedEventArgs
  public sealed class UISettingsMessageDurationChangedEventArgs
}
namespace Windows.UI.ViewManagement.Core {
  public sealed class CoreInputView {
    event TypedEventHandler<CoreInputView, CoreInputViewHidingEventArgs> PrimaryViewHiding;
    event TypedEventHandler<CoreInputView, CoreInputViewShowingEventArgs> PrimaryViewShowing;
  }
  public sealed class CoreInputViewHidingEventArgs
  public enum CoreInputViewKind {
    Symbols = 4,
  }
  public sealed class CoreInputViewShowingEventArgs
  public sealed class UISettingsController
}
namespace Windows.UI.Xaml.Controls {
  public class HandwritingView : Control {
    UIElement HostUIElement { get; set; }
    public static DependencyProperty HostUIElementProperty { get; }
    CoreInputDeviceTypes InputDeviceTypes { get; set; }
    bool IsSwitchToKeyboardButtonVisible { get; set; }
    public static DependencyProperty IsSwitchToKeyboardButtonVisibleProperty { get; }
    double MinimumColorDifference { get; set; }
    public static DependencyProperty MinimumColorDifferenceProperty { get; }
    bool PreventAutomaticDismissal { get; set; }
    public static DependencyProperty PreventAutomaticDismissalProperty { get; }
    bool ShouldInjectEnterKey { get; set; }
    public static DependencyProperty ShouldInjectEnterKeyProperty { get; }
    event TypedEventHandler<HandwritingView, HandwritingViewCandidatesChangedEventArgs> CandidatesChanged;
    event TypedEventHandler<HandwritingView, HandwritingViewContentSizeChangingEventArgs> ContentSizeChanging;
    void SelectCandidate(uint index);
    void SetTrayDisplayMode(HandwritingViewTrayDisplayMode displayMode);
  }
  public sealed class HandwritingViewCandidatesChangedEventArgs
  public sealed class HandwritingViewContentSizeChangingEventArgs
  public enum HandwritingViewTrayDisplayMode
}
namespace Windows.UI.Xaml.Core.Direct {
  public enum XamlEventIndex {
    HandwritingView_ContentSizeChanging = 321,
  }
  public enum XamlPropertyIndex {
    HandwritingView_HostUIElement = 2395,
    HandwritingView_IsSwitchToKeyboardButtonVisible = 2393,
    HandwritingView_MinimumColorDifference = 2396,
    HandwritingView_PreventAutomaticDismissal = 2397,
    HandwritingView_ShouldInjectEnterKey = 2398,
  }
}

The post Windows 10 SDK Preview Build 18970 available now! appeared first on Windows Developer Blog.

Microsoft and Qualcomm accelerate AI with Vision AI Developer Kit

$
0
0

Artificial intelligence (AI) workloads include megabytes of data and potentially billions of calculations. With advancements in hardware, it is now possible to run time-sensitive AI workloads on the edge while also sending outputs to the cloud for downstream applications. AI scenarios processed on the edge can facilitate important business scenarios, such as verifying if every person on a construction site is wearing a hardhat, or detecting whether items are out-of-stock on a store shelf.

The combination of hardware, software, and AI models needed to support these scenarios can be difficult to organize. To remove this barrier, we announced a developer kit last year with Qualcomm, to accelerate AI inferencing at the intelligent edge. Today we’re pleased to share that the Vision AI Developer Kit is now broadly available. The developer kit includes a camera, which uses Qualcomm’s Vision Intelligence 300 Platform, and the software needed to develop intelligent edge solutions using Azure IoT Edge and Azure Machine Learning. It supports an end-to-end Azure enabled solution with real-time image processing locally on the edge device, and model training and management on Azure. The Vision AI Developer Kit, made by our partner eInfochips, can now be ordered from Arrow Electronics.

Using the Vision AI Developer Kit, you can deploy vision models at the intelligent edge in minutes, regardless of your current machine learning skill level. Below, we detail three options for developers to get started, including no code using Custom Vision, an Azure Cognitive Service, custom models with Azure Machine Learning, and the fully integrated development environment provided by Visual Studio Code.

Azure Cognitive Services support for no code development

Custom Vision, an Azure Cognitive Service, enables you to build your own computer vision model, even if you’re not a data scientist. It provides a user-friendly interface that walks you through the process for uploading your data, training, and deploying customer vision models including image tagging. The Vision AI Developer Kit integration with Custom Vision includes the ability to use Azure IoT Hub to deploy your custom vision model directly to the developer kit. These custom vision models are then accelerated using the camera’s Snapdragon Neural Processing Engine (SNPE), which enables image classification to run quickly even when offline. 

Azure Machine Learning integration for data scientists

Azure Machine Learning streamlines the building, training, and deployment of machine learning models using tools that meet your needs, including code-first, visual drag and drop, and automated machine learning experiences. The Vision AI Developer Kit enables data scientists to use Azure Machine Learning to build custom models and deploy them to the included camera.

Get started with Azure Machine Learning using reference implementations provided in Jupyter notebooks. These reference implementations walk data scientists through the steps to upload training data to Azure Blob Storage, run a transfer learning experiment, convert the trained model to be compatible with the developer kit platform, and deploy via Azure IoT Edge.

Visual Studio Code integration for developers

Visual Studio Code provides developers a single development environment to manage their code and access Azure services through plugins. For developers using Visual Studio Code, we have created a GitHub repository which includes sample Python modules, pre-built Azure IoT deployment configurations, and Dockerfiles for container creation and deployment. You can use Visual Studio Code to modify the sample modules or create your own and containerize them to deploy on the camera.

Install the Vision AI DevKit extension for Visual Studio Code to take full advantage of the developer kit as a cloud managed device.  With the extension, you can deploy modules, see messages from the device, manage your Azure IoT Hub, and more, all from within a familiar development environment. You can also leverage Visual Studio Code to add business logic to your own Azure solutions that consume information from the camera using IoT Hub and transform camera data into normalized data streams using Azure Stream Analytics.

Next steps

To order your own Vision AI Developer Kit, visit the product page from Arrow. For more information, visit the Vision AI DevKit GitHub.

Hardware Intrinsics in .NET Core

$
0
0

Several years ago, we decided that it was time to support SIMD code in .NET. We introduced the System.Numerics namespace with Vector2Vector3Vector4Vector<T>, and related types. These types expose a general-purpose API for creating, accessing, and operating on them using hardware vector instructions (when available). They also provide a software fallback for when the hardware does not provide the appropriate instructions. This enabled a number of common algorithms to be vectorized, often with only minor refactorings. However, the generality of this approach made it difficult for programs to take full advantage of all vector instructions available on modern hardware. Additionally, modern hardware often exposes a number of specialized non-vector instructions that can dramatically improve performance. In this blog post, I’m exploring how we’ve addressed this limitation in .NET Core 3.0.

What are hardware intrinsics?

In .NET Core 3.0, we added a new feature called hardware intrinsics. Hardware intrinsics provide access to many of these hardware specific instructions that can’t easily be exposed in a more general-purpose mechanism. They differ from the existing SIMD intrinsics in that they are not general-purpose (the new hardware intrinsics are not cross-platform and the architecture does not provide a software fallback) and instead directly expose platform and hardware specific functionality to the .NET developer. The existing SIMD intrinsics, in comparison, are cross-platform, provide a software fallback, and are slightly abstracted from the underlying hardware. That abstraction can come at a cost and prevent certain functionality from being exposed (when said functionality does not exist or is not easily emulated on all target hardware).

The new intrinsics and supporting types are exposed under the System.Runtime.Intrinsics namespace. For .NET Core 3.0 there currently exists one namespace: System.Runtime.Intrinsics.X86. We are working on exposing hardware intrinsics for other platforms, such as System.Runtime.Intrinsics.Arm.

Under the platform specific namespaces, intrinsics are grouped into classes which represent logical hardware instruction groups (frequently referred to as Instruction Set Architectures or ISAs). Each class then exposes an IsSupported property that indicates whether the hardware you are currently executing on supports that instruction set. Each class then also exposes a set of methods that map to the underlying instructions exposed by that instruction set. There is sometimes additionally a subclass that is part of the same instruction set but that may be limited to specific hardware. For example, the Lzcnt class provides access to the leading zero count instructions. There is then a subclass named X64 which exposes the forms of the instruction that are only usable on 64-bit machines.

Some of the classes are also hierarchical in nature. For example, if Lzcnt.X64.IsSupported returns true, then Lzcnt.IsSupported must also return true since it is an explicit subclass. Likewise, if Sse2.IsSupported returns true, then Sse.IsSupported must also return true because Sse2 explicitly inherits from the Sseclass. However, it is worth noting that just because classes have similar names does not mean they are definitely hierarchical. For example, Bmi2 does not inherit from Bmi1 and so the IsSupported checks for the two instruction sets are distinct from each other. The design philosophy of these types is to truthfully represent the ISA specification. SSE2 requires to support SSE1, so we exposed a subclass and since BMI2 doesn’t require supporting BMI1, we didn’t use inheritance.

An example of the API shape described above is the following:

You can also see a more complete list by browsing the source code on source.dot.net or dotnet/coreclr on GitHub.

The IsSupported checks are treated as runtime constants by the JIT (when optimizations are enabled) and so you do not need to cross-compile to support multiple different ISAs, platforms, or architectures. Instead, you just write your code using if-statements and the unused code paths (any code path which is not executed, due to the condition for the branch being false or an earlier branch being taken instead) are dropped from the generated code (the native assembly code generated by the JIT at runtime).

It is essential that you guard usage of hardware intrinsics with the appropriate IsSupported check. If your code is unguarded and runs on a machine or architecture/platform that doesn’t support the intrinsic, a PlatformNotSupportedException is thrown by the runtime.

What benefits do these provide me?

Hardware Intrinsics definitely aren’t for everyone, but they can be used to boost perf in some computationally heavy workloads. Frameworks such as CoreFX or ML.NET take advantage of these methods to help accelerate things like copying memory, searching for the index of an item in an array/string, resizing images, or working with vectors, matrices, and tensors. Manually vectorizing some code that has been identified as a bottleneck can also be easier than it seems. Vectorizing your code is really all about performing multiple operations at once, generally using Single-Instruction Multiple Data (SIMD) instructions.

It is important to profile your code before vectorizing to ensure that the code you are optimizing is part of a hot spot (and therefore the optimization will be impactful). It is also important to profile while you are iterating on the vectorized code, as not all code will benefit from vectorization.

Vectorizing a simple algorithm

Take for example an algorithm which sums all elements in an array or span. This code is a perfect candidate for vectorization because it does the same unconditional operation every iteration of the loop and those operations are fairly trivial in nature.

An example of such an algorithm might look like the following:

The code is simple and understandable, but it is also not particularly fast for large inputs since you are only doing a single trivial operation per loop iteration.

Method Count Mean Error StdDev
Sum 1 2.477 ns 0.0192 ns 0.0179 ns
Sum 2 2.164 ns 0.0265 ns 0.0235 ns
Sum 4 3.224 ns 0.0302 ns 0.0267 ns
Sum 8 4.347 ns 0.0665 ns 0.0622 ns
Sum 16 8.444 ns 0.2042 ns 0.3734 ns
Sum 32 13.963 ns 0.2182 ns 0.2041 ns
Sum 64 50.374 ns 0.2955 ns 0.2620 ns
Sum 128 60.139 ns 0.3890 ns 0.3639 ns
Sum 256 106.416 ns 0.6404 ns 0.5990 ns
Sum 512 291.450 ns 3.5148 ns 3.2878 ns
Sum 1024 574.243 ns 9.5851 ns 8.4970 ns
Sum 2048 1,137.819 ns 5.9363 ns 5.5529 ns
Sum 4096 2,228.341 ns 22.8882 ns 21.4097 ns
Sum 8192 2,973.040 ns 14.2863 ns 12.6644 ns
Sum 16384 5,883.504 ns 15.9619 ns 14.9308 ns
Sum 32768 11,699.237 ns 104.0970 ns 97.3724 ns

Improving the perf by unrolling the loop

Modern CPUs have many ways of increasing the throughput at which it executes your code. For single-threaded applications, one of the ways it can do this is by executing multiple primitive operations in a single cycle (a cycle is the basic unit of time in a CPU).

Most modern CPUs can execute about 4 add operations in a single cycle (under optimal conditions), so by laying out your code correctly and profiling it, you can sometimes optimize your code to have better performance, even when only executing on a single-thread.

While the JIT can perform loop unrolling itself, it is conservative in deciding when to do so due to the larger codegen it produces. So, it can be beneficial to manually unroll the loop in your source code instead.

You might unroll your code like the following:

The code is slightly more complicated but takes better advantage of your hardware.

For really small loops, the code ends up being slightly slower, but that normalizes itself for inputs that have 8 elements and then starts getting faster for inputs with even more elements (taking 26% less time at 32k elements). It’s also worth noting that this optimization doesn’t always improve performance. For example, when handling float, the unrolled version is practically the same speed as the original version, so it’s important to profile your code accordingly.

Method Count Mean Error StdDev
SumUnrolled 1 2.922 ns 0.0651 ns 0.0609 ns
SumUnrolled 2 3.576 ns 0.0116 ns 0.0109 ns
SumUnrolled 4 3.708 ns 0.0157 ns 0.0139 ns
SumUnrolled 8 4.832 ns 0.0486 ns 0.0454 ns
SumUnrolled 16 7.490 ns 0.1131 ns 0.1058 ns
SumUnrolled 32 11.277 ns 0.0910 ns 0.0851 ns
SumUnrolled 64 19.761 ns 0.2016 ns 0.1885 ns
SumUnrolled 128 36.639 ns 0.3043 ns 0.2847 ns
SumUnrolled 256 77.969 ns 0.8409 ns 0.7866 ns
SumUnrolled 512 146.357 ns 1.3209 ns 1.2356 ns
SumUnrolled 1024 287.354 ns 0.9223 ns 0.8627 ns
SumUnrolled 2048 566.405 ns 4.0155 ns 3.5596 ns
SumUnrolled 4096 1,131.016 ns 7.3601 ns 6.5246 ns
SumUnrolled 8192 2,259.836 ns 8.6539 ns 8.0949 ns
SumUnrolled 16384 4,501.295 ns 6.4186 ns 6.0040 ns
SumUnrolled 32768 8,979.690 ns 19.5265 ns 18.2651 ns

Improving the perf by vectorizing the loop

However, we can still optimize the code a bit more. SIMD instructions are another way modern CPUs allow you to improve throughput. Using a single instruction they allow you to perform multiple operations in a single cycle. This can be better than the loop unrolling because it performs essentially the same operation, but with smaller generated code.

To elaborate a bit, each one of the add instructions from the unrolled loop is 4 bytes in size, so it takes 16-bytes of space to have all 4 adds in the unrolled form. However, the SIMD add instruction also performs 4 additions, but it only takes 4 bytes to encode. This means there are less instructions for the CPU to decode and execute each iteration of the loop. There are also other things the CPU can assume and optimize around for this single instruction, but those are out of scope for this blog post. What’s even better is that modern CPUs can also execute more than one SIMD instruction per cycle, so in certain cases you can then unroll your vectorized code to improve the performance further.

You should generally start by looking at whether the general-purpose Vector<T> class will suit your needs. It, like the newer hardware intrinsics, will emit SIMD instructions, but given that it is general-purpose you can reduce the amount of code you need to write/maintain.

The code might look like:

The code is faster, but we have to fall back to accessing individual elements when computing the overall sum. Vector<T> also does not have a well-defined size and can vary based on the hardware you are running against. The hardware intrinsics provide some additional functionality that can make this code a bit nicer and faster still (at the cost of additional code complexity and maintainence requirements).

Method Count Mean Error StdDev
SumVectorT 1 4.517 ns 0.0752 ns 0.0703 ns
SumVectorT 2 4.853 ns 0.0609 ns 0.0570 ns
SumVectorT 4 5.047 ns 0.0909 ns 0.0850 ns
SumVectorT 8 5.671 ns 0.0251 ns 0.0223 ns
SumVectorT 16 6.579 ns 0.0330 ns 0.0276 ns
SumVectorT 32 10.460 ns 0.0241 ns 0.0226 ns
SumVectorT 64 17.148 ns 0.0407 ns 0.0381 ns
SumVectorT 128 23.239 ns 0.0853 ns 0.0756 ns
SumVectorT 256 62.146 ns 0.8319 ns 0.7782 ns
SumVectorT 512 114.863 ns 0.4175 ns 0.3906 ns
SumVectorT 1024 172.129 ns 1.8673 ns 1.7467 ns
SumVectorT 2048 429.722 ns 1.0461 ns 0.9786 ns
SumVectorT 4096 654.209 ns 3.6215 ns 3.0241 ns
SumVectorT 8192 1,675.046 ns 14.5231 ns 13.5849 ns
SumVectorT 16384 2,514.778 ns 5.3369 ns 4.9921 ns
SumVectorT 32768 6,689.829 ns 13.9947 ns 13.0906 ns

NOTE: For the purposes of this blogpost, I forced the size of Vector<T> to 16-bytes using an internal configuration knob (COMPlus_SIMD16ByteOnly=1). This normalized the results when comparing SumVectorT to SumVectorizedSse and kept the latter code simpler. Namely, it avoided the need to write an if (Avx2.IsSupported) { } code path. Such a code path is nearly identical to the Sse2 path, but deals with Vector256<T> (32-bytes) and processes even more elements per loop iteration.

So, you might take advantage of the new hardware intrinsics like so:

The code is again slightly more complicated, but it’s significantly faster for all but the smallest workloads. At 32k elements, it’s taking 75% less time than the unrolled loop and 81% less than the original code.

You’ll notice that we have a few IsSupported checks. The first checks if the hardware intrinsics are supported for the current platform at all and falls back to the unrolled loop if they aren’t. This path will currently be hit for platforms like ARM/ARM64 which don’t have hardware intrinsics or if someone disables them for any reason. The second IsSupported check is in the SumVectorizedSse method and is used to produce slightly better codegen on newer hardware that additionally supports the Ssse3 instruction set.

Otherwise, most of the logic is essentially the same as what we had done for the unrolled version. Vector128<T> is a 128-bit type that contains Vector128<T>.Count elements. In the case of uint, which is itself 32-bits, you have 4 (128 / 32) elements, which is exactly how much we unrolled the loop by.

Method Count Mean Error StdDev
SumVectorized 1 4.555 ns 0.0192 ns 0.0179 ns
SumVectorized 2 4.848 ns 0.0147 ns 0.0137 ns
SumVectorized 4 5.381 ns 0.0210 ns 0.0186 ns
SumVectorized 8 4.838 ns 0.0209 ns 0.0186 ns
SumVectorized 16 5.107 ns 0.0175 ns 0.0146 ns
SumVectorized 32 5.646 ns 0.0230 ns 0.0204 ns
SumVectorized 64 6.763 ns 0.0338 ns 0.0316 ns
SumVectorized 128 9.308 ns 0.1041 ns 0.0870 ns
SumVectorized 256 15.634 ns 0.0927 ns 0.0821 ns
SumVectorized 512 34.706 ns 0.2851 ns 0.2381 ns
SumVectorized 1024 68.110 ns 0.4016 ns 0.3756 ns
SumVectorized 2048 136.533 ns 1.3104 ns 1.2257 ns
SumVectorized 4096 277.930 ns 0.5913 ns 0.5531 ns
SumVectorized 8192 554.720 ns 3.5133 ns 3.2864 ns
SumVectorized 16384 1,110.730 ns 3.3043 ns 3.0909 ns
SumVectorized 32768 2,200.996 ns 21.0538 ns 19.6938 ns

Summary

The new hardware intrinsics allow you to take advantage of platform-specific functionality for the machine you’re running on. There are approximately 1,500 APIs for x86 and x64 spread across 15 instruction sets and far too many to cover in a single blog post. By profiling your code to identify hot spots you can also potentially identify areas of your code that would benefit from vectorization and see some pretty good performance gains. There are multiple scenarios where vectorization can be applied and loop unrolling is just the beginning.

Anyone wanting to see more examples can search for uses of the intrinsics in the framework (see the dotnet and aspnet organizations) or in various other blog posts written by the community. And while the currently exposed intrinsics are extensive, there is still a lot of functionality that could be exposed. If you have functionality you would like exposed, feel free to log an API request against dotnet/corefx on GitHub. The API review process is detailed here and there is a good example for the API Request template listed under Step 1.

Special Thanks

A special thanks to our community members Fei Peng (@fiigii) and Jacek Blaszczynski (@4creators) who helped implement the hardware intrinsics. Also to all the community members who have provided valuable feedback to the design, implementation, and usability of the feature.

The post Hardware Intrinsics in .NET Core appeared first on .NET Blog.


Microsoft acquires Movere to help customers unlock cloud innovation with seamless migration tools

$
0
0

As cloud growth continues to unlock opportunities for our customers, cloud migration is increasingly important for business’s digital strategy. Today, I am pleased to announce that Microsoft has acquired Movere, an innovative technology provider in the cloud migration space.

We’re committed to providing our customers with a comprehensive experience for migrating existing applications and infrastructure to Azure, which include the right tools, processes, and programs. As part of that ongoing investment, we’re excited to welcome the leadership, talent, technology, and deep expertise Movere has built in enabling customers’ journey to the cloud over the last 11 years.

Movere’s innovative discovery and assessment capabilities will complement Azure Migrate and our integrated partner solutions, making migration an easier process for our customers. We believe that successful cloud migrations enable business transformation, and this acquisition underscores our investments to make that happen.

Together, Azure Migrate, Movere, and our ecosystem of independent software vendor (ISV) partners' solutions provide choice and a comprehensive set of capabilities from discovery, assessment, to migration and optimization. We aim to streamline our customers' journey to the cloud, enabling them to bring innovation and transformation with the power of Azure. You can read thoughts from Movere founders in their blog.

Python in Visual Studio Code – September 2019 Release

$
0
0

We are pleased to announce that the September 2019 release of the Python Extension for Visual Studio Code is now available. You can download the Python extensionfrom the Marketplace, or install it directly from the extension gallery in Visual Studio Code. If you already have the Python extension installed, you can also get the latest update by restarting Visual Studio Code. You can learn more about  Python support in Visual Studio Code in the documentation.  

This was a short release where we closed 35 issues, including improvements to the Python Language Server and to Jupyter Notebook cell debugging, as well as detection of virtual environment creationThe full list of enhancements is listed in ourchangelog. 

Improvements to Python Language Server 

The Python Language Server now has linting capabilities, and its latest release includenew linting messages and variety of additional general improvements, which are listed in the section “Other changes and enhancements” below  

The linting messages provided by the Python Language Server include detecting unresolved imports, undefined variables, too many arguments in a function call, unknown keyword arguments and inheriting from something that is not a class. To see the full detailed list of linting messages, you can check the documentation in the Language Server GitHub repo or the settings reference page within the Python for Visual Studio Code docs. 

We’ve also added general #noqa support, slinting messages can be disabled on a case by case basis. Lines with a #noqa comment will have their diagnostic output suppressed. For more information, you can check thdocumentation. 

Improvements to Jupyter Notebook cell debugging  

In the August release, we added the ability to debug Jupyter notebook cells where you can step into user code. In this release, this feature is enhanced with the option to also step into non-user code if needed. To enable, open the settings page (File > Preferences > Settings), search for “Data Science: Debug Just My Code” and uncheck the option. 

Once the setting is disabled, you’ll be able to step into function calls and, for example, inspect the non-user code behavior and how variables change when it’s being executed.  

Detection of virtual environment creation  

The Python interpreter displayed on the status bar indicates which environment the Python extension is using for running Python code (using the Python: Run Python File in Terminal command, for example), and to provide language services such as auto-completion, syntax checking, linting, formatting, etc:

In this release, when a new virtual environment is created, prompt will be displayed asking if you’d like to select its interpreter for the workspace 

This will add the path to the Python interpreter from the new virtual environment to your workspace settingsand therefore that environment will be used when installing packages and running code through the Python extension.  

Other Changes and Enhancements 

We have also added small enhancements and fixed issues requested by users that should improve your experience working with Python in Visual Studio Code. Some notable changes include: 

  • Update Jedi to 0.15.1 and parso to 0.5.1. (#6294) 
  • Bump version of PTVSD to 4.3.2. 
  • Added a setting to allow Python code to be executed when the interactive window is loading. (#6842) 
  • Add debug command code lenses when in debug mode. (#6672) 
  • General Improvements for the Python Language Server: 
    • Improved handling of generic classes in inheritance chains (#1278) 
    • Added support for TypeVar bound and generic self (#1242) 
    • Added support for forward references in type strings (#1186) 
    • Added goto definition for members in class bases (#1356#1443) 
    • Improved assignment handling (#1457#1494#411#1382 

We are continuing to A/B test new features. If you see something different that was not announced by the team, you may be part of an experiment! To see if you are part of an experiment, you can check the first lines in the Python extension output channel. If you wish to opt-out from A/B testing, disable telemetry in Visual Studio Code.  

Be sure to download the Python extension for Visual Studio Code now to try out the above improvements. If you run into any problems, please file an issue on the Python VS Code GitHub page. 

The post Python in Visual Studio Code – September 2019 Release appeared first on Python.

Visual Studio Code August 2019

ASP.NET Core and Blazor updates in .NET Core 3.0 Preview 9

$
0
0

.NET Core 3.0 Preview 9 is now available and it contains a number of improvements and updates to ASP.NET Core and Blazor.

Here’s the list of what’s new in this preview:

  • Blazor event handlers and data binding attributes moved to Microsoft.AspNetCore.Components.Web
  • Blazor routing improvements
    • Render content using a specific layout
    • Routing decoupled from authorization
    • Route to components from multiple assemblies
  • Render multiple Blazor components from MVC views or pages
  • Smarter reconnection for Blazor Server apps
  • Utility base component classes for managing a dependency injection scope
  • Razor component unit test framework prototype
  • Helper methods for returning Problem Details from controllers
  • New client API for gRPC
  • Support for async streams in streaming gRPC responses

Please see the release notes for additional details and known issues.

Get started

To get started with ASP.NET Core in .NET Core 3.0 Preview 9 install the .NET Core 3.0 Preview 9 SDK.

If you’re on Windows using Visual Studio, install the latest preview of Visual Studio 2019.

.NET Core 3.0 Preview 9 requires Visual Studio 2019 16.3 Preview 3 or later.

To install the latest Blazor WebAssembly template also run the following command:

dotnet new -i Microsoft.AspNetCore.Blazor.Templates::3.0.0-preview9.19424.4

Upgrade an existing project

To upgrade an existing ASP.NET Core app to .NET Core 3.0 Preview 9, follow the migrations steps in the ASP.NET Core docs.

Please also see the full list of breaking changes in ASP.NET Core 3.0.

To upgrade an existing ASP.NET Core 3.0 Preview 8 project to Preview 9:

  • Update all Microsoft.AspNetCore.* package references to 3.0.0-preview9.19424.4
  • In Blazor apps and libraries:
    • Add a using statement for Microsoft.AspNetCore.Components.Web in your top level _Imports.razor file (see Blazor event handlers and data binding attributes moved to Microsoft.AspNetCore.Components.Web below for details)
    • Update all Blazor component parameters to be public.
    • Update implementations of IJSRuntime to return ValueTask<T>.
    • Replace calls to MapBlazorHub<TComponent> with a single call to MapBlazorHub.
    • Update calls to RenderComponentAsync and RenderStaticComponentAsync to use the new overloads to RenderComponentAsync that take a RenderMode parameter (see Render multiple Blazor components from MVC views or pages below for details).
    • Update App.razor to use the updated Router component (see Blazor routing improvements below for details).
    • (Optional) Remove page specific _Imports.razor file with the @layout directive to use the default layout specified through the router instead.
    • Remove any use of the PageDisplay component and replace with LayoutView, RouteView, or AuthorizeRouteView as appropriate (see Blazor routing improvements below for details).
    • Replace uses of IUriHelper with NavigationManager.
    • Remove any use of @ref:suppressField.
    • Replace the previous RevalidatingAuthenticationStateProvider code with the new RevalidatingIdentityAuthenticationStateProvider code from the project template.
    • Replace Microsoft.AspNetCore.Components.UIEventArgs with System.EventArgs and remove the “UI” prefix from all EventArgs derived types (UIChangeEventArgs -> ChangeEventArgs, etc.).
    • Replace DotNetObjectRef with DotNetObjectReference.
  • In gRPC projects:
    • Update calls to GrpcClient.Create with a call GrpcChannel.ForAddress to create a new gRPC channel and new up your typed gRPC clients using this channel.
    • Rebuild any project or project dependency that uses gRPC code generation for an ABI change in which all clients inherit from ClientBase instead of LiteClientBase. There are no code changes required for this change.
    • Please also see the grpc-dotnet announcement for all changes.

You should now be all set to use .NET Core 3.0 Preview 9!

Blazor event handlers and data binding attributes moved to Microsoft.AspNetCore.Components.Web

In this release we moved the set of bindings and event handlers available for HTML elements into the Microsoft.AspNetCore.Components.Web.dll assembly and into the Microsoft.AspNetCore.Components.Web namespace. This change was made to isolate the web specific aspects of the Blazor programming from the core programming model. This section provides additional details on how to upgrade your existing projects to react to this change.

Blazor WebAssembly apps and libraries

Add a package reference to the Microsoft.AspNetCore.Components.Web package package if you don’t already have one. Then open the root _Imports.razor file for the project (create the file if you don’t already have it) and add @using Microsoft.AspNetCore.Components.Web.

Blazor Server apps

Open the application’s root _Imports.razor and add @using Microsoft.AspNetCore.Components.Web. Server-Side Blazor apps get a reference to the Microsoft.AspNetCore.Components.Web package implicitly without any additional package references, so adding a reference to this package isn’t necessary.

Troubleshooting guidance

With the correct references and using statement for Microsoft.AspNetCore.Components.Web, event handlers like @onclick and @bind should be bold font and colorized as shown below when using Visual Studio.

Events and binding working in Visual Studio

If @bind or @onclick are colorized as a normal HTML attribute, then the @using statement is missing.

Events and binding not recognized

If you’re missing a using statement for the Microsoft.AspNetCore.Components.Web namespace, you may see build failures. For example, the following build error for the code shown above indicates that the @bind attribute wasn’t recognized:

CS0169  The field 'Index.text' is never used
CS0428  Cannot convert method group 'Submit' to non-delegate type 'object'. Did you intend to invoke the method?

In other cases you may get a runtime exception and the app fails to render. For example, the following runtime exception seen in the browser console indicates that the @onclick attribute wasn’t recognized:

Error: There was an error applying batch 2.
DOMException: Failed to execute 'setAttribute' on 'Element': '@onclick' is not a valid attribute name.

Add a using statement for the Microsoft.AspNetCore.Components.Web namespace to address these issues. If adding the using statement fixed the problem, consider moving to the using statement app’s root _Imports.razor so it will apply to all files.

If you add the Microsoft.AspNetCore.Components.Web namespace but get the following build error, then you’re missing a package reference to the Microsoft.AspNetCore.Components.Web package:

CS0234  The type or namespace name 'Web' does not exist in the namespace 'Microsoft.AspNetCore.Components' (are you missing an assembly reference?)

Add a package reference to the Microsoft.AspNetCore.Components.Web package to address the issue.

Blazor routing improvements

In this release we’ve revised the Blazor Router component to make it more flexible and to enable new scenarios. The Router component in Blazor handles rendering the correct component that matches the current address. Routable components are marked with the @page directive, which adds the RouteAttribute to the generated component classes. If the current address matches a route, then the Router renders the contents of its Found parameter. If no route matches, then the Router component renders the contents of its NotFound parameter.

To render the component with the matched route, use the new RouteView component passing in the supplied RouteData from the Router along with any desired parameters. The RouteView component will render the matched component with its layout if it has one. You can also optionally specify a default layout to use if the matched component doesn’t have one.

<Router AppAssembly="typeof(Program).Assembly">
    <Found Context="routeData">
        <RouteView RouteData="routeData" DefaultLayout="typeof(MainLayout)" />
    </Found>
    <NotFound>
        <h1>Page not found</h1>
        <p>Sorry, but there's nothing here!</p>
    </NotFound>
</Router>

Render content using a specific layout

To render a component using a particular layout, use the new LayoutView component. This is useful when specifying content for not found pages that you still want to use the app’s layout.

<Router AppAssembly="typeof(Program).Assembly">
    <Found Context="routeData">
        <RouteView RouteData="routeData" DefaultLayout="typeof(MainLayout)" />
    </Found>
    <NotFound>
        <LayoutView Layout="typeof(MainLayout)">
            <h1>Page not found</h1>
            <p>Sorry, but there's nothing here!</p>
        </Layout>
    </NotFound>
</Router>

Routing decoupled from authorization

Authorization is no longer handled directly by the Router. Instead, you use the AuthorizeRouteView component. The AuthorizeRouteView component is a RouteView that will only render the matched component if the user is authorized. Authorization rules for specific components are specified using the AuthorizeAttribute. The AuthorizeRouteView component also sets up the AuthenticationState as a cascading value if there isn’t one already. Otherwise, you can still manually setup the AuthenticationState as a cascading value using the CascadingAuthenticationState component.

<Router AppAssembly="@typeof(Program).Assembly">
    <Found Context="routeData">
        <AuthorizeRouteView RouteData="@routeData" DefaultLayout="@typeof(MainLayout)" />
    </Found>
    <NotFound>
        <CascadingAuthenticationState>
            <LayoutView Layout="@typeof(MainLayout)">
                <p>Sorry, there's nothing at this address.</p>
            </LayoutView>
        </CascadingAuthenticationState>
    </NotFound>
</Router>

You can optionally set the NotAuthorized and Authorizing parameters of the AuthorizedRouteView component to specify content to display if the user is not authorized or authorization is still in progress.

<Router AppAssembly="@typeof(Program).Assembly">
    <Found Context="routeData">
        <AuthorizeRouteView RouteData="@routeData" DefaultLayout="@typeof(MainLayout)">
            <NotAuthorized>
                <p>Nope, nope!</p>
            </NotAuthorized>
        </AuthorizeRouteView>
    </Found>
</Router>

Route to components from multiple assemblies

You can now specify additional assemblies for the Router component to consider when searching for routable components. These assemblies will be considered in addition to the specified AppAssembly. You specify these assemblies using the AdditionalAssemblies parameter. For example, if Component1 is a routable component defined in a referenced class library, then you can support routing to this component like this:

<Router
    AppAssembly="typeof(Program).Assembly"
    AdditionalAssemblies="new[] { typeof(Component1).Assembly }>
    ...
</Router>

Render multiple Blazor components from MVC views or pages

We’ve reenabled support for rendering multiple components from a view or page in a Blazor Server app. To render a component from a .cshtml file, use the Html.RenderComponentAsync<TComponent>(RenderMode renderMode, object parameters) HTML helper method with the desired RenderMode.

RenderMode Description Supports parameters?
Static Statically render the component with the specified parameters. Yes
Server Render a marker where the component should be rendered interactively by the Blazor Server app. No
ServerPrerendered Statically prerender the component along with a marker to indicate the component should later be rendered interactively by the Blazor Server app. No

Support for stateful prerendering has been removed in this release due to security concerns. You can no longer prerender components and then connect back to the same component state when the app loads. We may reenable this feature in a future release post .NET Core 3.0.

Blazor Server apps also no longer require that the entry point components be registered in the app’s Configure method. Only a single call to MapBlazorHub() is required.

Smarter reconnection for Blazor Server apps

Blazor Server apps are stateful and require an active connection to the server in order to function. If the network connection is lost, the app will try to reconnect to the server. If the connection can be reestablished but the server state is lost, then reconnection will fail. Blazor Server apps will now detect this condition and recommend the user to refresh the browser instead of retrying to connect.

Blazor Server reconnect rejected

Utility base component classes for managing a dependency injection scope

In ASP.NET Core apps, scoped services are typically scoped to the current request. After the request completes, any scoped or transient services are disposed by the dependency injection (DI) system. In Blazor Server apps, the request scope lasts for the duration of the client connection, which can result in transient and scoped services living much longer than expected.

To scope services to the lifetime of a component you can use the new OwningComponentBase and OwningComponentBase<TService> base classes. These base classes expose a ScopedServices property of type IServiceProvider that can be used to resolve services that are scoped to the lifetime of the component. To author a component that inherits from a base class in Razor use the @inherits directive.

@page "/users"
@attribute [Authorize]
@inherits OwningComponentBase<Data.ApplicationDbContext>

<h1>Users (@Service.Users.Count())</h1>
<ul>
    @foreach (var user in Service.Users)
    {
        <li>@user.UserName</li>
    }
</ul>

Note: Services injected into the component using @inject or the InjectAttribute are not created in the component’s scope and will still be tied to the request scope.

Razor component unit test framework prototype

We’ve started experimenting with building a unit test framework for Razor components. You can read about the prototype in Steve Sanderson’s Unit testing Blazor components – a prototype blog post. While this work won’t ship with .NET Core 3.0, we’d still love to get your feedback early in the design process. Take a look at the code on GitHub and let us know what you think!

Helper methods for returning Problem Details from controllers

Problem Details is a standardized format for returning error information from an HTTP endpoint. We’ve added new Problem and ValidationProblem method overloads to controllers that use optional parameters to simplify returning Problem Detail responses.

[Route("/error")]
public ActionResult<ProblemDetails> HandleError()
{
    return Problem(title: "An error occurred while processing your request", statusCode: 500);
}

New client API for gRPC

To improve compatibility with the existing Grpc.Core implementation, we’ve changed our client API to use gRPC channels. The channel is where gRPC configuration is set and it is used to create strongly typed clients. The new API provides a more consistent client experience with Grpc.Core, making it easier to switch between using the two libraries.

// Old
using var httpClient = new HttpClient() { BaseAddress = new Uri("https://localhost:5001") };
var client = GrpcClient.Create<GreeterClient>(httpClient);

// New
var channel = GrpcChannel.ForAddress("https://localhost:5001");
var client = new GreeterClient(channel);

var reply = await client.GreetAsync(new HelloRequest { Name = "Santa" });

Support for async streams in streaming gRPC responses

gRPC streaming responses return a custom IAsyncStreamReader type that can be iterated on to receive all response messages in a streaming response. With the addition of async streams in C# 8, we’ve added a new extension method that makes for a more ergonomic API while consuming streaming responses.

// Old
while (await requestStream.MoveNext(CancellationToken.None))
{
  var message = requestStream.Current;
  // …
}

// New and improved
await foreach (var message in requestStream.ReadAllAsync())
{
  // …
}

Give feedback

We hope you enjoy the new features in this preview release of ASP.NET Core and Blazor! Please let us know what you think by filing issues on GitHub.

Thanks for trying out ASP.NET Core and Blazor!

The post ASP.NET Core and Blazor updates in .NET Core 3.0 Preview 9 appeared first on ASP.NET Blog.

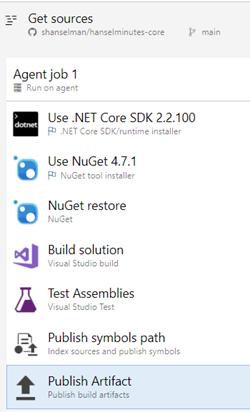
Announcing .NET Core 3.0 Preview 9

$
0
0

Today, we’re announcing .NET Core 3.0 Preview 9. Just like with Preview 8, we’ve focused on polishing .NET Core 3.0 for a final release and aren’t adding new features. If these final builds seem less exciting than earlier previews, that’s by design.

Download .NET Core 3.0 Preview 9 right now on Windows, macOS, and Linux.

ASP.NET Core, EF Core and Visual Studio are also releasing updates today.

Details:

.NET Core 3.0 is launching at .NET Conf

Tune in for .NET Conf, September 23-25th. We will launch .NET Core 3.0 during .NET Conf. Yes, that means that Preview 9 is the last preview, and .NET Core 3.0 will be released in its final version later this month. We have a lot of great speakers and content prepared for .NET Conf this year. It’s one of the big .NET developer events each year, and you cannot beat the price. It’s free and streaming online.

Visual Studio Support

.NET Core 3.0 is supported with Visual Studio 2019 16.3 Preview 3 and Visual Studio for Mac 8.3, which were also released today. Please upgrade to it for the best (and supported) experience with .NET Core 3.0 Preview 9. See Visual Studio 2019 16.3 release notes for more information.

We know that some folks have been successful using .NET Core 3.0 builds with Visual Studio 2019 16.2 and wonder why 16.3 is required. The short answer is that we only test .NET Core 3.0 with Visual Studio 2019 16.3 and have made many improvements and key fixes that are only in 16.3. The same model applies to Visual Studio for Mac 8.3.

The C# Extension for Visual Studio Code is always updated to support new .NET Core versions. Make sure you have the latest version of the C# extension installed.

Go Live

NET Core 3.0 Preview 9 is supported by Microsoft and can be used in production. We strongly recommend that you test your app running on Preview 9 before deploying into production. If you find an issue with .NET Core 3.0, please file a GitHub issue and/or contact Microsoft support.

The Microsoft .NET Site has been updated to .NET Core 3.0 Preview 9 (see the .NET Core runtime version in the footer text). It’s been running great on previews, starting with Preview 7, on Azure WebApps (as a self-contained app). Check out the Microsoft .NET site and see for yourself how it performs on Preview 9.

Closing

The .NET Core 3.0 release is coming close to completion, and the team is solely focused on stability and reliability now that we’re no longer building new features. Please tell us about any issues you find, ideally as quickly as possible. We want to get as many fixes in as possible before we ship the final 3.0 release.

If you missed earlier (more exciting) posts about .NET Core 3.0, check out the improvements that were part of .NET Core 3.0 Preview 6 and earlier releases.

If you install daily builds, read an important announcement about .NET Core master branches.

The post Announcing .NET Core 3.0 Preview 9 appeared first on .NET Blog.
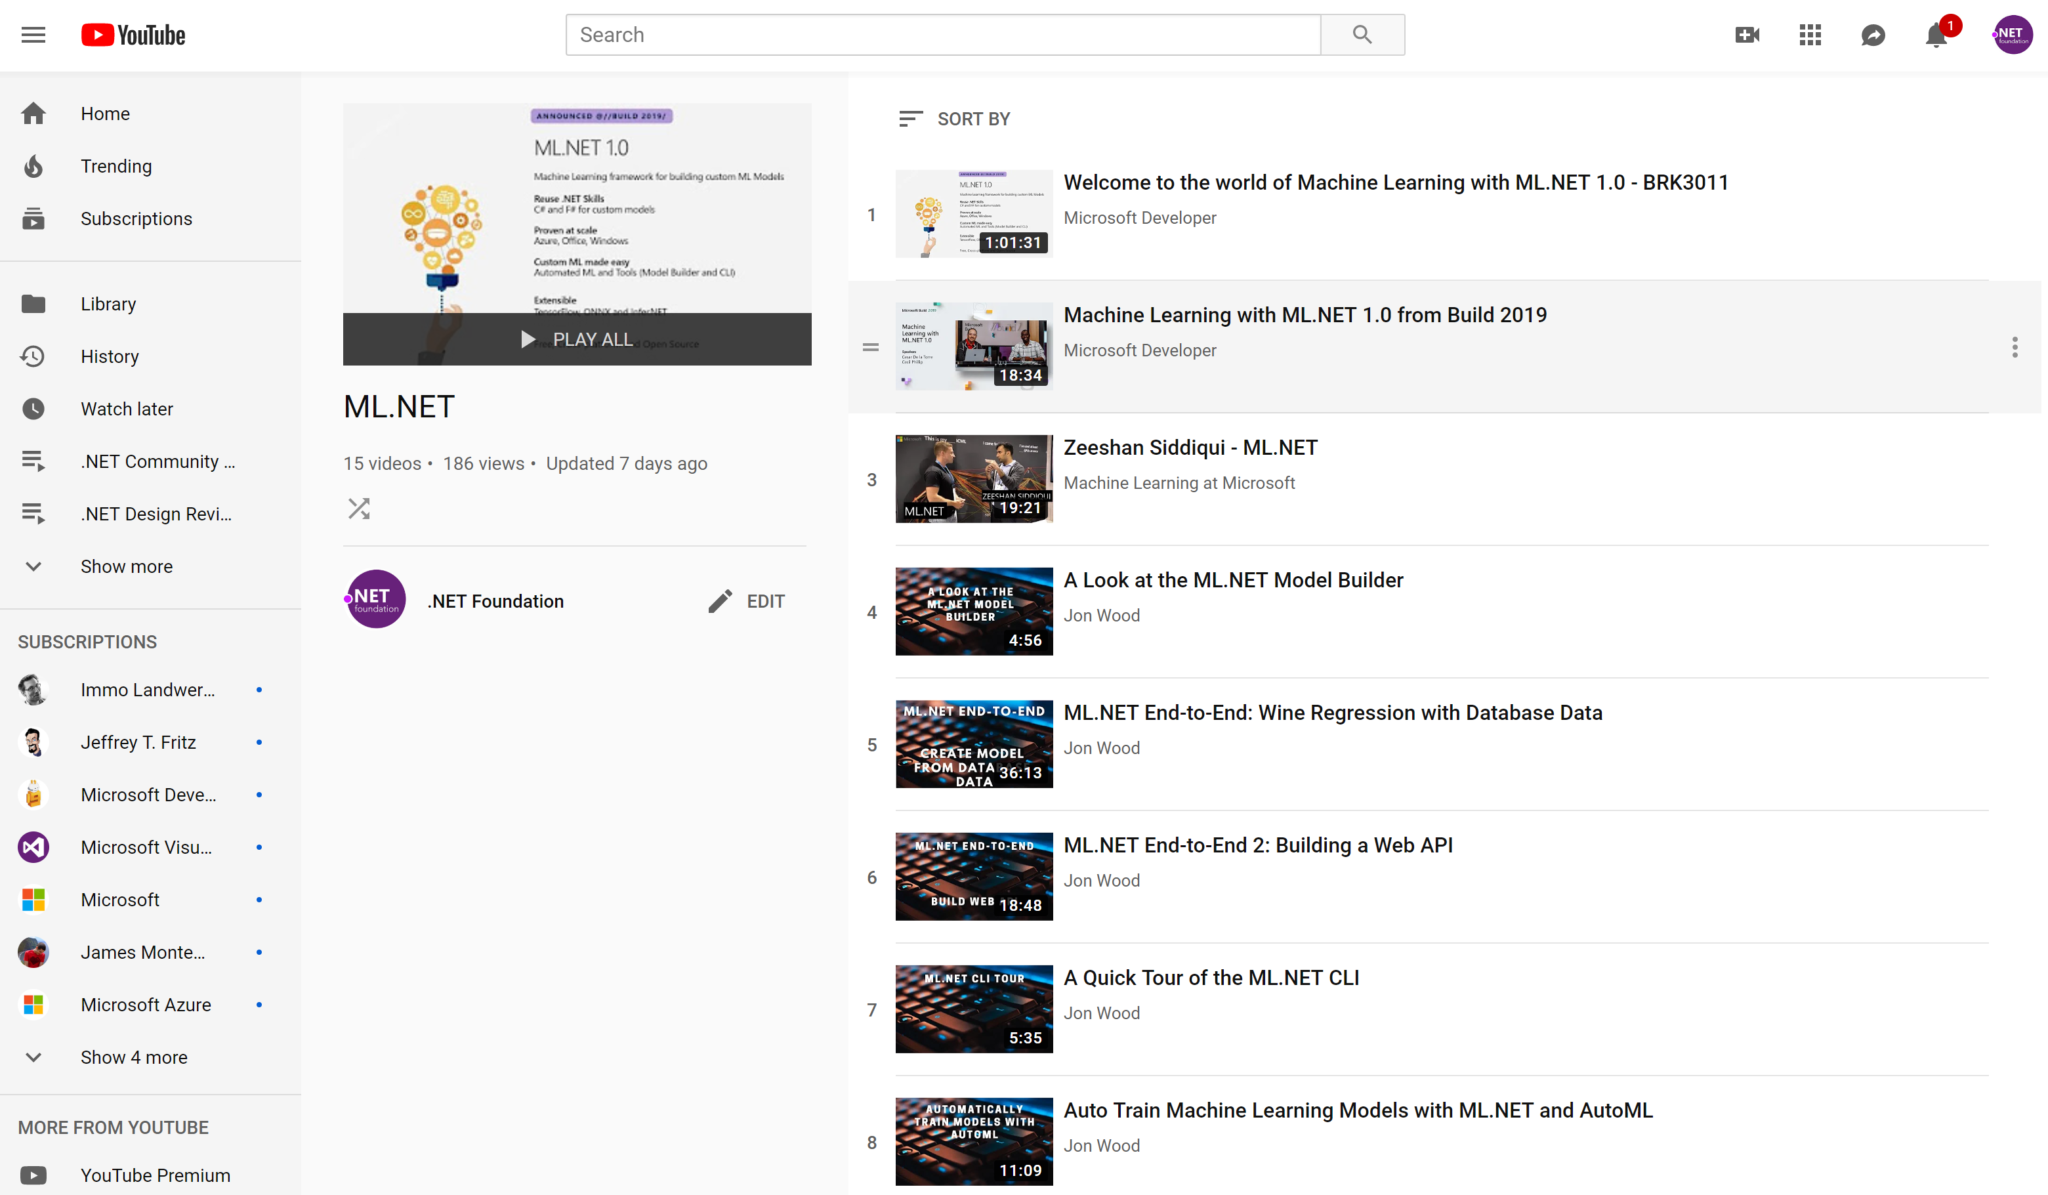
Viewing all 5971 articles
Browse latest View live


<script src="https://jsc.adskeeper.com/r/s/rssing.com.1596347.js" async> </script>