Quantcast
Channel: Category Name
Viewing all 5971 articles
Browse latest View live

Achievement Unlocked: Visual Studio for Mac ASP.NET Core Challenge Completed

$
0
0

Last month, we kicked-off a challenge for our developer community to build a solution using ASP.NET Core and the new .NET Core features in Visual Studio for Mac. We were delighted to hear from so many of you and we were excited to receive many projects built from scratch using some of the control libraries we highlighted. Check out some of the submissions that came our way:

Screen shots of apps built for the challenge - resume pages, a weather forecast, a mailbox sample, and other projects.

Thank you!

Thanks to all of you who took part in this challenge – we’re reaching out to get you the sweet, sweet swag that was mentioned as a perk of participating.

We’d also like to say thank you to the .NET Core component library partners that took part in this challenge by contributing licenses to the prize list and for their continued support of .NET Core developers on Mac:

More .NET Core, Coming Soon

The currently released Visual Studio for Mac v8.3 has full support for .NET Core 3.0. Our v8.4 release, now available in preview, adds support for .NET Core 3.1, Blazor, and ASP.NET Core scaffolding. You can read more about it in the announcement post from last week.

If you have any feedback on this, or any, version of Visual Studio for Mac, we invite you to leave them in the comments below this post or to reach out to us on Twitter at @VisualStudioMac. If you run into issues while using Visual Studio for Mac, you can use Report a Problem to notify the team. In addition to product issues, we also welcome your feature suggestions on the Visual Studio Developer Community website.

The post Achievement Unlocked: Visual Studio for Mac ASP.NET Core Challenge Completed appeared first on Visual Studio Blog.


HO HO HO! Microsoft and Bing Maps help NORAD track Santa!

$
0
0

The North American Aerospace Defense Command (NORAD) is preparing for their annual tradition of tracking Santa around the globe. As NORAD conducts its primary mission of defending Canadian and United States airspace, they take on the supplementary mission of tracking Santa's journey for the holidays.

Much like Santa and his Elves, NORAD gets help from volunteers, partners and Microsoft Employees who will be joining the crew at the Peterson Airforce Base to ensure Santa's safe travels around the globe!

Track Santa on a 3D Map

Working with Cesium, a platform for developers to build web-based 3D map apps, NORAD has built a 3D tracker that displays Santa's whereabouts. The 3D tracker app uses Bing Maps satellite imagery to give a realistic texture to the 3D globe rendered by the CesiumJS library.

NORAD Santa Tracker

For devices that do not support 3D, the app falls back to a 2D map using the Bing Maps API. That map displays a pin marking Santa’s current location for you to follow. You can also learn more about each location Santa visits by clicking on an icon that brings up Wikipedia articles and Santa Cam videos that you can play.

Join the world-wide countdown to the big trip with NORAD, play some games and see Santa's location on a Bing Map by visiting https://www.noradsanta.org/.


Wishing you and yours a wonderful holiday season!

- The Bing Maps Team

Advancing Azure Active Directory availability

$
0
0

“Continuing our Azure reliability series to be as transparent as possible about key initiatives underway to keep improving availability, today we turn our attention to Azure Active Directory. Microsoft Azure Active Directory (Azure AD) is a cloud identity service that provides secure access to over 250 million monthly active users, connecting over 1.4 million unique applications and processing over 30 billion daily authentication requests. This makes Azure AD not only the largest enterprise Identity and Access Management solution, but easily one of the world’s largest services. The post that follows was written by Nadim Abdo, Partner Director of Engineering, who is leading these efforts.” - Mark Russinovich, CTO, Azure


Our customers trust Azure AD to manage secure access to all their applications and services. For us, this means that every authentication request is a mission critical operation. Given the critical nature and the scale of the service, our identity team’s top priority is the reliability and security of the service. Azure AD is engineered for availability and security using a truly cloud-native, hyper-scale, multi-tenant architecture and our team has a continual program of raising the bar on reliability and security.

Azure AD: Core availability principles

Engineering a service of this scale, complexity, and mission criticality to be highly available in a world where everything we build on can and does fail is a complex task.

Our resilience investments are organized around the set of reliability principles below:

o	Azure AD resilience investments are organized around this set of reliability principles

Our availability work adopts a layered defense approach to reduce the possibility of customer visible failure as much as possible; if a failure does occur, scope down the impact of that failure as much as possible, and finally, reduce the time it takes to recover and mitigate a failure as much as possible.

Over the coming weeks and months, we dive deeper into how each of the principles is designed and verified in practice, as well as provide examples of how they work for our customers.

Highly redundant

Azure AD is a global service with multiple levels of internal redundancy and automatic recoverability. Azure AD is deployed in over 30 datacenters around the world leveraging Azure Availability Zones where present. This number is growing rapidly as additional Azure Regions are deployed.

For durability, any piece of data written to Azure AD is replicated to at least 4 and up to 13 datacenters depending on your tenant configuration. Within each data center, data is again replicated at least 9 times for durability but also to scale out capacity to serve authentication load. To illustrate—this means that at any point in time, there are at least 36 copies of your directory data available within our service in our smallest region. For durability, writes to Azure AD are not completed until a successful commit to an out of region datacenter.

This approach gives us both durability of the data and massive redundancy—multiple network paths and datacenters can serve any given authorization request, and the system automatically and intelligently retries and routes around failures both inside a datacenter and across datacenters.

To validate this, we regularly exercise fault injection and validate the system’s resiliency to failure of the system components Azure AD is built on. This extends all the way to taking out entire datacenters on a regular basis to confirm the system can tolerate the loss of a datacenter with zero customer impact.

No single points of failure (SPOF)

As mentioned, Azure AD itself is architected with multiple levels of internal resilience, but our principle extends even further to have resilience in all our external dependencies. This is expressed in our no single point of failure (SPOF) principle.

Given the criticality of our services we don’t accept SPOFs in critical external systems like Distributed Name Service (DNS), content delivery networks (CDN), or Telco providers that transport our multi-factor authentication (MFA), including SMS and Voice. For each of these systems, we use multiple redundant systems configured in a full active-active configuration.

Much of that work on this principle has come to completion over the last calendar year, and to illustrate, when a large DNS provider recently had an outage, Azure AD was entirely unaffected because we had an active/active path to an alternate provider.

Elastically scales

Azure AD is already a massive system running on over 300,000 CPU Cores and able to rely on the massive scalability of the Azure Cloud to dynamically and rapidly scale up to meet any demand. This can include both natural increases in traffic, such as a 9AM peak in authentications in a given region, but also huge surges in new traffic served by our Azure AD B2C which powers some of the world’s largest events and frequently sees rushes of millions of new users.

As an added level of resilience, Azure AD over-provisions its capacity and a design point is that the failover of an entire datacenter does not require any additional provisioning of capacity to handle the redistributed load. This gives us the flexibility to know that in an emergency we already have all the capacity we need on hand.

Safe deployment

Safe deployment ensures that changes (code or configuration) progress gradually from internal automation to internal to Microsoft self-hosting rings to production. Within production we adopt a very graduated and slow ramp up of the percentage of users exposed to a change with automated health checks gating progression from one ring of deployment to the next. This entire process takes over a week to fully rollout a change across production and can at any time rapidly rollback to the last well-known healthy state.

This system regularly catches potential failures in what we call our ‘early rings’ that are entirely internal to Microsoft and prevents their rollout to rings that would impact customer/production traffic.

Modern verification

To support the health checks that gate safe deployment and give our engineering team insight into the health of the systems, Azure AD emits a massive amount of internal telemetry, metrics, and signals used to monitor the health of our systems. At our scale, this is over 11 PetaBytes a week of signals that feed our automated health monitoring systems. Those systems in turn trigger alerting to automation as well as our team of 24/7/365 engineers that respond to any potential degradation in availability or Quality of Service (QoS).

Our journey here is expanding that telemetry to provide optics of not just the health of the services, but metrics that truly represent the end-to-end health of a given scenario for a given tenant. Our team is already alerting on these metrics internally and we’re evaluating how to expose this per-tenant health data directly to customers in the Azure Portal.

Partitioning and fine-grained fault domains

A good analogy to better understand Azure AD are the compartments in a submarine, designed to be able to flood without affecting either other compartments or the integrity of the entire vessel.

The equivalent for Azure AD is a fault domain, the scale units that serve a set of tenants in a fault domain are architected to be completely isolated from other fault domain’s scale units. These fault domains provide hard isolation of many classes of failures such that the ‘blast radius’ of a fault is contained in a given fault domain.

Azure AD up to now has consisted of five separate fault domains. Over the last year, and completed by next summer, this number will increase to 50 fault domains, and many services, including Azure Multi-Factor Authentication (MFA), are moving to become fully isolated in those same fault domains.

This hard-partitioning work is designed to be a final catch all that scopes any outage or failure to no more than 1/50 or ~2% of our users. Our objective is to increase this even further to hundreds of fault domains in the following year.

A preview of what’s to come

The principles above aim to harden the core Azure AD service. Given the critical nature of Azure AD, we’re not stopping there—future posts will cover new investments we’re making including rolling out in production a second and completely fault-decorrelated identity service that can provide seamless fallback authentication support in the event of a failure in the primary Azure AD service.

Think of this as the equivalent to a backup generator or uninterruptible power supply (UPS) system that can provide coverage and protection in the event the primary power grid is impacted. This system is completely transparent and seamless to end users and is now in production protecting a portion of our critical authentication flows for a set of M365 workloads. We’ll be rapidly expanding its applicability to cover more scenarios and workloads.

We look forward to sharing more on our Azure Active Directory Identity Blog, hearing your questions and topics of interest for future posts.

Windows 10 SDK Preview Build 19041 available now!

$
0
0

Today, we released a new Windows 10 Preview Build of the SDK to be used in conjunction with Windows 10 Insider Preview (Build 19041 or greater). The Preview SDK Build 19041 contains bug fixes and under development changes to the API surface area.

The Preview SDK can be downloaded from the developer section on Windows Insider.

For feedback and updates to the known issues, please see the developer forum. For new developer feature requests, head over to our Windows Platform UserVoice.

Things to note:

  • This build works in conjunction with previously released SDKs and Visual Studio 2017 and 2019. You can install this SDK and still also continue to submit your apps that target Windows 10 build 1903 or earlier to the Microsoft Store.
  • The Windows SDK will now formally only be supported by Visual Studio 2017 and greater. You can download the Visual Studio 2019 here.
  • This build of the Windows SDK will install on released Windows builds and on Windows 10 Insider Preview builds.
  • In order to assist with script access to the SDK, the ISO will also be able to be accessed through the following static URL: https://software-download.microsoft.com/download/sg/Windows_InsiderPreview_SDK_en-us_19041_1.iso.

Tools Updates

Message Compiler (mc.exe)

  • Now detects the Unicode byte order mark (BOM) in .mc files. If the If the .mc file starts with a UTF-8 BOM, it will be read as a UTF-8 file. Otherwise, if it starts with a UTF-16LE BOM, it will be read as a UTF-16LE file. If the -u parameter was specified, it will be read as a UTF-16LE file. Otherwise, it will be read using the current code page (CP_ACP).
  • Now avoids one-definition-rule (ODR) problems in MC-generated C/C++ ETW helpers caused by conflicting configuration macros (e.g. when two .cpp files with conflicting definitions of MCGEN_EVENTWRITETRANSFER are linked into the same binary, the MC-generated ETW helpers will now respect the definition of MCGEN_EVENTWRITETRANSFER in each .cpp file instead of arbitrarily picking one or the other).

Windows Trace Preprocessor (tracewpp.exe)

  • Now supports Unicode input (.ini, .tpl, and source code) files. Input files starting with a UTF-8 or UTF-16 byte order mark (BOM) will be read as Unicode. Input files that do not start with a BOM will be read using the current code page (CP_ACP). For backwards-compatibility, if the -UnicodeIgnore command-line parameter is specified, files starting with a UTF-16 BOM will be treated as empty.
  • Now supports Unicode output (.tmh) files. By default, output files will be encoded using the current code page (CP_ACP). Use command-line parameters -cp:UTF-8 or -cp:UTF-16 to generate Unicode output files.
  • Behavior change: tracewpp now converts all input text to Unicode, performs processing in Unicode, and converts output text to the specified output encoding. Earlier versions of tracewpp avoided Unicode conversions and performed text processing assuming a single-byte character set. This may lead to behavior changes in cases where the input files do not conform to the current code page. In cases where this is a problem, consider converting the input files to UTF-8 (with BOM) and/or using the -cp:UTF-8 command-line parameter to avoid encoding ambiguity.

TraceLoggingProvider.h

  • Now avoids one-definition-rule (ODR) problems caused by conflicting configuration macros (e.g. when two .cpp files with conflicting definitions of TLG_EVENT_WRITE_TRANSFER are linked into the same binary, the TraceLoggingProvider.h helpers will now respect the definition of TLG_EVENT_WRITE_TRANSFER in each .cpp file instead of arbitrarily picking one or the other).
  • In C++ code, the TraceLoggingWrite macro has been updated to enable better code sharing between similar events using variadic templates.

Signing your apps with Device Guard Signing

Windows SDK Flight NuGet Feed

We have stood up a NuGet feed for the flighted builds of the SDK. You can now test preliminary builds of the Windows 10 WinRT API Pack, as well as a microsoft.windows.sdk.headless.contracts NuGet package.

We use the following feed to flight our NuGet packages.

Microsoft.Windows.SDK.Contracts which can be used with to add the latest Windows Runtime APIs support to your .NET Framework 4.5+ and .NET Core 3.0+ libraries and apps.

The Windows 10 WinRT API Pack enables you to add the latest Windows Runtime APIs support to your .NET Framework 4.5+ and .NET Core 3.0+ libraries and apps.

Microsoft.Windows.SDK.Headless.Contracts provides a subset of the Windows Runtime APIs for console apps excludes the APIs associated with a graphical user interface. This NuGet is used in conjunction with

Windows ML container development. Check out the Getting Started guide for more information.

Breaking Changes

Removal of api-ms-win-net-isolation-l1-1-0.lib

In this release api-ms-win-net-isolation-l1-1-0.lib has been removed from the Windows SDK. Apps that were linking against api-ms-win-net-isolation-l1-1-0.lib can switch to OneCoreUAP.lib as a replacement.

Removal of IRPROPS.LIB

In this release irprops.lib has been removed from the Windows SDK. Apps that were linking against irprops.lib can switch to bthprops.lib as a drop-in replacement.

Removal of WUAPICommon.H and WUAPICommon.IDL

In this release we have moved ENUM tagServerSelection from WUAPICommon.H to wupai.h and removed the header. If you would like to use the ENUM tagServerSelection, you will need to include wuapi.h or wuapi.idl.

API Updates, Additions and Removals

The following APIs have been added to the platform since the release of Windows 10 SDK, version 1903, build 18362.

Additions:


namespace Windows.AI.MachineLearning {
  public sealed class LearningModelSessionOptions {
    bool CloseModelOnSessionCreation { get; set; }
  }
}
namespace Windows.ApplicationModel {
  public sealed class AppInfo {
    public static AppInfo Current { get; }
    Package Package { get; }
    public static AppInfo GetFromAppUserModelId(string appUserModelId);
    public static AppInfo GetFromAppUserModelIdForUser(User user, string appUserModelId);
  }
  public interface IAppInfoStatics
  public sealed class Package {
    StorageFolder EffectiveExternalLocation { get; }
    string EffectiveExternalPath { get; }
    string EffectivePath { get; }
    string InstalledPath { get; }
    bool IsStub { get; }
    StorageFolder MachineExternalLocation { get; }
    string MachineExternalPath { get; }
    string MutablePath { get; }
    StorageFolder UserExternalLocation { get; }
    string UserExternalPath { get; }
    IVectorView<AppListEntry> GetAppListEntries();
    RandomAccessStreamReference GetLogoAsRandomAccessStreamReference(Size size);
  }
}
namespace Windows.ApplicationModel.AppService {
  public enum AppServiceConnectionStatus {
    AuthenticationError = 8,
    DisabledByPolicy = 10,
    NetworkNotAvailable = 9,
    WebServiceUnavailable = 11,
  }
  public enum AppServiceResponseStatus {
    AppUnavailable = 6,
    AuthenticationError = 7,
    DisabledByPolicy = 9,
    NetworkNotAvailable = 8,
    WebServiceUnavailable = 10,
  }
  public enum StatelessAppServiceResponseStatus {
    AuthenticationError = 11,
    DisabledByPolicy = 13,
    NetworkNotAvailable = 12,
    WebServiceUnavailable = 14,
  }
}
namespace Windows.ApplicationModel.Background {
  public sealed class BackgroundTaskBuilder {
    void SetTaskEntryPointClsid(Guid TaskEntryPoint);
  }
  public sealed class BluetoothLEAdvertisementPublisherTrigger : IBackgroundTrigger {
    bool IncludeTransmitPowerLevel { get; set; }
    bool IsAnonymous { get; set; }
    IReference<short> PreferredTransmitPowerLevelInDBm { get; set; }
    bool UseExtendedFormat { get; set; }
  }
  public sealed class BluetoothLEAdvertisementWatcherTrigger : IBackgroundTrigger {
    bool AllowExtendedAdvertisements { get; set; }
  }
}
namespace Windows.ApplicationModel.ConversationalAgent {
  public sealed class ActivationSignalDetectionConfiguration
  public enum ActivationSignalDetectionTrainingDataFormat
  public sealed class ActivationSignalDetector
  public enum ActivationSignalDetectorKind
  public enum ActivationSignalDetectorPowerState
  public sealed class ConversationalAgentDetectorManager
  public sealed class DetectionConfigurationAvailabilityChangedEventArgs
  public enum DetectionConfigurationAvailabilityChangeKind
  public sealed class DetectionConfigurationAvailabilityInfo
  public enum DetectionConfigurationTrainingStatus
}
namespace Windows.ApplicationModel.DataTransfer {
  public sealed class DataPackage {
    event TypedEventHandler<DataPackage, object> ShareCanceled;
  }
}
namespace Windows.Devices.Bluetooth {
  public sealed class BluetoothAdapter {
    bool IsExtendedAdvertisingSupported { get; }
    uint MaxAdvertisementDataLength { get; }
  }
}
namespace Windows.Devices.Bluetooth.Advertisement {
  public sealed class BluetoothLEAdvertisementPublisher {
    bool IncludeTransmitPowerLevel { get; set; }
    bool IsAnonymous { get; set; }
    IReference<short> PreferredTransmitPowerLevelInDBm { get; set; }
    bool UseExtendedAdvertisement { get; set; }
  }
  public sealed class BluetoothLEAdvertisementPublisherStatusChangedEventArgs {
    IReference<short> SelectedTransmitPowerLevelInDBm { get; }
  }
  public sealed class BluetoothLEAdvertisementReceivedEventArgs {
    BluetoothAddressType BluetoothAddressType { get; }
    bool IsAnonymous { get; }
    bool IsConnectable { get; }
    bool IsDirected { get; }
    bool IsScannable { get; }
    bool IsScanResponse { get; }
    IReference<short> TransmitPowerLevelInDBm { get; }
  }
  public enum BluetoothLEAdvertisementType {
    Extended = 5,
  }
  public sealed class BluetoothLEAdvertisementWatcher {
    bool AllowExtendedAdvertisements { get; set; }
  }
  public enum BluetoothLEScanningMode {
    None = 2,
  }
}
namespace Windows.Devices.Bluetooth.Background {
  public sealed class BluetoothLEAdvertisementPublisherTriggerDetails {
    IReference<short> SelectedTransmitPowerLevelInDBm { get; }
  }
}
namespace Windows.Devices.Display {
  public sealed class DisplayMonitor {
    bool IsDolbyVisionSupportedInHdrMode { get; }
  }
}
namespace Windows.Devices.Input {
  public sealed class PenButtonListener
  public sealed class PenDockedEventArgs
  public sealed class PenDockListener
  public sealed class PenTailButtonClickedEventArgs
  public sealed class PenTailButtonDoubleClickedEventArgs
  public sealed class PenTailButtonLongPressedEventArgs
  public sealed class PenUndockedEventArgs
}
namespace Windows.Devices.Sensors {
 public sealed class Accelerometer {
    AccelerometerDataThreshold ReportThreshold { get; }
  }
  public sealed class AccelerometerDataThreshold
  public sealed class Barometer {
    BarometerDataThreshold ReportThreshold { get; }
  }
  public sealed class BarometerDataThreshold
  public sealed class Compass {
    CompassDataThreshold ReportThreshold { get; }
  }
  public sealed class CompassDataThreshold
  public sealed class Gyrometer {
    GyrometerDataThreshold ReportThreshold { get; }
  }
  public sealed class GyrometerDataThreshold
  public sealed class Inclinometer {
    InclinometerDataThreshold ReportThreshold { get; }
  }
  public sealed class InclinometerDataThreshold
  public sealed class LightSensor {
    LightSensorDataThreshold ReportThreshold { get; }
  }
  public sealed class LightSensorDataThreshold
  public sealed class Magnetometer {
    MagnetometerDataThreshold ReportThreshold { get; }
  }
  public sealed class MagnetometerDataThreshold
}
namespace Windows.Foundation.Metadata {
  public sealed class AttributeNameAttribute : Attribute
  public sealed class FastAbiAttribute : Attribute
  public sealed class NoExceptionAttribute : Attribute
}
namespace Windows.Globalization {
  public sealed class Language {
    string AbbreviatedName { get; }
    public static IVector<string> GetMuiCompatibleLanguageListFromLanguageTags(IIterable<string> languageTags);
  }
}
namespace Windows.Graphics.Capture {
  public sealed class GraphicsCaptureSession : IClosable {
    bool IsCursorCaptureEnabled { get; set; }
  }
}
namespace Windows.Graphics.DirectX {
  public enum DirectXPixelFormat {
    SamplerFeedbackMinMipOpaque = 189,
    SamplerFeedbackMipRegionUsedOpaque = 190,
  }
}
namespace Windows.Graphics.Holographic {
  public sealed class HolographicFrame {
    HolographicFrameId Id { get; }
  }
  public struct HolographicFrameId
  public sealed class HolographicFrameRenderingReport
  public sealed class HolographicFrameScanoutMonitor : IClosable
  public sealed class HolographicFrameScanoutReport
  public sealed class HolographicSpace {
    HolographicFrameScanoutMonitor CreateFrameScanoutMonitor(uint maxQueuedReports);
  }
}
namespace Windows.Management.Deployment {
  public sealed class AddPackageOptions
  public enum DeploymentOptions : uint {
    StageInPlace = (uint)4194304,
  }
  public sealed class PackageManager {
    IAsyncOperationWithProgress<DeploymentResult, DeploymentProgress> AddPackageByUriAsync(Uri packageUri, AddPackageOptions options);
    IVector<Package> FindProvisionedPackages();
    PackageStubPreference GetPackageStubPreference(string packageFamilyName);
    IAsyncOperationWithProgress<DeploymentResult, DeploymentProgress> RegisterPackageByUriAsync(Uri manifestUri, RegisterPackageOptions options);
    IAsyncOperationWithProgress<DeploymentResult, DeploymentProgress> RegisterPackagesByFullNameAsync(IIterable<string> packageFullNames, RegisterPackageOptions options);
    void SetPackageStubPreference(string packageFamilyName, PackageStubPreference useStub);
   IAsyncOperationWithProgress<DeploymentResult, DeploymentProgress> StagePackageByUriAsync(Uri packageUri, StagePackageOptions options);
  }
  public enum PackageStubPreference
  public enum PackageTypes : uint {
    All = (uint)4294967295,
  }
  public sealed class RegisterPackageOptions
  public enum RemovalOptions : uint {
    PreserveRoamableApplicationData = (uint)128,
  }
  public sealed class StagePackageOptions
  public enum StubPackageOption
}
namespace Windows.Media.Audio {
  public sealed class AudioPlaybackConnection : IClosable
  public sealed class AudioPlaybackConnectionOpenResult
  public enum AudioPlaybackConnectionOpenResultStatus
  public enum AudioPlaybackConnectionState
}
namespace Windows.Media.Capture {
  public sealed class MediaCapture : IClosable {
    MediaCaptureRelativePanelWatcher CreateRelativePanelWatcher(StreamingCaptureMode captureMode, DisplayRegion displayRegion);
  }
  public sealed class MediaCaptureInitializationSettings {
    Uri DeviceUri { get; set; }
    PasswordCredential DeviceUriPasswordCredential { get; set; }
  }
  public sealed class MediaCaptureRelativePanelWatcher : IClosable
}
namespace Windows.Media.Capture.Frames {
  public sealed class MediaFrameSourceInfo {
    Panel GetRelativePanel(DisplayRegion displayRegion);
  }
}
namespace Windows.Media.Devices {
  public sealed class PanelBasedOptimizationControl
  public sealed class VideoDeviceController : IMediaDeviceController {
    PanelBasedOptimizationControl PanelBasedOptimizationControl { get; }
 }
}
namespace Windows.Media.MediaProperties {
  public static class MediaEncodingSubtypes {
    public static string Pgs { get; }
    public static string Srt { get; }
    public static string Ssa { get; }
    public static string VobSub { get; }
  }
  public sealed class TimedMetadataEncodingProperties : IMediaEncodingProperties {
    public static TimedMetadataEncodingProperties CreatePgs();
    public static TimedMetadataEncodingProperties CreateSrt();
    public static TimedMetadataEncodingProperties CreateSsa(byte[] formatUserData);
    public static TimedMetadataEncodingProperties CreateVobSub(byte[] formatUserData);
  }
}
namespace Windows.Networking.BackgroundTransfer {
  public sealed class DownloadOperation : IBackgroundTransferOperation, IBackgroundTransferOperationPriority {
    void RemoveRequestHeader(string headerName);
    void SetRequestHeader(string headerName, string headerValue);
  }
  public sealed class UploadOperation : IBackgroundTransferOperation, IBackgroundTransferOperationPriority {
    void RemoveRequestHeader(string headerName);
    void SetRequestHeader(string headerName, string headerValue);
  }
}
namespace Windows.Networking.Connectivity {
  public enum NetworkAuthenticationType {
    Owe = 12,
  }
}
namespace Windows.Networking.NetworkOperators {
  public sealed class NetworkOperatorTetheringAccessPointConfiguration {
    TetheringWiFiBand Band { get; set; }
    bool IsBandSupported(TetheringWiFiBand band);
    IAsyncOperation<bool> IsBandSupportedAsync(TetheringWiFiBand band);
  }
  public sealed class NetworkOperatorTetheringManager {
    public static void DisableNoConnectionsTimeout();
    public static IAsyncAction DisableNoConnectionsTimeoutAsync();
    public static void EnableNoConnectionsTimeout();
    public static IAsyncAction EnableNoConnectionsTimeoutAsync();
    public static bool IsNoConnectionsTimeoutEnabled();
  }
  public enum TetheringWiFiBand
}
namespace Windows.Networking.PushNotifications {
  public static class PushNotificationChannelManager {
    public static event EventHandler<PushNotificationChannelsRevokedEventArgs> ChannelsRevoked;
  }
  public sealed class PushNotificationChannelsRevokedEventArgs
  public sealed class RawNotification {
    IBuffer ContentBytes { get; }
  }
}
namespace Windows.Security.Authentication.Web.Core {
  public sealed class WebAccountMonitor {
    event TypedEventHandler<WebAccountMonitor, WebAccountEventArgs> AccountPictureUpdated;
  }
}
namespace Windows.Security.Isolation {
  public sealed class IsolatedWindowsEnvironment
  public enum IsolatedWindowsEnvironmentActivator
  public enum IsolatedWindowsEnvironmentAllowedClipboardFormats : uint
  public enum IsolatedWindowsEnvironmentAvailablePrinters : uint
  public enum IsolatedWindowsEnvironmentClipboardCopyPasteDirections : uint
  public struct IsolatedWindowsEnvironmentContract
  public struct IsolatedWindowsEnvironmentCreateProgress
  public sealed class IsolatedWindowsEnvironmentCreateResult
  public enum IsolatedWindowsEnvironmentCreateStatus
  public sealed class IsolatedWindowsEnvironmentFile
  public static class IsolatedWindowsEnvironmentHost
  public enum IsolatedWindowsEnvironmentHostError
  public sealed class IsolatedWindowsEnvironmentLaunchFileResult
  public enum IsolatedWindowsEnvironmentLaunchFileStatus
  public sealed class IsolatedWindowsEnvironmentOptions
  public static class IsolatedWindowsEnvironmentOwnerRegistration
  public sealed class IsolatedWindowsEnvironmentOwnerRegistrationData
  public sealed class IsolatedWindowsEnvironmentOwnerRegistrationResult
  public enum IsolatedWindowsEnvironmentOwnerRegistrationStatus
  public sealed class IsolatedWindowsEnvironmentProcess
  public enum IsolatedWindowsEnvironmentProcessState
  public enum IsolatedWindowsEnvironmentProgressState
  public sealed class IsolatedWindowsEnvironmentShareFolderRequestOptions
  public sealed class IsolatedWindowsEnvironmentShareFolderResult
  public enum IsolatedWindowsEnvironmentShareFolderStatus
  public sealed class IsolatedWindowsEnvironmentStartProcessResult
  public enum IsolatedWindowsEnvironmentStartProcessStatus
  public sealed class IsolatedWindowsEnvironmentTelemetryParameters
  public static class IsolatedWindowsHostMessenger
  public delegate void MessageReceivedCallback(Guid receiverId, IVectorView<object> message);
}
namespace Windows.Storage {
  public static class KnownFolders {
    public static IAsyncOperation<StorageFolder> GetFolderAsync(KnownFolderId folderId);
    public static IAsyncOperation<KnownFoldersAccessStatus> RequestAccessAsync(KnownFolderId folderId);
    public static IAsyncOperation<KnownFoldersAccessStatus> RequestAccessForUserAsync(User user, KnownFolderId folderId);
  }
  public enum KnownFoldersAccessStatus
  public sealed class StorageFile : IInputStreamReference, IRandomAccessStreamReference, IStorageFile, IStorageFile2, IStorageFilePropertiesWithAvailability, IStorageItem, IStorageItem2, IStorageItemProperties, IStorageItemProperties2, IStorageItemPropertiesWithProvider {
    public static IAsyncOperation<StorageFile> GetFileFromPathForUserAsync(User user, string path);
  }
  public sealed class StorageFolder : IStorageFolder, IStorageFolder2, IStorageFolderQueryOperations, IStorageItem, IStorageItem2, IStorageItemProperties, IStorageItemProperties2, IStorageItemPropertiesWithProvider {
    public static IAsyncOperation<StorageFolder> GetFolderFromPathForUserAsync(User user, string path);
  }
}
namespace Windows.Storage.Provider {
  public sealed class StorageProviderFileTypeInfo
  public sealed class StorageProviderSyncRootInfo {
    IVector<StorageProviderFileTypeInfo> FallbackFileTypeInfo { get; }
  }
  public static class StorageProviderSyncRootManager {
    public static bool IsSupported();
  }
}
namespace Windows.System {
  public sealed class UserChangedEventArgs {
    IVectorView<UserWatcherUpdateKind> ChangedPropertyKinds { get; }
  }
  public enum UserWatcherUpdateKind
}
namespace Windows.UI.Composition.Interactions {
  public sealed class InteractionTracker : CompositionObject {
    int TryUpdatePosition(Vector3 value, InteractionTrackerClampingOption option, InteractionTrackerPositionUpdateOption posUpdateOption);
  }
  public enum InteractionTrackerPositionUpdateOption
}
namespace Windows.UI.Input {
  public sealed class CrossSlidingEventArgs {
    uint ContactCount { get; }
  }
  public sealed class DraggingEventArgs {
    uint ContactCount { get; }
  }
  public sealed class GestureRecognizer {
    uint HoldMaxContactCount { get; set; }
    uint HoldMinContactCount { get; set; }
    float HoldRadius { get; set; }
    TimeSpan HoldStartDelay { get; set; }
    uint TapMaxContactCount { get; set; }
    uint TapMinContactCount { get; set; }
    uint TranslationMaxContactCount { get; set; }
    uint TranslationMinContactCount { get; set; }
  }
  public sealed class HoldingEventArgs {
    uint ContactCount { get; }
    uint CurrentContactCount { get; }
  }
  public sealed class ManipulationCompletedEventArgs {
    uint ContactCount { get; }
    uint CurrentContactCount { get; }
  }
  public sealed class ManipulationInertiaStartingEventArgs {
    uint ContactCount { get; }
  }
  public sealed class ManipulationStartedEventArgs {
    uint ContactCount { get; }
  }
  public sealed class ManipulationUpdatedEventArgs {
    uint ContactCount { get; }
    uint CurrentContactCount { get; }
  }
  public sealed class RightTappedEventArgs {
    uint ContactCount { get; }
  }
  public sealed class SystemButtonEventController : AttachableInputObject
  public sealed class SystemFunctionButtonEventArgs
  public sealed class SystemFunctionLockChangedEventArgs
  public sealed class SystemFunctionLockIndicatorChangedEventArgs
  public sealed class TappedEventArgs {
    uint ContactCount { get; }
  }
}
namespace Windows.UI.Input.Inking {
  public sealed class InkModelerAttributes {
    bool UseVelocityBasedPressure { get; set; }
  }
}
namespace Windows.UI.Text {
  public enum RichEditMathMode
  public sealed class RichEditTextDocument : ITextDocument {
    void GetMath(out string value);
    void SetMath(string value);
    void SetMathMode(RichEditMathMode mode);
  }
}
namespace Windows.UI.ViewManagement {
  public sealed class UISettings {
    event TypedEventHandler<UISettings, UISettingsAnimationsEnabledChangedEventArgs> AnimationsEnabledChanged;
    event TypedEventHandler<UISettings, UISettingsMessageDurationChangedEventArgs> MessageDurationChanged;
  }
  public sealed class UISettingsAnimationsEnabledChangedEventArgs
  public sealed class UISettingsMessageDurationChangedEventArgs
}
namespace Windows.UI.ViewManagement.Core {
  public sealed class CoreInputView {
    event TypedEventHandler<CoreInputView, CoreInputViewHidingEventArgs> PrimaryViewHiding;
    event TypedEventHandler<CoreInputView, CoreInputViewShowingEventArgs> PrimaryViewShowing;
  }
  public sealed class CoreInputViewHidingEventArgs
  public enum CoreInputViewKind {
    Symbols = 4,
  }
  public sealed class CoreInputViewShowingEventArgs
  public sealed class UISettingsController
}

The post Windows 10 SDK Preview Build 19041 available now! appeared first on Windows Developer Blog.

This holiday season from Bing: flight booking and expanded visual search

$
0
0
The holidays can be a busy time, but at Bing we hope to make your holiday season easier and more enjoyable! Today we’re excited to announce an advanced flight booking experience as well as expanded visual search shopping scenarios.
 

Flight booking answer

One area we’re seeking to make more frictionless for our users is flight booking. Finding flights can be time-consuming, confusing, and involve searches across various websites, particularly during the holidays.

To solve this, we partnered with flight booking sites to provide a comprehensive booking experience in one place on Bing, so you can browse relevant results with accurate prices and minimal wait time. This new experience also leverages real-time data from the world’s leading Global Distribution Systems, and direct integration with top airlines to ensure a seamless experience for Bing users, from searching and comparing flights to booking them in one place. 

For example, if you’re looking for a Vegas getaway for the holidays, simply search for the trip you’d like to make, such as ‘flights from New York to Las Vegas’, and go from there.
 
FB-L1.PNG
 
If you click on a flight option to learn more about it, you’ll be taken to our comprehensive deep-dive page, which includes filtering options to allow you to quickly narrow the options down to the flight of your choice based on number of stops, airline, departure and arrival time, and price.
 
FB-l2.PNG
 
When you’ve found the option you want, you can click through right to a booking site to finalize your flight.
 

Visual search from more places in Windows

We’re also excited to let you use Bing’s existing visual search features in more places than ever before. Visual search lets you search using an image, so you can find what you’re looking for even when you don’t know what words to use.

We already have features that allow you to get visually-similar images from within Bing image results. Now, we’ve expanded and streamlined this capability so you can also use Bing visual search capabilities wherever you are, such as on third-party retailer site or in your own existing photos.

For example, imagine you’re holiday shopping on a retailer’s website or a home decor blog and see a couch you really like. Simply use the search bar in Windows, click the ‘Search with a screenshot’ icon in the lower right corner, and take a capture of the furniture that caught your eye.[1] Bing will provide visually-similar products from various retailers at diverse price points.[2]
 
110f38ab678ba343f448e7221906bae2.gif

 
Visual search also works from photos you already have in Windows (for example, if you have a picture of a pair of boots you’d like to replace). Just find the picture you like in the Photos app, open it, then right-click and click “Search the web with image”. In the newest Photos app, available to a percentage of our users today, it's even easier – just click the "Search the web with image" action in the toolbar.
 
2019-12-16_14-09-40.png
Capture2.JPG

Please note you must be updated to Windows 10 May 2019 Update or newer to see these features. You can learn more about this feature here.
 

Rewards

As always, searching on Bing when you’re signed in allows you to earn Rewards points. You can redeem these points for gift cards or choose to donate your points to support the charities you care about most. 


We hope you’re as excited by these feature as we are, and hope you have a great holiday season!


[1] This feature is rolling out to users in the U.S. first with international markets to follow shortly after.
[2] Shopping results are only available to users in the United States and United Kingdom.


Setting up Azure DevOps CI/CD for a .NET Core 3.1 Web App hosted in Azure App Service for Linux

$
0
0

Following up on my post last week on moving from App Service on Windows to App Service on Linux, I wanted to make sure I had a clean CI/CD (Continuous Integration/Continuous Deployment) pipeline for all my sites. I'm using Azure DevOps because it's basically free. You get 1800 build minutes a month FREE and I'm not even close to using it with three occasionally-updated sites building on it.

Last Post: I updated one of my websites from ASP.NET Core 2.2 to the latest LTS (Long Term Support) version of ASP.NET Core 3.1 this week. I want to do the same with my podcast site AND move it to Linux at the same time. Azure App Service for Linux has some very good pricing and allowed me to move over to a Premium v2 plan from Standard which gives me double the memory at 35% off.

Setting up on Azure DevOps is easy and just like signing up for Azure you'll use your Microsoft ID. Mine is my gmail/gsuite, in fact. You can also login with GitHub creds. It's also nice if your project makes NuGet packages as there's an integrated NuGet Server that others can consume libraries from downstream before (if) you publish them publicly.

Azure DevOps

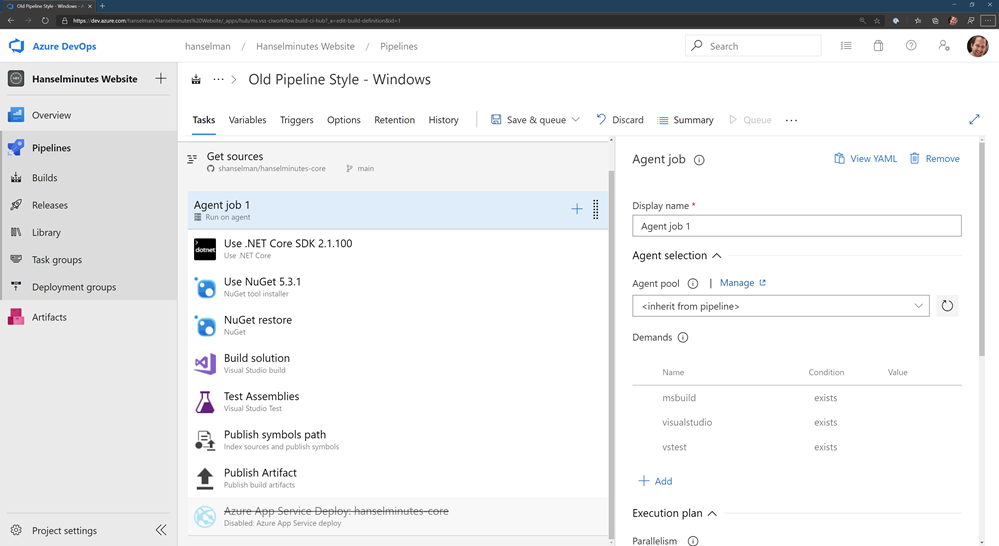
I set up one of my sites with Azure DevOps a while back in about an hour using their visual drag and drop Pipeline system which looked like this:

Old Pipeline Style

There's some controversy as some folks REALLY like the "classic" pipeline while others like the YAML (Yet Another Markup Language, IMHO) style. YAML doesn't have all the features of the original pipeline yet, but it's close. It's primary advantage is that the pipeline definition exists as a single .YAML file and can be checked-in with your source code. That way someone (you, whomever) could import your GitHub or DevOps Git repository and it includes everything it needs to build and optionally deploy the app.

The Azure DevOps team is one of the most organized and transparent teams with a published roadmap that's super detailed and they announce their sprint numbers in the app itself as it's updated which is pretty cool.

When YAML includes a nice visual interface on top of it, it'll be time for everyone to jump but regardless I wanted to make my sites more self-contained. I may try using GitHub Actions at some point and comparing them as well.

Migrating from Classic Pipelines to YAML Pipelines

If you have one, you can go to an existing pipeline in DevOps and click View YAML and get some YAML that will get you most of the way there but often includes some missing context or variables. The resulting YAML in my opinion isn't going to be as clean as what you can do from scratch, but it's worth looking at.

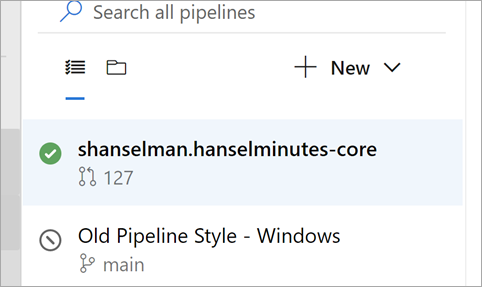
In decided to disable/pause my original pipeline and make a new one in parallel. Then I opened them side by side and recreated it. This let me learn more and the result ended up cleaner than I'd expected.

Two pipelines side by side

The YAML editor has a half-assed (sorry) visual designer on the right that basically has Tasks that will write a little chunk of YAML for you, but:

  • Once it's placed you're on your own
    • You can't edit it or modify it visually. It's text now.
  • If your cursor has the insert point in the wrong place it'll mess up your YAML
    • It's not smart

But it does provide a catalog of options and it does jumpstart things. Here's my YAML to build and publish a zip file (artifact) of my podcast site. Note that my podcast site is three projects, the site, a utility library, and some tests. I found these docs useful for building ASP.NET Core apps.

  • You'll see it triggers builds on the main branch. "Main" is the name of my primary GitHub branch. Yours likely differs.
  • It uses Ubuntu to do the build and it builds in Release mode. II
  • I install the .NET 3.1.x SDK for building my app, and I build it, then run the tests based on a globbing *tests pattern.
  • I do a self-contained publish using -r linux-x64 because I know my target App Service is Linux (it's cheaper) and it goes to the ArtifactStagingDirectory and I name it "hanselminutes." At this point it's a zip file in a folder in the sky.

Here it is:

trigger:

- main

pool:
vmImage: 'ubuntu-latest'

variables:
buildConfiguration: 'Release'

steps:
- task: UseDotNet@2
displayName: ".NET Core 3.1.x"
inputs:
version: '3.1.x'
packageType: sdk

- task: UseDotNet@2
inputs:
version: '3.1.x'
- script: dotnet build --configuration $(buildConfiguration)
displayName: 'dotnet build $(buildConfiguration)'

- task: DotNetCoreCLI@2
displayName: "Test"
inputs:
command: test
projects: '**/*tests/*.csproj'
arguments: '--configuration $(buildConfiguration)'

- task: DotNetCoreCLI@2
displayName: "Publish"
inputs:
command: 'publish'
publishWebProjects: true
arguments: '-r linux-x64 --configuration $(BuildConfiguration) --output $(Build.ArtifactStagingDirectory)'
zipAfterPublish: true

- task: PublishBuildArtifacts@1
displayName: "Upload Artifacts"
inputs:
pathtoPublish: '$(Build.ArtifactStagingDirectory)'
artifactName: 'hanselminutes'

Next I move to the release pipeline. Now, you can also do the actual Azure Publish to a Web App/App Service from a YAML Build Pipeline. I suppose that's fine if your site/project is simple. I wanted to have dev/test/staging so I have a separate Release Pipeline.

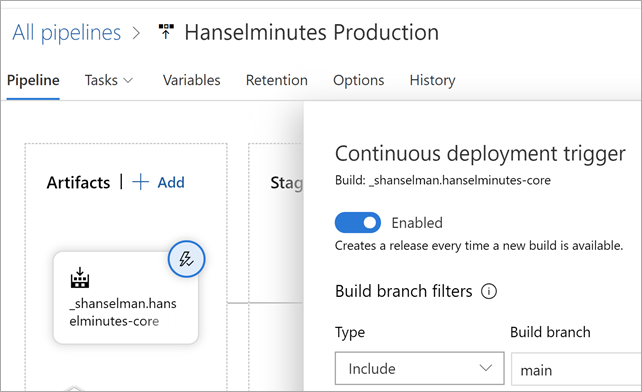
The Release Pipelines system in Azure DevOps can pull an "Artifact" from anywhere - GitHub, DevOps itself natch, Jenkins, Docker Hub, whatever. I set mine up with a Continuous Deployment Trigger that makes a new release every time a build is available. I could also do Releases manually, with specific tags, scheduled, or gated if I'd liked.

Continuous Deployment Trigger

Mine is super easy since it's just a website. It's got a single task in the Release Pipeline that does an Azure App Service Deploy. I can also deploy to a slot like Staging, then check it out, and then swap to Production later.

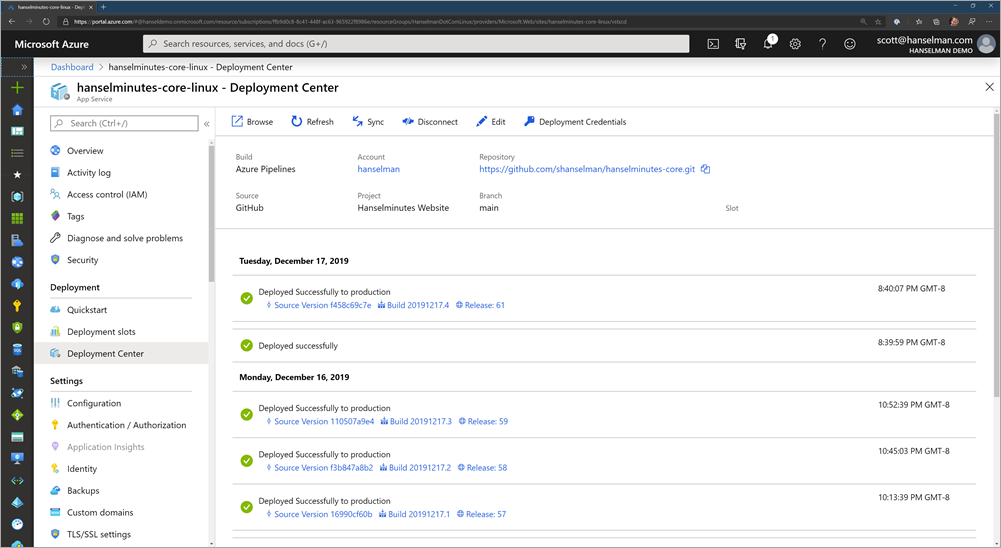
There's nice integration between Azure DevOps and the Azure Portal so I can see within Azure in the Deployment Center of my App Service that my deployments are working:

Azure Portal and DevOps integration

I've found this all to be a good use of my staycation and even though I'm just a one-person company I've been able to get a very nice automated build system set up at very low cost (GitHub free account for a private repo, 1800 free Azure DevOps minutes, and an App Service for Linux plan) A basic starts at $13 with 1.75Gb of RAM but I'm planning on moving all my sites over to a single big P1v2 with 3.5G of RAM and an SSD for around $80 a month. That should get all of my ~20 sites under one roof for a price/perf I can handle.


Sponsor: Like C#? We do too! That’s why we've developed a fast, smart, cross-platform .NET IDE which gives you even more coding power. Clever code analysis, rich code completion, instant search and navigation, an advanced debugger... With JetBrains Rider, everything you need is at your fingertips. Code C# at the speed of thought on Linux, Mac, or Windows. Try JetBrains Rider today!


© 2019 Scott Hanselman. All rights reserved.
     

Participate in the Developer Economics Survey

$
0
0

Slashdata Developer Survey Logo

The Developer Economics Q4 2019 Survey is now open! Every year more than 40,000 developers around the world participate in this survey, so this is a chance to be part of something big and share your experience as a developer and your view of the future of the software industry. Take the survey now or first read answers to the questions below.

Is this survey for me?

The survey is for all developers, whether you’re a professional, a hobbyist, or a student; building front-end, back-end, or full stack; working on desktop, web, gaming, cloud, mobile, IoT, AR/VR, machine learning, or data science.

What’s in it for me?

There are some perks to go with your participation. Have a look at what you can get our hands on:

  • A chance to win awesome prizes like a Microsoft Surface Pro 6.
  • A free State of the Developer Nation report with the key findings (available March 2020).

The Q2 2019 State of the Nation report delved into a wide range of topics from career paths of developers who considered themselves introverts vs. extroverts (not everyone in the C-suite is an extrovert) to the most popular tools for cross-platform development (React Native and Xamarin).

What’s in it for Microsoft?

This is an independent survey from SlashData, an analyst firm in the developer economy that tracks global software developer trends. We’re interested in seeing the reports that come from this survey, and we want to ensure the broadest developer audience participates.

Of course, any data collected by this survey is between you and SlashData. You should review their Terms & Conditions page to learn more about the awarding of prizes, their data privacy policy, and how SlashData will handle your personal data.

Ready to go?

The survey is open until Jan. 17, 2020.

Take the survey today

The survey is available in English, Chinese, Spanish, Portuguese, Vietnamese, Russian, Japanese, or Korean.

The post Participate in the Developer Economics Survey appeared first on Windows Developer Blog.

New features in Azure Monitor Metrics Explorer based on your feedback

$
0
0

A few months ago, we posted a survey to gather feedback on your experience with metrics in Azure Portal. Thank you for participation and for providing valuable suggestions!

We want to share some of the insights we gained from the survey and highlight some of the features that we delivered based on your feedback. These features include:

  • Resource picker that supports multi-resource scoping.
  • Splitting by dimension allows limiting the number of time series and specifying sort order.
  • Charts can show a large number of datapoints.
  • Improved chart legends.

Resource picker with multi-resource scoping

One of the key pieces of feedback we heard was about the resource picker panel. You said that being able to select only one resource at a time when choosing a scope is too limiting. Now you can select multiple resources across resource groups in a subscription.

Resource picker with selection of multiple resources.

Ability to limit the number of timeseries and change sort order when splitting by dimension

Many of you asked for the ability to configure the sort order based on dimension values, and for control over the maximum number of timeseries shown on the chart. Those who asked explained that for some metrics, including available memory and remaining disk space, they want to see the timeseries with smallest values, while for other metrics, including CPU utilization or count of failures, showing the timeseries with highest values make more sense. To address your feedback, we expanded the dimension splitter selector with Sort order and Limit count inputs.
  Split metric by dimension with configurable sort order and ability to limit the number of timeseries.

Charts that show a large number of datapoints

Charts with multiple timeseries over the long period, especially with short time grain are based on queries that return lots of datapoints. Unfortunately, processing too many datapoints may slow down chart interactions. To ensure the best performance, we used to apply a hard limit on the number of datapoints per chart, prompting users to lower the time range or to increase the time grain when the query returns too much data.

Some of you found the old experience frustrating. You said that occasionally you might want to plot charts with lots of datapoints, regardless of performance. Based on your suggestions, we changed the way we handle the limit. Instead of blocking chart rendering, we now display a message that suggests that the metrics query will return a lot of data, but will let you proceed anyways (with a friendly reminder that you might need to wait longer for the chart to display).
  A warning about too many datapoints with a button to ignore and continue. 
High-density charts from lots of datapoints can be useful to visualize the outliers, as shown in this example:
   High-density charts from lots of datapoints showing the outliers.

Improved chart legend

A small but useful improvement was made based on your feedback that the chart legends often wouldn’t fit on the chart, making it hard to interpret the data. This was almost always happening with the charts pinned to dashboards and rendered in the tight space of dashboard tiles, or on screens that have a smaller resolution. To solve the problem, we now let you scroll the legend until you find the data you need:
   A metric chart with scrollable chart legend.

Feedback

Let us know how we're doing and what more you'd like to see. Please stay tuned for more information on these and other new features in the coming months. We are continuously addressing pain points and making improvements based on your input.

If you have any questions or comments before our next survey, please use the feedback button on the Metrics blade. Don’t feel shy about giving us a shout out if you like a new feature or are excited about the direction we’re headed. Smiles are just as important in influencing our plans as frowns.

A menu to leave a feedback about Metrics Explorer.


Announcing the draft Security Baseline for Microsoft Edge version 79

$
0
0

We are pleased to announce the draft security baseline for the initial stable release of the new Microsoft Edge! Please review the security baseline (DRAFT) for Microsoft Edge version 79, and send us your feedback through the Baselines Discussion site.

What are security baselines?

Every organization faces security threats. However, the types of security threats that are of most concern to one organization can be completely different from another organization. For example, an e-commerce company may focus on protecting its Internet-facing web apps, while a hospital may focus on protecting confidential patient information. The one thing that all organizations have in common is a need to keep their apps and devices secure.

A security baseline is a group of Microsoft-recommended configuration settings that explains their security impact. These settings are based on feedback from Microsoft security engineering teams, product groups, partners, and customers.

Why are security baselines needed?

Security baselines are an essential benefit to your organization because they bring together expert knowledge from Microsoft, partners, and customers.

For example, there are 200+ Microsoft Edge Group Policy settings for Windows. Of these settings, only some are security-related.  Although Microsoft provides extensive guidance on these policies, exploring each one can take a long time. You would have to determine the security impact of each setting on your own. Then, you would still need to determine the appropriate value for each setting.

In modern organizations, the security threat landscape is constantly evolving, and IT administrators and policy-makers must keep up with security threats and make required changes to Microsoft Edge security settings to help mitigate these threats. To enable faster deployments and make managing Microsoft Edge easier, Microsoft provides customers with security baselines that are available in consumable formats, such as Group Policy Objects backups.

Security baseline principles

As with our current Windows and Office security baselines, our recommendations for Microsoft Edge configuration follow a streamlined and efficient approach to baseline definition when compared with the baselines we published before Windows 10. The foundation of that approach is essentially this:

  • The baselines are designed for well-managed, security-conscious organizations in which standard end users do not have administrative rights.
  • A baseline enforces a setting only if it mitigates a contemporary security threat and does not cause operational issues that are worse than the risks they mitigate.
  • A baseline enforces a default only if it is otherwise likely to be set to an insecure state by an authorized user:
    • If a non-administrator can set an insecure state, enforce the default.
    • If setting an insecure state requires administrative rights, enforce the default only if it is likely that a misinformed administrator will otherwise choose poorly.

(For further explanation, see the “Why aren’t we enforcing more defaults?” section in this blog post.)

How can you use security baselines?

You can use security baselines to:

  • Ensure that user and device configuration settings are compliant with the baseline.
  • Set configuration settings. For example, you can use Group Policy, System Center Configuration Manager, or Microsoft Intune to configure a device with the setting values specified in the baseline.

Download the security baselines

For version 78, see Security baseline (DRAFT) for Chromium-based Microsoft Edge, version 78.

For version 79, see Security baseline (DRAFT) for Chromium-based Microsoft Edge, version 79.

Future draft security baselines versions will be posted to the Microsoft Security Baselines Blog, and final security baselines will be available in the Security Compliance Toolkit (SCT).

Learn about Microsoft Edge in the enterprise

Check out our Microsoft Edge enterprise documentation to learn more about deploying and managing the next version of Microsoft Edge.

– Forbes Higman, Program Manager, Microsoft Edge enterprise security
– Brian Altman, Program Manager, Microsoft Edge manageability

The post Announcing the draft Security Baseline for Microsoft Edge version 79 appeared first on Microsoft Edge Blog.

Debugging Linux CMake Projects with gdbserver

$
0
0

Gdbserver is a program that allows you to remotely debug applications running on Linux. It is especially useful in embedded scenarios where your target system may not have the resources to run the full gdb.

Visual Studio 2019 version 16.5 Preview 1 enables remote debugging of CMake projects with gdbserver. In our previous blog post we showed you how to build a CMake application in a Linux docker container. In this post we’re going expand on that set-up to achieve the following workflow:

  1. Cross-compile for ARM in our Linux docker container
  2. Copy the build output back to our local machine
  3. Deploy the program to a separate ARM Linux system (connected over SSH) and debug using gdbserver on the ARM Linux system and a local copy of gdb

This allows you to leverage a specific version of gdb on your local machine and avoid running the full client on your remote system.

Support for this workflow in Visual Studio 2019 version 16.5 Preview 1 is still experimental and requires some manual configuration. Feedback on how you’re using these capabilities and what more you’d like to see is welcome.

Cross-compile a CMake project for ARM

This post assumes you are have already configured Visual Studio 2019 to build a CMake project in a Linux docker container (Ubuntu). Check out our previous post Build C++ Applications in a Linux Docker Container with Visual Studio for more information. However, nothing about this workflow is specific to Docker, so you can follow the same steps to configure any Linux environment (a VM, a remote Linux server, etc.) for build.

The first thing we will do is modify our build to cross-compile for ARM. I’ve created a new Dockerfile based on the image defined in my previous post.

# our local base image created in the previous post
FROM ubuntu-vs

LABEL description="Container to cross-compile for ARM with Visual Studio"

# install new build dependencies (cross-compilers)
RUN apt-get update && apt-get install -y gcc-arm-linux-gnueabi g++-arm-linux-gnueabi

# copy toolchain file from local Windows filesystem to
# Linux container (/absolute/path/)
COPY arm_toolchain.cmake /opt/toolchains/

In this Dockerfile I acquire my cross-compilers and copy a CMake toolchain file from my local Windows filesystem to my Linux Docker container. CMake is also a dependency but I will deploy statically linked binaries directly from Visual Studio in a later step.

CMake toolchain files specify information about compiler and utility paths. I used the example provided by CMake to create a toolchain file on Windows with the following content.

set(CMAKE_SYSTEM_NAME Linux)
set(CMAKE_SYSTEM_PROCESSOR arm)
set(CMAKE_C_COMPILER /usr/bin/arm-linux-gnueabi-gcc)
set(CMAKE_CXX_COMPILER /usr/bin/arm-linux-gnueabi-g++)

Save your toolchain file as ‘arm_toolchain.cmake’ in the directory where your new Dockerfile is saved. Alternatively, you can specify the path to the file relative to the build context as a part of the COPY command.

We can now build an image based on our new Dockerfile and run a container derived from the image:

> docker build -t ubuntu-vs-arm .
> docker run -p 5000:22 -i -t ubuntu-vs-arm /bin/bash

Lastly, we will interact with our docker container directly to start SSH and create a user account to use with our SSH connection.  Again, note that you can enable root login and start SSH from your Dockerfile if you want to avoid any manual and container-specific configuration. Replace <user-name> with the username you would like to use and run:

> service ssh start
> useradd -m -d /home/<user-name> -s /bin/bash -G sudo <user-name>
> passwd <user-name>

You are now ready to build from Visual Studio.

Configure CMake Settings in Visual Studio to cross-compile for ARM

Make sure you have Visual Studio 2019 version 16.5 Preview 1 or later and the Linux development with C++ workload installed. Open Visual Studio and create a new CMake project or open the sample application created in our previous post.

We will then create a new CMake configuration in Visual Studio. Navigate to the CMake Settings Editor and create a new “Linux-Debug” configuration. We will make the following modifications to cross-compile for ARM:

  1. Change the configuration name to arm-Debug (this does not affect build, but will help us reference this specific configuration)
  2. Ensure the remote machine name is set to your Linux docker container
  3. Change the toolset to linux_arm
  4. Specify the full path to your toolchain file on your Linux docker container (/opt/toolchains/arm_toolchain.cmake) as a CMake toolchain file.
  5. Navigate to the underlying CMakeSettings.json file by selecting ‘CMakeSettings.json’ in the description at the top of the editor. In your arm-Debug configuration, set “remoteCopyBuildOutput”: true. This will copy the output of your build back to your local machine for debugging with gdb.

Note that whenever your change your compilers you will need to delete the cache of the modified configuration (Project > CMake Cache (arm-Debug only) > Delete Cache) and reconfigure. If you don’t already have CMake installed, then Visual Studio will prompt you to deploy statically linked binaries directly to your remote machine as a part of the configure step.

Your CMake project is now configured to cross-compile for ARM on your Linux docker container. Once you build the program the executable should be available on both your build system (/home/<user-name>/.vs/…) and your local Windows machine.

Add a second remote connection

Next, I will add a new remote connection to the connection manager. This is the system I will be deploying to and has OS Raspbian (ARM). Make sure ssh is running on this system.

Note: The ability to separate your build system from your deploy system in Visual Studio 2019 version 16.5 Preview 1 does not yet support Visual Studio’s native support for WSL. It also does not support more than one connection to ‘localhost’ in the connection manager. This is due to a bug that will be resolved in the next release of Visual Studio. For this scenario, your docker connection should be the only connection with host name ‘localhost’ and your ARM system should be connected over SSH.

Configure launch.vs.json to debug using gdbserver

Finally, we will configure the debugger. Right-click on the root CMakeLists.txt, click on “Debug and Launch Settings” and select debugger type C/C++ Attach for Linux (gdb). We will manually configure this file (including adding and removing properties) to use gdbserver and a local copy of gdb. My launch file with inline comments is below. Again, this support is new and still requires quite a bit of manual configuration:

{
  "version": "0.2.1",
  "defaults": {},
  "configurations": [
    {
      "type": "cppdbg",
      "name": "gdbserver", // a friendly name for the debug configuration 
      "project": "CMakeLists.txt",
      "projectTarget": "CMakeProject134", // target to invoke, must match the name of the target that exists in the debug drop-down menu
      "cwd": "${workspaceRoot}", // some local directory 
      "program": "C:\Users\demo\source\repos\CMakeProject134\out\build\arm-Debug\CMakeProject134", // full Windows path to the program
      "MIMode": "gdb",
      "externalConsole": true,
      "remoteMachineName": "-1483267367;10.101.11.101 (username=test, port=22, authentication=Password)", // remote system to deploy to, you can force IntelliSense to prompt you with a list of existing connections with ctrl + space
      "miDebuggerPath": "C:\Program Files (x86)\Microsoft Visual Studio\2019\Enterprise\Common7\IDE\VC\Linux\bin\gdb\8.1\arm-linux-gnueabihf-gdb.exe", // full Windows path to local instance of gdb
      "setupCommands": [
        {
          "text": "set sysroot ." 
        },
        {
          "text": "-enable-pretty-printing",
          "ignoreFailures": true
        }
      ],
      "visualizerFile": "${debugInfo.linuxNatvisPath}",
      "showDisplayString": true,
      "miDebuggerServerAddress": "10.101.11.101:1234", // host name of the remote deploy system and port gdbserver will listen on
      "remotePrelaunchCommand": "gdbserver :1234 /home/test/.vs/CMakeProject134/66f2462c-6a67-40f0-8b92-34f6d03b072f/out/build/arm-Debug/CMakeProject134/CMakeProject134 >& /dev/null", // command to execute on the remote system before gdb is launched including the full path to the output on your remote debug system, >& /dev/null is required
      "remotePrelaunchWait": "2000" // property to specify a wait period after running the prelaunchCommand and before launching the debugger in ms
    }
  ]
}

Now set a breakpoint and make sure arm-Debug is your active CMake configuration and gdbserver is your active debug configuration.

Make sure arm-Debug is your active CMake configuration and gdbserver is your active debug configuration.

When you press F5 the project will build on the remote system specified in CMakeSettings.json, be deployed to the remote system specified in launch.vs.json, and a local debug session will be launched.

Troubleshooting tips:

  1. If your launch configuration is configured incorrectly then you may be unable to connect to your remote debug machine. Make sure to kill any lingering gdbserver processes on the system you are deploying to before attempting to reconnect.
  2. If you do not change your remote build root in CMake Settings, then the relative path to the program on your remote debug machine is the same as the relative path to the program on your remote build machine from ~/.vs/…
  3. You can enable cross-platform logging (Tools > Options > Cross Platform > Logging) to view the commands executed on your remote systems.

Give us your feedback

Do you have feedback on our Linux tooling or CMake support in Visual Studio? We’d love to hear from you to help us prioritize and build the right features for you. We can be reached via the comments below, Developer Community (you can “Suggest a Feature” to give us new ideas), email (visualcpp@microsoft.com), and Twitter (@VisualC). The best way to suggest new features or file bugs is via Developer Community.

The post Debugging Linux CMake Projects with gdbserver appeared first on C++ Team Blog.

Tips for learning Azure in the new year

$
0
0

As 2020 is upon us, it's natural to take time and reflect back on the current year’s achievements (and challenges) and begin planning for the next year. One of our New Year’s resolutions was to continue live streaming software development topics to folks all over the world. In our broadcasts in late November and December, the Azure community saw some of our 2020 plans. While sharing, many others typed in the chat from across the world that they’d set a New Year’s resolution to learn Azure and would love any pointers.

When we shared our experiences learning Azure in the “early days,” we talked about the number of great resources (available at no cost) users can take advantage of right now, and carry their learnings into the new year and beyond. 

Here are a few tips for our developer community to help them keep their resolutions to learn Azure:

  1. Create a free account: The first thing that you’ll need is to create a free account. You can sign up with a Microsoft or GitHub account and get access to 12 months of popular free services, a 30-day Azure free trial with $200 to spend during that period and over 25 services that are free forever. Once your 30-day trial is over, we’ll notify you so you can decide if you want to upgrade to pay-as-you-go pricing and remove the spending limit. In other words, no surprises here folks!
  2. Stay current with the Azure Application Developer and languages page: This home page is a single, unified destination for developers and architects that covers Azure application development along with all of our language pages such as .NET, Node.js, Python, and more. It is refreshed monthly and your go-to-source for our SDKs, hands-on tutorials, docs, blogs, events, and other Azure resources. Check out our recent Python for Beginners series to jump right in.
  3. Free Developer’s Guide to Azure eBook: This free eBook includes all the updates from Microsoft’s first-party conferences, along with new services and features announced since then. In addition to these important services, we drill into practical examples that you can use in the real world and included a table and reference architecture that show you “what to use when” for databases, containers, serverless scenarios, and more. There is also a key focus on security to help you stop potential threats to your business before they happen. You’ll also see brand new sections on IoT, DevOps, and AI/ML that you can take advantage of today. In the more than 20 pages of demos, you’ll be diving into topics that include creating and deploying .NET Core web apps and SQL Server to Azure from scratch, building on to the application to perform analysis of the data with Cognitive Services. After the app is created, we’ll make it more robust and easier to update by incorporating CI/CD using API Management to control our APIs and generate documentation automatically.
  4. Azure Tips and Tricks (weekly tips and videos): Azure Tips and Tricks helps developers learn something new within a couple of minutes. Since inception in 2017, the collection has grown to over 230 tips and more than 80 videos, conference talks, and several eBooks spanning the entire universe of the Azure platform. Featuring a new weekly tip and video it is designed to help you boost your productivity with Azure, and all tips are based on practical real-world scenarios. The series spans the entire universe of the Azure platform from Azure App Services, to containers, and more. Swing by weekly for a tip or stay for hours watching our Azure YouTube playlist.
  5. Rock, Paper, Scissors, Lizard, Spock sample application: Rock, Paper, Scissors, Lizard, Spock is the geek version of the classic Rock, Paper, Scissors game. Rock, Paper, Scissors, Lizard, Spock is created by Sam Kass and Karen Bryla.
    The sample application running in Azure was presented at Microsoft Ignite 2019 by Scott Hanselman and friends. It’s a multilanguage application built with Visual Studio and Visual Studio Code, deployed with GitHub Actions, and running on Azure Kubernetes Service (AKS). The sample application also uses Azure Machine Learning and Azure Cognitive Services (custom vision API). Languages used in this application include .NET, Node.js, Python, Java, and PHP.
  6. Microsoft.Source Newsletter: Get the latest articles, documentation, and events from our curated monthly developer community newsletter. Learn about new technologies and find opportunities to connect with other developers online and locally. Each edition, you’ll have the opportunity to share your feedback and shape the newsletter as it grows and evolves.

Additional resources

Here are some bonus tips to help you keep up with Azure as it changes:

  • Azure documentation is the most comprehensive and current resource you’ll find for all of our Azure services.
  • See how Microsoft does DevOps: Customers are looking for guidance and insights about companies that have undergone a transformation through DevOps. To that end, we are sharing the stories of four Microsoft teams that have experienced DevOps transformation, with guidance on lessons learned and ways to drive organizational change through Azure technologies and internal culture. The stories are aimed at providing practical information about DevOps adoption to developers, IT professionals, and decision-makers.
  • Azure Friday is a video series that releases up to three new episodes per week to keep up with the latest in Azure with hosts such as Scott Hanselman.

Connecting Microsoft Azure and Oracle Cloud in the UK and Canada

$
0
0

In June 2019, Microsoft announced a cloud interoperability collaboration with Oracle that will enable our customers to migrate and run enterprise workloads across Microsoft Azure and Oracle Cloud.

At Oracle OpenWorld in September, the cross-cloud collaboration was a big part of the conversation. Since then, we have fielded interest from mutual customers who want to accelerate their cloud adoption across both Microsoft Azure and Oracle Cloud. Customers are interested in running their Oracle database and enterprise applications on Azure and in the scenarios enabled by the industry’s first cross-cloud interconnect implementation between Azure and Oracle Cloud Infrastructure. Many are also excited about our announcement to integrate Microsoft Teams with Oracle Cloud Applications. We have already enabled the integration of Azure Active Directory with Oracle Cloud Applications and continue to break new ground while engaging with customers and partners.

Interest from the partner community

Partners like Accenture are very supportive of the collaboration between Microsoft Azure and Oracle Cloud. Accenture recently published a white paper, articulating their own perspective and hands-on experiences while configuring the connectivity between Microsoft Azure and Oracle Cloud Infrastructure.

Another Microsoft and Oracle partner who expressed interest early on is SYSCO. SYSCO is a European IT-company specializing in solutions for the utilities sector. They offer unique industry expertise combined with highly skilled technology experts within AI and analytics, cloud, infrastructure, and applications. SYSCO is a Microsoft Gold Cloud Platform partner and a Platinum Oracle partner.

In August 2019, we introduced the ability to interconnect Microsoft Azure (UK South) and Oracle Cloud Infrastructure in London, UK providing our joint customers access to a direct, low-latency, and highly reliable network connection between Azure and Oracle Cloud Infrastructure. Prior to that, for partners like SYSCO, the ability to leverage this new collaboration between Microsoft Azure and Oracle Cloud was out of reach.

“The Microsoft Azure and Oracle Cloud Interconnect announcement is one of the best announcements in years for our customers! A direct link provides the Microsoft / Oracle cloud interconnect with a new option for all customers using proprietary business applications. With our expertise across both Microsoft and Oracle, we are thrilled to be one of the first partners to pilot this together with our customers in the utilities industry in Norway.”–Frank Vikingstad VP International – SYSCO

Azure and Oracle Cloud Infrastructure interconnect in Toronto, Canada

Today we are announcing that we have extended the Microsoft Azure and Oracle Cloud Infrastructure interconnect to include the Azure Canada Central region and Oracle Cloud Infrastructure region in Toronto, Canada.

“This unique Azure and Oracle Cloud Infrastructure solution delivers the performance, easy integration, rigorous service level agreements, and collaborative enterprise support that enterprise IT departments need to simplify their operations. We’ve been pleased by the demand for the interconnected cloud solution by our mutual customers around the world and are thrilled to extend these capabilities to our Canadian customers.” –Clive D’Souza, Sr. Director and Head of Product Management, Oracle Cloud Infrastructure

What this means for you

In addition to being able to run certified Oracle databases and applications on Azure, you now have access to new migration and deployment scenarios enabled by the interconnect. For example, you can rely on tested, validated, and supported deployments of Oracle applications on Azure with Oracle databases, Real Application Clusters (RAC) and Exadata, deployed in Oracle Cloud Infrastructure. You can also run custom applications on Azure backed by Oracle’s Autonomous Database on Oracle Cloud Infrastructure.

To learn more about the collaboration between Oracle and Microsoft and how you can run Oracle applications on Azure please refer to our website.

Azure Lighthouse: The managed service provider perspective

$
0
0

This blog post was co-authored by Nikhil Jethava, Senior Program Manager, Azure Lighthouse.

Azure Lighthouse became generally available in July this year and we have seen a tremendous response from Azure managed service provider communities who are excited about the scale and precision of management that the Azure platform now enables with cross tenant management. Similarly, customers are empowered with architecting precise and just enough access levels to service providers for their Azure environments. Both customers and partners can decide on the precise scope of the projection.

Azure Lighthouse enables partners to manage multiple customer tenants from within a single control plane, which is their environment. This enables consistent application of management and automation across hundreds of customers and monitoring and analytics to a degree that was unavailable before. The capability works across Azure services (that are Azure Resource Manager enabled) and across licensing motion. Context switching is a thing of the past now.

In this article, we will answer some of the most commonly asked questions:

  • How can MSPs perform daily administration tasks across different customers in their Azure tenant from a single control plane?
  • How can MSPs secure their intellectual property in the form of code?

Let us deep dive into a few scenarios from the perspective of a managed service provider.

Azure Automation

Your intellectual property is only yours. Service providers, using Azure delegated resource management, are no longer required to create Microsoft Azure Automation runbooks under customers’ subscription or keep their IP in the form of runbooks in someone else’s subscription. Using this functionality, Automation runbooks can now be stored in a service provider's subscription while the effect of the runbooks will be reflected on the customer's subscription. All you need to do is ensure the Automation account's service principal has the required delegated built-in role-based access control (RBAC) role to perform the Automation tasks. Service providers can create Azure Monitor action groups in customer's subscriptions that trigger Azure Automation runbooks residing in a service provider's subscription.
    Runbook in MSP subscription

Azure Monitor alerts

Azure Lighthouse allows you to monitor the alerts across different tenants under the same roof. Why go through the hassle of storing the logs ingested by different customer's resources in a centralized log analytics workspace? This helps your customers stay compliant by allowing them to keep their application logs under their own subscription while empowering you to have a helicopter view of all customers.

Azure Monitor Alerts across tenants

Azure Resource Graph Explorer

With Azure delegated resource management, you can query Azure resources from Azure Resource Graph Explorer across tenants. Imagine a scenario where your boss has asked you for a CSV file that would list the existing Azure Virtual Machines across all the customers’ tenants. The results of the Azure Resource Graph Explorer query now include the tenant ID, which makes it easier for you to identify which Virtual Machine belongs to which customer.


Querying Azure resources across tenants 
 

Azure Security Center

Azure Lighthouse provides you with cross-tenant visibility of your current security state. You can now monitor compliance to security policies, take actions on security recommendations, monitor the secure score, detect threats, execute file integrity monitoring (FIM), and more, across the tenants.
Detecting threats across tenants
    Exploring Resource Menu of Cross Tenant VMs

Azure Virtual Machines

Service providers can perform post-deployment tasks on different Azure Virtual Machines from different customer's tenants using Azure Virtual Machine extensions, Azure Virtual Machine Serial Console, run PowerShell commands using Run command option, and more in the Azure Portal. Most administrative tasks on Azure Virtual Machines across the tenants can now be performed quickly since the dependency on taking remote desktop protocol (RDP) access to the Virtual Machines lessens. This also solves a big challenge since admins now do not require to log on to different Azure Subscriptions in multiple browser tabs just to get to the Virtual Machine’s resource menu.
Exploring Resource Menu of Cross Tenant VMs

Managing user access

Using Azure delegated resource management, MSPs no longer need to create administrator accounts (including contributor, security administrator, backup administrator, and more) in their customer tenants. This allows them to manage the lifecycle of delegated administrators right within their own Microsoft Azure Active Directory (AD) tenant. Moreover, MSPs can add user accounts to the user group in their Azure Active Directory (AD) tenant, while customers make sure those groups have the required access to manage their resources. To revoke access when an employee leaves the MSP’s organization, it can simply be removed from the specific group the access has been delegated to.

Added advantages for Cloud Solution Providers

Cloud Solution Providers (CSPs) can now save on administration time. Once you’ve set up the Azure delegated resource management for your users, there is absolutely no need for them to log in to the Partner Center (found by accessing Customers, Contoso, and finally All Resources) to administer customers’ Azure resources.

Also, Azure delegated resource management happens outside the boundaries of the Partner Center portal. Instead, the delegated user access is managed directly under Azure Active Directory. This means subscription and resource administrators in Cloud Solution Providers are no longer required to have the 'admin agent' role in the Partner Center. Therefore, Cloud Solutions Providers can now decide which users in their Azure Active Directory tenant will have access to which customer and to what extent.

More information

This is not all. There is a full feature list available for supported services and scenarios in Azure Lighthouse documentation. Check out Azure Chief Technology Officer Mark Russinovich’s blog for a deep under-the-hood view.

So, what are you waiting for? Get started with Azure Lighthouse today.

DeliveryConf 2020

$
0
0

This year, I’ve been privileged to work with a great team across the DevOps community and help co-chair the new DeliveryConf 2020 conference, a non-profit conference dedicated to the technical aspects of Continuous Integration and Continuous Delivery. The conference is taking place on January 21 & 22 2020, at the Grand Hyatt in Seattle.

The goal is to have a highly technical DevOps-related conference that spans technologies and cloud providers, and I’m proud to say that the speaker line up is fantastic! We will have 2 days and 3 tracks of technical talks delivered by some of the most experienced and well-known practitioners, addressing all aspects of CI/CD. Each session will be followed by a facilitated audience discussion around the topic.

Session Highlights

What Will The Next 10 Years Of Continuous Delivery Look Like?
We are celebrating a 10-year anniversary of the groundbreaking Continuous Delivery Book, and I am happy to say that the book authors, Dave Farley and Jez Humble, will be on stage together for the first time ever, delivering the main keynote on the future of continuous delivery.

How Secure Is Your Build/Server?
The word DevOps is so much a part of our daily lexicon, that we do not stop to consider that it is also only 10 years old! The “father” of the term DevOps and the organizer of the first-ever DevOpsDays conference, Patrick DeBois will join us on stage to talk about bringing security into our CI/CD pipeline. An increasing attack vector used by our Red Teams here in Microsoft is to try and penetrate the software delivery pipelines, therefore I’m really looking forward to his session.

Microsoft Speaker Highlights

Real World DevOps
Abel Wang, principal cloud advocate, DevOps lead, will deliver a technical deep dive on starting from scratch and deploying a modern application into the cloud following DevOps best practices! As always, Abel isn’t scared of live demos and building things right in front of the audience!

CI/CD For PowerShell That Isn’t A Mess
Thomas Rayner, senior security service engineer, will show us a CI/CD implementation for PowerShell. Thomas will share his real-world experience of how we can leverage the power of CI/CD to deliver PowerShell scripts, modules and runbooks to production!

CI/CD + ML == MLOps – The Way To Speed Bringing Machine Learning To Production
David Aronchik, the head of Open Source Machine Learning strategy, will show us how to build a CI/CD pipeline for Machine Learning models! David will leverage Azure Pipelines, Azure ML and Kubeflow to build a pipeline capable of deploying an ML model into production in under 15 minutes!

It’s a conference aimed at folks wanting to improve their CI/CD automation and learn from a wide array of folks across the whole industry.

If you get in quick, the holiday discount is still available at the time of this writing, (until the end of day December 20th). If you are reading this post later, you can use the code MICROSOFT_ROCKS for a 10% discount we can share with our readers.

Having been involved with this conference from its inception, I’m really looking forward to watching as many of the sessions as possible – and I’m also sure there will be new technical improvement ideas to learn for everyone. I hope to see you there. If you do attend, then please stop me to say ‘Hi’ – I might even have some stickers with me!

The post DeliveryConf 2020 appeared first on Azure DevOps Blog.

Top Stories from the Microsoft DevOps Community – 2019.12.20

$
0
0

This post is the last community roundup before the holiday break, and we certainly have some holiday cheer for you. Thanks to all the blog authors, and check out the end of the post for a fun holiday-break project!

Go blue/green with your Cloud Foundry app from WebIDE with Azure DevOps
One-click deploys are empowering, but they aren’t a good idea for production deployments. In this post, Martin Pankraz combines a number of different technologies to create a Blue-Green deployment for SAP WebIDE. In this way, you can have a controlled rollout of an SAP Multi-Target Application, promoting it into production when you are ready. Thank you, Martin!

Check for Malware in a Azure DevOps Pipeline
Security is becoming more and more important for any company developing software, and the attack surface is larger than ever. This is why we recommend shifting left on security as much as possible, bringing automated checks into your pipeline. In this post, Ricci Gian Maria shows us how to use the Microsoft Malware Scanner to help protect your agent against malware. Thank you, Gian Maria!

Different variables for different branches in your Azure DevOps Pipeline
Defining the appropriate variable scope for the hand-offs between different pipelines or environments is often a struggle. We’ve shared some posts on passing variables between stages before, but what do you do if you need to define a different variable for a branch? In this post, René van Osnabrugge shares a PowerShell Script he developed to address this use case. Thank you, René!

Tutorial: Using Azure DevOps to setup a CI/CD pipeline and deploy to Kubernetes
This post is a really detailed tutorial on how to deploy to a Kubernetes cluster using Azure DevOps, and it has been updated with all the new info on Helm 3 and Azure YAML Pipelines. The post has been reviewed by Microsoft teams, so you can use it as a best-practice reference guide for your AKS deployments. Thanks, Mathieu Benoit!

Setting up Azure DevOps CI/CD for a .NET Core 3.1 Web App hosted in Azure App Service for Linux
Have you figured out a technical implementation lately that the community, or even your future self could benefit from? The best blogs are born out of practitioners documenting things for their own future use. In this post, Scott Hanselman walks us through the steps of deploying a .NET Core 3.0 app to Azure App Service on Linux, using Azure Pipelines. I really appreciate the note on “Azure DevOps team is one of the most organized and transparent teams”. Thank you, Scott!

Register as an Organizer for the Global DevOps Bootcamp
The Global DevOps Bootcamp 2019 was attended by 10,000 practitioners from 89 venues from all over the globe, including Europe, Americas, Asia, Australia and Africa! You can check out the summary of the 2019 event here. And starting today, you can sign up as an organizer for the 2020 event. Please follow the link to add your venue to the list!

Smart Xmas
And, finally, some proper holiday cheer. In this video, our staff wizard, Martin Woodward shows us how to set up GitHub actions to control the smart devices in your house. Following the instructions, you can set up your holiday lights, and even some festive music to turn on based on a trigger of choice. And all you have to do make Martin’s house sparkle in the middle of the night is starring a GitHub repo!

If you’ve written an article about Azure DevOps or find some great content about DevOps on Azure, please share it with the #AzureDevOps hashtag on Twitter!

The post Top Stories from the Microsoft DevOps Community – 2019.12.20 appeared first on Azure DevOps Blog.


Experimenting with OData in ASP.NET Core 3.1

$
0
0

A lot of developers have asked me recently about OData compatibility with ASP.NET Core 3.0 and again with .NET Core 3.1 after it’s very recent release.

This demand became more and more critical with the recent announcement from the .NET team around .NET Core 2.2 reaching the end of its life on Dec 23rd of this year.

And because of all of that, the OData team at Microsoft have been working diligently in the last few months to ensure a stable release of OData that supports .NET Core 3.1 makes it out to the public as soon as possible.

And while the final release might take a bit longer to be production-ready, the OData team has recently released a beta version for developers to experiment with it, learn about it’s capabilities and possibly build some demo APIs and leverage it in some POCs.

In this article, I’m going to show you how you can build a modern ASP.NET Core 3.1 API with OData by simply following very few simple steps.


Prerequisites

In order for you to be able to create this demo on your local machine, you want to make sure that you have Visual Studio 2019 version 16.4 or later so you can leverage the capabilities of .NET Core 3.1, if you install that particular version of VS 2019 you will not need to install .NET Core 3.1 separately as it comes with the bundle.

You can check the current version of your Visual Studio 2019 by going to top menu, then Help then About Visual Studio as shows in the following screenshots:

If your current version of Visual Studio 2019 is lower than 16.4, you can upgrade your Visual Studio instance by clicking on the bell icon at the lower right corner of your Visual Studio instance then selecting to upgrade your Visual Studio as shows in the following screenshots:

Once you click the “More Details” link, it usually takes about 10 seconds and then you should be prompt with a dialog to upgrade your Visual Studio instance as follows:

Please make sure you save all your work before you click the “Update” button as the process will require Visual Studio to close automatically, you will not be prompted to save your work before Visual Studio closes, you also want to make sure you have Admin permissions to be able to continue with that process.

Once the upgrade is done, now you are ready to build ASP.NET Core applications with .NET Core 3.1, let’s talk about setting your project up.


Setting Things Up

For starters, let’s create a new ASP.NET Core Web Application by either starting a new instance of Visual Studio or simply going to File -> New -> Project, you should be then prompted with the following dialog:

After selecting ASP.NET Core Web Application (with C#) click the Next button you will be prompted to create a new name for your project and then selecting the version and template of which your project should be based on as follows:


Please make sure you select ASP.NET Core 3.1 from the drop down menu at the top right side, and API as a template for your project then click “Create“.


Installing OData

Now that you have created a new project, let’s go ahead and install the beta release of OData for ASP.NET Core 3.1

There are two ways you can install the beta library depends on your preference, if you are a command line kind of developer, you can simply open the package manager console by clicking on the Tools top menu option, then Nuget Package Manager then Package Manager Console as follows:

you will be prompted with a console window so you can type the following command:

PM> Install-Package Microsoft.AspNetCore.OData -Version 7.3.0-beta

If you don’t like using command lines, you can simply install the very same package by going to the exact same menu options we selected above, except you are going to choose Manage Nuget Packages for Solution instead of Package Manager Console the following dialog will appear so you can install the library as follows:

There are few things that I have highlighted in that screenshot that you need to pay attention to:

  1. You must check the “Include prerelease” so you can see the beta release of the nuget package.
  2. Search for Microsoft.AspNetCore.OData and select the first option.
  3. Select the project in which you want to install your library, in our case here since we have one project, it’s safe to just check the entire project.
  4. Make sure you select Latest prerelease 7.3.0-beta in the drop down menu on the right side before you click the Install button.


Models & Controllers

Now that we have OData installed, let’s create a Student model and create a controller to return a list of students as follows:

using System;

namespace ODataCore3BetaAPI.Models
{
    public class Student
    {
        public Guid Id { get; set; }
        public string Name { get; set; }
        public int Score { get; set; }
    }
}

Now let’s create a simple API controller that returns a list of students:

using System;
using System.Collections.Generic;
using Microsoft.AspNet.OData;
using Microsoft.AspNetCore.Mvc;
using ODataCore3BetaAPI.Models;

namespace ODataCore3BetaAPI.Controllers
{
    [Route("api/[controller]")]
    [ApiController]
    public class StudentsController : ControllerBase
    {
        [HttpGet]
        [EnableQuery()]
        public IEnumerable<Student> Get()
        {
            return new List<Student>
            {
                CreateNewStudent("Cody Allen", 130),
                CreateNewStudent("Todd Ostermeier", 160),
                CreateNewStudent("Viral Pandya", 140)
            };
        }

        private static Student CreateNewStudent(string name, int score)
        {
            return new Student
            {
                Id = Guid.NewGuid(),
                Name = name,
                Score = score
            };
        }
    }
}

Please notice that this controller is only created this way for a demo purpose, ideally your controller should return an IQueryable to achieve better performance and execute queries on your database server if you are retrieving your data from a database.


Final Step

Our final step here is to modify the startup.cs file to support OData, our code here will be very similar to our code from previous articles, let’s start with the ConfigureServices method in our startup.cs file as follows:

public void ConfigureServices(IServiceCollection services)
        {
            services.AddControllers(mvcOptions => 
                mvcOptions.EnableEndpointRouting = false);

            services.AddOData();
        }

You will notice a couple of changes in the above code, Adding OData which is just as similar as any other OData powered application.

The second change is disabling endpoint routing, let’s talk about that for a bit.

For starters, this is not an ideal situation, the final release of OData shall allow endpoint routing while supporting OData queries.

But for those who want to understand what endpoint routing setting is, especially for .NET Core 3.0 and above, here’s a quote from a previous post for Daniel Roth:

In ASP.NET Core 2.2 we introduced a new routing implementation called Endpoint Routing which replaces IRouter-based routing for ASP.NET Core MVC. In the upcoming 3.0 release Endpoint Routing will become central to the ASP.NET Core middleware programming model. Endpoint Routing is designed to support greater interoperability between frameworks that need routing (MVC, gRPC, SignalR, and more …) and middleware that want to understand the decisions made by routing (localization, authorization, CORS, and more …).

While it’s still possible to use the old UseMvc() or UseRouter() middleware in a 3.0 application, we recommend that every application migrate to Endpoint Routing if possible. We are taking steps to address compatibility bugs and fill in previously unsupported scenarios. We welcome your feedback about what features are missing or anything else that’s not great about routing in this preview release.

And while endpoint routing is one of the most important upgrades to ASP.NET Core 3.0, with this beta release you could still leverage the power of OData without leveraging endpoint routing temporarily.

With that being said, let’s move on to the next step which is implementing a GetEdmModel method as we have done previously and change the routing implementing in the Configure method as follows:


public void Configure(IApplicationBuilder app, IWebHostEnvironment env)
        {
            if (env.IsDevelopment())
            {
                app.UseDeveloperExceptionPage();
            }

            app.UseHttpsRedirection();
            app.UseRouting();
            app.UseAuthorization();

            app.UseMvc(routeBuilder =>
            {
                routeBuilder.Select().Filter();
                routeBuilder.MapODataServiceRoute("odata", "odata", GetEdmModel());
            });

            //app.UseEndpoints(endpoints =>
            //{
            //    endpoints.MapControllers();
            //});
        }

        IEdmModel GetEdmModel()
        {
            var odataBuilder = new ODataConventionModelBuilder();
            odataBuilder.EntitySet<Student>("Students");

            return odataBuilder.GetEdmModel();
        }

I have intentionally left the app.UseEndPoints to show you what code you need to remove (again, temporarily for this beta release) and what code you need to add to leverage the power of OData.
And that should be the final step in this tutorial, now you can run you application and call your endpoint as follows:

https://localhost:44344/odata/students?$select=name

and the results should be as follows:

{
    "@odata.context": "https://localhost:44344/odata/$metadata#Students(Name)",
    "value": [
        {
            "Name": "Cody Allen"
        },
        {
            "Name": "Todd Ostermeier"
        },
        {
            "Name": "Viral Pandya"
        }
    ]
}


Final Notes

  1. Huge thanks to Sam Xu, Saurabh Madan and the the rest of the OData team on the great efforts they have made to produce this beta release, and as you are reading this article, the team continues to push improvements and features before announcing the final release of OData 7.3.0 for ASP.NET Core 3.1 which should have a long term support of 3 years.
  2. This beta release should not be used in any way shape or form for production environments, it’s mainly for POCs and demos.
  3. OData team should announce the final release of OData for .NET Core 3.1 sometime in the second quarter of 2020.
  4. You can follow up on the most recent updates for OData on this public github repository and this thread as well.
  5. This is a repository for the demo in this article.

If you have any questions, comments, concerns or if you are running into any issues running this demo feel free to reach out on this blog post, we are more than happy to listen to your feedback and communicate your concerns.


The post Experimenting with OData in ASP.NET Core 3.1 appeared first on OData.

$select Enhancement in ASP.NET Core OData

$
0
0

The release of ASP.NET Core OData v7.3 brings a ton of improvements to $select functionality. In this article, I’d like to introduce some of the new features of $select and its usages in combination with other query options like $filter, $top, $skip, $orderby, $count and $expand.
This tutorial assumes that you already have the knowledge to build an ASP.NET Core Web Application service using ASP.NET Core OData NuGget package. If not, start by reading ASP.NET Core OData now Available and refer to the sample project used in this article.
Let’s get started.

Data Model

As mentioned, we are going to skip the steps to create an ASP.NET Core Web Application with OData functionalities enabled. However, to get a good understanding of the scenarios listed in this article, it is important for us to see the model types used in this sample project.

Below are the CLR class types used in sample project:

// Entity type
public class Customer
{
    public int Id { get; set; }
    public string Name { get; set; }
    public IList<string> Emails { get; set; }
    public Address HomeAddress { get; set; }
    public IList<Address> FavoriteAddresses { get; set; }
    public Order PersonOrder { get; set; }
    public Order[] Orders { get; set; }
}

// Complex type
public class Address
{
    public string Street { get; set; }
    public string City { get; set; }
    public ZipCode ZipCode { get; set; }
}

// Complex type
public class BillAddress : Address
{
    public string FirstName { get; set; }
    public string LastName { get; set; }
}

// Entity type
public class Order
{
    public int Id { get; set; }
    public string Title { get; set; }
}

// Entity Type
public class ZipCode
{
    public int Id { get; set; }
    public string DisplayName { get; set; }
}

Where,

  • Type “Customer”, “Order”, “ZipCode” serve as Edm entity types.
  • Type “Address” and “BillAddress” serve as Edm complex types, and “BillAddress” is derived from “Address”.
  • Address” has a navigation property named “ZipCode“.

In the corresponding Edm model, I have “Customers”, “Orders” and “ZipCodes” as the Edm entity sets related to the above Edm types.

Besides, I have two real “Customers” named “Balmy” and “Chilly” in the sample project. For other properties’ information, you can refer the source code or build, run, and send a http://localhost:5000/odata/Customers to get.

$select

$select is one of OData supported query options which allows the clients to select specific properties from the server. The biggest advantage of using $select is that the heavy lifting is done by the server before the data is returned, which leads to better performance. Hassan Habit’s Optimizing Web Applications with OData $Select shares some advantages to use $select.

For example, we can select a complex property using $select like:

http://localhost:5000/odata/Customers(1)?$select=HomeAddress

We can get:

{
    "@odata.context": "http://localhost:5000/odata/$metadata#Customers(HomeAddress)/$entity",
    "HomeAddress": {
        "Street": "145TH AVE",
        "City": "Redonse"
    }
}

In this way, we can get data performance by limiting the result only including the properties wanted. That is, server doesn’t need to return all properties belong to “Customer(1)”, meanwhile the client doesn’t need to trim the result.

Select path in $select

The above example is a very basic usage of $select. With the release of ASP.NET Core OData v7.3.0, we now have support to use select path in $select.

For example:

http://localhost:5000/odata/Customers(1)?$select=HomeAddress/Street

In summary, the select path should follow up the following basic rules:

  • If only one segment exists, it could be “*”, “NS.*”, “Structural property” segment or “Navigation property” segment.
  • Otherwise, the last segment in a select path could be “Structural property” segment or “Navigation property” segment, and the other segments could be “Complex property” segment or “Complex type cast” segment.

For the above request, we can get the following result:

{
    "@odata.context": "http://localhost:5000/odata/$metadata#Customers(HomeAddress/Street)/$entity",
    "HomeAddress": {
        "Street": "145TH AVE"
    }
}

Note: The result only includes the Street in HomeAddress.

Type cast select path in $select

It also supports the type cast in the select path, for example:

http://localhost:5000/odata/Customers?$select=HomeAddress/SelectImprovement.Models.BillAddress/FirstName

We can get:

{
    "@odata.context": "http://localhost:5000/odata/$metadata#Customers(HomeAddress/SelectImprovement.Models.BillAddress/FirstName)",
    "value": [
        {
            "HomeAddress": {}
        },
        {
            "HomeAddress": {
                "@odata.type": "#SelectImprovement.Models.BillAddress",
                "FirstName": "Peter"
            }
        }
    ]
}

Note:

  • The first customer’s HomeAddress is not a BillAddress, so the entity for this customer only includes the HomeAddress property with empty object.
  • The second customer’s HomeAddress is a BillAddress, so it includes the selected property named FirstName and a control metadata property named @odata.type.

Nested $select in $select

We can use the nested $select to replace the above select path. In fact, It’s more understandable to use nested $select.

A simplified example should look as follows:

http://localhost:5000/odata/Customers?$select=HomeAddress($select=Street)

We can get:

{
    "@odata.context": "http://localhost:5000/odata/$metadata#Customers(HomeAddress)",
    "value": [
        {
            "HomeAddress": {
                "Street": "145TH AVE"
            }
        },
        {
            "HomeAddress": {
                "@odata.type": "#SelectImprovement.Models.BillAddress",
                "Street": "Main ST"
            }
        }
    ]
}

Note, the context URI in this scenario is not correct. It should be same as the context URI in select path scenario. It’s a known issue and will be fixed in the future release.

Select sub navigation property in $select

It also supports to select the sub navigation property in a complex property. For example:

http://localhost:5000/odata/Customers?$select=HomeAddress/ZipCode

We can get:

{
    "@odata.context": "http://localhost:5000/odata/$metadata#Customers(HomeAddress/ZipCode)",
    "value": [
        {
            "HomeAddress": {}
        },
        {
            "HomeAddress": {
                "@odata.type": "#SelectImprovement.Models.BillAddress"
            }
        }
    ]
}

You may be wondering “Why the HomeAddress is empty object here?” It’s empty not because it’s not a BillAddress, but because the navigation link control information is omitted by default in the “Minimal” metadata level. In OData, if we don’t set the metadata level, by default it’s “Minimal” metadata level. So, if we want to get all control metadata information, we can use $format to set the “Full” metadata level as below:

http://localhost:5000/odata/Customers(1)?$select=HomeAddress/ZipCode&$format=application/json;odata.metadata=full

We can get:

{
    "@odata.context": "http://localhost:5000/odata/$metadata#Customers(HomeAddress/ZipCode)/$entity",
    "@odata.type": "#SelectImprovement.Models.Customer",
    "@odata.id": "http://localhost:5000/odata/Customers(1)",
    "@odata.editLink": "http://localhost:5000/odata/Customers(1)",
    "HomeAddress": {
        "@odata.type": "#SelectImprovement.Models.Address",
        "ZipCode@odata.associationLink": "http://localhost:5000/odata/Customers(1)/HomeAddress/ZipCode/$ref",
        "ZipCode@odata.navigationLink": "http://localhost:5000/odata/Customers(1)/HomeAddress/ZipCode"
    }
}

Again, we can use nested $select to get the same payload result as below (except the context URI):

http://localhost:5000/odata/Customers(1)?$select=HomeAddress($select=ZipCode)&$format=application/json;odata.metadata=full

Selection on collection property

Now, there’s support to select path and nested select on collection complex property. For example:

http://localhost:5000/odata/Customers(2)?$select=FavoriteAddresses/Street
or
http://localhost:5000/odata/Customers(2)?$select=FavoriteAddresses($select=Street)

We can get:

{
    "@odata.context": "http://localhost:5000/odata/$metadata#Customers(FavoriteAddresses/Street)/$entity",
    "FavoriteAddresses": [
        {
            "Street": "145TH AVE"
        },
        {
            "@odata.type": "#SelectImprovement.Models.BillAddress",
            "Street": "Main ST"
        },
        {
            "Street": "32ST NE"
        }
    ]
}

Note: The result in select path and nested select is almost same except the context URI.

Nested $filter, $top, $skip, $orderby, $count

Besides the nested $select, there is support for nested $filter, $top, $skip, $orderby and $count on collection property selection.

For example, we can select the collection property of string as:

http://localhost:5000/odata/Customers(2)?$select=Emails

We can get:

{
    "@odata.context": "http://localhost:5000/odata/$metadata#Customers(Emails)/$entity",
    "Emails": [
        "E8",
        "E7",
        "E9"
    ]
}

  • Now, we can add nested $filter as:

http://localhost:5000/odata/Customers(2)?$select=Emails($filter=$it eq 'E7')

{
    "@odata.context": "http://localhost:5000/odata/$metadata#Customers(Emails)/$entity",
    "Emails": [
        "E7"
    ]
}

  • We can add nested $top, $skip as:

http://localhost:5000/odata/Customers(2)?$select=Emails($top=1;$skip=1)

{
    "@odata.context": "http://localhost:5000/odata/$metadata#Customers(Emails)/$entity",
    "Emails": [
        "E7"
    ]
}

  • Also, we can add $orderby as:

http://localhost:5000/odata/Customers(2)?$select=Emails($top=2;$skip=1;$orderby=$it)

{
    "@odata.context": "http://localhost:5000/odata/$metadata#Customers(Emails)/$entity",
    "Emails": [
        "E8",
        "E9"
    ]
}

Or order by in descending order as:

http://localhost:5000/odata/Customers(2)?$select=Emails($top=2;$skip=1;$orderby=$it desc)

{
    "@odata.context": "http://localhost:5000/odata/$metadata#Customers(Emails)/$entity",
    "Emails": [
        "E8",
        "E7"
    ]
}

The above query options can also apply to complex type collection property, for example:

  • $filter on collection complex property

http://localhost:5000/odata/Customers(2)?$select=FavoriteAddresses($filter=Street eq '32ST NE')

{
    "@odata.context": "http://localhost:5000/odata/$metadata#Customers(FavoriteAddresses)/$entity",
    "FavoriteAddresses": [
        {
            "Street": "32ST NE",
            "City": "Bellewe"
        }
    ]
}

  • $top, $skip, $count, $orderby on collection complex property

http://localhost:5000/odata/Customers(2)?$select=FavoriteAddresses($top=2;$skip=1;$count=true;$orderby=City desc)

{
    "@odata.context": "http://localhost:5000/odata/$metadata#Customers(FavoriteAddresses)/$entity",
    "FavoriteAddresses@odata.count": 3,
    "FavoriteAddresses": [
        {
            "@odata.type": "#SelectImprovement.Models.BillAddress",
            "Street": "Main ST",
            "City": "Issaue",
            "FirstName": "Peter",
            "LastName": "Jok"
        },
        {
            "Street": "32ST NE",
            "City": "Bellewe"
        }
    ]
}

Note: So far, $filter, $top, $skip and $orderby work for “all” type collection structural property, such as primitive type, Enum type and complex type. However, $count only works for complex type collection property.

Nested $expand in $select (?)

It also supports to expand the navigation property under a complex property. For example, we can get a customer with “HomeAddress” selected meanwhile “ZipCode” is included under HomeAddress property.

It seems that we can use the “nested $expand” in selection, same as nested $filter as above, like:

~/Customers(2)?$select=HomeAddress($expand=ZipCode)

However, it’s not allowed, not supported by design. Even though the OData spec says that you may use “$select with nested $expand”, but there is no compelling use case for such a scenario. There’s active discussion around this topic and this might change in the near future. So, at this time, we decided not to provide support for nested $expand in $select.

However, it doesn’t mean that we cannot accomplish the above goal. We can combine $select and $expand together to get the result.

Let’s start from the expand path. Simply put, we can use the expand path to expand a navigation property under a complex property as below:

http://localhost:5000/odata/Customers(1)?$expand=HomeAddress/ZipCode

{
    "@odata.context": "http://localhost:5000/odata/$metadata#Customers(HomeAddress/ZipCode())/$entity",
    "Id": 1,
    "Name": "Balmy",
    "Emails": [
        "E1",
        "E3",
        "E2"
    ],
    "HomeAddress": {
        "Street": "145TH AVE",
        "City": "Redonse",
        "ZipCode": {
            "Id": 71,
            "DisplayName": "aebc"
        }
    },
    "FavoriteAddresses": [
        {
            "Street": "145TH AVE",
            "City": "Redonse"
        },
        {
            "@odata.type": "#SelectImprovement.Models.BillAddress",
            "Street": "Main ST",
            "City": "Issaue",
            "FirstName": "Peter",
            "LastName": "Jok"
        },
        {
            "Street": "32ST NE",
            "City": "Bellewe"
        }
    ]
}

We can see “ZipCode” navigation property included under “HomeAddress”.

We can also use the same pattern on the navigation property of collection complex property as:

http://localhost:5000/odata/Customers(1)?$expand=FavoriteAddresses/ZipCode

We can get the following result:

{
    "@odata.context": "http://localhost:5000/odata/$metadata#Customers(FavoriteAddresses/ZipCode())/$entity",
    "Id": 1,
    "Name": "Balmy",
    "Emails": [
        "E1",
        "E3",
        "E2"
    ],
    "HomeAddress": {
        "Street": "145TH AVE",
        "City": "Redonse"
    },
    "FavoriteAddresses": [
        {
            "Street": "145TH AVE",
            "City": "Redonse",
            "ZipCode": {
                "Id": 71,
                "DisplayName": "aebc"
            }
        },
        {
            "@odata.type": "#SelectImprovement.Models.BillAddress",
            "Street": "Main ST",
            "City": "Issaue",
            "FirstName": "Peter",
            "LastName": "Jok",
            "ZipCode": {
                "Id": 61,
                "DisplayName": "yxbc"
            }
        },
        {
            "Street": "32ST NE",
            "City": "Bellewe",
            "ZipCode": {
                "Id": 81,
                "DisplayName": "bexc"
            }
        }
    ]
}

However, we cannot use nested $expand in this scenario as below:

~/Customers(1)?$expand=FavoriteAddresses($expand=ZipCode)

A $expand query as such will get an error message stating that “FavoriteAddresses” is not a navigation property and you can’t expand on a non-navigation property.

To summarize, the expand path should follow up the following basic rules:

  • The last segment in the expand path should be navigation property segment.
  • The other segment could be complex property segment or type cast segment.

Combine $select and $expand

Even though we cannot use $expand in $select, we can combine them together to get more interesting results, for example:

http://localhost:5000/odata/Customers(1)?$select=Name&$expand=HomeAddress/ZipCode

We can get:

{
    "@odata.context": "http://localhost:5000/odata/$metadata#Customers(Name,HomeAddress/ZipCode())/$entity",
    "Name": "Balmy",
    "HomeAddress": {
        "Street": "145TH AVE",
        "City": "Redonse",
        "ZipCode": {
            "Id": 71,
            "DisplayName": "aebc"
        }
    }
}

You may notice that in this scenario, I only select “Name” explicitly, without select “HomeAddress”, and only expand “ZipCode” in “HomeAddress”, the payload should only include “Name” property and “ZipCode” of “HomeAddress”. The above payload does not seem correct. It’s a known issue and will be fixed in the future release.

To get the result only including “ZipCode” of “HomeAddress”, we can construct a query like:

http://localhost:5000/odata/Customers(1)?$select=HomeAddress/ZipCode&$expand=HomeAddress/ZipCode

which gets:

{
    "@odata.context": "http://localhost:5000/odata/$metadata#Customers(HomeAddress/ZipCode,HomeAddress/ZipCode())/$entity",
    "HomeAddress": {
        "ZipCode": {
            "Id": 71,
            "DisplayName": "aebc"
        }
    }
}

Note, in “Full” metadata level, the payload includes the navigation link metadata.

Summary

Thanks for reading this article. I hope you enjoy the new $select usages released in new ASP.NET Core OData. If you have any questions, comments, concerns, please feel free send email to saxu@microsoft.com.  If you find any issues or have a feature request, please go to odata@github.

For the sample project used in this article, you can find it here. And big thanks for reviewing from Saurahb Madan.

The post $select Enhancement in ASP.NET Core OData appeared first on OData.

Advancing no-impact and low-impact maintenance technologies

$
0
0

“This post continues our reliability series kicked off by my July blog post highlighting several initiatives underway to keep improving platform availability, as part of our commitment to provide a trusted set of cloud services. Today I wanted to double-click on the investments we’ve made in no-impact and low-impact update technologies including hot patching, memory-preserving maintenance, and live migration. We’ve deployed dozens of security and reliability patches to host infrastructure in the past year, many of which were implemented with no customer impact or downtime. The post that follows was written by John Slack from our core operating systems team, who is the Program Manager for several of the update technologies discussed below.” - Mark Russinovich, CTO, Azure


This post was co-authored by Apurva Thanky, Cristina del Amo Casado, and Shantanu Srivastava from the engineering teams responsible for these technologies.


We regularly update Azure host infrastructure to improve the reliability, performance, and security of the platform. While the purposes of these ‘maintenance’ updates vary, they typically involve updating software components in the hosting environment or decommissioning hardware. If we go back five years, the only way to apply some of these updates was by fully rebooting the entire host. This approach took customer virtual machines (VMs) down for minutes at a time. Since then, we have invested in a variety of technologies to minimize customer impact when updating the fleet. Today, the vast majority of updates to the host operating system are deployed in place with absolute transparency and zero customer impact using hot patching. In infrequent cases in which the update cannot be hot patched, we typically utilize low-impact memory preserving update technologies to roll out the update.

Even with these technologies, there are still other rare cases in which we need to do more impactful maintenance (including evacuating faulty hardware or decommissioning old hardware). In such cases, we use a combination of live migration, in-VM notifications, and planned maintenance providing customer controls.

Thanks to continued investments in this space, we are at a point where the vast majority of host maintenance activities do not impact the VMs hosted on the affected infrastructure. We’re writing this post to be transparent about the different techniques that we use to ensure that Azure updates are minimally impactful.

Plan A: Hot patching

Function-level “hot” patching provides the ability to make targeted changes to running code without incurring any downtime for customer VMs. It does this by redirecting all new invocations of a function on the host to an updated version of that function, so it is considered a ‘no impact’ update technology. Wherever possible we use hot patching to apply host updates completely avoiding any impact to the VMs running on that host. We have been using hot patching in Azure since 2017. Since then, we have worked to broaden the scope of what we can hot patch. As an example, we updated the host operating system to allow the hypervisor to be hot patched in 2018. Looking forward, we are exploring firmware hot patches. This is a place where the industry typically hasn't focused. Firmware has always been viewed as ‘if you need to update it, reboot the server,’ but we know that makes for a terrible customer experience. We've been working with hardware manufacturers to consider our own firmware to make them hot patchable and incrementally updatable.

Some large host updates contain changes that cannot be applied using function-level hot patching. For those updates, we endeavor to use memory-preserving maintenance.

Plan B: Memory-preserving maintenance

Memory-preserving maintenance involves ‘pausing’ the guest VMs (while preserving their memory in RAM), updating the host server, then resuming the VMs and automatically synchronizing their clocks. We first used memory-preserving maintenance for Azure in 2018. Since then we have improved the technology in three important ways. First, we have developed less impactful variants of memory-preserving maintenance targeted for host components that can be serviced without a host reboot. Second, we have reduced the duration of the customer experienced pause. Third, we have expanded the number of VM types that can be updated with memory preserving maintenance. While we continue to work in this space, some variants of memory-preserving maintenance are still incompatible with some specialized VM offerings like M, N, or H series VMs for a variety of technical reasons.

In the rare case we need to make more impactful maintenance (including host reboots, VM redeployment), customers are notified in advance and given the opportunity to perform the maintenance at a time suitable for their workload(s).

Plan C: Self-service maintenance

Self-service maintenance involves providing customers and partners a window of time, within which they can choose when to initiate impactful maintenance on their VM(s). This initial self-service phase typically lasts around a month and empowers organizations to perform the maintenance on their own schedules so it has no or minimal disruption to users. At the end of this self-service window, a scheduled maintenance phase begins—this is where Azure will perform the maintenance automatically. Throughout both phases, customers get full visibility of which VMs have or have not been updated—in Azure Service Health or by querying in PowerShell/CLI. Azure first offered self-service maintenance in 2018. We generally see that administrators take advantage of the self-service phase rather than wait for Azure to perform maintenance on their VMs automatically.

In addition to this, when the customer owns the full host machine, either using Azure Dedicated Hosts or Isolated virtual machines, we recently started to offer maintenance control over all non-zero impact platform updates. This includes rebootless updates which only cause a few seconds pause. It is useful for VMs running ultra-sensitive workloads which can’t sustain any interruption even if it lasts just for a few seconds. Customers can choose when to apply these non-zero impact updates in a 35-day rolling window. This feature is in public preview, and more information can be found in this dedicated blog post.

Sometimes in-place update technologies aren’t viable, like when a host shows signs of hardware degradation. In such cases, the best option is to initiate a move of the VM to another host, either through customer control via planned maintenance or through live migration.

Plan D: Live migration

Live migration involves moving a running customer VM from one “source” host to another “destination” host. Live migration starts by moving the VM’s local state (including RAM and local storage) from the source to the destination while the virtual machine is still running. Once most of the local state is moved, the guest VM experiences a short pause usually lasting five seconds or less. After that pause, the VM resumes running on the destination host. Azure first started using live migration for maintenance in 2018. Today, when Azure Machine Learning algorithms predict an impending hardware failure, live migration can be used to move guest VMs onto different hosts preemptively.

Amongst other topics, planned maintenance and AI Operations were covered in Igal Figlin’s recent Ignite 2019 session “Building resilient applications in Azure.” Watch the recording here for additional context on these, and to learn more about how to take advantage of the various resilient services Azure provides to help you build applications that are inherently resilient.

The future of Azure maintenance 

In summary, the way in which Azure performs maintenance varies significantly depending on the type of updates being applied. Regardless of the specifics, Azure always approaches maintenance with a view towards ensuring the smallest possible impact to customer workloads. This post has outlined several of the technologies that we use to achieve this, and we are working diligently to continue improving the customer experience. As we look toward the future, we are investing heavily in machine learning-based insights and automation to maintain availability and reliability. Eventually, this “AI Operations” model will carry out preventative maintenance, initiate automated mitigations, and identify contributing factors and dependencies during incidents more effectively than our human engineers can. We look forward to sharing more on these topics as we continue to learn and evolve.

Top Stories from the Microsoft DevOps Community – 2020.01.03

$
0
0

This is the first post of 2020, and the community did not take a break for the holidays! Today, I am reminded of the importance of 101s and introductory trainings. Wherever you are on your (Azure) DevOps journey, this community has content for you!

GCast 68: Azure DevOps Work Items
We often think that everyone knows what we know, and tend towards sharing only deep-dive content. But when you are just getting started, 101 videos are fantastic. In this short video, David Giard shows us how to create and link Work Items in Azure Boards. Thank you, David!

How to Build an Azure Pipeline (Build/Release) from Scratch
In this well-organized guide, Adam Bertram and Peter De Tender walk us through creating a Build and Release pipeline to deploy a .NET Core app to an Azure Web App on Linux. Here, we start from scratch and create a new Azure DevOps organization, link a GitHub repo and then proceed to configure the Azure Pipelines. Thanks, Adam and Peter!

Angular 8 with Azure DevOps Build Pipeline
Application frameworks are perpetually evolving, and whether we like it or not, we must evolve with them. In this post, Daniel Oliver shows us the updates needed to build Angular 8 with Azure Pipelines, compared to Angular 7. And, of course, I have to quote that “Azure DevOps makes builds easy”. Thank you, Daniel!

Getting Started with LightHouse CI
In this post, Gurucharan Subramani walks us through setting up the LightHouse CI to run in Azure Pipelines. Gurucharan created an Azure DevOps extension for running the LightHouse health checks and retrieving the results. Thank you Gurucharan!

Implementing Azure DevOps Development Processes
Last but not least, it is my pleasure to share that the Linux Academy is offering a class on Azure DevOps in January 2020. This course walks you through version control and branching strategies, build configurations, mobile deployments, secrets management and so much more. The course can be used in preparation for the AZ-400 Azure DevOps Expert certification exam. Thanks to Tim Lawless for crafting the course!

If you’ve written an article about Azure DevOps or find some great content about DevOps on Azure, please share it with the #AzureDevOps hashtag on Twitter!

The post Top Stories from the Microsoft DevOps Community – 2020.01.03 appeared first on Azure DevOps Blog.

Integrating Cosmos DB with OData (Part 3)

$
0
0

Sometimes requiring to build an entire ASP.NET Core application just for the purpose of exposing a RESTFul API endpoint to give your API consumers the ability to query, filter and order the data could be a bit of an overhead, especially if you are not planning on adding in any additional business logic between your data and it’s consumers.

It’s not also a very cost effective solution when it comes to the development effort, maintenance, infrastructure and all the bells and whistles that accompany developing a custom ASP.NET Core API.

If that’s the case for your task, Cosmos DB offers native support for OData out of the box without having to add an additional layer of infrastructure.

In this article, we will discuss how you can leverage Cosmos DB native support for OData while exposing an API and leveraging a secure reliable geo-redundant communications between your clients and your data resources.


Setting Things Up

Let’s start with Azure Dashboard where we need to setup up our infrastructure.

1. At the front page of Azure Dashboard, Click on the plus sign to Create a resource as highlighted in the screenshot below:

2. Select Azure Cosmos DB Option from the list of cloud services presented in the next dialog:

3. In this page we are going to setup all the information needed to create a Cosmos DB instance as shows in the following screenshot:

After selecting the subscription you would like to use for your Cosmos DB, you will need to select the resource group where you need your Cosmos DB instance to reside. If you don’t have an existing resource group, you can click Create new link right below the resource group drop down to create a new resource group for your resources.

You will also notice in the screenshot that we’ve chosen studentsdata as an account name for the purpose of this demo, but the most important part of this setup is to select the right API to ensure you can leverage the native support of OData, in our demo here, you will need to select Azure Table which is the API Cosmos DB offers with OData support as we will discuss further in this article.

You can also enable the Geo-Redundancy option for your instance to enable global distribution on your account across multiple regions, you can also enable that option later as your data needs grow, additionally you can also enable the Multi-region Writes which should allow you to take advantage of the provisioned throughput for your databases and containers across the globe, for the purpose of this demo, we will keep both options disabled.

4.Once you have accomplished the aforementioned steps, click the Review + Create button to review all the information you’ve entered as follows:

The process of creating a Cosmos DB instance takes between 5 – 10 minutes to be fully provisioned and deployed. Once the deployment is done click on Go to resource blue button to start working with your Cosmos DB instance as shows in the following screenshot:


Let’s move on to the next part of this article, which is to create a table with some data so we can examine our OData querying options.


Adding Some Data

To add some data to your new instance, we will need to create a table or container for this data first, in order for you to do that follow the following steps.

1. Click on the Data Explorer option to navigate to data manipulation and querying page as shows in the following screenshot:


2. Now in the new page, click New Table option at the top left corner to create a table that contains our sample data, once clicked, a dialog will appear from the right side to enable you to give your new data table a name, for the purpose of our demo here, we are going to call our new table students as highlighted in the screenshot below:


3. Now that your table is created, you will need to navigate to your table by expanding TablesDB root item on the left hand in the navigation pane, then at the top click on Add Entity then start defining the properties of the student entity that you would like to store in the table as shows in the following screenshot:

You will notice that the PartitionKey and the RowKey are mandatory keys that you cannot remove or modify their types, they play the role of primary key in an equivalent relational database system, but you can, however add unique values and query the data based on these values.

Since both properties are of string data types, you can choose to add whichever values you want in there, stringified Guids, numbers or any other form of unique identifiers.

But as it shows in the screenshot above, we needed to add more properties to our entity here, we added Name with a data type string, and a Score with data type Int32. now let’s add some entities for our demo as shows in the following screenshot:


Consuming the Data

This is the part where we consume the data that we have created and examine our OData querying against our the students data table that we have created.

But before we start writing any code, make sure you copy the Connection String of your Cosmos DB instance so you can establish a secure communication between your client and your Cosmos API.

You can find the Connection String of your instance simply by going to the Connection String navigation option on the left hand side of your Azure instance and copying the Primary Connection String as shows in the following screenshot:


1. Now, let’s start by create a simple client as a Console Application in Visual Studio to consume and query our data as follows:

We will be going with a Console App (.NET Core) in this demo, let’s call our App StudentsDataClient.

2. We will need to add a nuget package to enable the authentication and communication, querying and navigation between our simple app and our Cosmos DB students table, the nuget package is Microsoft.Azure.Cosmos.Table specifically version 1.0.6. You can add the package simply by using Manage Nuget Packages option in Visual Studio or by simply typing the following command in the Package Manager Console:

Install-Package Microsoft.Azure.Cosmos.Table -Version 1.0.6

3. Now, that we had our project setup, let’s start by creating a model that reflects the same properties we have created in our students Cosmos DB table, so, in a new file let’s call it Student.cs let’s create the following model:

using Microsoft.Azure.Cosmos.Table;

namespace StudentsDataClient
{
    public class Student : TableEntity
    {
        public string? Name { get; set; }
        public int? Score { get; set; }
    }
}

You will notice that our Student model here inherits from another model called TableEntity, this inheritance is necessary to include all the other properties that a Cosmos DB Table record has, such as the PartitionKey, RowKey, Timestamp in addition to a native implementation of ReadEntity and WriteEntity functions which are needed to map a Cosmos DB record to a strongly typed model for both reading from and writing to your table.

You can also override these methods and properties or simply replace TableEntity with ITableEntity and start implementing all the aforementioned properties and functions.

You will also notice that we defined all our properties here as nullable with a question mark by the type of each, this enables us to ignore properties that are discarded in an OData query, otherwise the return result will be the initial value of the primitive type of the property, for instance, Score would return 0’s.

4. With our model being implemented, let’s instantiate a Cosmos DB client to establish a secure communication while retrieving everything in our table with an empty query as follows:

using System.Threading.Tasks;
using Microsoft.Azure.Cosmos.Table;

namespace StudentsDataClient
{
    class Program
    {
        static async Task Main(string[] args)
        {
            string connectionString = "YOUR_PRIMARY_CONNECTION_STRING";
            CloudStorageAccount storageAccount = CloudStorageAccount.Parse(connectionString);
            CloudTableClient tableClient = storageAccount.CreateCloudTableClient();

            CloudTable table = tableClient.GetTableReference("students");
            TableQuery<Student> tableQuery = new TableQuery<Student>();
            
            TableQuerySegment<Student> studentsSegment = 
                await table.ExecuteQuerySegmentedAsync(tableQuery, token: null);
            
            studentsSegment.Results.ForEach(i => 
                Console.WriteLine("{0,5} {1,10} {2,-10}", i.PartitionKey, i.Name, i.Score));
            
            Console.ReadKey();
        }
    }
}

Let’s walk through the previous code snippet:

First of all make sure you reference Microsoft.Azure.Cosmos.Table in your usings so you can access all the models, methods and functionality the library offers.

Secondly, make sure you change your main method from by synchronous to asynchronous by changing the return type from void to Task and adding the async option. you will need to do that so you can await and execute asynchronous calls in your Main method.

Asynchronous Main methods were introduced with C# 7.1 – you will want to make sure you’re using that version or later to establish this.

We have also used the Connection String variable to contain the reference we have copied from our Cosmos DB instance, please refer to the beginning of this part to find out where to get that value in Azure.

The rest of the code is simply a validation/parsing of the connection string then using a CreateCloudTableClient factory method to instantiate Cosmos DB table client for our further communications.

We also, reference the students table to target that particular data container in our Cosmos DB account, this step is important because a Cosmos DB account could contain many, many other tables.

Our TableQuery in this basic example is completely empty, but in the next steps I’m going to show you how you can leverage that object to run OData queries shortly – but for now, running the code above results the following Console output as follows:

1     Hassan 155
    2       Josh 133
    3       Todd 189
    4     Jackie 175
    5    Sandeep 199
    6      Kailu 211
    7     Vishwa 183
    8      Viral 125


OData Querying

Now that we have successfully retrieved all the data we entered in our Cosmos DB table, let’s execute some of the powerful features of OData.


Filtering

Let’s start with the filtering feature of OData to only return students with score higher than 150 as follows:

TableQuery<Student> tableQuery = new TableQuery<Student>
{
     FilterString = "Score gt 150"
};

The result will be as follows:

1     Hassan 155
    3       Todd 189
    4     Jackie 175
    5    Sandeep 199
    6      Kailu 211
    7     Vishwa 183

You can also establish the same filtering process by modifying your code as follows:

TableQuery<Student> tableQuery = new TableQuery<Student>();
tableQuery.Where("Score gt 150");

And here’s a third option as well:

TableQuery<Student> tableQuery = new TableQuery<Student>();
string filter = TableQuery.GenerateFilterConditionForInt("Score", QueryComparisons.GreaterThan, 150);
tableQuery.Where(filter);

For filtering with the last option, the library offers multiple methods for comparing several primitive data types, such as GenerateFilterConditionForBinary, GenerateFilterConditionForDate, GenerateFilterConditionForInt and many other options, the default method GenerateFilterCondition compares against strings by default.

You can also use the same pattern to combine multiple filters as follows:

TableQuery<Student> tableQuery = new TableQuery<Student>();
            
string filter = TableQuery.CombineFilters(
     TableQuery.GenerateFilterConditionForInt("Score", QueryComparisons.GreaterThan, 150),
     TableOperators.And,
     TableQuery.GenerateFilterCondition("Name", QueryComparisons.Equal, "Hassan"));
            
tableQuery.Where(filter);


Selecting

Now, let’s experiment with selecting particular properties off of our results, for instance, if we only care about students names, regardless of their score, we can implement the following code:

TableQuery<Student> tableQuery = new TableQuery<Student>();
List<string> columns = new List<string> { "Name" };
tableQuery.Select(columns);

The above code will yield the following results:

1     Hassan
    2       Josh
    3       Todd
    4     Jackie
    5    Sandeep
    6      Kailu
    7     Vishwa
    8      Viral

The Score property are not in display in our code because we declared it as nullable property, therefore the Console writer will ignore it if not fulfilled by Cosmos API response.


Ordering

You can also execute ordering in an ascending or descending fashion based on a particular property such as Name as follows:

TableQuery<Student> tableQuery = new TableQuery<Student>();
tableQuery.OrderBy("Name");

The above code result the following details:

1     Hassan 155
    4     Jackie 175
    2       Josh 133
    6      Kailu 211
    5    Sandeep 199
    3       Todd 189
    8      Viral 125
    7     Vishwa 183

You can also leverage the ordering in descending fashion by using OrderByDesc the exact same way.


Take

You can also leverage the Take functionality by getting only a specific count of the final result to be returned as follows:

TableQuery<Student> tableQuery = new TableQuery<Student>();
tableQuery.Take(take: 3);

The above code should returning the following results:

1     Hassan 155
    2       Josh 133
    3       Todd 189


Final Notes

  1. The Cosmos DB team has an extensive documentation about all the capabilities of the technology and thorough details on the client library you can find that documentation in this link.
  2. There are few capabilities the library & the API do not offer such as IN and Expand functionality, mainly due to the non-relational nature of Cosmos and Table API.
  3. This is the link to a github repository for the code we used in this article.

The post Integrating Cosmos DB with OData (Part 3) appeared first on OData.

Viewing all 5971 articles
Browse latest View live


<script src="https://jsc.adskeeper.com/r/s/rssing.com.1596347.js" async> </script>