Quantcast
Channel: Category Name
Viewing all 5971 articles
Browse latest View live

Microsoft C++ Team on CppCast

$
0
0

Today we have a short guest post from Rob Irving, host of CppCast to tell us about an episode he recorded with our team.

CppCast logo


During CppCon 2019 the hosts of CppCast had a chance to sit down with Marian Luparu, Sy Brand and Stephan T. Lavavej from Microsoft’s C++ team to discuss some of the announcements made by the team at CppCon.

For those not familiar with CppCast. It’s an audio podcast hosted by Microsoft MVPs Rob Irving and Jason Turner. This latest episode is the 216th of the (almost) weekly podcast that started in 2015. In each ~40-60 minute episode they talk to a member of the C++ community and discuss recent news. Past guests include Bjarne Stroustrup, Herb Sutter, Kate Gregory, Scott Meyers and many more.

In this latest episode you can hear more about the Open Sourcing of MSVC’s STL, the upcoming ASAN support in Visual Studio and the team’s effort in achieving C++17 standards conformance. You can find this episode of CppCast at https://cppcast.com/msvc-cppcon-2019/

The post Microsoft C++ Team on CppCast appeared first on C++ Team Blog.


Announcing the webhint v1 browser extension for Microsoft Edge

$
0
0

We are thrilled to announce that the webhint browser extension has moved from beta to its v1 release and is now available for Insider builds of Microsoft Edge, as well as for Chrome and Firefox!

The webhint browser extension allows you to easily scan a website and get feedback on accessibility, browser compatibility, security, performance, and more within the browser DevTools. Read more at https://webhint.io/.

Try the webhint browser extension

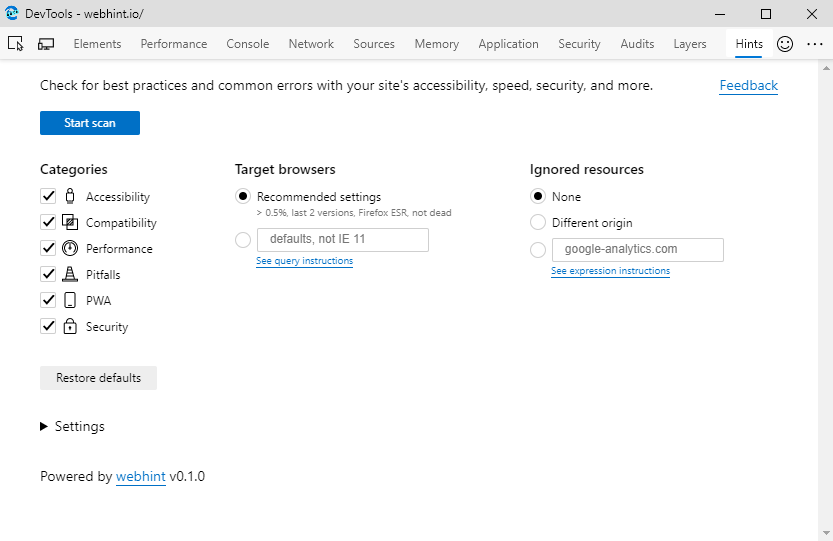
Once you’ve installed the extension for your browser, simply open DevTools and select the Hints tab. From here, you’ll be able to run a customizable site scan. You can select what browsers are relevant to you by using the browserslist syntax. (browserslist is the defacto standard for creating browser support matrix, and it’s used by tools such as autoprefixer.) You can also ignore certain cross-origin resources in your scan, letting you focus on the code you care about most.

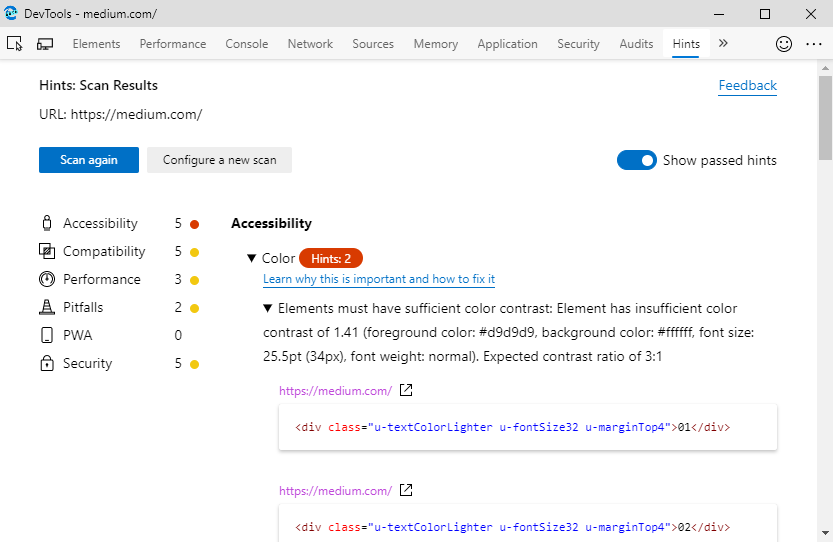
Screenshot of the Hints tab in the Microsoft Edge DevTools

What’s new for v1

Since announcing the beta in July, we’ve made a number of bug fixes, improvements, performance enhancements, and all-new features to the browser extension based on your feedback. Here are a few of the highlights.

Improvements to cross-browser compatibility hints

Making sure your website works in all the browsers you care about is a difficult task. webhint’s compat-api uses MDN’s browser compat data to help you identify possible gaps in your browser support matrix.

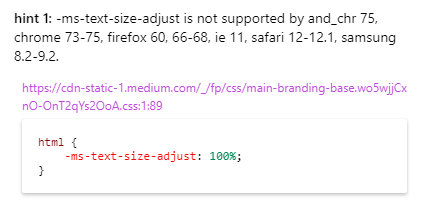
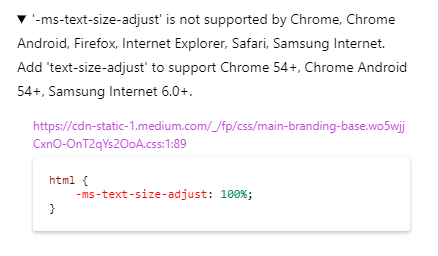
In v1, we added suggestions for missing vendor prefixes. These hints are especially helpful for testing cross-browser compatibility. We also improved the way in which browser versions are listed in compatibility hints, as shown in the before and after screenshots below.

Screenshot of a hint in the previous version of webhint

Browser versions were shortened in prior versions of webhint

Screenshot of a hint in the webhint v1 extension, with an improved layout

In webhint v1, compatibility hints will display browser versions more clearly, and provide tips to get better cross-browser support

Grouping of similar hints

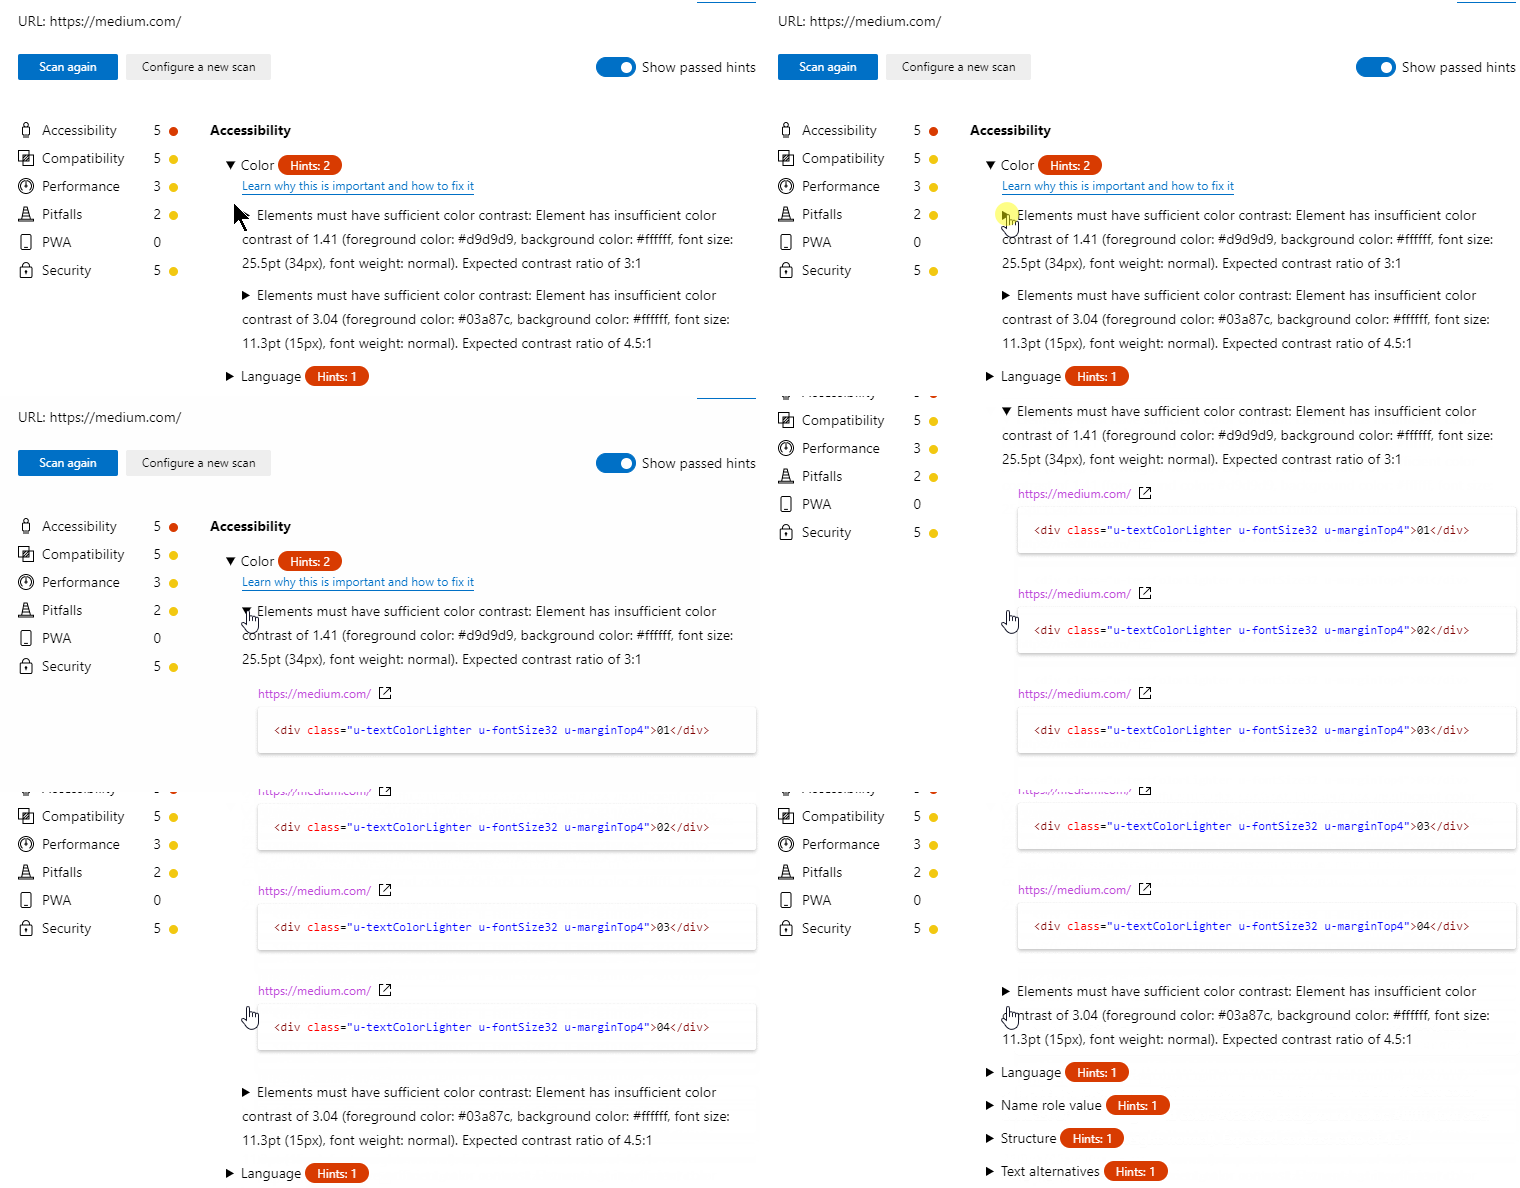
Previously, if a hint affected numerous elements on a webpage, it could produce an overwhelming number of recommendations. We’ve improved this experience by grouping similar hints together.

Screen capture showing similar hints grouped together

Similar hints are now grouped together

More insights on accessibility

Previously, the browser extension surfaced color contrast hints but did not display the current color contrast ratio. In v1, this information has been added to color contrast hints.

We’ve also made more granular category breakdowns for accessibility to help you quickly sort through recommendations.

Screenshot of category breakdowns and new accessibility insights

…and more!

webhint now uses axe-core version 3.3.2, giving us a great performance boost. Browser extension scans now take and average of 9 seconds. We’ve also added hints for inline SVG styles, bug fixes, and more! You can see the full changelog here.

webhint ❤ open source

Illustration of the webhint mascot, "Nellie the narwhal," at a computer

webhint is built in then open as an OpenJS foundation project, and has benefited from the contributions of about 30 unique contributors active on our GitHub repo since our last browser extension announcement at the end of July. Thank you all for being part of the webhint community!

If you have feedback or would like to get involved in the future development of webhint, please find us on GitHubGitter, or Twitter.

Rachel Weil, Program Manager, Microsoft Edge DevTools

The post Announcing the webhint v1 browser extension for Microsoft Edge appeared first on Microsoft Edge Blog.

OneDrive Personal Vault and expandable storage now available worldwide

Introducing .NET Core Windows Forms Designer Preview 1

$
0
0

Introducing .NET Core Windows Forms Designer Preview 1

We just released a GA version of .NET Core 3.0 that includes support for Windows Forms and WPF. And along with that release we’re happy to announce the first preview version of the Windows Forms Designer for .NET Core projects!

For developers the .NET Core Windows Forms Designer (when we will release the GA version) will look and feel the same as the .NET Framework Windows Forms Designer. But for us it is a huge technical challenge to bring the designer to .NET Core because it requires the design surface that hosts the live .NET Core form to run outside the Visual Studio process. That means we need to re-architect the way the designer surface “communicates” with Visual Studio. You can watch these communications in the Output Window, where we track each request sent when the Visual Studio components are accessing properties or executing methods on the live controls in the design surface. The engineering team is still working on this technical challenge, and we will be releasing the Preview versions on regular basis to give you the early glance at the .NET Core Designer. Stay tuned! The next Preview will be coming out in early November.

Because this is the very first preview of the designer, it isn’t yet bundled with Visual Studio and instead is available as a Visual Studio extension (“VSIX”) (download). That means that if you open a Windows Forms project targeting .NET Core in Visual Studio, it won’t have the designer support by default – you need to install the .NET Core Designer first!

Enabling the designer

To enable the designer, download and install the Windows Forms .NET Core Designer VSIX package. You can remove it from Visual Studio at any time. After you install the .NET Core Designer, Visual Studio will automatically pick the right designer (.NET Core or .NET Framework) depending on the target framework of the project you’re working on.

It is early days for the designer, here is what to expect…

Please keep in mind, that this is the first preview, so the experience is limited. We support the most commonly used controls and base operations and will be adding more in each new Preview version. Eventually, we will bring the .NET Core Designer at parity with the Windows Forms Designer for .NET Framework.

Because many controls aren’t yet supported in Preview 1 of the designer, we don’t recommend porting your Windows Forms applications to .NET Core just yet if you need to use the designer on a regular basis. This Preview 1 is good for “Hello World” scenarios of creating new projects with common controls.

Controls included in Preview 1:

  • Pointer
  • Button
  • Checkbox
  • CheckedListBox
  • ComboBox
  • DateTimePicker
  • Label
  • LinkLabel
  • ListBox
  • ListView
  • MaskedTextBox
  • MonthCalendar
  • NumericUpDown
  • PictureBox
  • ProgressBar
  • RadioButton
  • RichTextBox
  • TextBox
  • TreeView

What is not supported in Preview 1:

  • Container
  • Resources
  • Component Tray
  • In-place editing
  • Designer Actions
  • Databinding
  • User Controls/Inherited Controls

Give us your feedback!

We are putting out our first bits so early to support the culture of developing the product with our users’ early feedback in mind. Please do reach out with your suggestions, issues and feature requests via Visual Studio Feedback channel. To do so, click on Send Feedback icon in Visual Studio top right corner as it is shown on the picture below.

We appreciate your engagement!

Addressing Questions

What to do if Windows Forms Designer doesn’t work?

We heard some question related to the Windows Forms Designer not working. Here’s what could have happened:

  1. You might have created a .NET Core Windows Forms project instead of the traditional .NET Framework one without realizing it. If you type “WinForms” or “Windows Forms” in the New Project Dialog, the first option would be a .NET Core Windows Forms project. If your intention is to create a .NET Framework project (with the mature designer support), just find and select Windows Forms App (.NET Framework).

  2. If you want to work with .NET Core project, don’t forget to install the .NET Core Windows Forms Designer, since it isn’t yet shipped inside Visual Studio by default. See the previous “Enabling the designer” section.

Does .NET Core WPF Designer depend on Windows Forms Designer installation?

We also received some questions related to the .NET Core WPF Designer not working and if it requires a separate installation or the Windows Forms Designer installation. No, the WPF Designer is completely independent of the Windows Forms Designer. We released its GA version of the WPF .NET Core Designer at the same time as .NET Core 3.0 and it comes with Visual Studio. In Visual Studio version 16.3.0 we had an issue with the Enable XAML Designer property set to false by default. That means that when you click on .xaml files, the designer doesn’t open automatically. Upgrade to the latest Visual Studio version 16.3.1 where this issue is fixed. Another option to fix it is to go to Tools -> Options -> XAML Designer and check Enable XAML Designer.

The post Introducing .NET Core Windows Forms Designer Preview 1 appeared first on .NET Blog.

Track the progress of work using Rollup columns

$
0
0

How is our Feature progressing? As simple and common as this question is, it’s a hard one to answer. Especially if your Feature is complex and is composed of multiple User Stories and Tasks. With Sprint 157 Update you will be able to answer this using Rollup in Azure Boards backlog view.

What is rollup?

Rollup is an aggregation displayed on a parent item (like Epic, Feature or even User story) calculated based on parent child relationships. For example, at the Feature backlog you can track progress of each of the Features based on the sum of Story Points for the completed linked User Stories. Learn more about Rollup. Rollup is based on the Analytics service, see Analytics latency and rollup for more details.

Add rollup columns to you backlog

Adding a rollup column is as simple as adding any other column to your backlog view. Click on “Column Options”. In the panel click “Add rollup column” and select from the rollup quick list what you want to rollup on. You can add one or more rollup columns to any of the backlog levels. Like regular columns, this selection will be saved per user and backlog level. The rollup options you can add are based on your project’s process template. That means that the list of rollup columns available may vary per project.

Rollup for custom fields

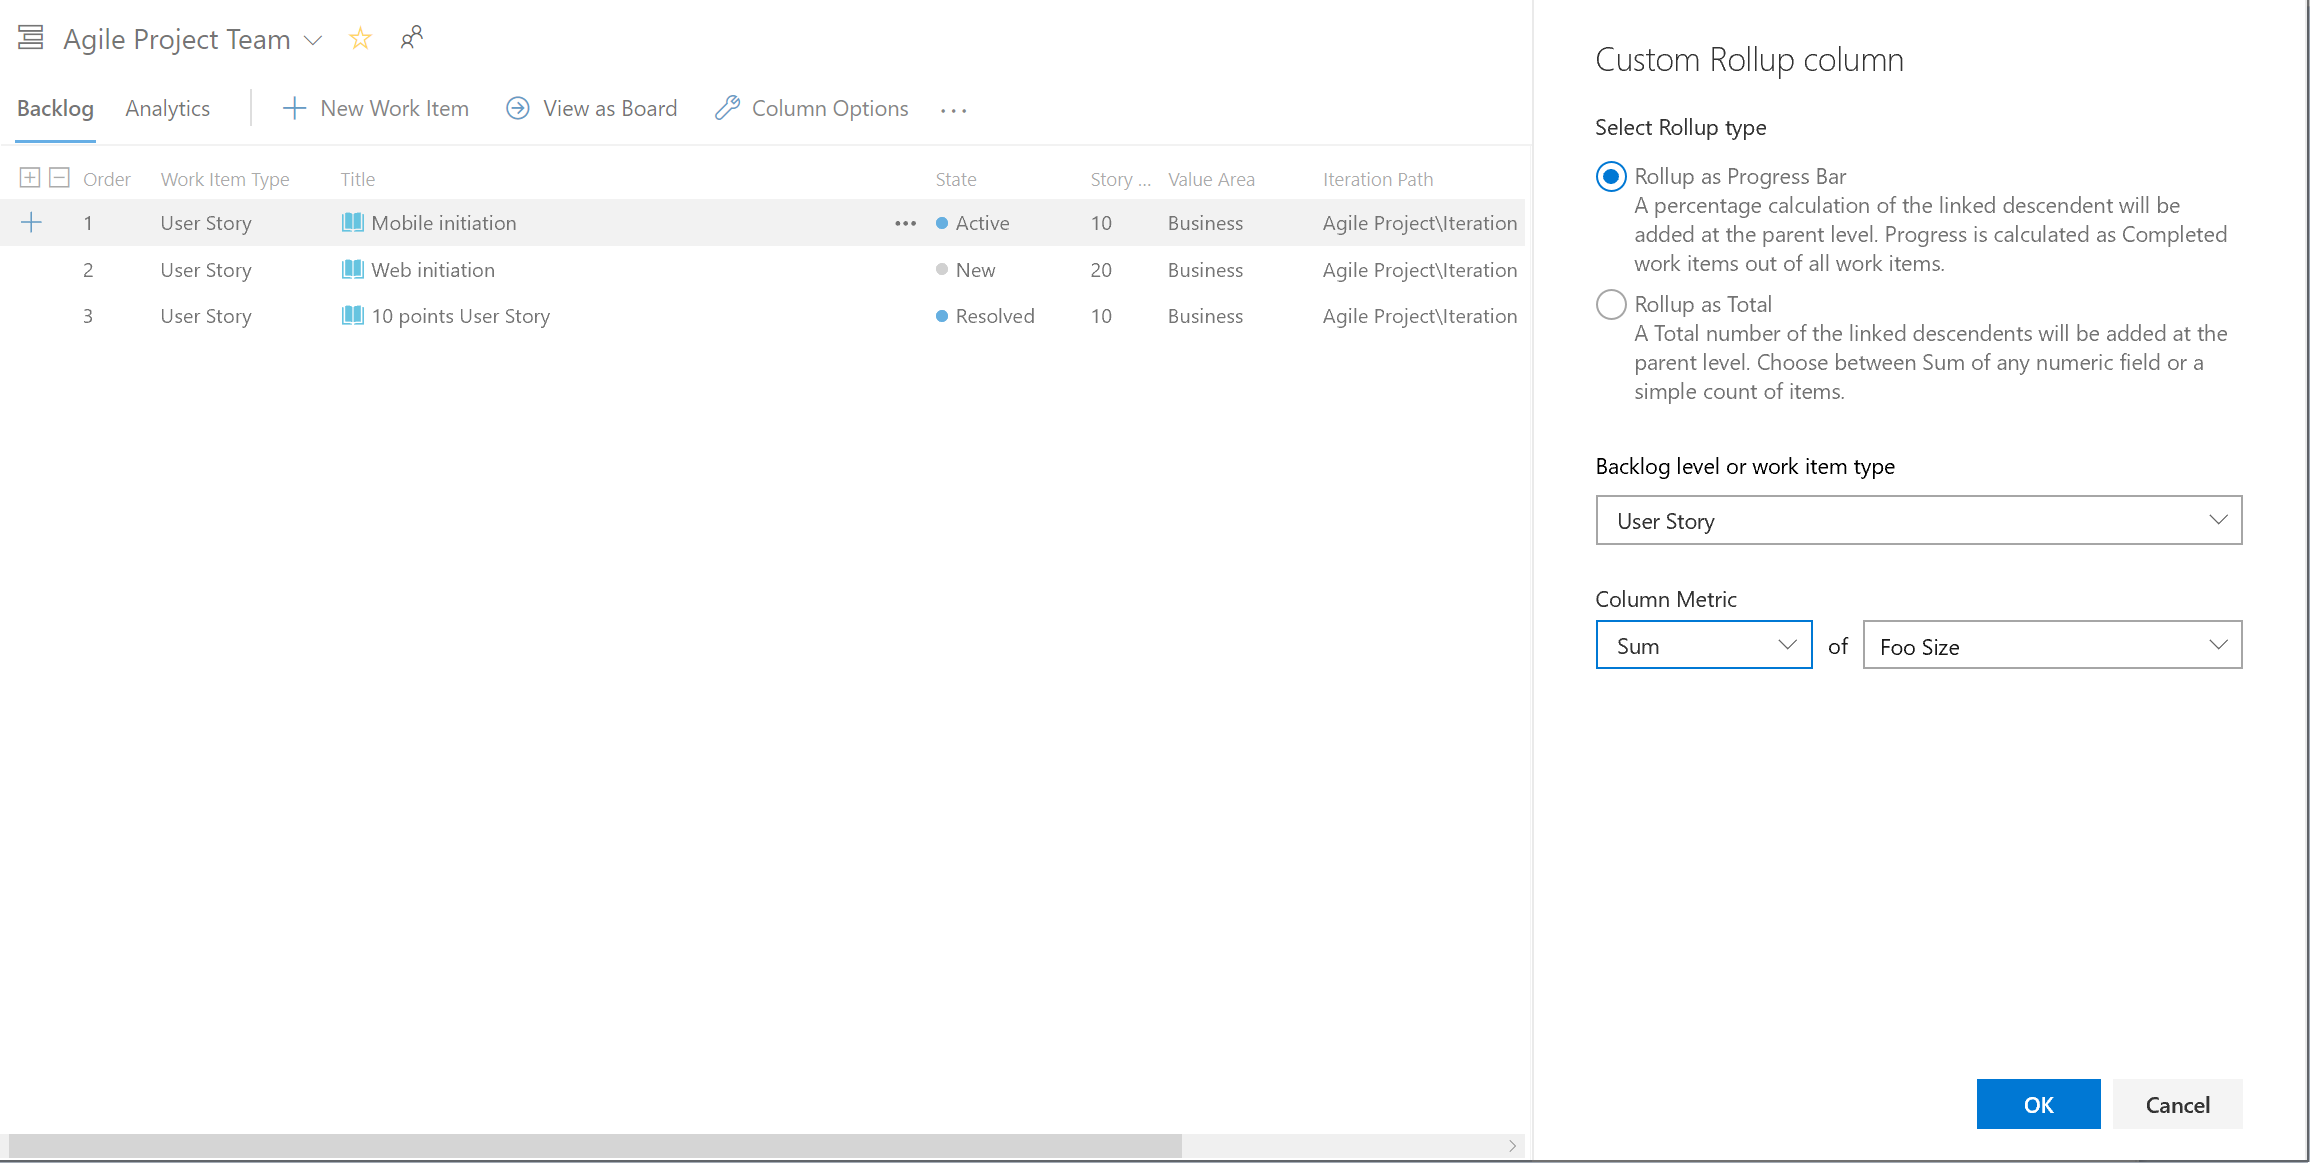
If you want to rollup on numeric fields that are not part of the out of the box process template, you can configure your own column. In the “Column options” panel, click “Add rollup column” and then “Configure custom rollup”. Then you’ll then need to define the column’s characteristics:

  • Pick between Progress Bar and Total (More details on types of rollup columns below)
  • Select a work item type or a Backlog level for the descendant items
  • Select the aggregation type: count of work items or sum of field. For sum also select the field to summarize.

How to read a rollup column?

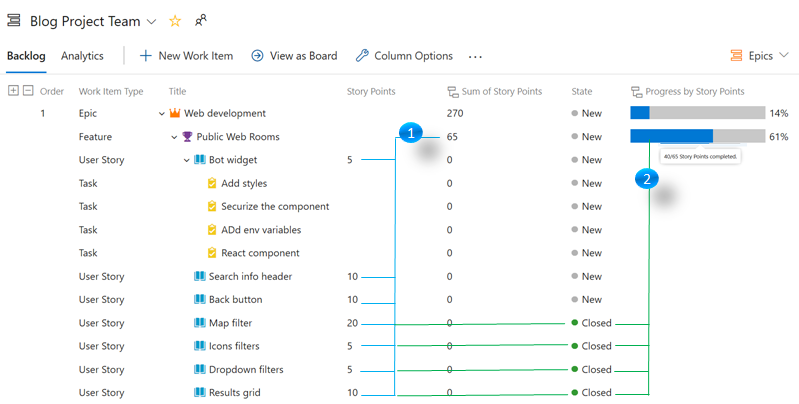
Let’s explore an example using the image below: Rolling up Story points into Sum of Story Points and Progress by Story Points

  1. The “Sum of Story Points” column for the “Public Web Rooms” Feature is 65 based on the Story Points of the linked User Stories. Note that the same rollup column for the User Stories themselves is showing 0 because they don’t have items with Story Points linked as children.
  2. The “Progress by Story Points” column is indicating that 61% of the Story Points were completed (40/65).

Types of rollup columns

There are two types of rollup columns you can add. Progress rollup and Total rollup. Each serves a different scenario.

  • Progress is based on the state of the linked items. This column presents the percentage of completed linked items as a progress bar. Hovering over the bar shows the details of the calculation. For example, if you choose “Progress by all Work Items” then a tooltip will tell you the count of items completed out of all the linked items.

  • Totals are state agnostic and can be used to estimate size. For example, let’s imagine that your team breaks Epics into Features, and Features into User Stories. If you add the “Total by Count of User Stories” column to the Epics backlog, next to each Epic you’ll see the number of User Stories linked to it. This is an easy way to compare the size of two Epics in terms of engineering work (assuming the team has good practices on breaking down work evenly). Notice that in this example User Stories are actually the “Grandchildren” of the Epic.

Important notes when using rollup columns

  1. The “Progress by all Work Items” column includes all the descendant items, including custom work item types. For example, for an Epic, it will count all the Features, User Stories, and Tasks.

  2. If you update a large amount of items from the backlog or your project has a lot of updates going on, you might experience a delay when refreshing rollup columns. If we can’t present accurate data you will see an error indicating the last time data was ingested into the Analytics service. Read more about Rollup latency.

  3. The “Progress based on Sum of Remaining work” column assumes the remaining work is set to 0 for any linked items that are closed. Even if the actual value of Remaining work is greater than

  4. Linking between projects is not supported. Rollup is only calculated based on linked items from the same project.

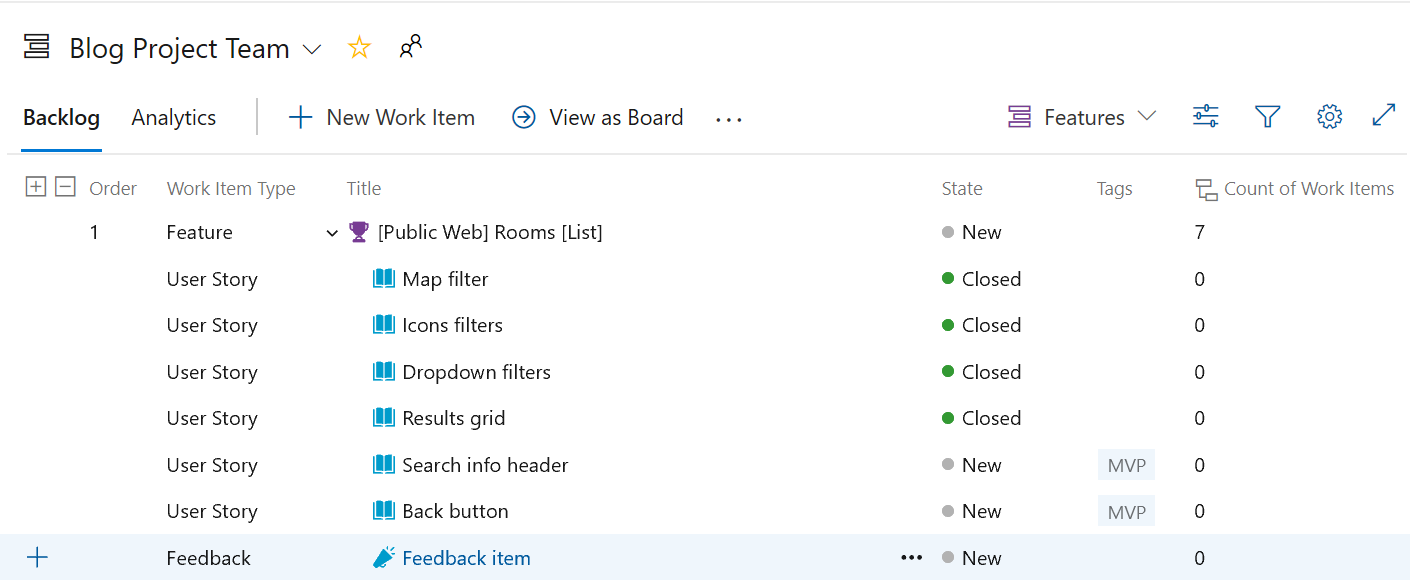
  5. Rollup is always calculated based on the descendant links. Even if your view is not showing all the descendant items, rollup will take them into account. For example, in the image below we added “Total – Count of Work items” as a column. The Feature has 7 items, 6 User Stories and 1 Feedback item. Even if we filter the backlog to only show User Stories, the rollup column would still show 7 items. If the numbers don’t add up we recommend checking the parents linked items panel in the work item form. Filters don't imapct Rollup calculation

Keep providing great feedback

Rollup was one of the community’s top requests. Post your feedback in the comments below or through the Developer community.

The post Track the progress of work using Rollup columns appeared first on Azure DevOps Blog.

What’s new in Azure DevOps Sprint 158

$
0
0

Sprint 158 just finished rolling out to all organizations and you can check out all the new features in the release notes. Here are some of the features that you can start using today.

Azure Repos: Preview Markdown in Pull Request

You can now see a preview of how a Markdown file will look by using the new Preview button on the Pull Request Files tab. In addition, you can see the full content of a file from the Side-by-side diff by selecting the View button.

Azure Pipelines: Retry failed stages in YAML pipelines

In multi-stage YAML pipelines, you can now retry a pipeline stage when the execution fails. Any jobs that failed in the first attempt and those that depend transitively on those failed jobs are all re-attempted. (Note: you must have the preview feature Multi-stage pipelines enabled)

Azure Boards: Link work items to deployments

We are excited to release a preview of the Deployment control on the work item form. This control links your work items to a release and enables you to easily track where your work item has been deployed.

Azure Boards: Hide fields in a work item form based on condition

We’ve added a new rule to the inherited rules engine to let you hide fields in a work item form. This rule will hide fields based on the user’s group membership. For example, if the user belongs to the “product owner” group, then you can hide a developer-specific field.

These are just the tip of the iceberg, and there are plenty more features that we’ve released in Sprint 158. Check out the full list of features for this sprint in the release notes.

The post What’s new in Azure DevOps Sprint 158 appeared first on Azure DevOps Blog.

C++20’s Conditionally Explicit Constructors

$
0
0

explicit(bool) is a C++20 feature for simplifying the implementation of generic types and improving compile-time performance.

In C++ it is common to write and use types which wrap objects of other types. std::pair and std::optional are two examples, but there are plenty of others in the standard library, Boost, and likely your own codebases. Following the principle of least astonishment, it pays to ensure that these wrappers preserve the behavior of their stored types as much as is reasonable.

Take std::string as an example. It allows implicit conversion from a string literal, but not from a std::string_view:

void f(std::string);

f(“hello”);   //compiles
f(“hello”sv); //compiler error

This is achieved in std::string by marking the constructor which takes a std::string_view as explicit.

If we are writing a wrapper type, then in many cases we would want to expose the same behaviour, i.e. if the stored type allows implicit conversions, then so does our wrapper; if the stored type does not, then our wrapper follows[1]. More concretely:

void g(wrapper<std::string>);

g("hello");   //this should compile
g("hello"sv); //this should not

The common way to implement this is using SFINAE. If we have a wrapper which looks like this[2]:

template<class T>
struct wrapper {
  template <class U>
  wrapper(U const& u) : t_(u) {}

  T t_;
};

Then we replace the single constructor with two overloads: one implicit constructor for when U is convertible to T and one explicit overload for when it is not:

template<class T>
struct wrapper {
  template<class U, std::enable_if_t<std::is_convertible_v<U, T>>* = nullptr>
  wrapper(U const& u) : t_(u) {}
  
  template<class U, std::enable_if_t<!std::is_convertible_v<U, T>>* = nullptr>
  explicit wrapper(U const& u) : t_(u) {}

  T t_;
};

This gives our type the desired behavior. However, it’s not very satisfactory: we now need two overloads for what should really be one and we’re using SFINAE to choose between them, which means we take hits on compile-time and code clarity.explicit(bool) solves both problems by allowing you to lift the convertibility condition into the explicit specifier:

template<class T> 
struct wrapper { 
  template<class U> 
  explicit(!std::is_convertible_v<U, T>) 
  wrapper(U const& u) : t_(u) {} 

  T t_; 
};

Next time you need to make something conditionally explicit, use explicit(bool) for simpler code, faster compile times[3], and less code repetition.

explicit(bool) will be supported in MSVC v14.24[4] (available in Visual Studio 2019 version 16.4), Clang 9, and GCC 9. We’d love for you to download Visual Studio 2019 and give it a try. As always, we welcome your feedback. We can be reached via the comments below or via email (visualcpp@microsoft.com). If you encounter problems with Visual Studio or MSVC, or have a suggestion for us, please let us know through Help > Send Feedback > Report A Problem / Provide a Suggestion in the product, or via Developer Community. You can also find us on Twitter (@VisualC).

  1. I know, implicit conversions are evil. There are some places where they make a big improvement to ergonomics though and leaving choices to users makes our generic types more widely applicable.
  2. std::forward and such omitted for brevity.
  3. I tested 500 template instantiations with Visual Studio 2019 version 16.2 and using explicit(bool) sped up the frontend by ~15%
  4. The feature is supported in MSVC v14.22 (Visual Studio 2019 version 16.2) for builds with /permissive-, but there are some issues for builds which do not use that flag.


The post C++20’s Conditionally Explicit Constructors appeared first on C++ Team Blog.

Bing Maps Android and iOS SDK V1 Ready for Production

$
0
0

Earlier this year we announced the Bing Maps SDK for Android and iOS Public preview and embarked on a journey to bring our native maps to mobile apps. We are excited to announce that the preview is over and version 1.0 is here. Now Bing Maps SDK for Android and iOS is ready for your production applications. We’d like to offer a big thanks to those who participated in our Public Preview!

Bing Maps Android and iOS SDK

Since preview started the team has added numerous features, increased loading performance by over 40%, and optimized the API structure and stability. On the topic of API structure and stability, you will find a few differences in Version 1.0 when compared to the 0.X previews. We believe these changes improve both the code health and the developer experience. You can learn more about the technical changes here.

Looking for more information? Don’t forget to check out these helpful links:

Happy Mapping!

- The Bing Maps Team


A new way for small and midsize businesses to stay secure and current

Windows 10 SDK Preview Build 18990 available now!

$
0
0

Today, we released a new Windows 10 Preview Build of the SDK to be used in conjunction with Windows 10 Insider Preview (Build 18990 or greater). The Preview SDK Build 18990 contains bug fixes and under development changes to the API surface area.

The Preview SDK can be downloaded from developer section on Windows Insider.

For feedback and updates to the known issues, please see the developer forum. For new developer feature requests, head over to our Windows Platform UserVoice.

Things to note:

  • This build works in conjunction with previously released SDKs and Visual Studio 2017 and 2019. You can install this SDK and still also continue to submit your apps that target Windows 10 build 1903 or earlier to the Microsoft Store.
  • The Windows SDK will now formally only be supported by Visual Studio 2017 and greater. You can download the Visual Studio 2019 here.
  • This build of the Windows SDK will install on only on Windows 10 Insider Preview builds.
  • In order to assist with script access to the SDK, the ISO will also be able to be accessed through the following static URL: https://software-download.microsoft.com/download/sg/Windows_InsiderPreview_SDK_en-us_18990_1.iso.

Tools Updates

Message Compiler (mc.exe)

  • Now detects the Unicode byte order mark (BOM) in .mc files. If the If the .mc file starts with a UTF-8 BOM, it will be read as a UTF-8 file. Otherwise, if it starts with a UTF-16LE BOM, it will be read as a UTF-16LE file. If the -u parameter was specified, it will be read as a UTF-16LE file. Otherwise, it will be read using the current code page (CP_ACP).
  • Now avoids one-definition-rule (ODR) problems in MC-generated C/C++ ETW helpers caused by conflicting configuration macros (e.g. when two .cpp files with conflicting definitions of MCGEN_EVENTWRITETRANSFER are linked into the same binary, the MC-generated ETW helpers will now respect the definition of MCGEN_EVENTWRITETRANSFER in each .cpp file instead of arbitrarily picking one or the other).

Windows Trace Preprocessor (tracewpp.exe)

  • Now supports Unicode input (.ini, .tpl, and source code) files. Input files starting with a UTF-8 or UTF-16 byte order mark (BOM) will be read as Unicode. Input files that do not start with a BOM will be read using the current code page (CP_ACP). For backwards-compatibility, if the -UnicodeIgnore command-line parameter is specified, files starting with a UTF-16 BOM will be treated as empty.
  • Now supports Unicode output (.tmh) files. By default, output files will be encoded using the current code page (CP_ACP). Use command-line parameters -cp:UTF-8 or -cp:UTF-16 to generate Unicode output files.
  • Behavior change: tracewpp now converts all input text to Unicode, performs processing in Unicode, and converts output text to the specified output encoding. Earlier versions of tracewpp avoided Unicode conversions and performed text processing assuming a single-byte character set. This may lead to behavior changes in cases where the input files do not conform to the current code page. In cases where this is a problem, consider converting the input files to UTF-8 (with BOM) and/or using the -cp:UTF-8 command-line parameter to avoid encoding ambiguity.

TraceLoggingProvider.h

  • Now avoids one-definition-rule (ODR) problems caused by conflicting configuration macros (e.g. when two .cpp files with conflicting definitions of TLG_EVENT_WRITE_TRANSFER are linked into the same binary, the TraceLoggingProvider.h helpers will now respect the definition of TLG_EVENT_WRITE_TRANSFER in each .cpp file instead of arbitrarily picking one or the other).
  • In C++ code, the TraceLoggingWrite macro has been updated to enable better code sharing between similar events using variadic templates.

Signing your apps with Device Guard Signing

Breaking Changes

Removal of api-ms-win-net-isolation-l1-1-0.lib

In this release api-ms-win-net-isolation-l1-1-0.lib has been removed from the Windows SDK. Apps that were linking against api-ms-win-net-isolation-l1-1-0.lib can switch to OneCoreUAP.lib as a replacement.

Removal of IRPROPS.LIB

In this release irprops.lib has been removed from the Windows SDK. Apps that were linking against irprops.lib can switch to bthprops.lib as a drop-in replacement.

API Updates, Additions and Removals

The following APIs have been added to the platform since the release of Windows 10 SDK, version 1903, build 18362.

Additions:


  namespace Windows.AI.MachineLearning {
  public sealed class LearningModelSessionOptions {
    bool CloseModelOnSessionCreation { get; set; }
  }
}
namespace Windows.ApplicationModel {
  public sealed class AppInfo {
    public static AppInfo Current { get; }
    Package Package { get; }
    public static AppInfo GetFromAppUserModelId(string appUserModelId);
    public static AppInfo GetFromAppUserModelIdForUser(User user, string appUserModelId);
  }
  public interface IAppInfoStatics
  public sealed class Package {
    StorageFolder EffectiveExternalLocation { get; }
    string EffectiveExternalPath { get; }
    string EffectivePath { get; }
    string InstalledPath { get; }
    bool IsStub { get; }
    StorageFolder MachineExternalLocation { get; }
    string MachineExternalPath { get; }
    string MutablePath { get; }
    StorageFolder UserExternalLocation { get; }
    string UserExternalPath { get; }
    IVectorView<AppListEntry> GetAppListEntries();
    RandomAccessStreamReference GetLogoAsRandomAccessStreamReference(Size size);
  }
}
namespace Windows.ApplicationModel.AppService {
  public enum AppServiceConnectionStatus {
    AuthenticationError = 8,
    DisabledByPolicy = 10,
    NetworkNotAvailable = 9,
    WebServiceUnavailable = 11,
  }
  public enum AppServiceResponseStatus {
    AppUnavailable = 6,
    AuthenticationError = 7,
    DisabledByPolicy = 9,
    NetworkNotAvailable = 8,
    WebServiceUnavailable = 10,
  }
  public enum StatelessAppServiceResponseStatus {
    AuthenticationError = 11,
    DisabledByPolicy = 13,
    NetworkNotAvailable = 12,
    WebServiceUnavailable = 14,
  }
}
namespace Windows.ApplicationModel.Background {
  public sealed class BackgroundTaskBuilder {
    void SetTaskEntryPointClsid(Guid TaskEntryPoint);
  }
  public sealed class BluetoothLEAdvertisementPublisherTrigger : IBackgroundTrigger {
    bool IncludeTransmitPowerLevel { get; set; }
    bool IsAnonymous { get; set; }
    IReference<short> PreferredTransmitPowerLevelInDBm { get; set; }
    bool UseExtendedFormat { get; set; }
  }
  public sealed class BluetoothLEAdvertisementWatcherTrigger : IBackgroundTrigger {
    bool AllowExtendedAdvertisements { get; set; }
  }
}
namespace Windows.ApplicationModel.ConversationalAgent {
  public sealed class ActivationSignalDetectionConfiguration
  public enum ActivationSignalDetectionTrainingDataFormat
  public sealed class ActivationSignalDetector
  public enum ActivationSignalDetectorKind
  public enum ActivationSignalDetectorPowerState
  public sealed class ConversationalAgentDetectorManager
  public sealed class DetectionConfigurationAvailabilityChangedEventArgs
  public enum DetectionConfigurationAvailabilityChangeKind
  public sealed class DetectionConfigurationAvailabilityInfo
  public enum DetectionConfigurationTrainingStatus
}
namespace Windows.ApplicationModel.DataTransfer {
  public sealed class DataPackage {
    event TypedEventHandler<DataPackage, object> ShareCanceled;
  }
}
namespace Windows.Devices.Bluetooth {
  public sealed class BluetoothAdapter {
    bool IsExtendedAdvertisingSupported { get; }
    uint MaxAdvertisementDataLength { get; }
  }
}
namespace Windows.Devices.Bluetooth.Advertisement {
  public sealed class BluetoothLEAdvertisementPublisher {
    bool IncludeTransmitPowerLevel { get; set; }
    bool IsAnonymous { get; set; }
    IReference<short> PreferredTransmitPowerLevelInDBm { get; set; }
    bool UseExtendedAdvertisement { get; set; }
  }
  public sealed class BluetoothLEAdvertisementPublisherStatusChangedEventArgs {
    IReference<short> SelectedTransmitPowerLevelInDBm { get; }
  }
  public sealed class BluetoothLEAdvertisementReceivedEventArgs {
    BluetoothAddressType BluetoothAddressType { get; }
    bool IsAnonymous { get; }
    bool IsConnectable { get; }
    bool IsDirected { get; }
    bool IsScannable { get; }
    bool IsScanResponse { get; }
    IReference<short> TransmitPowerLevelInDBm { get; }
  }
  public enum BluetoothLEAdvertisementType {
    Extended = 5,
  }
  public sealed class BluetoothLEAdvertisementWatcher {
    bool AllowExtendedAdvertisements { get; set; }
  }
  public enum BluetoothLEScanningMode {
    None = 2,
  }
}
namespace Windows.Devices.Bluetooth.Background {
  public sealed class BluetoothLEAdvertisementPublisherTriggerDetails {
    IReference<short> SelectedTransmitPowerLevelInDBm { get; }
  }
}
namespace Windows.Devices.Display {
  public sealed class DisplayMonitor {
    bool IsDolbyVisionSupportedInHdrMode { get; }
  }
}
namespace Windows.Devices.Input {
  public sealed class PenButtonListener
  public sealed class PenDockedEventArgs
  public sealed class PenDockListener
  public sealed class PenTailButtonClickedEventArgs
  public sealed class PenTailButtonDoubleClickedEventArgs
  public sealed class PenTailButtonLongPressedEventArgs
  public sealed class PenUndockedEventArgs
}
namespace Windows.Devices.Sensors {
  public sealed class Accelerometer {
    AccelerometerDataThreshold ReportThreshold { get; }
  }
  public sealed class AccelerometerDataThreshold
  public sealed class Barometer {
    BarometerDataThreshold ReportThreshold { get; }
  }
  public sealed class BarometerDataThreshold
  public sealed class Compass {
    CompassDataThreshold ReportThreshold { get; }
  }
  public sealed class CompassDataThreshold
 public sealed class Gyrometer {
    GyrometerDataThreshold ReportThreshold { get; }
  }
  public sealed class GyrometerDataThreshold
  public sealed class Inclinometer {
    InclinometerDataThreshold ReportThreshold { get; }
  }
  public sealed class InclinometerDataThreshold
  public sealed class LightSensor {
    LightSensorDataThreshold ReportThreshold { get; }
  }
  public sealed class LightSensorDataThreshold
  public sealed class Magnetometer {
    MagnetometerDataThreshold ReportThreshold { get; }
  }
  public sealed class MagnetometerDataThreshold
}
namespace Windows.Foundation.Metadata {
  public sealed class AttributeNameAttribute : Attribute
  public sealed class FastAbiAttribute : Attribute
  public sealed class NoExceptionAttribute : Attribute
}
namespace Windows.Globalization {
  public sealed class Language {
    string AbbreviatedName { get; }
    public static IVector<string> GetMuiCompatibleLanguageListFromLanguageTags(IIterable<string> languageTags);
  }
}
namespace Windows.Graphics.Capture {
  public sealed class GraphicsCaptureSession : IClosable {
    bool IsCursorCaptureEnabled { get; set; }
  }
}
namespace Windows.Graphics.DirectX {
  public enum DirectXPixelFormat {
    SamplerFeedbackMinMipOpaque = 189,
    SamplerFeedbackMipRegionUsedOpaque = 190,
  }
}
namespace Windows.Graphics.Holographic {
  public sealed class HolographicFrame {
    HolographicFrameId Id { get; }
  }
  public struct HolographicFrameId
  public sealed class HolographicFrameRenderingReport
  public sealed class HolographicFrameScanoutMonitor : IClosable
  public sealed class HolographicFrameScanoutReport
  public sealed class HolographicSpace {
    HolographicFrameScanoutMonitor CreateFrameScanoutMonitor(uint maxQueuedReports);
  }
}
namespace Windows.Management.Deployment {
  public sealed class AddPackageOptions
  public enum DeploymentOptions : uint {
    StageInPlace = (uint)4194304,
  }
  public sealed class PackageManager {
    IAsyncOperationWithProgress<DeploymentResult, DeploymentProgress> AddPackageByUriAsync(Uri packageUri, AddPackageOptions options);
    IIterable<Package> FindProvisionedPackages();
    PackageStubPreference GetPackageStubPreference(string packageFamilyName);
    IAsyncOperationWithProgress<DeploymentResult, DeploymentProgress> RegisterPackageByNameAsync(string name, RegisterPackageOptions options);
    IAsyncOperationWithProgress<DeploymentResult, DeploymentProgress> RegisterPackageByUriAsync(Uri manifestUri, RegisterPackageOptions options);
    IAsyncOperationWithProgress<DeploymentResult, DeploymentProgress> RegisterPackagesByFullNameAsync(IIterable<string> packageFullNames, DeploymentOptions deploymentOptions);
    void SetPackageStubPreference(string packageFamilyName, PackageStubPreference useStub);
    IAsyncOperationWithProgress<DeploymentResult, DeploymentProgress> StagePackageByUriAsync(Uri packageUri, StagePackageOptions options);
  }
  public enum PackageStubPreference
  public enum PackageTypes : uint {
    All = (uint)4294967295,
  }
  public sealed class RegisterPackageOptions
  public enum RemovalOptions : uint {
    PreserveRoamableApplicationData = (uint)128,
  }
  public sealed class StagePackageOptions
  public enum StubPackageOption
}
namespace Windows.Media.Audio {
  public sealed class AudioPlaybackConnection : IClosable
  public sealed class AudioPlaybackConnectionOpenResult
  public enum AudioPlaybackConnectionOpenResultStatus
  public enum AudioPlaybackConnectionState
}
namespace Windows.Media.Capture {
  public sealed class MediaCapture : IClosable {
    MediaCaptureRelativePanelWatcher CreateRelativePanelWatcher(StreamingCaptureMode captureMode, DisplayRegion displayRegion);
  }
  public sealed class MediaCaptureInitializationSettings {
    Uri DeviceUri { get; set; }
    PasswordCredential DeviceUriPasswordCredential { get; set; }
  }
  public sealed class MediaCaptureRelativePanelWatcher : IClosable
}
namespace Windows.Media.Capture.Frames {
  public sealed class MediaFrameSourceInfo {
    Panel GetRelativePanel(DisplayRegion displayRegion);
  }
}
namespace Windows.Media.Devices {
  public sealed class PanelBasedOptimizationControl
}
namespace Windows.Media.MediaProperties {
  public static class MediaEncodingSubtypes {
    public static string Pgs { get; }
    public static string Srt { get; }
    public static string Ssa { get; }
    public static string VobSub { get; }
  }
  public sealed class TimedMetadataEncodingProperties : IMediaEncodingProperties {
    public static TimedMetadataEncodingProperties CreatePgs();
    public static TimedMetadataEncodingProperties CreateSrt();
    public static TimedMetadataEncodingProperties CreateSsa(byte[] formatUserData);
    public static TimedMetadataEncodingProperties CreateVobSub(byte[] formatUserData);
  }
}
namespace Windows.Networking.BackgroundTransfer {
  public sealed class DownloadOperation : IBackgroundTransferOperation, IBackgroundTransferOperationPriority {
    void RemoveRequestHeader(string headerName);
    void SetRequestHeader(string headerName, string headerValue);
  }
  public sealed class UploadOperation : IBackgroundTransferOperation, IBackgroundTransferOperationPriority {
    void RemoveRequestHeader(string headerName);
    void SetRequestHeader(string headerName, string headerValue);
  }
}
namespace Windows.Networking.Connectivity {
  public enum NetworkAuthenticationType {
    Owe = 12,
  }
}
namespace Windows.Networking.NetworkOperators {
  public sealed class NetworkOperatorTetheringAccessPointConfiguration {
    TetheringWiFiBand Band { get; set; }
    bool IsBandSupported(TetheringWiFiBand band);
    IAsyncOperation<bool> IsBandSupportedAsync(TetheringWiFiBand band);
  }
  public sealed class NetworkOperatorTetheringManager {
    public static void DisableNoConnectionsTimeout();
    public static IAsyncAction DisableNoConnectionsTimeoutAsync();
    public static void EnableNoConnectionsTimeout();
    public static IAsyncAction EnableNoConnectionsTimeoutAsync();
    public static bool IsNoConnectionsTimeoutEnabled();
  }
  public enum TetheringWiFiBand
}
namespace Windows.Networking.PushNotifications {
  public static class PushNotificationChannelManager {
    public static event EventHandler<PushNotificationChannelsRevokedEventArgs> ChannelsRevoked;
  }
  public sealed class PushNotificationChannelsRevokedEventArgs
  public sealed class RawNotification {
    IBuffer ContentBytes { get; }
  }
}
namespace Windows.Security.Authentication.Web.Core {
  public sealed class WebAccountMonitor {
    event TypedEventHandler<WebAccountMonitor, WebAccountEventArgs> AccountPictureUpdated;
  }
}
namespace Windows.Security.Isolation {
  public sealed class IsolatedWindowsEnvironment
  public enum IsolatedWindowsEnvironmentActivator
  public enum IsolatedWindowsEnvironmentAllowedClipboardFormats : uint
  public enum IsolatedWindowsEnvironmentAvailablePrinters : uint
  public enum IsolatedWindowsEnvironmentClipboardCopyPasteDirections : uint
  public struct IsolatedWindowsEnvironmentContract
  public struct IsolatedWindowsEnvironmentCreateProgress
  public sealed class IsolatedWindowsEnvironmentCreateResult
  public enum IsolatedWindowsEnvironmentCreateStatus
  public sealed class IsolatedWindowsEnvironmentFile
  public static class IsolatedWindowsEnvironmentHost
  public enum IsolatedWindowsEnvironmentHostError
  public sealed class IsolatedWindowsEnvironmentLaunchFileResult
  public enum IsolatedWindowsEnvironmentLaunchFileStatus
  public sealed class IsolatedWindowsEnvironmentOptions
  public static class IsolatedWindowsEnvironmentOwnerRegistration
  public sealed class IsolatedWindowsEnvironmentOwnerRegistrationData
  public sealed class IsolatedWindowsEnvironmentOwnerRegistrationResult
  public enum IsolatedWindowsEnvironmentOwnerRegistrationStatus
  public sealed class IsolatedWindowsEnvironmentProcess
  public enum IsolatedWindowsEnvironmentProcessState
  public enum IsolatedWindowsEnvironmentProgressState
  public sealed class IsolatedWindowsEnvironmentShareFolderRequestOptions
  public sealed class IsolatedWindowsEnvironmentShareFolderResult
  public enum IsolatedWindowsEnvironmentShareFolderStatus
  public sealed class IsolatedWindowsEnvironmentStartProcessResult
  public enum IsolatedWindowsEnvironmentStartProcessStatus
  public sealed class IsolatedWindowsEnvironmentTelemetryParameters
  public static class IsolatedWindowsHostMessenger
  public delegate void MessageReceivedCallback(Guid receiverId, IVectorView<object> message);
}
namespace Windows.Storage {
  public static class KnownFolders {
    public static IAsyncOperation<StorageFolder> GetFolderAsync(KnownFolderId folderId);
    public static IAsyncOperation<KnownFoldersAccessStatus> RequestAccessAsync(KnownFolderId folderId);
    public static IAsyncOperation<KnownFoldersAccessStatus> RequestAccessForUserAsync(User user, KnownFolderId folderId);
  }
  public enum KnownFoldersAccessStatus
  public sealed class StorageFile : IInputStreamReference, IRandomAccessStreamReference, IStorageFile, IStorageFile2, IStorageFilePropertiesWithAvailability, IStorageItem, IStorageItem2, IStorageItemProperties, IStorageItemProperties2, IStorageItemPropertiesWithProvider {
    public static IAsyncOperation<StorageFile> GetFileFromPathForUserAsync(User user, string path);
  }
  public sealed class StorageFolder : IStorageFolder, IStorageFolder2, IStorageFolderQueryOperations, IStorageItem, IStorageItem2, IStorageItemProperties, IStorageItemProperties2, IStorageItemPropertiesWithProvider {
    public static IAsyncOperation<StorageFolder> GetFolderFromPathForUserAsync(User user, string path);
  }
}
namespace Windows.Storage.Provider {
  public sealed class StorageProviderFileTypeInfo
  public sealed class StorageProviderSyncRootInfo {
    IVector<StorageProviderFileTypeInfo> FallbackFileTypeInfo { get; }
  }
  public static class StorageProviderSyncRootManager {
    public static bool IsSupported();
  }
}
namespace Windows.System {
  public sealed class UserChangedEventArgs {
    IVectorView<UserWatcherUpdateKind> ChangedPropertyKinds { get; }
  }
  public enum UserWatcherUpdateKind
}
namespace Windows.UI.Composition.Interactions {
  public sealed class InteractionTracker : CompositionObject {
    int TryUpdatePosition(Vector3 value, InteractionTrackerClampingOption option, InteractionTrackerPositionUpdateOption posUpdateOption);
  }
  public enum InteractionTrackerPositionUpdateOption
}
namespace Windows.UI.Input {
  public sealed class CrossSlidingEventArgs {
    uint ContactCount { get; }
  }
  public sealed class DraggingEventArgs {
    uint ContactCount { get; }
  }
  public sealed class GestureRecognizer {
    uint HoldMaxContactCount { get; set; }
    uint HoldMinContactCount { get; set; }
    float HoldRadius { get; set; }
    TimeSpan HoldStartDelay { get; set; }
    uint TapMaxContactCount { get; set; }
    uint TapMinContactCount { get; set; }
    uint TranslationMaxContactCount { get; set; }
    uint TranslationMinContactCount { get; set; }
  }
  public sealed class HoldingEventArgs {
    uint ContactCount { get; }
    uint CurrentContactCount { get; }
  }
  public sealed class ManipulationCompletedEventArgs {
    uint ContactCount { get; }
    uint CurrentContactCount { get; }
  }
  public sealed class ManipulationInertiaStartingEventArgs {
    uint ContactCount { get; }
  }
  public sealed class ManipulationStartedEventArgs {
    uint ContactCount { get; }
  }
  public sealed class ManipulationUpdatedEventArgs {
    uint ContactCount { get; }
    uint CurrentContactCount { get; }
  }
  public sealed class RightTappedEventArgs {
    uint ContactCount { get; }
  }
  public sealed class SystemButtonEventController : AttachableInputObject
  public sealed class SystemFunctionButtonEventArgs
  public sealed class SystemFunctionLockChangedEventArgs
  public sealed class SystemFunctionLockIndicatorChangedEventArgs
  public sealed class TappedEventArgs {
    uint ContactCount { get; }
  }
}
namespace Windows.UI.Input.Inking {
  public sealed class InkModelerAttributes {
    bool UseVelocityBasedPressure { get; set; }
  }
}
namespace Windows.UI.Text {
  public enum RichEditMathMode
  public sealed class RichEditTextDocument : ITextDocument {
    void GetMath(out string value);
    void SetMath(string value);
    void SetMathMode(RichEditMathMode mode);
  }
}
namespace Windows.UI.ViewManagement {
  public sealed class ApplicationView {
    bool CriticalInputMismatch { get; set; }
    bool TemporaryInputMismatch { get; set; }
    void ApplyApplicationUserModelID(string value);
  }
  public sealed class UISettings {
    event TypedEventHandler<UISettings, UISettingsAnimationsEnabledChangedEventArgs> AnimationsEnabledChanged;
    event TypedEventHandler<UISettings, UISettingsMessageDurationChangedEventArgs> MessageDurationChanged;
  }
  public sealed class UISettingsAnimationsEnabledChangedEventArgs
  public sealed class UISettingsMessageDurationChangedEventArgs
}
namespace Windows.UI.ViewManagement.Core {
 public sealed class CoreInputView {
    event TypedEventHandler<CoreInputView, CoreInputViewHidingEventArgs> PrimaryViewHiding;
    event TypedEventHandler<CoreInputView, CoreInputViewShowingEventArgs> PrimaryViewShowing;
  }
  public sealed class CoreInputViewHidingEventArgs
  public enum CoreInputViewKind {
    Symbols = 4,
  }
  public sealed class CoreInputViewShowingEventArgs
  public sealed class UISettingsController
}

The post Windows 10 SDK Preview Build 18990 available now! appeared first on Windows Developer Blog.

Bringing the security and manageability of Windows for IoT to the intelligent edge

$
0
0

The intelligent edge continues to expand the possibilities for businesses of all sizes, enabling them to gain new insights in real time and translate them into powerful business intelligence on site. With the growth of the intelligent edge comes increasing demand for connected devices, and this creates new opportunities for developers with expertise in security, cloud, systems engineering and hardware programming. But building IoT devices and connected systems also poses fresh challenges.

The IoT in Action event series is a great opportunity for you to learn to build new IoT experiences and drive rapid innovation in your business with the intelligent edge. Join Microsoft in Santa Clara on Oct. 10 to learn more.

The IoT in Action event series cover photo

How the intelligent edge is influencing needed developer skills

For embedded developers—those tasked with developing the actual devices and making them ”smart” by embedding sensors, microprocessors and CPUs into machines that may not have incorporated such technologies in the past—the major challenges lie in understanding connectivity. Embedded developers are seeing these devices be connected to the internet for the first time, and along the way, they’re being exposed to new worlds: the world of the cloud, and that of network infrastructures. They need to learn new skills so they can integrate the devices with IT networks and with cloud applications and solutions. They also need to understand and mitigate new network-born threats that these devices encounter.

On-premises application developers confront a different obstacle. They need to learn how to develop for new devices, creating applications that will run on or connect to machines, gadgets, and appliances that they may never have worked with before. Their applications must ingest the data from these devices and pass it to a cloud platform reliably and securely. These developers must cultivate the skills necessary to work within devices’ constraints. IoT devices often have very limited storage and compute, they may run on batteries, and they may have only intermittent connectivity. Such constraints require developers to learn new paradigms.

Microsoft products and services were developed with these needed capabilities and skills in mind. For instance, Windows for IoT supports Azure IoT Edge. This makes it easy and seamless to integrate the IoT Edge runtime, making it possible to move machine learning algorithms and other similarly complex computing functions from the cloud to edge devices. Windows for IoT also supports Windows Machine Learning and Windows Vision Skills, which allows you to run advanced AI algorithms developed in Azure on any Windows for IoT device.

How Windows 10 helps improve security and manageability for IoT devices

Security and device management are primary obstacles faced by enterprises seeking to implement IoT scenarios at scale, and developers are tasked with building the infrastructure to solve these problems. As a member of the Windows 10 family, Windows for IoT provides developers with a solid foundation for building innovative IoT solutions, incorporating the security, manageability and long-term support for which Windows has long been known. Microsoft has decades of experience building enterprise-grade systems and solutions, and it’s baked into every edition of Windows.

Windows for IoT includes editions that support devices from small and low-cost to powerful server-class. Windows 10 IoT Core is optimized for smaller devices with or without displays, while Windows 10 IoT Enterprise is designed for PC-class hardware. And Windows Server IoT 2019 can run on the most powerful server systems with very large storage. These operating systems share security features like Secure Boot, data encryption with Bit locker, and lockdown features to easily create dedicated devices.

Windows is the world’s most popular business operating system, with different versions running on billions of devices across the globe. Windows for IoT benefits from this universality, taking advantage of Microsoft’s experience with delivering software patches to millions of end users to secure an operating system at scale, as well as Microsoft’s experience provisioning and managing PCs on networks both large and small. These can include security patches which Microsoft has committed to offering for 10 years on select releases for Windows for IoT.

Device management is another area where Windows for IoT benefits from Microsoft’s experience. Windows for IoT has many management options ranging from the traditional tools used to manage Windows PCs, laptops and servers to newer methods that use cloud connections. The latter includes MDM systems and IoT-specific services like Azure IoT Hub, which connects and manages devices at scale. Azure IoT Hub also enables ”zero touch” provisioning, which streamlines the device enrollment and provision process of Windows for IoT devices.

Microsoft and Windows for IoT: a resource-rich ecosystem for developers

Joining the Microsoft IoT partner ecosystem and collaborating with a Microsoft partner can be an effective way to build the IoT solutions for your business. Working together with a partner, you won’t have to start from scratch when developing IoT projects and can rely on Microsoft reference architectures—as well as building blocks that your partner can supply. It’s a great idea to start with simple, off-the-shelf solutions and then customize as you learn more.

Start by joining Microsoft in Santa Clara for the upcoming IoT in Action event on Oct. 10. This event series is your opportunity to meet and connect with customers and partners across the IoT ecosystem. Whether you’re looking for specific skills and valuable insights from others’ IoT experiences, or you want to connect with those that are building or ready to implement repeatable, out-of-the-box IoT solutions – these events will help surface these opportunities for you.

For those with experience developing IoT solutions or devices, we will be hosting a hands-on lab experience the day before, on Oct. 9, in the Microsoft Sunnyvale office. Seating is extremely limited, so be sure to request a seat in the lab in advance.

Developers working with Azure IoT and Windows for IoT products, services and solutions can make use of abundant resources that Microsoft has created to help them develop new skills. Extensive documentation and training resources are available at the IoT School, and you can meet likeminded professionals and engage in ongoing discussion by joining the IoT Tech Community.

Prefer videos and webinars? Microsoft also has the IoT in Action webinar series that spotlights partner solutions and technology.

The post Bringing the security and manageability of Windows for IoT to the intelligent edge appeared first on Windows Developer Blog.

Visual Studio for Mac: Top Features of the New Editor

$
0
0

Over the past year, the Visual Studio for Mac team updated the editors within the IDE to be faster, more fluent and more productive. We did this by building a macOS-native editor interface on top of the same editor backend as Visual Studio on Windows. In version 8.1 we introduced the new C# editor. This was followed by the new XAML editor in 8.2. And most recently, we updated our web languages to utilize the new editors in version 8.3, completing the process we set out to do a year ago. To celebrate this accomplishment, I wanted to share a bit of detail regarding the design and implementation of the new editors along with my five favorite new features in the Visual Studio for Mac code editors.

At the core of the updated editors within Visual Studio for Mac is the shared language service with Visual Studio on Windows. What this means is that the same backend that powers the Windows version of Visual Studio now powers the macOS version as well. This includes IntelliSense, Roslyn, text logic, and all the language services behind the scenes. The only portion not shared between Windows and macOS is the UI layer, which stays native for each platform. In the case of macOS, that means using macOS frameworks like Cocoa and CoreText to power the UI experience. By using a native UI, while also being able to utilize support for native input methods as well as support for right-to-left languages, font ligatures and other advanced graphical features.

Now that we have the power of the new editor in the IDE, let’s take a look at my top 5 favorite new editor features. All of the features I want to share with you today are aimed at making your development experience more productive, delightful and fun. I hope you enjoy using them as much as we enjoyed developing them!

Multi-Caret Editing

Multi-caret allows you to insert any number of carets (text insertion points) within the file you are editing. This can be accomplished manually through mouse clicks with control-option-click or through the keyboard. When using the keyboard, you can utilize pattern matching to insert next matching (Option+Shift+.) or insert all matching (Option+Shift+;). You can also remove the last inserted caret with Option+Shift+, or move the last caret down with Option+Shift+/. In the below GIF, I use the Option+Shift+. hotkey to insert the next matching caret twice, allowing me to edit all three instances of “double” within this page.

Multi-caret editing is a very powerful feature that can greatly reduce the time associated with editing multiple lines at the same time. For example, if you need to change a prefix on several variables, or switching specific var declarations to strongly typed declarations, multi-caret editing allows you to do this with ease.


IntelliSense Type Filtering

The next feature that I want to highlight is IntelliSense Type Filtering. With IntelliSense Type Filtering, you can filter the completion list by type of completion. If, for example, you only want to see classes in your completion list, you can either click the classes icon or use the hotkey “option-c”. We have a full list of types that you can filter by, in addition to their corresponding icons and hotkeys in our Visual Studio for Mac Documentation. In the GIF below, I use IntelliSense type filtering to focus my list on interfaces, structures and finally on delegates.

This feature really comes in handy when you can’t recall the exact name of the item you want, or simply want to focus solely on a specific type. It also works super well when combined with my next favorite feature, Show Import Items.

Show Import Items

Often, when I am working on a project, I can’t always recall the exact namespace I need to import into my code file for a specific type. This often leads me to panic and feverishly search anywhere I can to find the import I need. This next feature alleviates this angst by not only showing completions which I have already imported, but also completions that are available for import. Additionally, if I end up selecting one of the not-yet-imported completions, the using statement will be added to the header of the code file. In the below GIF, I add “System.ComponentModel.DataAnnotations” to my project through the Show Import Items feature. You may have also noticed that for items which are not yet imported, the full namespace is listed next to the type, making it easy to see what the system is going to add to your header.

Show Import Items is currently disabled by default, but you can easily enable it by opening Visual Studio > Preferences > Text Editor > IntelliSense and enabling “Show Import Items”.

Right-to-Left and Native Input Support

A top ask from our community was to enable support of right-to-left and bi-directional languages, and we incredibly excited to offer support for those requests in Visual Studio 2019 for Mac. In the old editors, typing or pasting right-to-left strings, such as those in Persian, Hebrew or Arabic, would result in the word appearing to be in reverse. For example, the word for “hello” would appear to say “olleh”, flipping the text around so that it appears reversed. With the new editors, right-to-left and all types of bi-directional text are supported.

We’ve also introduced native input support. As the editors are built using the native toolkit for macOS, inserting text into the editor is just like inserting in any other native macOS app. This means that you get access to all of the advanced text entry features of macOS, such as long-press for accented and alternate characters as well as the emoji selector!

Ligature Support

If you use a font which supports ligatures, such as the newly released Cascadia Code, Visual Studio for Mac 2019 will automatically support the insertion of ligatures in place of common dual character glyphs. For example, the double-equal sign (==) will be transformed into an elongated equal sign with no space. Likewise, the bang-equals (!=) will be transformed to an equal sign with a slash throughout, more accurately depicting the “does not equal” symbol which bang-equals is intended to represent.

In the below GIF, I use a simple “if” statement to demonstrate the available ligatures for several different common multi-character glyphs.

Download Visual Studio 2019 for Mac

These are my five favorite editors features in Visual Studio for Mac 2019, but there are plenty more to experience as you work through a project. To get started with Visual Studio 2019 for Mac Download the Visual Studio 2019 for Mac v8.3 release today, or if you have it installed already – update to the latest release using the Stable channel!

If you run into any issues with the v8.3 release, please use the Help > Report a Problem menu in the IDE to let us know about it. You can also provide suggestions for future improvements by using the Provide a Suggestion menu.

report a problem context menu

Finally, make sure to follow us on Twitter at @VisualStudioMac to stay up to date on the latest Visual Studio for Mac news and let us know what your experience has been like. We look forward to hearing from you!

The post Visual Studio for Mac: Top Features of the New Editor appeared first on Visual Studio Blog.

Announcing TypeScript 3.7 Beta

$
0
0

We’re pleased to announce TypeScript 3.7 Beta, a feature-complete version of TypeScript 3.7. Between now and the final release, we’ll be fixing bugs and further improving performance and stability.

To get started using the beta, you can get it through NuGet, or use npm with the following command:

npm install typescript@beta

You can also get editor support by

TypeScript 3.7 Beta includes some of our most highly-requested features! Let’s dive in and see what’s new, starting with the highlight feature of 3.7: Optional Chaining.

Optional Chaining

TypeScript 3.7 implements one of the most highly-demanded ECMAScript features yet: optional chaining! Our team has been heavily involved in TC39 to champion the feature to Stage 3 so that we can bring it to all TypeScript users.

So what is optional chaining? Well at its core, optional chaining lets us write code where we can immediately stop running some expressions if we run into a null or undefined. The star of the show in optional chaining is the new ?. operator for optional property accesses. When we write code like

let x = foo?.bar.baz();

this is a way of saying that when foo is defined, foo.bar.baz() will be computed; but when foo is null or undefined, stop what we’re doing and just return undefined.”

More plainly, that code snippet is the same as writing the following.

let x = (foo === null || foo === undefined) ?
    undefined :
    foo.bar.baz();

Note that if bar is null or undefined, our code will still hit an error accessing baz. Likewise, if baz is null or undefined, we’ll hit an error at the call site. ?. only checks for whether the value on the left of it is null or undefined – not any of the subsequent properties.

You might find yourself using ?. to replace a lot of code that performs intermediate property checks using the && operator.

// Before
if (foo && foo.bar && foo.bar.baz) {
    // ...
}

// After-ish
if (foo?.bar?.baz) {
    // ...
}

Keep in mind that ?. acts differently than those && operations since && will act specially on “falsy” values (e.g. the empty string, 0, NaN, and, well, false).

Optional chaining also includes two other operations. First there’s optional element access which acts similarly to optional property accesses, but allows us to access non-identifier properties (e.g. aribtrary strings, numbers, and symbols):

/**
 * Get the first element of the array if we have an array.
 * Otherwise return undefined.
 */
function tryGetFirstElement<T>(arr?: T[]) {
    return arr?.[0];
    // equivalent to
    //   return (arr === null || arr === undefined) ?
    //       undefined :
    //       arr[0];
}

There’s also optional call, which allows us to conditionally call expressions if they’re not null or undefined.

async function makeRequest(url: string, log?: (msg: string) => void) {
    log?.(`Request started at ${new Date().toISOString()}`);
    // equivalent to
    //   if (log !== null && log !== undefined) {
    //       log(`Request started at ${new Date().toISOString()}`);
    //   }

    const result = (await fetch(url)).json();

    log?.(`Request finished at at ${new Date().toISOString()}`);

    return result;
}

The “short-circuiting” behavior that optional chains have is limited to both “ordinary” and optional property accesses, calls, element accesses – it doesn’t expand any further out from these expressions. In other words,

let result = foo?.bar / someComputation()

doesn’t stop the division or someComputation() call from occurring. It’s equivalent to

let temp = (foo === null || foo === undefined) ?
    undefined :
    foo.bar;

let result = temp / someComputation();

That might result in dividing undefined, which is why in strictNullChecks, the following is an error.

function barPercentage(foo?: { bar: number }) {
    return foo?.bar / 100;
    //     ~~~~~~~~
    // Error: Object is possibly undefined.
}

More more details, you can read up on the proposal and view the original pull request.

Nullish Coalescing

The nullish coalescing operator is another upcoming ECMAScript feature that goes hand-in-hand with optional chaining, and which our team has been deeply involved in championing.

You can think of this feature – the ?? operator – as a way to “fall back” to a default value when dealing with null or undefined. When we write code like

let x = foo ?? bar();

this is a new way to say that the value foo will be used when it’s “present”; but when it’s null or undefined, calculate bar() in its place.

Again, the above code is equivalent to the following.

let x = (foo !== null && foo !== undefined) ?
    foo :
    bar();

The ?? operator can replace uses of || when trying to use a default value. For example, the following code snippet tries to fetch the volume that was last saved in localStorage (if it ever was); however, it has a bug because it uses ||.

function initializeAudio() {
    let volume = localStorage.volume || 0.5

    // ...
}

When localStorage.volume is set to 0, the page will set the volume to 0.5 which is unintended. ?? avoids some unintended behavior from 0, NaN and "" being treated as falsy values.

We owe a large thanks to community members Wenlu Wang and Titian Cernicova Dragomir for implementing this feature! For more details, check out their pull request and the nullish coalescing proposal repository.

Assertion Functions

There’s a specific set of functions that throw an error if something unexpected happened. They’re called “assertion” functions. As an example, Node.js has a dedicated function for this called assert.

assert(someValue === 42);

In this example if someValue isn’t equal to 42, then assert will throw an AssertionError.

Assertions in JavaScript are often used to guard against improper types being passed in. For example,

function multiply(x, y) {
    assert(typeof x === "number");
    assert(typeof y === "number");

    return x * y;
}

Unfortunately in TypeScript these checks could never be properly encoded. For loosely-typed code this meant TypeScript was checking less, and for slightly conservative code it often forced users to use type assertions..

function yell(str) {
    assert(typeof str === "string");

    return str.toUppercase();
    // Oops! We misspelled 'toUpperCase'.
    // Would be great if TypeScript still caught this!
}

The alternative was to instead rewrite the code so that the language could analyze it, but this isn’t convenient.

function yell(str) {
    if (typeof str !== "string") {
        throw new TypeError("str should have been a string.")
    }
    // Error caught!
    return str.toUppercase();
}

Ultimately the goal of TypeScript is to type existing JavaScript constructs in the least disruptive way. For that reason, TypeScript 3.7 introduces a new concept called “assertion signatures” which model these assertion functions.

The first type of assertion signature models the way that Node’s assert function works. It ensures that whatever condition is being checked must be true for the remainder of the containing scope.

function assert(condition: any, msg?: string): asserts condition {
    if (!condition) {
        throw new AssertionError(msg)
    }
}

asserts condition says that whatever gets passed into the condition parameter must be true if the assert returns (because otherwise it would throw an error). That means that for the rest of the scope, that condition must be truthy. As an example, using this assertion function means we do catch our original yell example.

function yell(str) {
    assert(typeof str === "string");

    return str.toUppercase();
    //         ~~~~~~~~~~~
    // error: Property 'toUppercase' does not exist on type 'string'.
    //        Did you mean 'toUpperCase'?
}

function assert(condition: any, msg?: string): asserts condition {
    if (!condition) {
        throw new AssertionError(msg)
    }
}

The other type of assertion signature doesn’t check for a condition, but instead tells TypeScript that a specific variable or property has a different type.

function assertIsString(val: any): asserts val is string {
    if (typeof val !== "string") {
        throw new AssertionError("Not a string!");
    }
}

Here asserts val is string ensures that after any call to assertIsString, any variable passed in will be known to be a string.

function yell(str: any) {
    assertIsString(str);

    // Now TypeScript knows that 'str' is a 'string'.

    return str.toUppercase();
    //         ~~~~~~~~~~~
    // error: Property 'toUppercase' does not exist on type 'string'.
    //        Did you mean 'toUpperCase'?
}

These assertion signatures are very similar to writing type predicate signatures:

function isString(val: any): val is string {
    return typeof val === "string";
}

function yell(str: any) {
    if (isString(str)) {
        return str.toUppercase();
    }
    throw "Oops!";
}

And just like type predicate signatures, these assertion signatures are incredibly expressive. We can express some fairly sophisticated ideas with these.

function assertIsDefined<T>(val: T): asserts val is NonNullable<T> {
    if (val === undefined || val === null) {
        throw new AssertionError(
            `Expected 'val' to be defined, but received ${val}`
        );
    }
}

To read up more about assertion signatures, check out the original pull request.

Better Support for never-Returning Functions

As part of the work for assertion signatures, TypeScript needed to encode more about where and which functions were being called. This gave us the opportunity to expand support for another class of functions: functions that return never.

The intent of any function that returns never is that it never returns. It indicates that an exception was thrown, a halting error condition occurred, or that the program exited. For example, process.exit(...) in @types/node is specified to return never.

In order to ensure that a function never potentially returned undefined or effectively returned from all code paths, TypeScript needed some syntactic signal – either a return or throw at the end of a function. So users found themselves return-ing their failure functions.

function dispatch(x: string | number): SomeType {
    if (typeof x === "string") {
        return doThingWithString(x);
    }
    else if (typeof x === "number") {
        return doThingWithNumber(x);
    }
    return process.exit(1);
}

Now when these never-returning functions are called, TypeScript recognizes that they affect the control flow graph and accounts for them.

function dispatch(x: string | number): SomeType {
    if (typeof x === "string") {
        return doThingWithString(x);
    }
    else if (typeof x === "number") {
        return doThingWithNumber(x);
    }
    process.exit(1);
}

As with assertion functions, you can read up more at the same pull request.

(More) Recursive Type Aliases

Type aliases have always had a limitation in how they could be “recursively” referenced. The reason is that any use of a type alias needs to be able to replace substitute itself with whatever it aliases. In some cases, that’s not not possible, so the compiler rejects certain recursive aliases like the following:

type Foo = Foo;

This is a reasonable restriction because any use of Foo would need to be replaced with Foo which would need to be replaced with Foo which would need to be replaced with Foo which… well, hopefully you get the idea! In the end, there isn’t a type that makes sense in place of Foo.

This is fairly consistent with how other languages treat type aliases, but it does give rise to some slightly surprising scenarios for how users leverage the feature. For example, in TypeScript 3.6 and prior, the following causes an error.

type ValueOrArray<T> = T | Array<ValueOrArray<T>>;
//   ~~~~~~~~~~~~
// error: Type alias 'ValueOrArray' circularly references itself.

This is strange because there is technically nothing wrong with any use users could always write what was effectively the same code by introducing an interface.

type ValueOrArray<T> = T | ArrayOfValueOrArray<T>;

interface ArrayOfValueOrArray<T> extends Array<ValueOrArray<T>> {}

Because interfaces (and other object types) introduce a level of indirection and their full structure doesn’t need to be eagerly built out, TypeScript has no problem working with this structure.

But workaround of introducing the interface wasn’t intuitive for users. And in principle there really wasn’t anything wrong with the original version of ValueOrArray that used Array directly. If the compiler was a little bit “lazier” and only calculated the type arguments to Array when necessary, then TypeScript could express these correctly.

That’s exactly what TypeScript 3.7 introduces. At the “top level” of a type alias, TypeScript will defer resolving type arguments to permit these patterns.

This means that code like the following that was trying to represent JSON…

type Json =
    | string
    | number
    | boolean
    | null
    | JsonObject
    | JsonArray;

interface JsonObject {
    [property: string]: Json;
}

interface JsonArray extends Array<Json> {}

can finally be rewritten without helper interfaces.

type Json =
    | string
    | number
    | boolean
    | null
    | { [property: string]: Json }
    | Json[];

This new relaxation also lets us recursively reference type aliases in tuples as well. The following code which used to error is now valid TypeScript code.

type VirtualNode =
    | string
    | [string, { [key: string]: any }, ...VirtualNode[]];

const myNode: VirtualNode =
    ["div", { id: "parent" },
        ["div", { id: "first-child" }, "I'm the first child"],
        ["div", { id: "second-child" }, "I'm the second child"]
    ];

For more information, you can read up on the original pull request.

--declaration and --allowJs

The --declaration flag in TypeScript allows us to generate .d.ts files (declaration files) from source TypeScript files like .ts and .tsx files. These .d.ts files are important because they allow TypeScript to type-check against other projects without re-checking/building the original source code. For the same reason, this setting is required when using project references.

Unfortunately, --declaration didn’t work with settings like --allowJs to allow mixing TypeScript and JavaScript input files. This was a frustrating limitation because it meant users couldn’t use --declaration when migrating codebases, even if they were JSDoc-annotated. TypeScript 3.7 changes that, and allows the two features to be mixed!

When using allowJs, TypeScript will use its best-effort understanding of JavaScript source code and save that to a .d.ts file in an equivalent representation. That includes all of its JSDoc smarts, so code like the following:

/**
 * @callback Job
 * @returns {void}
 */

/** Queues work */
export class Worker {
    constructor(maxDepth = 10) {
        this.started = false;
        this.depthLimit = maxDepth;
        /**
         * NOTE: queued jobs may add more items to queue
         * @type {Job[]}
         */
        this.queue = [];
    }
    /**
     * Adds a work item to the queue
     * @param {Job} work 
     */
    push(work) {
        if (this.queue.length + 1 > this.depthLimit) throw new Error("Queue full!");
        this.queue.push(work);
    }
    /**
     * Starts the queue if it has not yet started
     */
    start() {
        if (this.started) return false;
        this.started = true;
        while (this.queue.length) {
            /** @type {Job} */(this.queue.shift())();
        }
        return true;
    }
}

will currently be transformed into the following implementation-less .d.ts file:

/**
 * @callback Job
 * @returns {void}
 */
/** Queues work */
export class Worker {
    constructor(maxDepth?: number);
    started: boolean;
    depthLimit: number;
    /**
     * NOTE: queued jobs may add more items to queue
     * @type {Job[]}
     */
    queue: Job[];
    /**
     * Adds a work item to the queue
     * @param {Job} work
     */
    push(work: Job): void;
    /**
     * Starts the queue if it has not yet started
     */
    start(): boolean;
}
export type Job = () => void;

For more details, you can check out the original pull request.

Build-Free Editing with Project References

TypeScript’s project references provide us with an easy way to break codebases up to give us faster compiles. Unfortunately, editing a project whose dependencies hadn’t been built (or whose output was out of date) meant that the editing experience wouldn’t work well.

In TypeScript 3.7, when opening a project with dependencies, TypeScript will automatically use the source .ts/.tsx files instead. This means projects using project references will now see an improved editing experience where semantic operations are up-to-date and “just work”. You can disable this behavior with the compiler option disableSourceOfProjectReferenceRedirect which may be appropriate when working in very large projects where this change may impact editing performance.

You can read up more about this change by reading up on its pull request.

Uncalled Function Checks

A common and dangerous error is to forget to invoke a function, especially if the function has zero arguments or is named in a way that implies it might be a property rather than a function.

interface User {
    isAdministrator(): boolean;
    notify(): void;
    doNotDisturb?(): boolean;
}

// later...

// Broken code, do not use!
function doAdminThing(user: User) {
    // oops!
    if (user.isAdministrator) {
        sudo();
        editTheConfiguration();
    }
    else {
        throw new AccessDeniedError("User is not an admin");
    }
}

Here, we forgot to call isAdministrator, and the code incorrectly allows non-adminstrator users to edit the configuration!

In TypeScript 3.7, this is identified as a likely error:

function doAdminThing(user: User) {
    if (user.isAdministrator) {
    //  ~~~~~~~~~~~~~~~~~~~~
    // error! This condition will always return true since the function is always defined.
    //        Did you mean to call it instead?t

This check is a breaking change, but for that reason the checks are very conservative. This error is only issued in if conditions, and it is not issued on optional properties, if strictNullChecks is off, or if the function is later called within the body of the if:

interface User {
    isAdministrator(): boolean;
    notify(): void;
    doNotDisturb?(): boolean;
}

function issueNotification(user: User) {
    if (user.doNotDisturb) {
        // OK, property is optional
    }
    if (user.notify) {
        // OK, called the function
        user.notify();
    }
}

If you intended to test the function without calling it, you can correct the definition of it to include undefined/null, or use !! to write something like if (!!user.isAdministrator) to indicate that the coercion is intentional.

We owe a big thanks to GitHub user @jwbay who took the initiative to create a proof-of-concept and iterated to provide us with with the current version.

// @ts-nocheck in TypeScript Files

TypeScript 3.7 allows us to add // @ts-nocheck comments to the top of TypeScript files to disable semantic checks. Historically this comment was only respected in JavaScript source files in the presence of checkJs, but we’ve expanded support to TypeScript files to make migrations easier for all users.

Semicolon Formatter Option

TypeScript’s built-in formatter now supports semicolon insertion and removal at locations where a trailing semicolon is optional due to JavaScript’s automatic semicolon insertion (ASI) rules. The setting is available now in Visual Studio Code Insiders, and will be available in Visual Studio 16.4 Preview 2 in the Tools Options menu.

New semicolon formatter option in VS Code

Choosing a value of “insert” or “remove” also affects the format of auto-imports, extracted types, and other generated code provided by TypeScript services. Leaving the setting on its default value of “ignore” makes generated code match the semicolon preference detected in the current file.

Breaking Changes

DOM Changes

Types in lib.dom.d.ts have been updated. These changes are largely correctness changes related to nullability, but impact will ultimately depend on your codebase.

Function Truthy Checks

As mentioned above, TypeScript now errors when functions appear to be uncalled within if statement conditions. An error is issued when a function type is checked in if conditions unless any of the following apply:

  • the checked value comes from an optional property
  • strictNullChecks is disabled
  • the function is later called within the body of the if

Local and Imported Type Declarations Now Conflict

Due to a bug, the following construct was previously allowed in TypeScript:

// ./someOtherModule.ts
interface SomeType {
    y: string;
}

// ./myModule.ts
import { SomeType } from "./someOtherModule";
export interface SomeType {
    x: number;
}

function fn(arg: SomeType) {
    console.log(arg.x); // Error! 'x' doesn't exist on 'SomeType'
}

Here, SomeType appears to originate in both the import declaration and the local interface declaration. Perhaps surprisingly, inside the module, SomeType refers exclusively to the imported definition, and the local declaration SomeType is only usable when imported from another file. This is very confusing and our review of the very small number of cases of code like this in the wild showed that developers usually thought something different was happening.

In TypeScript 3.7, this is now correctly identified as a duplicate identifier error. The correct fix depends on the original intent of the author and should be addressed on a case-by-case basis. Usually, the naming conflict is unintentional and the best fix is to rename the imported type. If the intent was to augment the imported type, a proper module augmentation should be written instead.

What’s Next?

The final release of TypeScript 3.7 will be released near the start of November, with a release candidate available a few weeks earlier. We hope you give the beta a shot and let us know how things work. If you have any suggestions or run into any problems, don’t be afraid to drop by the issue tracker and open up an issue!

Happy Hacking!

– Daniel Rosenwasser and the TypeScript Team

The post Announcing TypeScript 3.7 Beta appeared first on TypeScript.

Azure Cost Management updates – September 2019

$
0
0

Whether you're a new student, thriving startup, or the largest enterprise, you have financial constraints and you need to know what you're spending, where, and how to plan for the future. Nobody wants a surprise when it comes to the bill, and this is where Azure Cost Management comes in!

We're always looking for ways to learn more about your challenges and how Cost Management can help you better understand where you're accruing costs in the cloud, identify and prevent bad spending patterns, and optimize costs to empower you to do more with less. Here are a few of the latest improvements and updates based on your feedback:

Let's dig into the details.


Reconcile invoiced charges with the new invoice details view

Have you ever had to compare your PDF invoice with raw cost and usage details? The process can be a bit daunting. Detailed usage data is critical for analysis and reporting, but can be overkill for invoice reconciliation. You need a summary of your usage with the same granularity as the invoice. This is exactly what you get with the new Invoice details view.

The new Invoice details view showing a table with publisher type, charge type, service, tier, meter, and part number.

With the new Invoice details view, you can also view and filter by part number for Enterprise Agreement (EA) accounts and use publisher and charge type to identify Marketplace purchases. What would you like to see next?


Automate reporting across subscriptions with management group exports

You already know you can dig into your cost and usage data from the Azure portal. You may even know you can get rich reporting from the Cost Management Query API or get the full details, in all its glory, from the UsageDetails API. These are both great for ad-hoc queries, but you may be looking for a simpler solution. This is where Cost Management exports come in!

Cost Management exports automatically publish your cost and usage data to a storage account on a daily, weekly, or monthly basis. Up to this month, you've been able to schedule exports for billing accounts, subscriptions, and resource groups. Now, you can also schedule exports across subscriptions using management groups. If you manage pay-as-you-go (PAYG) subscriptions, this will be even more powerful because, for the first time, you'll be able to export all cost and usage data for your account from a single place.

If you do start using management groups, don't forget they also allow you to analyze and drill into costs and get notified before they go over predefined limits.

Learn more about exports in the Create and manage exported data tutorial.


What's new in Cost Management Labs

With Cost Management Labs, you get a sneak peek at what's coming in Azure Cost Management and can engage directly with us to share feedback and help us better understand how you use the service, so we can deliver more tuned and optimized experiences. Here are a few features you can see in Cost Management Labs:

  • Download charts as an image – This is now available in the public portal.
    Open the desired view, then click the Export command at the top, select the PNG option, and click the Download charts button.
  • Dark theme support in cost analysis – This is now available in the public portal.
    Support for the Azure portal dark theme was added to cost analysis in early August. We're making the last few final touches and expect this to be available from the full portal in early September.
  • New: Get started quicker with the cost analysis Home view
    Cost Management offers 5 built-in views to get started with understanding and drilling into your costs. The Home view gives you quicker access to those views so you get to what you need faster!
    Cost analysis Home view with links to the 5 built-in views: Accumulated costs, Cost by resource, Daily costs, Cost by service, and Invoice details.

Of course, that's not all! Every change in Cost Management is available in Cost Management Labs a week before it's in the full Azure portal, like the new Invoice details view and scheduling management group exports. We're eager to hear your thoughts and understand what you'd like to see next. What are you waiting for? Try Cost Management Labs today!


Save and share customized views in cost analysis

You built a custom view, saved it, and even shared it with your team. But now you need to share that view outside the portal. Whether you need to present it as part of a larger PowerPoint deck or simply share it over email, you can now download charts in cost analysis as an image to share it with others. You'll see a slightly redesigned Export menu which now offers a PNG option when viewing charts.

Cost analysis Export command with options to download a PNG image, Excel file, or CSV file.


New ways to save money with Azure

Lots of cost optimization improvements have been introduced over the past month! Here are a few you might be interested in:


Documentation updates

We added a clarification in the budgets tutorial about when to expect email alerts. In general, new cost and usage data is available in Cost Management within 8-12 hours, depending on the service. Budget alerts are processed within the next 4 hours. You can generally expect to receive budget alerts via email or action group within 12-16 hours. Keep in mind this time is based on when services emit usage data. Learn more about Cost Management data in the Understanding Cost Management data documentation.

Want to keep an eye on all documentation updates? Check out the Cost Management doc change history in the azure-docs repository on GitHub. If you see something missing, select Edit at the top of the document and submit a quick pull request.


What's next?

These are just a few of the big updates from last month. We're always listening and making constant improvements based on your feedback, so please keep the feedback coming!

Follow @AzureCostMgmt on Twitter and subscribe to the YouTube channel for updates, tips, and tricks! And, as always, share your ideas and vote up others in the Cost Management feedback forum.

Over 100 Azure services support PROTECTED Australian government data

$
0
0

Today Microsoft published an independent security assessment of 113 Microsoft Azure services for their suitability to handle official and PROTECTED Australian government information. This assessment, carried out under the Information Security Registered Assessor Program (IRAP), is now available for customers and partners to review and use as they plan for increasing the use of cloud in government.

This milestone significantly expands the ability of the Australian government to leverage Microsoft Azure to drive digital transformation. The expanded scope of this IRAP assessment includes cognitive services, machine learning, IoT, advanced cybersecurity, open source database management, and serverless and application development technologies. This enables the full range of innovation within Azure Australia to be utilized for government applications, further reinforcing our commitment to achieving the broadest range of accreditations and assurances to meet the needs of government customers.

This assurance is critical for customers such as the Victorian Government, using ICT shared services provider Cenitex in partnership with Canberra-based OOBE to deploy VicCloud Protect, a ground-breaking and highly secure service that enables its government customers to safely manage applications and data rated up to PROTECTED level.

“VicCloud Protect is a first for the Victorian Government and our customers can now confidently store their classified data in the cloud with peace of mind that the platform meets both the Australian Cyber Security Centre guidelines and the Victorian Protection Data Security Framework to handle Protected level information.” - Nigel Cadywould, Cenitex Service Delivery Director

This is just one of many examples of Australian governments and partners building on the secure foundations of Azure to build transformative solutions for government. Microsoft is one of the only global cloud providers to operate cloud regions in Canberra specifically designed and secured to meet the strict security compliance requirements of Australian government and national critical infrastructure, including:

  • Data center facilities within CDC, a datacenter provider based in Canberra that specializes in government and national critical infrastructure and meets the stringent sovereignty and transparent ownership controls required by the Australian government’s hosting policy.
  • Leading physical and personnel security within the Canberra facilities designed for the even higher requirements of handling secret government data.
  • Direct connection within the data center to the federal government’s intragovernment communications network (ICON) for enhanced security and performance.
  • Unmatched flexibility for colocation of critical systems in the same facilities as Microsoft Azure in Canberra and access to the ecosystem of solution providers deployed within CDC.

Microsoft delivers the Azure Australia Central regions in Canberra as the first and best home of Australian government data and applications. The assessment released today covers not just the Central regions , but addresses all regions of Microsoft Azure in Australia, including Australia East (Sydney) and Australia Southeast (Melbourne). Also, as Microsoft has introduced further capacity and capabilities into the Australia Central regions, we have streamlined the process for customers to deploy services into our Canberra regions. Customers no longer need to manually request access to deploy services to the Australia Central region and can now directly deploy from the portal.

Because the Australian Government has designed the IRAP program to follow a risk-based approach, each customer decides whether to operate that service at the PROTECTED level or lower. To assist customers with their authorization decision, Microsoft makes the IRAP assessment report and supporting documents available to customers and partners on an Australia-specific page of the Microsoft Service Trust Portal.

For government customers who want to get started building solutions for PROTECTED level data, we’ve published Australia PROTECTED Blueprint guidance with reference architectures for IaaS and PaaS web applications along with threat model and control implementation guidance. This Blueprint enables customers to more easily deploy Azure solutions suitable for processing, storage, and transmission of sensitive and official information classified up to and including PROTECTED.

Learn more about our latest IRAP assessment


Microsoft 365 makes work and play more intuitive and natural with innovations in voice, digital ink, and touch

$
0
0

Last week we announced several new capabilities that bring new inking capabilities to our Office apps, including Inking in Slide Show while in PowerPoint on the web and Ink Replay to bring your presentations to life. Today, I’m excited to share our progress with you on a set of innovations to help people be more productive when away from their desk utilizing voice, digital pen, and touch across Office 365 and our Surface devices.

The post Microsoft 365 makes work and play more intuitive and natural with innovations in voice, digital ink, and touch appeared first on Microsoft 365 Blog.

The key to a data-driven culture: Timely insights

$
0
0

A data-driven culture is critical for businesses to thrive in today’s environment. In fact, a brand-new Harvard Business Review Analytic Services survey found that companies who embrace a data-driven culture experience a 4x improvement in revenue performance and better customer satisfaction.

Foundational to this culture is the ability to deliver timely insights to everyone in your organization across all your data. At our core, that is exactly what we aim to deliver with Azure Analytics and Power BI, and our work is paying off in value for our customers. According to a recent commissioned Forrester Consulting Total Economic Impact™ study, Azure Analytics and Power BI deliver incredible value to customers with a 271 percent ROI, while increasing satisfaction by 60 percent.

Our position in the leaders quadrant in Gartner’s 2019 Magic Quadrant for Analytics & Power BI, coupled with our undisputed performance in analytics provides you with the foundation you need to implement a data-driven culture.

But what are three key attributes needed to establish a data-driven culture?

First, it is vital to get the best performance from your analytics solution across all your data, at the best possible price.

Second, it is critical that your data is accurate and trusted, with all the security and privacy rigor needed for today’s business environment.

Finally, a data-driven culture necessitates self-service tools that empower everyone in your organization to gain insights from your data.

Let’s take a deeper look into each one of these critical attributes.

Performance

When it comes to performance, Azure has you covered. An independent study by GigaOm found that Azure SQL Data Warehouse is up to 14x faster and costs 94% less than other cloud providers. This unmatched performance is why leading companies like Azure Anheuser-Busch Inbev adopt Azure.

“We leveraged the elasticity of SQL Data Warehouse to scale the instance up or down, so that we only pay for the resources when they’re in use, significantly lowering our costs. This architecture performs significantly better than the legacy on-premises solutions it replaced, and it also provides a single source of truth for all of the company’s data.” - Chetan Kundavaram, Global Director, Anheuser-Busch Inbev

Security

Azure is the most secure cloud for analytics. This is according to Donald Farmer, a well-respected thought leader in the data industry, who recently stated, “Azure SQL Data Warehouse platform offers by far the most comprehensive set of compliance and security capabilities of any cloud data warehouse provider”. Since then, we announced Dynamic Data Masking and Data Discovery and Classification to automatically help protect and obfuscate sensitive data on-the-fly to further enhance your data security and privacy.

Insights for all

Only when everyone in your organization has access to timely insights can you achieve a truly data-driven culture. Companies drive results when they break down data silos and establish a shared context of their business based on trusted data. Customers that use Azure Analytics and Power BI do exactly that. According to the same Forrester study, customers stated.

Azure Analytics has helped with a culture change at our company. We are expanding into other areas so that everyone can make informed business decisions.”  — Study interviewee

“Power BI was a huge success. We’ve added 25,000 users organically in three years.”  — Study interviewee

Only Azure Analytics and Power BI together can unlock the performance, security and insights for your entire organization. We are uniquely positioned to empower you to develop a data-driven culture needed to thrive. We are excited to see customers like Reckitt Benckiser, choose Azure for their analytics needs.

"Data is most powerful when it's accessible and understandable. With this Azure solution, our employees can query the data however they want versus being confined to the few rigid queries our previous system required. It’s very easy for them to use Power BI Pro to integrate new data sets to deliver enormous value. When you put BI solutions in the hands of your boots on the ground—your sales force, marketing managers, product managers—it delivers a huge impact to the business."  — Wilmer Peres, Information Services Director, Reckitt Benckise

When you add it all up, Azure Analytics and Power BI are simply unmatched.

Get started today

To learn more about Azure’s insights for all advantage, get started today!

Gartner, Magic Quadrant for Analytics and Business Intelligence Platforms, 11 February 2019, Cindi Howson, James Richardson, Rita Sallam, Austin Kronz

Gartner does not endorse any vendor, product or service depicted in its research publications, and does not advise technology users to select only those vendors with the highest ratings or other designation. Gartner research publications consist of the opinions of Gartner’s research organization and should not be construed as statements of fact. Gartner disclaims all warranties, express or implied, with respect to this research, including any warranties of merchantability or fitness for a particular purpose.

Visual Studio Code Remote SSH Tips and Tricks

Introducing the preview of direct-upload to Azure managed disks

$
0
0

We are excited to announce the preview of direct-upload to Azure managed disks. Today, there are two ways you can bring your on-premises VHD files to Azure as managed disks:

  1. Stage the VHD into a storage account before converting them into managed disks
  2. Attach an empty managed disk to a VM and do copy.

Both these ways have disadvantage. The first option requires extra storage account to manage while the second option has extra cost of running virtual machine. Direct-upload addresses both these issues and provides a simplified workflow by allowing copy of your on-premises VHD into an empty managed disk. You can use it to upload to Standard HDD, Standard SSD, and Premium SSD managed disks of all the supported sizes.

If you are an independent software vendor (ISV) providing backup solution for IaaS virtual machines in Azure, we recommend you leverage direct-upload to restore your customers’ backups to managed disks. It will help simplify the restore process by getting away from storage account management. Our Azure Backup support for large managed disks is powered by direct-upload. It uses direct-upload to restore large managed disks.

For increased productivity, Azure Storage Explorer also added support for managed disks. It exposes direct-upload via an easy-to-use graphical user interface (GUI), enabling you to migrate your local VHD files to managed disks in few clicks. Moreover, it also leverages direct-upload to enable you to copy and migrate your managed disks seamlessly to another Azure region. This cross-region copy is powered by AzCopy v10 which is designed to support large-scale data movement in Azure.

If you choose to use Azure Compute Rest API or SDKs, you must first create an empty managed disk by setting the createOption property to Upload and the uploadSizeBytes property to match the exact size of the VHD being uploaded.

Rest API

{
   "location": "WestUS2",
   "properties": {
     "creationData": {
       "createOption": "Upload",
       "uploadSizeBytes": 10737418752
     }
   }
}

Azure CLI

az disk create 
-n mydiskname 
-g resourcegroupname 
-l westus2 
--for-upload 
--upload-size-bytes 10737418752 
--sku standard_lrs

You must generate a writeable SAS for the disk, so you can reference it as the destination for your upload.

az disk grant-access 
-n mydiskname 
-g resourcegroupname 
--access-level Write 
--duration-in-seconds 86400

Use AzCopy v10 to upload your local VHD file to the empty managed disk by specifying the SAS URI you generated.

AzCopy copy "c:somewheremydisk.vhd" "SAS-URI" --blob-type PageBlob

After the upload is complete, and you no longer need to write any more data to the disk, revoke the SAS. Revoking the SAS will change the state of the managed disk and allow you to attach the disk to a virtual machine.

az disk revoke-access -n mydiskname -g resourcegroupname

Supported regions

All regions are supported via Azure Compute Rest API version 2019-03-01, latest version of Azure CLI, Azure PowerShell SDK, Azure .Net SDK, AzCopy v10 and Storage explorer.

Getting started

  1. Upload a vhd to Azure using Azure PowerShell and AzCopy v10
  2. Upload a vhd to Azure using Azure CLI and AzCopy v10
  3. Upload, download, cross-region copy managed disks using Azure Storage Explorer

Introducing solution-level NuGet Package Management in Visual Studio for Mac

$
0
0

Visual Studio 2019 for Mac version 8.3 comes with many new features as summarized in this blog post. While the entirety of this release was greatly influenced by your feedback, having the ability to manage packages at the solution level was one of the capabilities that most of you expressed as lacking in Visual Studio for Mac. A new solution-level NuGet Package Manager is one of the exciting new features of Visual Studio 2019 for Mac version 8.3. We’ve made improvements to help you discover packages more easily. This includes an improved experience while searching for new packages, gaining an understanding of what packages are already installed in your project, and finding packages that have updates available. In this blog post, we will focus on the package management experience for a Solution. However, most of the experiences including installing, updating, and viewing installed packages have a similar new experience at the project-level, too.

To launch the NuGet Package Manager for a Solution, you can go to the context menu for the Solution and select “Manage NuGet Package…”:

Context menu for Solution-level NuGet Package Manager


Add new packages

When you search and try to add a new package, you can now select the projects you want to install the package into.

At any time, you can go to the Installed tab and view list of all the packages installed in your solution, allowing you to uninstall to update them.

NuGet Package Management Install


Update packages

The Updates tab shows you all the packages in the solution for which updates are available (or a project, if you invoke the command at a project level).

NuGet Package Manager Updates

Consolidate packages

Often, large solutions end up in situations where different projects refer to different versions of a package. To consolidate these versions into one single version of the package that you might want to use across the solution, you can go to the consolidate tab of the NuGet Package Manager invoked at the solution node, select the package’s version to you would like all the projects in the solution to use and choose to consolidate packages:

Consolidate packages

Download today!

To try out these new NuGet capabilities, download the Visual Studio 2019 for Mac version 8.3 release today or update to the latest release using the Stable channel if you already have Visual Studio for Mac installed.

If you run into any issues with the version 8.3 release, please use the Help > Report a Problem menu in the IDE to let us know about it. You can also provide suggestions for future improvements to Visual Studio for Mac by using the Provide a Suggestion menu.

Report a Problem

Finally, make sure to follow us on Twitter at @VisualStudioMac to stay up to date on the latest Visual Studio for Mac news and let us know what your experience has been like. We look forward to hearing from you!


The post Introducing solution-level NuGet Package Management in Visual Studio for Mac appeared first on Visual Studio Blog.

Viewing all 5971 articles
Browse latest View live


<script src="https://jsc.adskeeper.com/r/s/rssing.com.1596347.js" async> </script>