Quantcast
Channel: Category Name
Viewing all 5971 articles
Browse latest View live

A wonderfully unholy alliance – Real Linux commands for PowerShell with WSL function wrappers

$
0
0

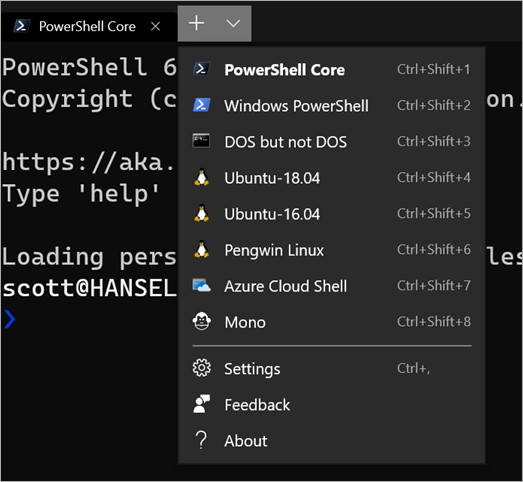
Dropdown filled with shells in the Windows TerminalI posted recently about What's the difference between a console, a terminal, and a shell? The world of Windows is interesting - and a little weird and unfamiliar to non-Windows people. You might use Ubuntu or Mac and you've picked your shell like zsh or bash or pwsh, but then you come to Windows and we're hopping between shells (and now operating systems with WSL!) on a tab by tab basis.

If you're using a Windows shell like PowerShell because you like it's .NET Core based engine and powerful scripting language, you might still miss common *nix shell commands like ls, grep, sed and more.

No matter what shell you're using in Windows (powershell, yori, cmd, whatever) you can always call into your default Ubuntu instance with "wsl command" so "wsl ls" or "wsl grep" but it'd be nice to make those more naturally and comfortably integrated.

Now there's a new series of "function wrappers" that make Linux commands available directly in PowerShell so you can easily transition between multiple environments.

This might seem weird but it allows us to create amazing piped commands that move in and out of Windows and Linux, PowerShell and bash. It's actually pretty amazing and very natural if you, like me, are non-denominational in your choice of operating system and preferred shell.

These function wrappers are very neatly designed and even expose TAB completion across operating systems! That means I can type Linux commands in PowerShell and TAB completion comes along!

It's super easy to set up. From Mike Battista's Github

  • Install PowerShell Core
  • Install the Windows Subsystem for Linux (WSL)
  • Install the WslInterop module with Install-Module WslInterop
  • Import commands with Import-WslCommand either from your profile for persistent access or on demand when you need a command (e.g. Import-WslCommand "awk", "emacs", "grep", "head", "less", "ls", "man", "sed", "seq", "ssh", "tail", "vim")

You'll do your Install-Module just one, and then run notepad $profile and add just a that single last line. Make sure you change it to expose the WSL/Linux commands that you want. Once you're done, you can just open PowerShell Core and mix and match your commands!

From the blog, "With these function wrappers in place, we can now call our favorite Linux commands in a more natural way without having to prefix them with wsl or worry about how Windows paths are translated to WSL paths:"

  • man bash
  • less -i $profile.CurrentUserAllHosts
  • ls -Al C:Windows | less
  • grep -Ein error *.log
  • tail -f *.log

It's a really genius thing and kudos to Mike for sharing it with us! Go try it now. https://github.com/mikebattista/PowerShell-WSL-Interop


Sponsor: Like C#? We do too! That’s why we've developed a fast, smart, cross-platform .NET IDE which gives you even more coding power. Clever code analysis, rich code completion, instant search and navigation, an advanced debugger... With JetBrains Rider, everything you need is at your fingertips. Code C# at the speed of thought on Linux, Mac, or Windows. Try JetBrains Rider today!


© 2019 Scott Hanselman. All rights reserved.
     

Top Stories from the Microsoft DevOps Community – 2019.10.04

$
0
0

Time flies, and it is October already. Pumpkins are everywhere, even in Azure DevOps! If you are looking for a fun automation project for Halloween, check out our last story for this week.

PowerApps BuildTools for Azure DevOps
I get excited every time I see Continuous Integration and Continuous Delivery practices make it into another traditionally manual field. This great post from Francisco Ruiz A shows how to use the preview PowerApps build tools for Azure DevOps to add a PowerApp to source control and automatically deploy it to the target environment. Say goodbye to manual zip uploads! Thank you for sharing with the community, Francicso!

Azure DevOps Multi-Stage Pipelines Approval Strategies
A little while ago we added the manual approvals functionality to multi-stage YAML pipelines in Azure DevOps. This great post from Justin Yoo walks us through the configuration needed to add reviewers to the YAML pipeline stages. Thank you, Justin!

Creating Tasks automatically in Azure DevOps using Flow
Often times, larger Azure Boards work items require a breakdown into routine tasks, and Project Managers have to manually create and assign them. This blog post by Shan shows an automation of this process using Microsoft Flow. What is extra cool is that you can use a similar process to automate work item creation based on other triggers. For instance you could create a work item after getting a certain kind of email, using Microsoft Flow or Azure Logic Apps. Thank you Shan!

App Center to Azure DevOps: how to check your app build status in a Pipeline
This post from Ant Puleo walks us through integrating Azure Repos and App Center, getting the mobile application Build status back to Azure DevOps using a Function task. Thank you Ant!

Azure Functions using Java Spring with CI/CD using Azure Pipelines— Part 2
And, of course, just as we can use Azure Functions to automate tasks in Azure DevOps, we can also use Azure Pipelines to automate Functions deployments. This post from Visweshwar Ganesh shows us how to create and deploy a Java Spring Function. Visweshwar starts from the Deployment Center tab in Azure Portal, which automatically wires up the initial CI/CD pipeline for you. Thank you Visweshwar!

Pumpkin Pi 🎃 with Raspberry’s & Pipelines
It is October, and Halloween is just around the corner! In this video, Martin Woodward shows us how to get a spooky Build status light using a pumpkin and a Raspberry Pi. I must admit, I was most impressed by Martin’s skills at carving a pumpkin!

If you’ve written an article about Azure DevOps or find some great content about DevOps on Azure, please share it with the #AzureDevOps hashtag on Twitter!

The post Top Stories from the Microsoft DevOps Community – 2019.10.04 appeared first on Azure DevOps Blog.

Now is the time to make a fresh new Windows Terminal profiles.json

$
0
0

I've been talking about it for months, but in case you haven't heard, there's a new Windows Terminal in town. You can download it and start using it now from the Windows Store. It's free and open source.

At the time of this writing, Windows Terminal is around version 0.5. It's not officially released as a 1.0 so things are changing all the time.

Here's your todo - Have you installed the Windows Terminal before? Have you customize your profile.json file? If so, I want you to DELETE your profiles.json!

Your profiles.json is somewhere like C:UsersUSERNAMEAppDataLocalPackagesMicrosoft.WindowsTerminal_8wekyb3d8bbweLocalState but you can get to it from the drop down in the Windows Terminal like this:

Windows Terminal dropdown

When you hit Settings, Windows Terminal will launch whatever app is registered to handle JSON files. In my case, I'm using Visual Studio Code.

I have done a lot of customization on my profiles.json, so before I delete or "zero out" my profiles.json I will save a copy somewhere. You should to!

You can just "ctrl-a" and delete all of your profiles.json when it's open and Windows Terminal 0.5 or greater will recreate it from scratch by detecting the shells you have. Remember, a Console or Terminal isn't a Shell!

Note the new profiles.json also includes another tip! You can hold ALT- and click settings to see the default settings! This new profiles.json is simpler to read and understand because there's an inherited default.


// To view the default settings, hold "alt" while clicking on the "Settings" button.
// For documentation on these settings, see: https://aka.ms/terminal-documentation

{
"$schema": "https://aka.ms/terminal-profiles-schema",

"defaultProfile": "{61c54bbd-c2c6-5271-96e7-009a87ff44bf}",

"profiles":
[
{
// Make changes here to the powershell.exe profile
"guid": "{61c54bbd-c2c6-5271-96e7-009a87ff44bf}",
"name": "Windows PowerShell",
"commandline": "powershell.exe",
"hidden": false
},
{
// Make changes here to the cmd.exe profile
"guid": "{0caa0dad-35be-5f56-a8ff-afceeeaa6101}",
"name": "cmd",
"commandline": "cmd.exe",
"hidden": false
},
{
"guid": "{574e775e-4f2a-5b96-ac1e-a2962a402336}",
"hidden": false,
"name": "PowerShell Core",
"source": "Windows.Terminal.PowershellCore"
},
...

You'll notice there's a new $schema that gives you dropdown Intellisense so you can autocomplete properties and their values now! Check out the Windows Terminal Documentation here https://aka.ms/terminal-documentation and the complete list of things you can do in your profiles.json is here.

I've made these changes to my Profile.json.

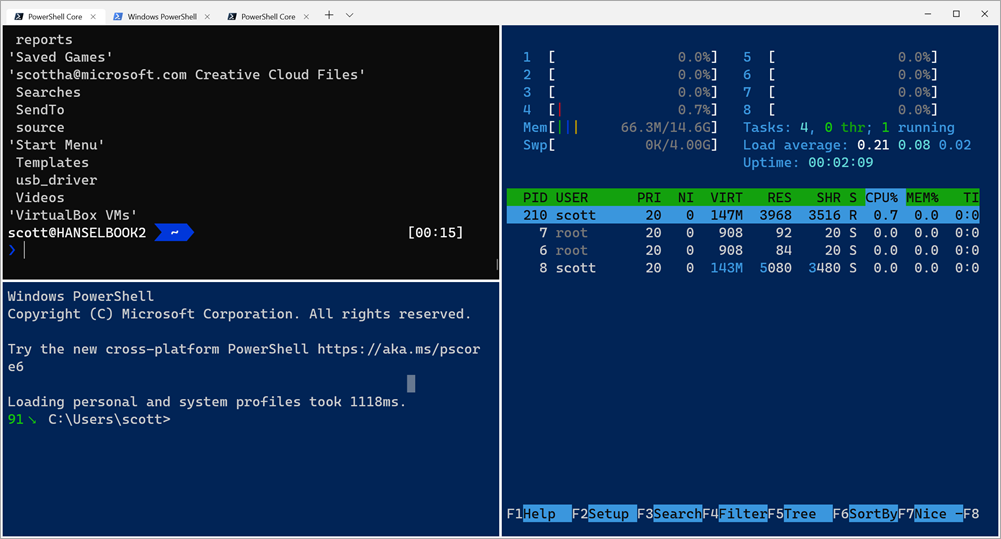
Split panes

I've added "requestedTheme" and changed it to dark, to get a black titleBar with tabs.

requestedTheme = dark

I also wanted to test the new (not even close to done) splitscreen features, that give you a simplistic tmux style of window panes, without any other software.

// Add any keybinding overrides to this array.

// To unbind a default keybinding, set the command to "unbound"
"keybindings": [
{ "command": "closeWindow", "keys": ["alt+f4"] },
{ "command": "splitHorizontal", "keys": ["ctrl+-"]},
{ "command": "splitVertical", "keys": ["ctrl+\"]}
]

Then I added an Ubuntu specific color scheme, named UbuntuLegit.

// Add custom color schemes to this array

"schemes": [
{
"background" : "#2C001E",
"black" : "#4E9A06",
"blue" : "#3465A4",
"brightBlack" : "#555753",
"brightBlue" : "#729FCF",
"brightCyan" : "#34E2E2",
"brightGreen" : "#8AE234",
"brightPurple" : "#AD7FA8",
"brightRed" : "#EF2929",
"brightWhite" : "#EEEEEE",
"brightYellow" : "#FCE94F",
"cyan" : "#06989A",
"foreground" : "#EEEEEE",
"green" : "#300A24",
"name" : "UbuntuLegit",
"purple" : "#75507B",
"red" : "#CC0000",
"white" : "#D3D7CF",
"yellow" : "#C4A000"
}
],

And finally, I added a custom command prompt that runs Mono's x86 developer prompt.

{

"guid": "{b463ae62-4e3d-5e58-b989-0a998ec441b8}",
"hidden": false,
"name": "Mono",
"fontFace": "DelugiaCode NF",
"fontSize": 16,
"commandline": "C://Windows//SysWOW64//cmd.exe /k "C://Program Files (x86)//Mono//bin//setmonopath.bat"",
"icon": "c://Users//scott//Dropbox//mono.png"
}

Note I'm using forward slashes an double escaping them, as well as backslash escaping quotes.

Save your profiles.json away somewhere, make sure your Terminal is updated, then delete it or empty it and you'll likely get some new "free" shells that the Terminal will detect, then you can copy in just the few customizations you want.


Sponsor: Like C#? We do too! That’s why we've developed a fast, smart, cross-platform .NET IDE which gives you even more coding power. Clever code analysis, rich code completion, instant search and navigation, an advanced debugger... With JetBrains Rider, everything you need is at your fingertips. Code C# at the speed of thought on Linux, Mac, or Windows. Try JetBrains Rider today!


© 2019 Scott Hanselman. All rights reserved.
     

Azure Data Factory Mapping Data Flows are now generally available

$
0
0

In today’s data-driven world, big data processing is a critical task for every organization. To unlock transformational insights and embrace a data-driven culture, companies need tools to help them easily integrate and transform data at scale, without requiring specialized skills.

Today we’re announcing the general availability of the Mapping Data Flows feature of Azure Data Factory (ADF), our productive and trusted hybrid integration service. Data Factory now empowers users with a code-free, serverless environment that simplifies ETL in the cloud and scales to any data size, no infrastructure management required.

Built to handle all the complexities and scale challenges of big data integration, Mapping Data Flows allow users to quickly transform data at scale. Build resilient data pipelines in an accessible visual environment with our browser-based designer and let ADF handle the complexities of Spark execution.

Mapping Data Flows simplifies data processing, with built-in capabilities to handle unpredictable data schemas and to maintain resilience to changing input data. With Mapping Data Flows, customers like Nielsen are empowering their employees to turn data into insights, regardless of data complexity or the coding skills of their teams.

"Mapping Data Flows have been instrumental in enabling Nielsen's analytics teams to perform data cleansing and preparation in a user-friendly and code-free environment, and allow us to deliver insights to our clients in a faster and more automated way." - David Hudzinski, Director, Product, Nielsen


740 Blog
Accelerate time to insights by focusing on building your business logic without worrying about managing and maintaining server clusters or writing code to build pipelines. Easily perform ETL tasks like loading fact tables, maintaining slowly changing dimensions, aggregating semi-structured big data, matching data using fuzzy matching, and preparing data for modeling. With our intuitive visual interface, design your data transformation logic as easy-to-read graphs, and build libraries of transformation routines to easily turn raw data into business insights.

Work the way you want – code-first, or entirely code-free with Mapping Data Flows. Use built-in transformations to perform common actions like joining, aggregating, pivoting, and sorting. Customize these transformations with the expression builder, which includes auto-complete and comprehensive online help.

As you build your logical graphs, validate in real-time using ADF’s live data preview capability. Features like null counts, value distributions, and standard deviation provide immediate insights into your data.
   Interactive data preview of your data in ADF.
Finally, build pipelines and debug your new ETL process end-to-end using the drag and drop pipeline builder with interactive debugging.
    740 Blog
Build schedules for your pipelines and monitor your data flow executions from the ADF monitoring portal. Easily manage data availability SLAs with ADF’s rich availability monitoring and alerts, and leverage built-in CI/CD capabilities to save and manage your flows in a managed DataOps environment. And establish alerts and view execution plans to validate that your logic is performing as planned as you tune your data flows.

Mapping Data Flows is a game-changer for any organization looking to make data integration and transformation faster, easier, and accessible to everyone.

Learn more and get started today using ADF with Mapping Data Flows.

Measuring your return on investment of Azure as a compliance platform

$
0
0

Today we’re pleased to introduce the release of Microsoft Azure is Helping Organizations Manage Regulatory Challenges More Effectively, a new International Data Corporation (IDC) white paper based on original research by IDC and sponsored by Microsoft. IDC studied Azure customers who are using Azure as a platform to meet regulatory compliance needs, with a special focus on government, healthcare, and financial customers. Azure Policy was cited by customers as having an important impact on meeting compliance obligations.

IDC found that these customers are realizing significant benefits by leveraging Azure capabilities to make their regulatory and compliance efforts more effective. Significant findings of research include:

•    Five-year return on investment (ROI) of 465 percent, worth an average of $4.29 Million.
•    Six-month payback on investment.
•    47 percent reduction in unplanned downtime.
•    35 percent reduction in compliance-related penalties.
•    A 24 percent increase in productivity for regulatory compliance teams.

Microsoft Azure is helping organizations manage regulatory challenges more effectively

Research summary findings

“Study participants reported use of Azure as a compliance platform helped them carry out their day–to-day compliance responsibilities more effectively. Azure helped them better manage spikes in the workload, enabled faster access to (and analysis of) data during audits, and reduced exposure to risk based on the strong internal controls of Azure.”

Specific benefits outlined by study participants in the research included:

  • Better workload management and reduced risk: "We are able to stay on top of what we are doing, and we can now handle growth or spikes in the workload. Azure has lessened our exposure to risk because of its strong internal controls."
  • Increased audit efficiency: "Azure has absolutely helped with audits. For example, it allows us to have much better access to our data, and faster analysis of that data for our audits. Compliance teams save time as a result."
  • State-of-the-art security: "Azure has lessened compliance risk exposure because its … security systems are state of the art. There is less chance of any kind of data being compromised through intrusion."

About half of the organizations surveyed were using Azure Blueprints, which enable tenants to deploy a repeatable set of Azure resources that implements and adheres to common compliance standards, including ISO 27001, PCI DSS, and NIST SP 800-53. Benefits cited by customers from using Azure Blueprints included better visibility and remediation of threats and vulnerabilities, guidance documentation, and automation scripts for hosting web applications.

One customer said of Azure Blueprints in the research, "The architecture is already set up and is very sophisticated (for example, there are different app services, load balancers, and the database are all set up). We don't have to spend a lot of time on architecture. Other benefits are the resource manager, security management, logging and auditing, activity logs, and diagnostic logs. It’s a great resource for support of our ongoing compliance requirements."

Learn more about how to deploy Azure Blueprints today.  

Read more about the IDC findings by visiting the article.

Client provided keys with Azure Storage server-side encryption

$
0
0

Microsoft Azure Storage offers several options to encrypt data at rest. With client-side encryption you can encrypt data prior to uploading it to Azure Storage. You can also choose to have Azure Storage manage encryption operations with server-side encryption using Microsoft managed keys or using customer managed keys in Microsoft Azure Key vault. Today, we present enhancement to server-side encryption to support granular encryption settings on storage account with keys hosted in any key store. Client provided key (CPK) enables you to store and manage keys in on-premises or key stores other than Azure Key Vault to meet corporate, contractual and regulatory compliance requirements for data security.

Client provided keys allows you to pass an encryption key as part of read or write operation to storage service using blob APIs. When you create a blob with a client provided key, the storage service persists the SHA-256 hash of the encryption key with the blob to validate future requests. When you retrieve an object, you must provide the same encryption key as part of the request. For example, if a blob is created with Put Blob, all subsequent write operations must provide the same encryption key. If a different key is provided, or if no key is provided in the request, the operation will fail with 400 Bad Request. As the encryption key itself is provided in the request, a secure connection must be established to transfer the key. Here’s the process:

azure

Figure 1: Client provided keys

Getting started

Client provided keys may be used with supported blob operations by adding the x-ms-encryption-* headers to the request.

Request Header

Description

x-ms-encryption-key

Required. A Base64-encoded AES-256 encryption key value.

x-ms-encryption-key-sha256

Required. The Base64-encoded SHA256 of the encryption key.

x-ms-encryption-algorithm

Required. Specifies the algorithm to use when encrypting data using the given key. Must be AES256.

Request

PUT mycontainer/myblob.txt
x-ms-version: 2019-02-02
x-ms-encryption-key: MDEyMzQ1NjcwMTIzNDU2NzAxMjM0NTY3MDEyMzQ1Njc=
x-ms-encryption-key-sha256: 3QFFFpRA5+XANHqwwbT4yXDmrT/2JaLt/FKHjzhOdoE=
x-ms-encryption-algorithm: AES256
Content-Length: <length>
... 

Key Management

Azure Storage does not store or manage client provided encryption keys. Keys are securely discarded as soon as possible after they’ve been used to encrypt or decrypt the blob data. If client provided keys are used on blobs with snapshots enabled, each snapshot can be provisioned with different encryption key. You must keep track of snapshot and associated encryption key to pass the correct key with blob operations. If you need to rotate the key associated with an object, you can use copy blob operation to pass old and new keys as headers as shown below.

Request

PUT mycontainer/myblob.txt
x-ms-copy-source: https://myaccount.blob.core.windows.net/mycontainer/myblob.txt
x-ms-source-encryption-key: MDEyMzQ1NjcwMTIzNDU2NzAxMjM0NTY3MDEyMzQ1Njc=
x-ms-source-encryption-key-sha256: 3QFFFpRA5+XANHqwwbT4yXDmrT/2JaLt/FKHjzhOdoE=
x-ms-source-encryption-algorithm: AES256
x-ms-encryption-key: NzY1NDMyMTA3NjU0MzIxMDc2NTQzMjEwNzY1NDMyMTA=
x-ms-encryption-key-sha256: uYo4dwqNEIFWjJ5tWAlTJWSrfdY2QIH5UF9IHYNRqyo=
x-ms-encryption-algorithm: AES256

Next Steps

This feature is available now on your storage account with recent release of Storage Services REST API (version 2019-02-02). You may also use .NET client library and Java client library.

For more information on client provided keys please visit our documentation page. For any further questions, or to discuss your specific scenario, send us an email at azurestoragefeedback@microsoft.com or post your ideas and suggestions about Azure Storage on our feedback forum.

Customer Provided Keys with Azure Storage Service Encryption

$
0
0

Azure storage offers several options to encrypt data at rest. With client-side encryption you can encrypt data prior to uploading it to Azure Storage. You can also choose to have Azure storage manage encryption operations with storage service encryption using Microsoft managed keys or using customer managed keys in Azure Key Vault. Today, we present enhancement to storage service encryption to support granular encryption settings on storage account with keys hosted in any key store. Customer provided keys (CPK) enables you to store and manage keys in on-premises or key stores other than Azure Key Vault to meet corporate, contractual, and regulatory compliance requirements for data security.

Customer provided keys allows you to pass an encryption key as part of read or write operation to storage service using blob APIs. Since the encryption key is defined at the object level, you can have multiple encryption keys within a storage account. When you create a blob with customer provided key, storage service persists the SHA-256 hash of the encryption key with the blob to validate future requests. When you retrieve an object, you must provide the same encryption key as part of the request. For example, if a blob is created with Put Blob using CPK, all subsequent write operations must provide the same encryption key. If a different key is provided, or if no key is provided in the request, the operation will fail with 400 Bad Request. As the encryption key itself is provided in the request, a secure connection must be established to transfer the key. Here’s the process:
 

740 Blog
Figure 1 Customer Provided Keys

Getting started

Customer Provided Keys may be used with supported blob operations by adding the x-ms-encryption-* headers to the request.

Request Header Description
x-ms-encryption-key Required. A Base64-encoded AES-256 encryption key value.
x-ms-encryption-key-sha256 Required. The Base64-encoded SHA256 of the encryption key.
x-ms-encryption-algorithm Required. Specifies the algorithm to use when encrypting data using the given key. Must be AES256.

Request

PUT mycontainer/myblob.txt
x-ms-version: 2019-02-02
x-ms-encryption-key: MDEyMzQ1NjcwMTIzNDU2NzAxMjM0NTY3MDEyMzQ1Njc=
x-ms-encryption-key-sha256: 3QFFFpRA5+XANHqwwbT4yXDmrT/2JaLt/FKHjzhOdoE=
x-ms-encryption-algorithm: AES256
Content-Length: <length>
...

Key management

Azure Storage does not store or manage customer provided encryption keys. Keys are securely discarded as soon as possible after they’ve been used to encrypt or decrypt the blob data. If customer provided keys are used on blobs with snapshots enabled, each snapshot can be provisioned with different encryption key. You must keep track of snapshot and associated encryption key to pass the correct key with blob operations. If you need to rotate the key associated with an object, you can download the object and upload with new encryption key.

Next steps

This feature is available now on your storage account with recent release of Storage services REST API (version 2019-02-02). You may also use .NET Client library and Java Client library. There are no additional charges for customer provided keys.

For more information on customer provided keys please visit our documentation page. For any further questions, or to discuss your specific scenario, send us an email at azurestoragefeedback@microsoft.com or post your ideas and suggestions about Azure Storage on our feedback forum.

SAP on Azure–Designing for availability and recoverability

$
0
0

This is the third in a four-part blog series on Designing a great SAP on Azure Architecture.

Robust SAP on Azure Architectures are built on the pillars of security, performance and scalability, availability and recoverability, efficiency and operations.

We covered designing for performance and scalability previously and within this blog we will focus on availability and recoverability.

Designing for availability

Designing for availability ensures that your mission critical SAP applications such as SAP ERP or S/4HANA have high-availability (HA) provisions applied. These HA provisions ensure the application is resilient to both hardware and software failures and that the SAP application uptime is secured to meet your service-level-agreements (SLAs).

Within the links below, you will find a comprehensive overview on Azure virtual machine maintenance versus downtime where unplanned hardware maintenance events, unexpected downtime and planned maintenance events are covered in detail.

740 Blog


From an availability perspective the options you have for deploying SAP on Azure are as follows:

  1. 99.9 percent SLA for single instance VMs with Azure premium storage. In this case, the SAP database (DB), system central services A(SCS) and application servers are either running on separate VMs or consolidated on one or more VMs. A 99.9 percent SLA is also offered on our single node, bare metal HANA Large Instances.
  2. 99.95 percent SLA for VMs within the same Azure availability set. The availability set enforces that the VMs within the set are deployed in separate fault and update domains, in turn this ensures the VMs are safeguarded against unplanned hardware maintenance events, unexpected downtime and planned maintenance events. To ensure HA of the SAP application, the availability sets are used in conjunction with Azure Load Balancers,  guest operating system clustering technologies such as Windows Failover cluster or Linux Pacemaker to facilitate short failover times and synchronous database replication technologies (SQL AlwaysOn, HANA System Replication, etc) to guarantee no loss of data. Additionally, configuring the SAP Enqueue Replication Server can mitigate against loss of the SAP lock table during a failover of the A(SCS).
  3. 99.99 percent SLA for VMs within Azure availability zones. An availability zone in an Azure region is a combination of a fault domain and an update domain. The Azure platform recognizes this distribution across update domains to ensure that VMs in different zones are not updated at the same time in the case of Azure planned maintenance events.  Additionally, availability zones are physically separate zones within an Azure region where each zone has its own power source, network, cooling and is logically separated from the other zones within the Azure region. This construct hedges against unexpected downtime due to a hardware or infrastructure failure within a given zone. By architecting the SAP deployment to leverage replication across zones i.e. DBMS replication (HANA System Replication, SQL AlwaysOn), SAP Enqueue Replication Server and distributing the SAP application servers (for redundancy) across zones you can protect the SAP system from the loss of a complete datacenter. If one zone is compromised, the SAP System will be available in another zone. For an overview of Azure availability zones and our latest Mv2 VM offering you can check out this video.
  4. HANA Large Instances are offered at an SLA of 99.99 percent when they are configured as an HA pair, this applies to single datacenter and availability zones deployments.

In the case of availability sets and availability zones, guest OS clustering is necessary for HA. We would like to use this opportunity to clarify the Linux Pacemaker Fencing options on Azure to avoid split brain of your SAP application, these are:

  • Azure Fencing Agent
  • Storage Based Death (SBD)

The Azure Fencing Agent is available on both RedHat Enterprise Linux (RHEL) and SUSE Enterprise Linux (SLES) and SBD is supported by SLES, but not RHEL;  for the shortest cluster failover times for SAP on Azure with Pacemaker, we recommend:

  • Azure Fencing Agent for SAP clusters built on RHEL.
  • SBD for SAP clusters built on SLES

In the case of productive SAP applications, we strongly recommend availability sets or availability zones.  Availability zones are an alternative to availability sets to provide HA with the addition of resiliency to datacenter failures within an Azure region. However, be mindful, there is no guarantee of a certain distances between the building structures hosting different availability zones. Different Azure regions can encounter different setups in terms of distance of the physical buildings. Therefore, for deterministic application performance and the lowest network Round-Trip-Time (RTT), Availability sets could be the better option.

Single Instance VMs can be a good fit for non-production (project, sandbox and test SAP systems) which don’t have availability SLAs on the same level as production, this option also helps to minimize run costs.

Designing for recoverability

Designing for recoverability means recovering from data loss, such as a logical error on the SAP database, from large scale disasters, or loss of a complete Azure region. When designing for recoverability, it is necessary to understand the Recovery Point Objective (RPO) and Recovery Time Objective (RTO) of your SAP Application. Azure Regional Pairs are recommended for disaster recovery which offer isolation and availability to hedge against the risks of natural or human disasters impacting a single region.

On the DBMS layer, asynchronous replication can be used to replicate your production data from your primary region to your disaster recovery (DR) region. On the SAP application layer, Azure-to-Azure Site Recovery can be used as part of an efficient, cost-conscious DR solution. You could also choose to architect a dual-purpose scenario on your DR side such as running a combined QA/DR system for a better return on your investments as shown below.

In addition to HA and DR provisions an enterprise data protection solution for backup and recovery of your SAP data is essential.

Our first party Azure Backup offering is certified for SAP HANA, the solution is currently in public preview (as of September 2019) and supports SAP HANA scale-up (data and log backup) with further scenarios to be supported in the future such as data snapshot and SAP HANA scale-out.

Additionally, the Azure platforms supports a broad range of ISVs which offer enterprise data protection and management for your SAP applications. One such ISV is Commvault where Microsoft have recently partnered to produce this whitepaper. A key advantage of Commvault is the IntelliSnap (data snapshot) capability which offers instantaneous application consistent data snapshots of your SAP database – this is hugely beneficial for large databases which have low RTO requirements. Commvault facilitates highly performant multi-streaming (backint) data backup directly to Azure Blob storage for both SAP HANA scale-up, SAP HANA scale-out and anyDB workloads. Your enterprise data protection strategy can include a combination of data snapshots and data backup i.e. running daily snapshots and a data backup (backint) on the weekend. Below, a data snapshot executed via IntelliSnap against an SAP HANA database on an M128s (2TB) VM, the snapshot duration is 20 seconds.
 

Blog Photos

Within this blog we have summarized the options for designing SAP on Azure for Availability and Recoverability. When architecting and deploying your production SAP applications on Azure, it is essential to include availability sets or availability zones to support your mission critical SAP SLAs. Furthermore, you should apply DR provisions and enterprise data protection to secure your SAP application against the loss of a complete Azure region or data corruption.

Be sure to execute HA and DR testing through the lifecycle of your SAP to Azure project and also re-test these capabilities during maintenance windows once your SAP Applications are in productive operations i.e. DR drill tests annually.
Availability and Recoverability should be reviewed on an ongoing basis to incorporate the latest technologies and guidance on best practices from Microsoft.

In blog #4 in our series we will cover designing for efficiency and operations.


Join the Bing Maps team at Microsoft Ignite 2019 in Orlando, Florida

$
0
0

The Bing Maps team is looking forward to seeing you at Microsoft Ignite 2019, in Orlando, Florida, November 4th through the 8th. If you are attending the event, we hope you will enjoy our sessions and stop by the Bing Maps for Enterprise booth in the Modern Workplace + Modern Life area of the Expo to learn more about the latest features and updates to our Bing Maps Platform.

Bing Maps session details:

Announcing Bing Maps Geospatial Analytics Platform Preview for Enterprise Business Planning

Breakout session: BRK-1074

Need help in determining where to expand, build or deploy resources to meet customer demand? Don’t know how your business KPI vary from location to location? The new Bing Maps Geospatial Analytics solution takes the difficulty out of wrangling location intelligence data and helps you arrive at location-based business decisions faster. In this session, you’ll learn how to use local business, parcel info, demographics etc. to identify underserved locations for future business expansion or uncover key locations insights for your business.

Harness the power of Bing Maps Location Insights in your Enterprise Applications

Breakout session: BRK-1071

In the modern workplace, location is key. Bing Maps helps your business take location relevant data into account in day to day business decisions. Whether you are planning new sites, optimizing your offerings based on local situations, or providing your customers with highly relevant local experiences, Bing Maps has location data and APIs for you. In this session you will learn about the Microsoft mapping offerings for Location Recognition, Local Search, and Local Insights.

Optimizing Workforce Itinerary Scheduling and Travel Time with Bing Maps

Theater session: THR-1071

Modern workforce management requires state-of-the-art geospatial technologies and solutions. Do you have field staff that you need to assign to visit multiple customer locations? Do you want optimized routes for those visits? Save time and reduce costs by leveraging the recently released Bing Maps Multi-Itinerary Optimization API.

If you are not able to attend Microsoft Ignite 2019, we will share news and updates on the blog after the conference and post recordings of the Bing Maps sessions on https://blogs.bing.com/maps. You can also follow us on Twitter, LinkedIn and the Bing for Partners Facebook page.

For more information about using Bing Maps for Enterprise Custom Maps APIs for business, go to https://www.microsoft.com/maps.

- The Bing Maps Team

Introducing Azure Spring Cloud: fully managed service for Spring Boot microservices

$
0
0

As customers have moved their workloads to the cloud, we’ve seen a growth in the use of cloud-native architectures, particularly microservices. Microservice-based architectures help improve scalability and velocity but implementing them can pose challenges. For many Java developers, Spring Boot and Spring Cloud have helped address these challenges, providing a robust platform with well-established patterns for developing and operating microservice applications. But creating and maintaining a Spring Cloud environment requires work. Such as setting up the infrastructure for dynamic scaling, installing and managing multiple components, and wiring up the application to your logging infrastructure. 

To help make it simpler to deploy and operate Spring Cloud applications, together with Pivotal, Microsoft have created Azure Spring Cloud.

Azure Spring Cloud is jointly built, operated, and supported by both Pivotal and Microsoft. This means that you can use Azure Spring Cloud for your most demanding applications and know that both Pivotal and Microsoft are standing behind the service to ensure your success.

High productivity development

Azure Spring Cloud abstracts away the complexity of infrastructure management and Spring Cloud middleware management, so you can focus on building your business logic and let Azure take care of dynamic scaling, security patches, compliance standards, and high availability.

With a few clicks, you can provision an Azure Spring Cloud instance. After configuring a couple dependencies in your pom file, your Spring Cloud app is automatically wired up with Spring Cloud Config Server and Service Registry. Furthermore, you can deploy and scale Spring Boot applications in seconds. 

image

To accelerate your development experience, we provide support for the Azure Spring Cloud Maven plugin and VS Code extensions that optimize Spring development. In other words, you can use the tools that you already know and love.

Ease of monitoring

With out-of-the-box support for aggregating logs, metrics, and distributed app traces into Azure Monitor, you can easily visualize how your applications are performing, detect and diagnose issues across microservice applications and their dependencies, drill into monitoring data for troubleshooting and gain better understanding of what end-users do with your apps.

image

Open source innovation with Spring integrations

Azure Spring Cloud sets up the compute foundation for cloud-native Spring applications. From there, Azure Spring Cloud makes it simple to connect to data services such as Azure SQL Database, MySQL, PostgreSQL, or Cosmos DB to enable enterprise grade end-user authentication and authorization using Azure Active Directory, to bind cloud streams with Service Bus or Event Hubs, and to load and manage secrets with Azure Key Vault. To help you save the effort of manually figuring out dependencies and eliminate boilerplate code, we’ve created a rich library of Spring integrations and starters for your Spring applications.

Sign up for Azure Spring Cloud

Both Pivotal and Microsoft are looking forward to hearing feedback on the new Azure Spring Cloud from our joint customers. If you’re interested in joining the private preview, please submit your contact details here. To hear more from Pivotal on today’s announcement, head over to their blog and let us know what you think.

The service will be available in public preview, for all customers, before end of the calendar year.

Visual Studio extensibility is better with IntelliCode

$
0
0

Installing the Visual Studio extension development workload presents you with a choice of optional components. And looking at the component list might leave you rather confused. Because how are various C++ components and the Class Designer especially relevant to writing extension? And where is IntelliCode?

Taking a deeper look at the list we could sensibly remove some components that most extenders are not going to use. We could also add the IntelliCode component which was missing. So, we did in the Visual Studio 2019 v16.3 update, and the result looks like this:

Let’s add IntelliCode

It’s now a much cleaner list and it includes IntelliCode as an optional, but recommended component. So why is it recommended you ask? Let’s first look at what IntelliCode provides us when working with types from the Visual Studio SDK:

Notice how the IntelliSense items starting with a ★ help write the code. That’s IntelliCode providing the guidance when I’m using the Visual Studio SDK. Since the SDK is so huge, it can really make exploring the APIs and choosing the right methods and properties much easier to do by popping the most relevant items to the top of my suggestion list. It has helped me on numerous occasions, so I’m a big  .

To make IntelliCode aware of the usage patterns of Visual Studio SDK, we trained its machine learning model on a lot of GitHub repositories containing extension code. The result is great guidance from types used from MEF such as IWpfTextView, EnvDTE, and many others.

So, if you are an extension author, do yourself a favor and give IntelliCode a try and let us know how it went in the comments below.

The post Visual Studio extensibility is better with IntelliCode appeared first on Visual Studio Blog.

AI, Machine Learning and Data Science Roundup: September/October 2019

$
0
0

A roundup of news about Artificial Intelligence, Machine Learning and Data Science. This is an eclectic collection of interesting blog posts, software announcements and data applications from Microsoft and elsewhere that I've noted recently.

Open Source AI, ML & Data Science News

Tensorflow 2.0.0 has been released. This major update makes many changes to improve simplicity and ease of use. Tensorflow 1.x models will need to be upgraded for Tensorflow 2.0.

Keras 2.3.0 has been released, the first release of the high-level deep learning framework to support Tensorflow 2.0.

spaCy v2.2 has been released, with retrained natural language models and a new data augmentation system.

greta: an R package to fit complex Bayesian models using Tensorflow as the optimization engine.

Julia 1.2.0 has been released. This minor release of the scientific computing language includes no breaking changes.

Industry News

Facebook and Microsoft launch a research program to detect deepfakes, and Google releases a library of deepfake videos for research.

Facebook open sources Hydra, a framework for elegantly configuring complex Python applications.

Hyperparameter tuning has been added to Facebook's fastText text classifier library.

Google contributes MLIR, the compiler framework for Tensorflow graphs, to the LLVM Foundation.

Google open-sources differential-privacy, a C++ library of algorithms to produce aggregate statistics from sensitive datasets.

Microsoft News

The Vision AI Developer Kit, a Qualcomm IoT camera coupled with an Azure toolkit for AI vision applications, is now generally available.

PyTorch 1.2 is now supported in Azure: Azure ML Service, Azure Notebooks and Data Science Virtual Machine.

Azure Video Indexer adds support for detecting animated characters and multilingual identification and transcription.

Jupyter Notebooks are now generally available in Azure Cosmos DB, supporting all data models including Cassandra, MongoDB, SQL, Gremlin and Spark.

Twelve Cognitive Services are now included in Azure Free,  including Custom Vision, Text Analytics, Translator and Personalizer.

Machine Learning Notebooks for Azure ML Service, including a suite of examples of automated machine learning.

Visual Studio expands testing and debugging support for Python.

Python support in Azure Functions is now generally available.

Learning resources

Python for Beginners, a series of instructional videos and associated code samples from Microsoft.

Natural Language Processing Best Practices & Examples, a collection of Jupyter notebooks and utility functions for text classification, entity recognition and more, from Microsoft.

The CodeSearchNet Corpus, an open database of six million code samples released by Github, with the aim of improving semantic analysis of code and documentation.

Excavating AI, a philosophical essay on the issues related to image selection and labelling in training datasets for computer vision.

Video: How Backpropagation Works, part of Brendan Rohrer's End-to-End Machine Learning School series.

Recorded talks from the useR!2019 conference are available to view on the R Consortium channel.

A paper describes how AI agents may learn "superstitions" from reinforcement learning, recalling Skinner's superstitious pigeons.

Reference implementation for deploying ONNX models with Azure IoT edge, as demonstrated in this episode of the IoT Show.

Applications

Write with Transformer, a handy website from Hugging Face where you can generate text from powerful natural language models.

A new paper describes a method to generate a 3-D "Ken Burns effect" zoom from a single image.

An OpenAI project finds virtual agents learning unexpected strategies in a game of hide-and-seek.

CTRL: the Control Transformer Language model can be used to attribute the source of text, or generate synthetic text on a variety of themes. This new language model from Salesforce claims to be the largest released to date.

Startup Airdoc is using computer vision to detect chronic diseases including diabetes and hypertension from retinal scans of patients in China.

Fashion service Stitch Fix provides a machine-learning based service to recommend items that coordinate with a piece of clothing.

Find previous editions of the AI roundup here.

Code analysis with clang-tidy in Visual Studio

$
0
0

Visual Studio 2019 version 16.4 Preview 1 brings a significant improvement to the C++ code analysis experience: native support for clang-tidy, a Clang-based “linter” tool developed by the LLVM Project that delivers a variety of code improvements such as modernization and standards conformance, static analysis, and automatic formatting.

Setup: Installing Clang tools

Having Clang tooling on your system is necessary to run clang-tidy within Visual Studio. To install the required Clang tools, check “C++ Clang tools for Windows” as part of the “Desktop development with C++” workload while installing or modifying your installation of Visual Studio in the Installer:

For more information about using Clang/LLVM as a compiler in your project, see our past blog posts on Clang/LLVM for MSBuild projects and for CMake projects.

Configuring clang-tidy

Code Analysis defaults to the respective tool as dictated by your platform toolset and compiler: Microsoft Code Analysis if using MSVC (“Visual Studio 2019”) and clang-tidy if using LLVM/clang-cl. While Code Analysis will run automatically in the background on files opened in the Editor, by default it will not run at build time on all your files. Read on to learn about further configuration options.

MSBuild projects

We’ve redesigned the Code Analysis section of project Property Pages, allowing you to better configure and define which tool you’re using with each of your projects. In the General tab, you can select which tool(s) to run when running analysis – whether that’s via the Analyze menu, on build, or automatically in the background. (If you explicitly run Code Analysis without either tool enabled, you’ll simply get a warning returned in the Error List.)

Rule sets for the MSVC Code Analysis engine are configurable under the “Microsoft” tab, while the “Clang-Tidy” tab allows you to specify which specific clang-tidy checks to enable or disable, i.e. the input to be provided to the

--checks
  option of the tool.

Further configuration is possible via .clang-tidy files, from where the tool attempts to read additional settings and in which you can provide further configuration, e.g. via options such as Checks, HeaderFilterRegex, and SystemHeaders.  See the LLVM.org documentation for more details.

CMake projects

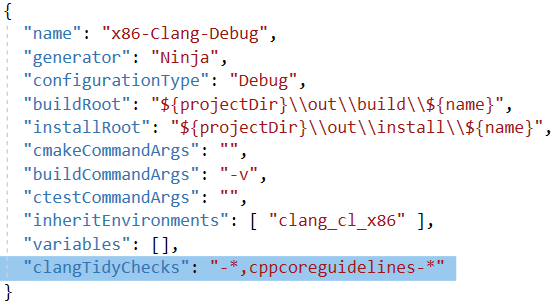
In CMake configurations targeting Windows, you can customize checks by specifying the

clangTidyChecks
  key in the JSON view of CMakeSettings.json, with a string value to be passed to the tool’s
--checks
  option like above. Starting in Preview 2, you can also configure which tool(s) to use via the
enableMicrosoftCodeAnalysis
and
enableClangTidyCodeAnalysis
 keys, with in-editor warnings and the Error List updating on file save.

We do not currently support configuration via the

CMAKE_<LANG>_CLANG_TIDY
  variable in CMakeLists.txt in the IDE. In addition, Clang-Tidy support for CMake configurations only extends to Windows, i.e. we do not yet support WSL or remote Linux targeting.

Code Analysis can be further configured (e.g. toggling squiggle display or background runs) within Tools > Options > Text Editor > C/C++ > Advanced.

Error List & editor integration

Running clang-tidy results in itemized warnings populating the Error List, from where you can quickly navigate around your code. The “Category” column provides information on the type of warning based on the check prefix, e.g. cppcoreguidelines, readability, or clang-diagnostic.

Warnings also display as in-editor squiggles so you can easily view the location and context of discovered issues. Squiggles show underneath relevant sections of code and hovering over these displays a tooltip with information about the issue, just like with Microsoft Code Analysis warnings.

Future work

The UI doesn’t currently support pointing Visual Studio to use a custom clang-tidy.exe, which may be desired in the case of using custom checks, but we’re exploring this as an option going forward. We’re also working toward allowing you to run clang-tidy with the

--fix
  flag and applying resulting quick fixes.

Send us feedback

Your feedback is a key part of ensuring we’re able to deliver the best Code Analysis experience to all! We’d love for you to try out the latest Preview version of Visual Studio 2019 version 16.4 and let us know how it’s working for you, either in the comments below or via email. If you encounter problems or have suggestions, please Report A Problem or reach out via Developer Community. You can also find us on Twitter @VisualC.

The post Code analysis with clang-tidy in Visual Studio appeared first on C++ Team Blog.

.NET Framework October 2019 Security and Quality Rollup

$
0
0

Today, we are releasing the October 2019 Security and Quality Rollup and Cumulative Updates for .NET Framework.

Security

No new security fixes. See September 2019 Security and Quality Rollup for the latest security updates.

Quality and Reliability

This release contains the following quality and reliability improvements.

BCL1

  • Addresses an issue that affects thread contention that occurs in BinaryFormatter.GetTypeInformation by using ConcurrentDictionary to handle multi-thread access.

CLR2

  • Addresses an issue that might cause handle leaks to occur in scenarios that repeatedly load and unload Mscoree.dll.
  • Addresses rare cases that incorrectly cause process termination instead of delivering the expected NullReferenceException result.

WPF3

  • Addresses an issue that affects a WPF ComboBox (or any Selector) within a DataGrid cell that can try to change its selection properties (SelectedIndex, SelectedItem, SelectedValue) when the cell’s data item is re-virtualized or removed from the underlying collection. This can occur if the Selector’s ItemSource property is data bound through the cell’s DataContext setting. Depending on the virtualization mode and the bindings that are declared for the selection properties, the symptoms can include unexpected changes (to null) of the data item’s properties, and unexpected displays (as null) of other data items that re-use the UI that was previously attached to the re-virtualized item.
  • Addresses an issue in which a WPF TextBox or RichTextBox element that has spell checking enabled crashes and returns an “ExecutionEngineException” error in some situations, including inserting text near a hyperlink.
  • Addresses an issue that affects Per-Monitor Aware WPF applications that host System-Aware or Unaware child windows and that run on .NET Framework 4.8. This .NET version occasionally crashes and returns a “System.Collections.Generic.KeyNotFoundException” exception.

1 Base Class Library (BCL)
2 Common Language Runtime (CLR)
3 Windows Presentation Foundation (WPF)

Getting the Update

The Security and Quality Rollup is available via Windows Update, Windows Server Update Services, and Microsoft Update Catalog.

Microsoft Update Catalog

You can get the update via the Microsoft Update Catalog. For Windows 10, NET Framework 4.8 updates are available via Windows Update, Windows Server Update Services, Microsoft Update Catalog. Updates for other versions of .NET Framework are part of the Windows 10 Monthly Cumulative Update.

Note: Customers that rely on Windows Update and Windows Server Update Services will automatically receive the .NET Framework version-specific updates. Advanced system administrators can also take use of the below direct Microsoft Update Catalog download links to .NET Framework-specific updates. Before applying these updates, please ensure that you carefully review the .NET Framework version applicability, to ensure that you only install updates on systems where they apply. The following table is for Windows 10 and Windows Server 2016+ versions.

Product Version Cumulative Update
Windows 10 1903 and Windows Server, version 1903 Catalog 4524100
.NET Framework 3.5, 4.8 Catalog 4515871
Windows 10 1809 (October 2018 Update) Windows Server 2019 Catalog 4524099
.NET Framework 3.5, 4.7.2 Catalog 4515855
.NET Framework 3.5, 4.8 Catalog 4515843
Windows 10 1803 (April 2018 Update)
.NET Framework 3.5, 4.7.2 Catalog 4520008
.NET Framework 4.8 Catalog 4524098
Windows 10 1709 (Fall Creators Update)
.NET Framework 3.5, 4.7.1, 4.7.2 Catalog 4520004
.NET Framework 4.8 Catalog 4524097
Windows 10 1703 (Creators Update)
.NET Framework 3.5, 4.7, 4.7.1, 4.7.2 Catalog 4520010
.NET Framework 4.8 Catalog 4524096
Windows 10 1607 (Anniversary Update) Windows Server 2016
.NET Framework 3.5, 4.6.2, 4.7, 4.7.1, 4.7.2 Catalog 4519998
.NET Framework 4.8 Catalog 4524095

The following table is for earlier Windows and Windows Server versions.

Product Version Security and Quality Rollup
Windows 8.1, Windows RT 8.1 and Windows Server 2012 R2 Catalog 4516553
.NET Framework 3.5 Catalog 4507005
.NET Framework 4.5.2 Catalog 4506999
.NET Framework 4.6, 4.6.1, 4.6.2, 4.7, 4.7.1, 4.7.2 Catalog 4515853
.NET Framework 4.8 Catalog 4515846
Windows Server 2012 Catalog 4516552
.NET Framework 3.5 Catalog 4507002
.NET Framework 4.5.2 Catalog 4507000
.NET Framework 4.6, 4.6.1, 4.6.2, 4.7, 4.7.1, 4.7.2 Catalog 4515852
.NET Framework 4.8 Catalog 4515845
Windows 7 SP1 Windows Server 2008 R2 SP1 Catalog 4516551
.NET Framework 3.5.1 Catalog 4507004
.NET Framework 4.5.2 Catalog 4507001
.NET Framework 4.6, 4.6.1, 4.6.2, 4.7, 4.7.1, 4.7.2 Catalog 4515854
.NET Framework 4.8 Catalog 4515847
Windows Server 2008 Catalog 4516554
.NET Framework 2.0, 3.0 Catalog 4507003
.NET Framework 4.5.2 Catalog 4507001
.NET Framework 4.6 Catalog 4515854

Previous Monthly Rollups

The last few .NET Framework Monthly updates are listed below for your convenience:

The post .NET Framework October 2019 Security and Quality Rollup appeared first on .NET Blog.

Announcing Support for Native Editing of Jupyter Notebooks in VS Code

$
0
0

With today’s October release of the Python extension, we’re excited to announce the support of native editing of Jupyter notebooks inside Visual Studio Code! You can now directly edit .ipynb files and get the interactivity of Jupyter notebooks with all of the power of VS Code. You can manage source control, open multiple files, and leverage productivity features like IntelliSense, Git integration, and multi-file management, offering a brand-new way for data scientists and developers to experiment and work with data efficiently. You can try out this experience today by downloading the latest version of the Python extension and creating/opening a Jupyter Notebook inside VS Code.

Since the initial release of our data science experience in VS Code, one of the top features that users have requested has been a more notebook-like layout to edit their Jupyter notebooks inside VS Code. In the rest of this post we’ll take a look at the new capabilities this offers.

Getting Started

Here’s how to get started with Jupyter in VS Code.

  • If you don’t already have an existing Jupyter Notebook file, open the VS Code Command Palette with the shortcut CTRL + SHIFT + P (Windows) or Command + SHIFT + P (macOS), and run the “Python: Create Blank New Jupyter Notebook” command.
  • If you already have a Jupyter Notebook file, it’s as simple as just opening that file in VS Code. It will automatically open with the new native Jupyter editor.

Once you have a Jupyter Notebook open, you can add new cells, write code in cells, run cells, and perform other notebook actions.

AI-Assisted Autocompletion

As you write code, IntelliSense will give you intelligent code complete suggestions right inside your code cells. You can further supercharge your editor experience by installing our IntelliCode extension to get AI-powered IntelliSense with smarter auto-complete suggestions based on your current code context.

Variable Explorer

Another benefit of using VS Code is that you can take advantage of the variable explorer and plot viewer by clicking the “Variables” button in the notebook toolbar. The variable explorer will help you keep track of the current state of your notebook variables at a glance, in real-time.

Now you can explore your datasets, filter your data, and even export plots! Gone are the days of having to type df.head() just to view your data.

Connecting To Remote Jupyter Servers

When a Jupyter notebook file is created or opened, VS Code automatically creates a Jupyter server for you locally by default. If you want to use a remote Jupyter server, it’s as simple as using the “Specify Jupyter server URI” command via the VS Code command palette, and entering in the server URI.

Exporting as Python Code

When you’re ready to turn experimentation into production-ready Python code, just simply press the “Convert and Save as Python File” button in the top toolbar and let the Python extension do all the work for you. You can then view that Python code in our existing Python Interactive window and keep on working with the awesome features of the Python extension to further make your code production-ready, such as the integrated debugger, refactoring, Visual Studio Live Share, and Git source control.

Debugging

VS Code supports debugging Jupyter Notebooks through using the “Exporting as Python Code” functionality outlined in the previous section. Once you have your code in the Python Interactive window, you can use VS Code’s integrated debugger to debug your code. We are working on bringing cell debugging into the Jupyter editor in a future release so stay tuned!

Try it out today!

You can check out the documentation for the full list of features available in the first release of the native Jupyter experience and learn to get started with Jupyter notebooks in VS Code. Also, if you have any suggestions or run across any issues, please file an issue in the Python extension GitHub page.

We’re excited for everyone to try out this new experience and have the Python extension in VS Code empower your notebook development!

The post Announcing Support for Native Editing of Jupyter Notebooks in VS Code appeared first on Python.


Python in Visual Studio Code – October 2019 Release

$
0
0

We are pleased to announce that the October 2019 release of the Python Extension for Visual Studio Code is now available. You can download the Python extensionfrom the Marketplace, or install it directly from the extension gallery in Visual Studio Code. If you already have the Python extension installed, you can also get the latest update by restarting Visual Studio Code. You can learn more about  Python support in Visual Studio Code in the documentation.  

In this release we addressed 97 issues, including native editing of Jupyter Notebooks, a button to run Python file in the terminal, and linting and import improvements with the Python Language Server. The full list of enhancements is listed in ourchangelog. 

Native editing of Jupyter Notebooks 

We’re excited to announce the first release of native editing of Jupyter notebooks inside VS Code! The native Jupyter experience brings a new way for both data scientists and notebook developers alike to directly edit .ipynb files and get the interactivity of Jupyter notebooks with all of the power of VS Code. You can check the blog post to learn more about this feature and how to get started.

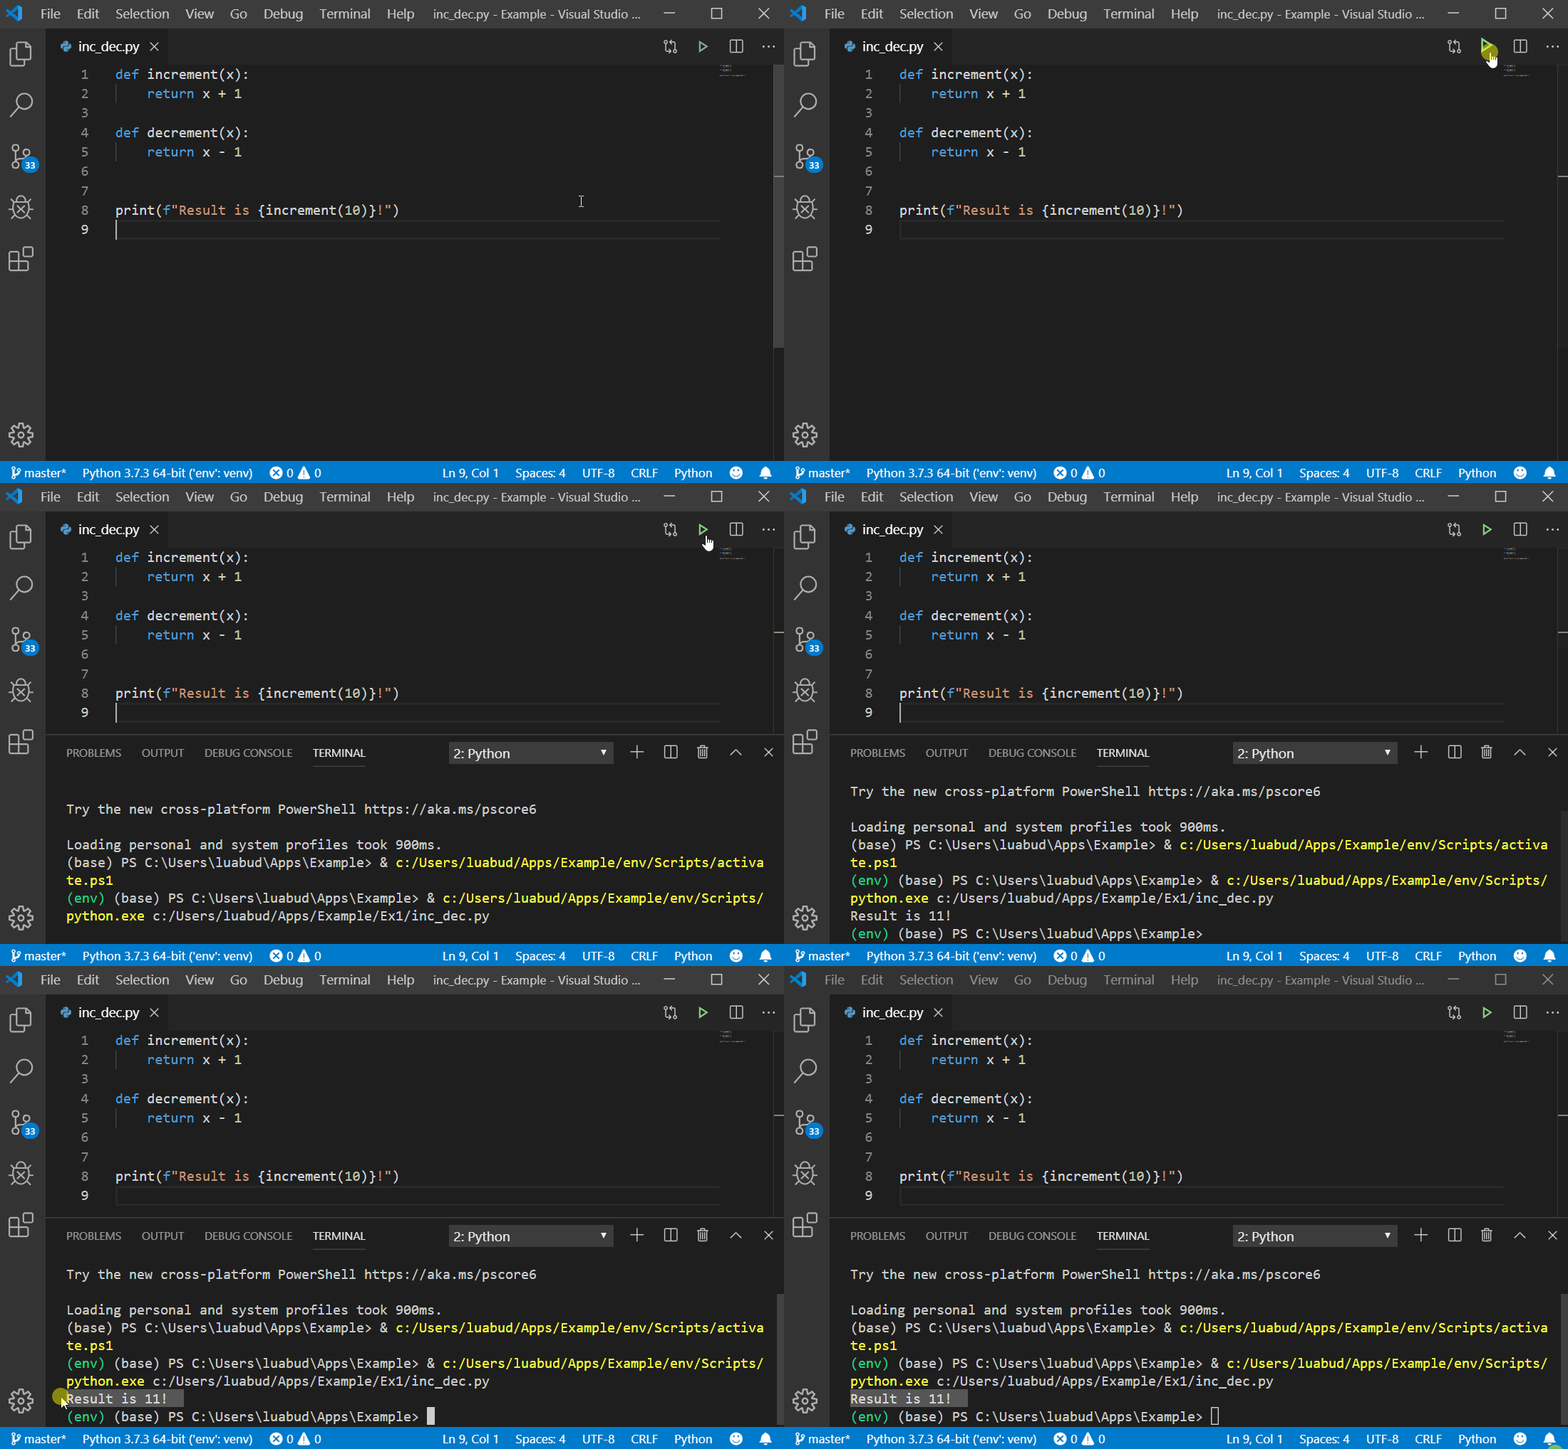
Run Python File in Terminal button 

This release includes a play” button to run the Run Python File in Terminal command. Now it only takes one click to run Python files with the Python extension!  

The new button is located on the top-right side of the editor, matching the behavior of the Code Runner extension: 

If you’re into key bindings, you can also customize your own keyboard shortcut to run Python files in the terminal, by running the Preferences: Open Keyboard Shortcuts (JSON) command in the command palette (View Command Palette…) and entering a key binding for the python.execInTerminal command as you prefer. For example, you could have the following definition to run Python files in the terminal with a custom shortcut: 

If the Code Runner extension is enabled, the Python extension doesn’t display this button in order to avoid possible confusion. 

Linting and import improvements with the Python Language Server 

This release also includes three new linting rules with the Python Language Server, as well as significant improvements to autocompletion for packages such as PyTorch and pandas.

Additionally, there have been large improvements made to import resolution. Historically the Language Server has treated the workspace root as the sys.path entry (i.e. the main workspace root) of user module imports, which led to false-positive unresolved imports warnings when importing modules from a src directory. With this release, if there’s such a src directory in the project’s environment, the Language Server automatically detects and adds the directory to its list of search paths. You can refer to the documentation to learn more about configuring search paths for the Language Server. 

Other Changes and Enhancements 

We have also added small enhancements and fixed issues requested by users that should improve your experience working with Python in Visual Studio Code. Some notable changes include: 

  • Fix for test discovery issues with pytest 5.1+. (#6990) 
  • Fixes for detecting the shell. (#6928) 
  • Opt insiders users into the Beta version of the Language Server by default. (#7108) 
  • Replaced occurrences of pep8 with pycodestyle. All mentions of pep8 have been replaced with pycodestyle (thanks Marsfan). (#410) 

We are continuing to A/B test new features. If you see something different that was not announced by the team, you may be part of the experiment! To see if you are part of an experiment, you can check the first lines in the Python extension output channel. If you wish to opt-out from A/B testing, you can open the user settings.json file (View Command Palette… and run Preferences: Open Settings (JSON)) and set the python.experiments.enabled” setting to false  

Be sure to download the Python extension for Visual Studio Code now to try out the above improvements. If you run into any problems, please file an issue on the Python VS Code GitHub page. 


The post Python in Visual Studio Code – October 2019 Release appeared first on Python.

Visual Studio Code September 2019

The new evergreen Bingbot simplifying SEO by leveraging Microsoft Edge

$
0
0
Today we’re announcing that Bing is adopting Microsoft Edge as the Bing engine to run JavaScript and render web pages. Doing so will create less fragmentation of the web and ease Search Engines Optimization (SEO) for all web developers. As you may already know, the next version of Microsoft Edge is adopting the Chromium open source project.
 
This update means Bingbot will be evergreen as we are committing to regularly update our web page rendering engine to the most recent stable version of Microsoft Edge.


Easing Search Engine Optimization

 
By adopting Microsoft Edge, Bingbot will now render all web pages using the same underlying web platform technology already used today by Googlebot, Google Chrome, and other Chromium-based browsers. This will make it easy for developers to ensure their web sites and their Content Management System work across all these solutions without having to spend time investigating each solution in depth.
 
By disclosing our new Bingbot Web Pages rendering technology, we are ensuring fewer SEO compatibility problems moving forward and increase satisfaction in the SEO community.
 
If your feedback can benefit the greater SEO community, Bing and Edge will propose and contribute to the open source Chromium project to make the web better for all of us. Head to github  to check out our explainers!


What happens next

 
Over the next few months, we will be switching to Microsoft Edge “under the hood”, gradually over time. The key aspects of this evolution will be transparent for most sites. We may change our bingbot crawler user-agent as appropriate to allow rendering on some sites.
 
For most web sites, there is nothing you should really need to worry as we will carefully test that they dynamically render fine before switching them to Microsoft Edge.
 
We invite you to install and test Microsoft Edge and register your site to Bing Webmaster Tools to get insights about your site, to be notified if we detect issues, and to investigate your site using our upcoming tools based on our new rendering engine.
 
We look forward to sharing more details in the future. We are excited about the opportunity to be an even-more-active part of the SEO community to continue to make the web better for everyone including all search engines.
 
Thanks,

Fabrice Canel
Principal Program Manager
Microsoft- Bing


Leveraging Cognitive Services to simplify inventory tracking

$
0
0

The team of interns at the New England Research and Development Center in Cambridge
Who spends their summer at the Microsoft Garage New England Research & Development Center (or “NERD”)? The Microsoft Garage internship seeks out students who are hungry to learn, not afraid to try new things, and able to step out of their comfort zones when faced with ambiguous situations. The program brought together Grace Hsu from Massachusetts Institute of Technology, Christopher Bunn from Northeastern University, Joseph Lai from Boston University, and Ashley Hong from Carnegie Mellon University. They chose the Garage internship because of the product focus—getting to see the whole development cycle from ideation to shipping—and learning how to be customer obsessed.

Microsoft Garage interns take on experimental projects in order to build their creativity and product development skills through hacking new technology. Typically, these projects are proposals that come from our internal product groups at Microsoft, but when Stanley Black & Decker asked if Microsoft could apply image recognition for asset management on construction sites, this team of four interns accepted the challenge of creating a working prototype in twelve weeks.

Starting with a simple request for leveraging image recognition, the team conducted market analysis and user research to ensure the product would stand out and prove useful. They spent the summer gaining experience in mobile app development and AI to create an app that recognizes tools at least as accurately as humans can.

The problem

In the construction industry, it’s not unusual for contractors to spend over 50 hours every month tracking inventory, which can lead to unnecessary delays, overstocking, and missing tools. All together, large construction sites could lose more than $200,000 worth of equipment over the course of a long project. Addressing this problem is an unstandardized mix that typically involves barcodes, Bluetooth, RFID tags, and QR codes. The team at Stanley Black & Decker asked, “wouldn’t it be easier to just take a photo and have the tool automatically recognized?”

Because there are many tool models with minute differences, recognizing a specific drill, for example, requires you to read a model number like DCD996. Tools can also be assembled with multiple configurations, such as with or without a bit or battery pack attached, and can be viewed from different angles. You also need to take into consideration the number of lighting conditions and possible backgrounds you’d come across on a typical construction site. It quickly becomes a very interesting problem to solve using computer vision.

Four different DeWalt drills that look very similar
 

How they hacked it

Classification algorithms can be easily trained to reach strong accuracy when identifying distinct objects, like differentiating between a drill, a saw, and a tape measure. Instead, they wanted to know if a classifier could accurately distinguish between very similar tools like the four drills shown above. In the first iteration of the project, the team explored PyTorch and Microsoft’s Custom Vision service. Custom Vision appeals to users by not requiring a high level of data science knowledge to get a working model off the ground, and with enough images (roughly 400 for each tool), Custom Vision proved to be an adequate solution. However, it immediately became apparent that manually gathering this many images would be challenging to scale for a product line with thousands of tools. The focus quickly shifted to find ways of synthetically generating the training images.

For their initial approach, the team did both three-dimensional scans and green screen renderings of the tools. These images were then overlaid with random backgrounds to mimic a real photograph. While this approach seemed promising, the quality of the images produced proved challenging.

In the next iteration, in collaboration with Stanley Black & Decker’s engineering team, the team explored a new approach using photo-realistic renders from computer-aided design (CAD) models. They were able to use relatively simple Python scripts to resize, rotate, and randomly overlay these images on a large set of backgrounds. With this technique, the team could generate thousands of training images within minutes.


    Image generated in front of a green screen vs an image rendered from CAD

On the left is an image generated in front of a green screen versus an extract from CAD on the right.

Benchmarking the iterations

The Custom Vision service offers reports on the accuracy of the model as shown below.

Exemplary report extracted from the custom vision service
For a classification model that targets visually similar products, a confusion matrix like the one below is very helpful. A confusion matrix visualizes the performance of a prediction model by comparing the true label of a class in the rows with the label outputted by the model in the columns. The higher the scores on the diagonal, the more accurate the model is. When high values are off the diagonal it helps the data scientists understand which two classes are being confused with each other by the trained model.

Existing Python libraries can be used to quickly generate a confusion matrix with a set of test images.
Confusion matrix for 10 products from DeWalt 

The result

The team developed a React Native application that runs on both iOS and Android and serves as a lightweight asset management tool with a clean and intuitive UI. The app adapts to various degrees of Wi-Fi availability and when a reliable connection is present, the images taken are sent to the APIs of the trained Custom Vision model on Azure Cloud. In the absence of an internet connection, the images are sent to a local computer vision model.

These local models can be obtained using Custom Vision, which exports models to Core ML for iOS, TensorFlow for Android, or as a Docker container that can run on a Linux App Service in Azure. An easy framework for the addition of new products to the machine learning model can be implemented by exporting rendered images from CAD and generating synthetic images.

Captures of the user interface of the inventory appCaptures of the user interface of the inventory app
  
Images in order from left to right: inventory checklist screen, camera functionality to send a picture to Custom Vision service, display of machine learning model results, and a manual form to add a tool to the checklist.

Arch_Diagram

What’s next

Looking for an opportunity for your team to hack on a computer vision project? Search for an OpenHack near you.

Microsoft OpenHack is a developer focused event where a wide variety of participants (Open) learn through hands-on experimentation (Hack) using challenges based on real world customer engagements designed to mimic the developer journey. OpenHack is a premium Microsoft event that provides a unique upskilling experience for customers and partners. Rather than traditional presentation-based conferences, OpenHack offers a unique hands-on coding experience for developers.

The learning paths can also help you get hands on with the cognitive services.

CIS Azure Security Foundations Benchmark open for comment

$
0
0

One of the best ways to speed up securing your cloud deployments is to focus on the most impactful security best practices. Best practices for securing any service begins with a fundamental understanding of cybersecurity risk and how to manage it. As an Azure customer, you can leverage this understanding by using security recommendations from Microsoft to help guide your risk-based decisions as they’re applied to specific security configuration settings in your environment.

We partnered with the Center for Internet Security (CIS) to create the CIS Microsoft Azure Foundations Benchmark v1.  Since that submission, we’ve received good feedback and wanted to share it with the community for comment in a document we call the Azure Security Foundations Benchmark. This benchmark contains recommendations that help improve the security of your applications and data on Azure. The recommendations in this document will go into updating the CIS Microsoft Azure Foundations Benchmark v1, and are anchored on the security best practices defined by the CIS Controls, Version 7.

In addition, these recommendations are or will be integrated into Azure Security Center and their impact will be surfaced in the Azure Security Center Secure Score and the Azure Security Center Compliance Dashboard.

We want your feedback on this document. There are two ways you can let us know what you think:

The Azure Security Foundation Benchmark is now in draft stage and we’d like to get your input on this effort. Specifically, we’d like to know:

  • Does this document provide you with the information needed to understand how to define your own security baseline for Azure based resources?
  • Does this format work for you? Are there other formats that would make it easier for you to use the information and act on it?
  • Do you currently use the CIS Controls as a framework and the current edition of the CIS Azure Security Foundation Benchmarks?
  • What additional information do you need on how to implement the recommendations using Azure security related capabilities?
  • Once we have the final version of the benchmark ready, we will be integrating with Azure Security Center Compliance Portal. Does this meet your requirements of monitoring Azure resources based on CIS Benchmarks?

The Azure Security Foundation Benchmark team wants to hear from you! You can connect with us via email or the feedback form.

What’s in the Azure Security Foundation Benchmark document

The benchmark document is divided into three main sections:

  • Overview information.
  • Security recommendations.
  • Security implementation in Azure services.

The Overview information provides background on why we put this document together, how you can use it to improve your security posture in Azure, and some key definitions of benchmark terminology.

The security recommendations are the cornerstone of the document. In this phase, we cover security recommendations in the following areas:

  • Network
  • Logging
  • Monitoring
  • Identity and access management
  • Data protection

The recommendations are surfaced in tables like those seen in the image below.

Azure Security Foundations Benchmark Recommendations table
The last section shows how the Azure security recommendations are implemented in a selection of core Azure services. The implementations include links to documents that will help you understand how to apply each component of the benchmark to improve your security.

Implementation information is contained in tables as seen below.

Azure Security Foundations Benchmark service mapping table
We hope you find this information useful and thank you in advance for your input on how we can make this document more useful for you and your organization! Remember to send us your feedback via email on the CIS Azure Cloud Security Benchmark.

Viewing all 5971 articles
Browse latest View live


<script src="https://jsc.adskeeper.com/r/s/rssing.com.1596347.js" async> </script>